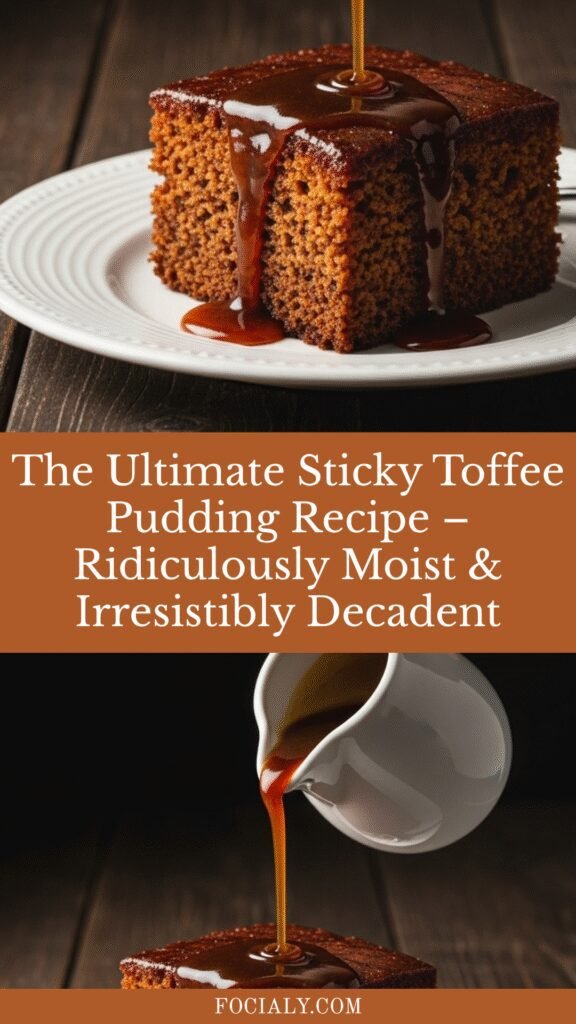
The Ultimate Sticky Toffee Pudding Recipe – Ridiculously Moist & Irresistibly Decadent
If you’ve never experienced the pure bliss of sticky toffee pudding, you’re in for an absolute treat! This classic British dessert is a warm, incredibly moist date cake drenched in the most luxurious toffee sauce you’ll ever taste. Imagine tender, spongy cake studded with sweet dates, then generously soaked with a rich, buttery toffee sauce that seeps into every bite. It’s comfort food at its finest—the kind of dessert that makes you close your eyes and sigh with contentment.
Sticky toffee pudding (often called sticky date pudding) has become a beloved dessert worldwide, and once you taste it, you’ll understand why. The combination of the deeply flavored date cake with that glossy, caramel-like toffee sauce creates something truly magical. It’s not overly sweet despite what you might think—the dates provide a natural, complex sweetness, while the sauce adds buttery richness with just a hint of salt to balance everything perfectly.
This dessert is perfect for cozy fall and winter evenings, holiday gatherings, dinner parties, Sunday family dinners, or any time you want to treat yourself to something truly special. Serve it warm from the oven with a scoop of vanilla ice cream or a dollop of whipped cream, and watch it disappear in minutes. It’s the kind of dessert that turns a regular weeknight into an occasion and makes special celebrations even more memorable.
History / Background
Sticky toffee pudding is one of Britain’s most treasured desserts, though its exact origins are somewhat debated and shrouded in delicious mystery. The dessert as we know it today is widely credited to Francis Coulson, who served it at his Sharrow Bay Country House Hotel in the Lake District, England, during the 1970s. Coulson reportedly received the recipe from two Canadian women who had stayed at the hotel, though the trail grows murky beyond that.
Another claim to fame comes from Patricia Martin of The Old Rectory Hotel in Claughton, Lancashire, who says she created the dessert in the 1960s and shared it with Coulson. Regardless of who truly invented it, sticky toffee pudding exploded in popularity throughout Britain in the 1980s and 1990s, becoming a staple on restaurant menus and in home kitchens across the UK.
The genius of sticky toffee pudding lies in its humble ingredients transformed into something extraordinary. Dates, which have been cultivated for thousands of years in the Middle East and were brought to Britain through trade routes, provide the foundation. The British have long had a love affair with steamed puddings and toffee-based desserts, so sticky toffee pudding represents a perfect marriage of these traditions.
What makes this dessert particularly special is its texture—described by the British as “pudding” (which in British cuisine refers to dessert in general, not specifically a custard-like dessert as Americans might think). The cake is extraordinarily moist, almost impossibly so, thanks to the dates which break down during baking and create pockets of caramelized sweetness throughout. When you pour that warm toffee sauce over the top, it soaks into the sponge like a dream, creating a dessert that’s both cake and sauce in perfect harmony.
Today, sticky toffee pudding has transcended its British roots and become a beloved dessert worldwide. It’s particularly popular in Australia, New Zealand, and Canada, and has gained a devoted following in the United States. Many consider it the ultimate comfort dessert—one bite and you’re transported to a cozy British pub on a rainy evening, regardless of where you actually are.
Why You’ll Love This Recipe
This sticky toffee pudding recipe delivers authentic British flavor with a texture that’s absolutely divine. While it might look fancy and taste like something from an upscale restaurant, it’s surprisingly straightforward to make at home. The technique is simple—if you can make a basic cake, you can make this—and the results are consistently spectacular.
Here’s why this recipe will become your go-to special occasion dessert:
- Impossibly Moist Texture – The dates create the most tender, melt-in-your-mouth cake you’ve ever experienced
- Make-Ahead Friendly – Perfect for entertaining since you can prepare components in advance and assemble before serving
- Crowd-Pleasing Appeal – Even people who claim they don’t like dates absolutely love this dessert
- Luxurious Yet Simple – Tastes incredibly fancy but uses everyday ingredients you might already have
- Warm Comfort Food – The ultimate cozy dessert that feels like a warm hug on a plate
- Versatile Serving Options – Delicious on its own, with ice cream, whipped cream, or custard
- Impressive Presentation – Looks beautiful and sophisticated with minimal effort
- Perfect Portion Control – Bake in individual ramekins or as one large cake to suit your needs
- Keeps Well – Actually tastes even better the next day as the flavors develop and meld
- Budget-Friendly Elegance – Uses affordable ingredients to create an upscale dessert experience
Ingredient Notes
For the Date Cake:
Medjool or Deglet Noor Dates – The star ingredient! Dates provide natural sweetness, moisture, and that characteristic toffee-like flavor. Use pitted dates and chop them into small pieces. Medjool dates are larger and sweeter, while Deglet Noor dates are slightly less sweet and more affordable—both work beautifully. Make sure they’re soft and pliable, not dried out.
Baking Soda – Essential for the dates! When you pour boiling water over dates and baking soda, it creates a chemical reaction that softens the dates and darkens the color, contributing to that deep, rich flavor. Don’t skip this step or substitute baking powder.
Unsalted Butter – Provides richness and moisture to the cake. Room temperature butter creams better with the sugar. European-style butter with higher fat content creates an even more luxurious result.
Dark Brown Sugar – The molasses content in dark brown sugar enhances the toffee flavor and creates moisture. Light brown sugar can substitute in a pinch, but dark brown is preferable for depth of flavor.
Eggs – Bind the cake together and provide structure. Room temperature eggs incorporate more smoothly into the batter.
All-Purpose Flour – Provides structure. Don’t overmix once flour is added or you’ll develop too much gluten and create a tough cake.
Vanilla Extract – Enhances all the other flavors. Use pure vanilla extract, never imitation.
Salt – Balances the sweetness and enhances the toffee flavor.
For the Toffee Sauce:
Heavy Cream – Creates that silky, pourable sauce consistency. Don’t substitute with milk—you need the fat content of cream for proper texture and richness.
Unsalted Butter – Provides that essential buttery, toffee flavor. The higher quality your butter, the better your sauce will taste.
Dark Brown Sugar – The foundation of the toffee sauce. The molasses gives it that deep caramel-toffee flavor.
Vanilla Extract – Adds warmth and rounds out the flavors.
Sea Salt (optional) – A pinch of flaky sea salt transforms the sauce from good to extraordinary by balancing the sweetness.
Equipment Needed
- 9×9-inch square baking pan or 8-10 individual ramekins (6-ounce capacity)
- Medium saucepan
- Large mixing bowl
- Electric mixer (hand mixer or stand mixer)
- Wooden spoon
- Fine-mesh strainer
- Measuring cups and spoons
- Whisk
- Rubber spatula
- Toothpick or cake tester
- Parchment paper
- Knife for chopping dates
- Small saucepan (for toffee sauce)
- Ladle or large spoon (for pouring sauce)
The Ultimate Sticky Toffee Pudding Recipe – Ridiculously Moist & Irresistibly Decadent

The ultimate British sticky toffee pudding recipe featuring an incredibly moist date cake drenched in luxurious homemade toffee sauce. This warm, comforting dessert is easier to make than you’d think and guaranteed to impress!
- Prep Time: 20 minutes
- Cook Time: 35 minutes
- Total Time: 55 minutes Yield:
- Yield: 9 servings 1x
- Category: Dessert
- Method: Baking
- Cuisine: British
- Diet: Vegetarian
Ingredients
For the Date Cake:
- 1½ cups (250g) pitted dates, chopped into small pieces
- 1¼ cups (300ml) boiling water
- 1 teaspoon baking soda
- ⅓ cup (75g) unsalted butter, softened
- ¾ cup (150g) dark brown sugar, packed
- 2 large eggs, at room temperature
- 1 teaspoon pure vanilla extract
- 1½ cups (190g) all-purpose flour
- 1½ teaspoons baking powder
- ½ teaspoon salt
For the Toffee Sauce:
- 1 cup (240ml) heavy cream
- ½ cup (113g) unsalted butter
- 1 cup (200g) dark brown sugar, packed
- 1 teaspoon pure vanilla extract
- ¼ teaspoon sea salt (optional but recommended)
For Serving (Optional):
- Vanilla ice cream or whipped cream
- Extra toffee sauce
- Flaky sea salt
Instructions
Prepare the Dates:
- Soak the dates: Preheat your oven to 350°F (175°C). Grease a 9×9-inch square baking pan with butter or cooking spray, then line it with parchment paper, leaving overhang on two sides for easy removal. Place the chopped dates in a heatproof bowl and sprinkle the baking soda over them. Pour the boiling water over the dates and baking soda, stir gently, and let sit for 15-20 minutes to soften. The dates will absorb water and become very soft, and the mixture will darken—this is perfect!
- Mash the dates: After soaking, use a fork or potato masher to roughly mash the date mixture. You want some texture remaining—not a completely smooth puree, but most of the dates should be broken down. Set aside to cool slightly.
Make the Cake Batter:
- Cream butter and sugar: In a large mixing bowl, beat the softened butter and dark brown sugar together with an electric mixer on medium speed for 3-4 minutes until light, fluffy, and pale in color. This incorporation of air is important for a tender cake.
- Add eggs: Add the eggs one at a time, beating well after each addition. The mixture should be smooth and well combined. Add the vanilla extract and mix until incorporated.
- Combine dry ingredients: In a separate bowl, whisk together the flour, baking powder, and salt. This ensures even distribution of the leavening agents.
- Alternate additions: With the mixer on low speed, add the flour mixture in three additions, alternating with the date mixture (beginning and ending with flour). Add about ⅓ of the flour, mix just until combined, then add half the date mixture, mix, then another ⅓ flour, remaining dates, and final ⅓ flour. Mix each addition only until just combined—don’t overmix or your cake will be tough.
- Bake: Pour the batter into your prepared pan and smooth the top with a spatula. Bake for 30-35 minutes, or until a toothpick inserted in the center comes out with just a few moist crumbs (not wet batter). The top should be set and spring back lightly when touched. Don’t overbake—this cake should be very moist.
Make the Toffee Sauce:
- Combine sauce ingredients: While the cake is baking (or after it’s done), make the toffee sauce. In a medium saucepan, combine the heavy cream, butter, and dark brown sugar. Place over medium heat.
- Cook the sauce: Bring the mixture to a gentle boil, stirring frequently with a whisk to dissolve the sugar and melt the butter. Once boiling, reduce heat to medium-low and simmer for 4-5 minutes, stirring occasionally. The sauce should thicken slightly and become glossy. It will thicken more as it cools.
- Finish the sauce: Remove from heat and stir in the vanilla extract and sea salt if using. Set aside. You can keep it warm over very low heat, or reheat gently before serving.
Assemble and Serve:
- Poke holes: When the cake comes out of the oven, let it cool in the pan for 5 minutes. While still warm, use a toothpick or skewer to poke holes all over the surface of the cake (about 20-30 holes). This allows the toffee sauce to soak in beautifully.
- Pour sauce: Pour about half of the warm toffee sauce slowly over the warm cake, allowing it to soak into the holes. Let it sit for 5-10 minutes to absorb the sauce.
- Serve: Cut into squares and serve warm, with extra toffee sauce drizzled over each portion. Top with vanilla ice cream or whipped cream if desired. The combination of warm cake and cold ice cream is absolutely divine!
Notes
- Date preparation is key: Don’t skip the baking soda and boiling water step—this is what makes the dates break down properly and creates that characteristic sticky texture.
- Cake texture: The cake will be very moist and may seem slightly underbaked—this is correct! It should be tender and almost pudding-like in texture.
- Sauce thickness: The toffee sauce will be pourable when hot and will thicken as it cools. If it becomes too thick, gently rewarm it with a splash of cream.
- Individual servings: This recipe works beautifully in individual ramekins. Divide batter among 8-10 greased ramekins, reduce baking time to 20-25 minutes.
- Make-ahead: Both the cake and sauce can be made a day ahead. Reheat before serving for best results.
- Leftover sauce: Store extra toffee sauce in the refrigerator for up to 2 weeks—it’s amazing on ice cream, pancakes, or eaten by the spoonful!
Nutrition
- Serving Size: 1 piece (based on 9 servings)
- Calories: 485
- Sugar: 52g
- Sodium: 310mg
- Fat: 24g
- Saturated Fat: 15g
- Unsaturated Fat: 7g
- Trans Fat: 0g
- Carbohydrates: 65g
- Fiber: 2g
- Protein: 4g
- Cholesterol: 105mg
Tips & Variations
Flavor Variations:
- Bourbon Sticky Toffee Pudding: Add 2 tablespoons of bourbon to the toffee sauce for an adult version with complex caramel notes.
- Espresso Sticky Toffee: Add 1 tablespoon of instant espresso powder to the date mixture for a mocha twist.
- Orange Sticky Toffee: Add the zest of 1 orange to the cake batter and 1 tablespoon of orange juice to the sauce.
- Ginger Spice: Add 1 teaspoon ground ginger and ½ teaspoon cinnamon to the cake batter for a warming spiced version.
- Salted Caramel Version: Increase the sea salt in the sauce to ½ teaspoon and sprinkle flaky salt on top before serving.
Dietary Modifications:
- Gluten-Free: Use a 1:1 gluten-free flour blend in place of all-purpose flour. The texture will be slightly different but still delicious.
- Dairy-Free: Use plant-based butter and coconut cream in place of dairy butter and heavy cream. The flavor will be different but still tasty.
- Lower Sugar: You can reduce the sugar in the cake by ¼ cup, though the dates provide plenty of natural sweetness anyway.
Presentation Ideas:
- Individual Ramekins: Bake in 6-ounce ramekins for elegant individual servings. Unmold onto plates or serve in the ramekins.
- Bundt Pan: Bake in a bundt pan (increase time to 40-45 minutes) for a stunning presentation, then pour sauce over the whole cake.
- Trifle Style: Cut cake into cubes, layer with sauce and whipped cream in glasses for a beautiful trifle.
Pro Chef Tips
Perfect Date Texture:
The key to authentic sticky toffee pudding is properly prepared dates. When you add baking soda to the dates and pour boiling water over them, a chemical reaction occurs that softens them and darkens the color. Don’t rush this step—let them soak the full 15-20 minutes. The dates should be very soft and easily mashable. This step is what creates that signature sticky, almost fudgy texture throughout the cake.
Temperature Matters:
Serve sticky toffee pudding warm, not hot or cold. The texture is best when the cake is warm to the touch and the sauce is pourable but not scalding. If you’ve made it ahead, reheat individual portions in the microwave for 20-30 seconds, or the whole cake in a 300°F oven for 10-15 minutes before pouring warm sauce over it.
Sauce Consistency Control:
Your toffee sauce should be pourable but not thin like water. It should coat the back of a spoon and flow slowly off it. If your sauce is too thin, simmer it a bit longer. If it’s too thick (especially after refrigeration), warm it gently with a splash of cream and whisk until smooth. The perfect consistency is like warm honey.
The Poke Method:
Those holes you poke in the cake aren’t just for show—they’re essential for maximum sauce absorption. Use a wooden skewer or chopstick and poke holes about 1 inch apart, going almost to the bottom of the cake. Pour the sauce slowly over the cake, giving it time to sink into each hole rather than just running off the sides.
Quality Ingredients Make the Difference:
Since this dessert has so few ingredients, quality really matters. Use fresh, soft dates (not dried-out ones), real butter (never margarine), dark brown sugar (the molasses content is key), and heavy cream with high fat content. These premium ingredients create that authentic, luxurious flavor that makes sticky toffee pudding so special.
Proper Mixing Technique:
When combining the wet and dry ingredients, use a gentle folding motion and mix only until just combined. Overmixing develops gluten and creates a tough, dense cake. You want a tender, almost pudding-like texture, which requires a light hand. A few small lumps in the batter are perfectly fine—they’ll disappear during baking.
Common Mistakes to Avoid
1. Using Dry, Hard Dates
If your dates are old and dried out, they won’t break down properly and will create hard chunks in your cake instead of that soft, sticky texture. Always use fresh, pliable dates that feel slightly sticky to the touch. If your dates are a bit dry, the soaking step becomes even more important. Medjool dates from the refrigerated section of the store are usually the freshest.
2. Skipping the Baking Soda in the Date Mixture
Some people think the baking soda is optional or try to put it in with the dry ingredients instead. Don’t! The baking soda must be combined with the dates and hot water—it creates an alkaline environment that breaks down the dates’ cellular structure and caramelizes them, creating that deep toffee flavor and dark color. Without it, you’ll have a completely different (and inferior) cake.
3. Overbaking the Cake
Sticky toffee pudding should be very moist—almost too moist. Many bakers are tempted to keep it in the oven until it looks “done” by traditional cake standards, but this dessert should come out when a toothpick has moist crumbs clinging to it, not bone dry. The cake continues to cook from residual heat, and the sauce adds even more moisture. An overbaked sticky toffee pudding is disappointingly dry.
4. Making the Sauce Too Thin or Too Thick
The toffee sauce should have a pourable but syrupy consistency—like warm caramel. If it’s too thin, it will run right off the cake without soaking in. If it’s too thick, it won’t penetrate the cake properly. Aim for that Goldilocks zone: simmer until it coats the back of a spoon and drips off slowly. Remember it will thicken as it cools.
5. Pouring Cold Sauce on Cold Cake
For the best texture and flavor, both the cake and sauce should be warm when you assemble them. Warm sauce flows into the holes you’ve poked and creates that signature sticky texture throughout. Cold sauce on cold cake results in a layer of hard toffee on top instead of that beautiful integration. Always reheat components before serving if they’ve been stored.
Storage & Meal Prep
Refrigerator Storage:
Store sticky toffee pudding covered tightly with plastic wrap or in an airtight container in the refrigerator for up to 4 days. The cake actually improves after a day as the flavors meld and the sauce continues to soak into the sponge. Store any extra toffee sauce separately in an airtight container in the fridge for up to 2 weeks.
Room Temperature Storage:
If you plan to eat the pudding within 24 hours, you can keep it at room temperature, covered. However, because it’s so moist and contains dairy-based sauce, refrigeration is safer for longer storage.
Reheating Instructions:
Sticky toffee pudding is best served warm, so reheating is essential for leftovers:
- Individual portions: Microwave for 20-30 seconds until warm, then add warm sauce
- Whole cake: Cover with foil and warm in a 300°F (150°C) oven for 15-20 minutes
- Sauce: Gently rewarm in a small saucepan over low heat, stirring frequently, or microwave in 15-second intervals
The sauce will thicken considerably when cold. Add a tablespoon or two of cream when reheating if needed to restore the pourable consistency.
Quality Over Time:
Interestingly, many people prefer sticky toffee pudding the day after it’s made because the sauce has had time to fully penetrate the cake, making it even stickier and more flavorful. Just make sure to store it properly and reheat before serving.
Make-Ahead & Freezer Notes
Make-Ahead Strategy:
Sticky toffee pudding is excellent for make-ahead entertaining:
- 1-2 days ahead: Bake the cake, let it cool completely, wrap tightly, and refrigerate. Make the toffee sauce, cool, and store separately in the fridge.
- Day of serving: Let cake come to room temperature or rewarm in the oven. Rewarm the sauce until pourable. Poke holes in the cake, pour half the sauce over, and let it soak for 10 minutes before serving with extra sauce.
This approach actually improves the flavor as everything has time to develop and meld together.
Freezer Instructions:
Cake: The baked cake (without sauce) freezes beautifully for up to 3 months. Let it cool completely, wrap tightly in plastic wrap, then in aluminum foil. Label with the date. Thaw overnight in the refrigerator, then bring to room temperature or rewarm before adding sauce.
Sauce: Toffee sauce also freezes well for up to 3 months. Store in a freezer-safe container or heavy-duty freezer bag. Thaw in the refrigerator overnight, then reheat gently on the stovetop, whisking until smooth. You may need to add a splash of cream to restore the consistency.
Assembled pudding: I don’t recommend freezing the cake after it’s been sauced, as the texture changes upon thawing. Keep the components separate for best results.
Best Reheating Method:
For frozen cake, thaw completely, then warm covered in a 300°F oven for 20 minutes. For sauce, thaw and gently reheat on the stovetop, whisking constantly. Combine the warm components just before serving for the best texture and flavor.
Serving Suggestions
Sticky toffee pudding is a standalone star, but the right accompaniments elevate it even further:
Classic Pairings:
- Vanilla Ice Cream: The cold, creamy vanilla against the warm pudding and hot sauce is absolutely heavenly—this is the most traditional British way to serve it
- Clotted Cream: Very British and wonderfully rich, clotted cream adds luxurious thickness
- Custard (Crème Anglaise): Traditional British custard sauce is a classic pairing that adds even more comfort
- Whipped Cream: Lightly sweetened whipped cream provides a lighter contrast to the rich pudding
Elegant Garnishes:
- Flaky sea salt sprinkled on top (sweet-salty contrast is divine)
- Candied pecans or walnuts for crunch
- Fresh berries (the tartness cuts the richness beautifully)
- Caramel shards or toffee pieces
- Edible flowers for special occasions
- Dusting of cocoa powder or cinnamon
Beverage Pairings:
- Coffee or Espresso: The bitterness perfectly balances the sweet toffee
- Tea: Strong English Breakfast or Earl Grey tea is wonderfully British
- Dessert Wine: Sticky wine like Sauternes or Tokaji echoes the toffee flavors
- Port: Ruby or tawny port complements the caramel notes beautifully
- Whiskey or Bourbon: Especially if you’ve added bourbon to the sauce
- Hot Chocolate: For the ultimate cozy, indulgent experience
Occasion-Specific Serving:
- Dinner Party: Serve in individual ramekins with a quenelle of ice cream
- Holiday Meal: Present as a large cake with sauce on the side for guests to add their own
- Casual Family Dinner: Serve in bowls with generous sauce and ice cream
- Afternoon Tea: Cut into small squares and serve as a sweet alongside scones and sandwiches
FAQs Section
Q: What’s the difference between sticky toffee pudding and regular cake?
A: Sticky toffee pudding is much moister and denser than regular cake, with an almost pudding-like texture (hence the name). The dates break down during baking, creating pockets of caramelized sweetness throughout. The generous amount of toffee sauce poured over and into the cake makes it exceptionally moist and “sticky.” It’s also typically served warm rather than at room temperature like traditional cakes.
Q: Can I use a different type of dried fruit instead of dates?
A: While dates are traditional and provide that characteristic toffee flavor, you can experiment with dried figs or prunes in a pinch. However, the flavor will be noticeably different. Dates have a unique caramel-like sweetness that’s hard to replicate. If you’re not a fan of dates, you might be surprised to find that the finished pudding doesn’t taste strongly of dates—they meld into a complex toffee flavor.
Q: My toffee sauce is grainy. What went wrong?
A: Graininess in toffee sauce usually means the sugar didn’t fully dissolve. Make sure you bring the mixture to a full boil while stirring constantly, and simmer it long enough (4-5 minutes). Using fresh brown sugar (not clumpy or old) also helps. If your sauce is grainy, you can strain it through a fine-mesh sieve, or whisk it vigorously while reheating to help the sugar dissolve.
Q: Can I make sticky toffee pudding without a mixer?
A: Absolutely! While an electric mixer makes creaming the butter and sugar easier, you can do it by hand with a wooden spoon—it just takes more elbow grease and time (5-7 minutes of vigorous stirring). Make sure your butter is very soft (almost melty) to make this easier. The rest of the recipe is simple stirring and folding.
Q: How do I know when the cake is done if it’s supposed to be moist?
A: Insert a toothpick or cake tester into the center. It should come out with moist crumbs clinging to it—not wet batter, but not completely clean either. The top should be set and spring back when lightly touched. The cake will continue to cook slightly from residual heat after you remove it from the oven, and the sauce adds even more moisture, so err on the side of slightly underbaking rather than overbaking.
Q: Why is it called “pudding” when it’s really a cake?
A: In British cuisine, “pudding” is a general term for dessert, not specifically the custardy dessert Americans think of. Sticky toffee pudding is indeed a cake, but the British call it pudding both because of the naming convention and because it has a denser, moister, more pudding-like texture than a typical light and fluffy cake. The name stuck and has become iconic!
Q: Can I make individual servings in a muffin tin instead of ramekins?
A: Yes! Grease a 12-cup muffin tin very well and divide the batter among the cups, filling each about ⅔ full. Bake for 18-22 minutes until the tops spring back when touched. These are easier to unmold than ramekins and make portion control simple. Serve them right in the muffin tin or unmold onto plates and pour sauce over each one.
Conclusion
There you have it—the ultimate sticky toffee pudding recipe that brings a taste of Britain right to your kitchen! I hope you’re as excited to make this as I am to share it with you. This dessert truly is something special—that combination of incredibly moist date cake with luxurious toffee sauce creates pure comfort food magic that’s impossible to resist.
The beauty of sticky toffee pudding is that while it tastes and looks impressive enough for your fanciest dinner party, it’s actually quite simple to make. Once you’ve tried it, I guarantee it’ll become one of those recipes you return to again and again, especially when you want to treat yourself or wow your guests with something truly memorable.
I’d love to hear how your sticky toffee pudding adventure goes! Did you add any fun variations? What did you serve it with? Drop a comment below and share your experience. And if this recipe brought a little British comfort to your table, please save it to your favorite Pinterest board so you can find it again (and help other dessert lovers discover it too!). Don’t forget to snap a photo of that gorgeous toffee sauce cascading over your pudding and tag me—seeing your creations absolutely makes my day!
Now go forth and create some sticky, toffee-y, utterly delicious magic! ☕🍮✨