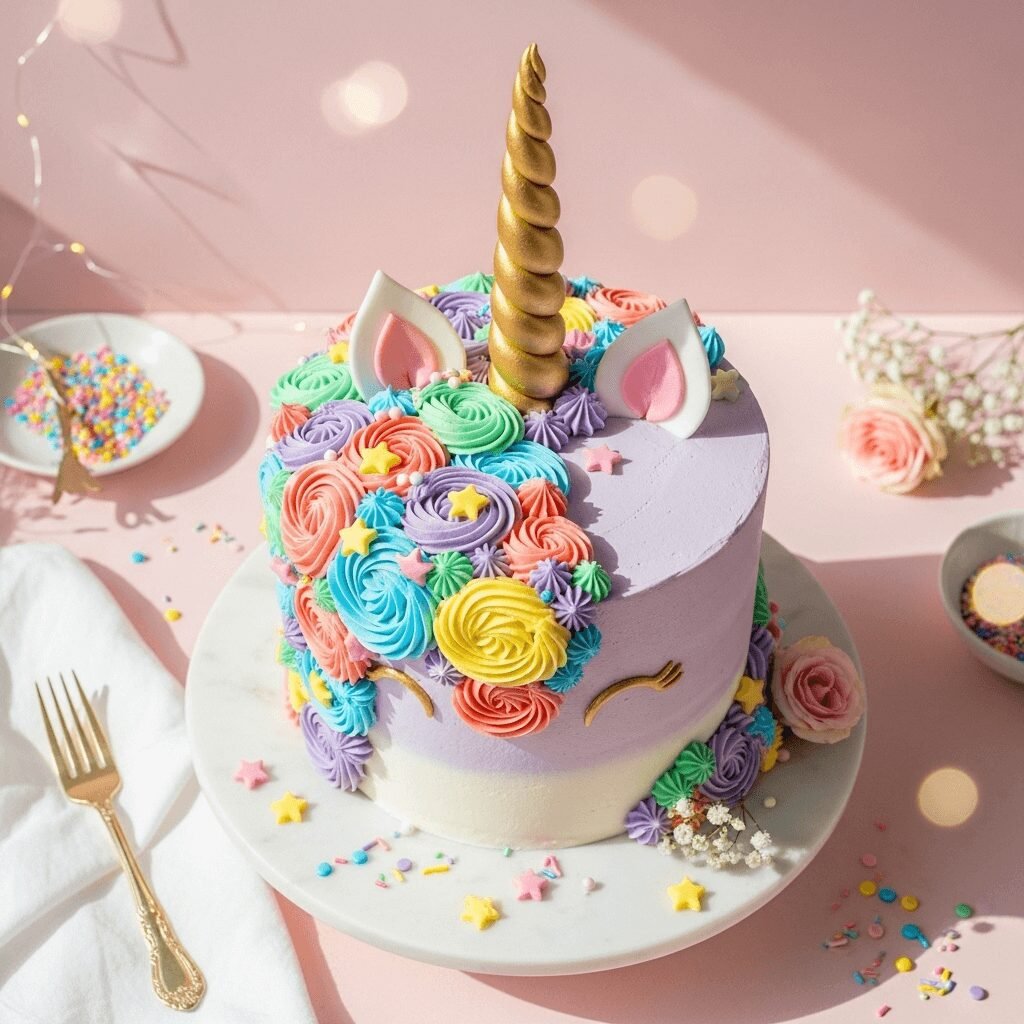
Easy Unicorn Cake Recipe – Magical Rainbow Layer Cake Perfect for Birthday Parties!
There’s something absolutely magical about cutting into a cake and discovering rainbow layers inside! This Unicorn Cake is a show-stopping dessert that combines fluffy vanilla cake layers, vibrant rainbow colors, and a cloud-like buttercream frosting decorated with whimsical unicorn features. It’s the ultimate celebration cake that brings pure joy to both kids and adults alike.
This enchanting cake has become a Pinterest sensation and the go-to choice for birthday parties, baby showers, and any celebration that deserves a touch of magic. While it looks like it came from a professional bakery, this recipe breaks down every step so you can create this masterpiece right in your own kitchen. The cake itself is moist and tender with a classic vanilla flavor, while the colorful layers create that wow-factor moment when you slice into it. Top it all off with pastel buttercream, fondant unicorn ears, a golden horn, and you’ve got a cake that’ll have everyone reaching for their phones to snap photos before taking a bite!
History / Background
The unicorn cake trend exploded onto the baking scene around 2016-2017, riding the wave of the broader unicorn food phenomenon that took social media by storm. While rainbow cakes have been around for decades (with roots tracing back to the 1970s), the addition of unicorn decorations transformed them into something entirely new and magical.
The concept draws inspiration from several baking traditions. Rainbow layer cakes became popular in American home baking during the mid-20th century when food coloring became widely available to home cooks. The technique of creating multiple colored layers was seen as a fun, whimsical way to surprise party guests. Meanwhile, decorative character cakes have long been a staple of children’s birthday celebrations.
The modern unicorn cake combines these traditions with contemporary Instagram-worthy aesthetics – pastel colors, metallic accents, and fantasy elements. The trend was fueled by Pinterest and Instagram, where home bakers and professional cake artists alike shared their colorful creations. What started as a specialty bakery item quickly became accessible to home bakers, as people realized that with the right technique and patience, these magical cakes were achievable in any kitchen.
Today, the unicorn cake represents more than just a dessert – it’s about creating memorable moments and bringing a sense of wonder to celebrations. It’s become particularly popular for children’s birthdays (especially for kids aged 4-10), but adults have embraced the trend too, appreciating the nostalgic, playful aesthetic and the impressive presentation.
Why You’ll Love This Recipe
This Unicorn Cake recipe is designed with the home baker in mind, making what looks like an intimidating project totally achievable for anyone with basic baking skills. The vanilla cake base is foolproof and forgiving, and I’ll walk you through every decorating step with clear instructions.
Here’s why this recipe will become your go-to celebration cake:
- Impressive but achievable – Looks professional but uses straightforward techniques that beginners can master
- Customizable colors – Choose your own rainbow color palette to match any party theme
- Moist, delicious cake – Not just pretty, but genuinely tasty with tender crumb and perfect sweetness
- Make-ahead friendly – Cake layers can be baked in advance and frozen, making party prep stress-free
- Feeds a crowd – Makes 12-16 generous servings, perfect for parties
- Kid-approved flavor – Classic vanilla taste that even picky eaters will love
- Budget-friendly magic – Creates a wow-factor dessert without expensive specialty ingredients
- Flexible decorating – Simple version for beginners or elaborate styling for experienced decorators
- Social media worthy – Guaranteed to get oohs, ahhs, and plenty of shares on Pinterest and Instagram
Ingredient Notes
For the Cake:
All-purpose flour – Provides structure without making the cake too dense. Measure by spooning into the cup and leveling off for accuracy. Cake flour can be substituted for an even more tender crumb.
Granulated sugar – Sweetens and helps create that tender, moist texture. Don’t reduce the amount or the cake will be dry.
Butter – Use unsalted butter at room temperature. It should be soft enough to leave an indent when pressed but not melted or greasy. This creates the best texture.
Eggs – Large eggs at room temperature incorporate better into the batter. Take them out of the fridge 30 minutes before baking.
Whole milk – The fat content keeps the cake moist. Low-fat milk can work but whole milk gives the best results.
Vanilla extract – Pure vanilla extract is worth the investment here for the best flavor.
Baking powder & baking soda – These leavening agents work together to make the cake rise beautifully. Make sure they’re fresh (not expired) for proper lift.
Salt – Enhances all the flavors and balances the sweetness.
Gel food coloring – Essential for vibrant rainbow layers! Gel colors are more concentrated than liquid and won’t thin out your batter. You’ll need red, orange, yellow, green, blue, and purple.
For the Buttercream:
Unsalted butter – The base of American buttercream. Must be at room temperature and beaten until fluffy.
Powdered sugar – Also called confectioners’ sugar, this dissolves smoothly into buttercream without any graininess.
Heavy cream or milk – Thins the buttercream to the perfect spreading consistency.
Vanilla extract – Flavors the frosting beautifully.
For Decorations:
Fondant – For making unicorn ears and other decorations. Store-bought works perfectly, or make your own. You’ll need white, pink, and gold.
Gold luster dust – Creates that magical metallic horn. Find it in the cake decorating aisle.
White chocolate or candy melts – For the unicorn horn if you’re creating a 3D version.
Equipment Needed
- Three 8-inch or 9-inch round cake pans
- Parchment paper for lining pans
- Stand mixer or electric hand mixer
- Large mixing bowls
- Measuring cups and spoons
- Wire cooling racks
- Rubber spatula for scraping bowls
- Small bowls for dividing batter (6 total)
- Toothpicks for testing doneness
- Offset spatula for frosting
- Rotating cake stand (optional but helpful)
- Piping bags and tips (for decorative frosting)
- Serrated knife for leveling cakes
- Fondant rolling pin
- Ear-shaped cookie cutter or template
- Small brush for gold dust
Unicorn Cake Recipe

A magical six-layer rainbow cake covered in pastel buttercream and decorated with fondant unicorn features. This stunning Unicorn Cake features moist vanilla layers in vibrant rainbow colors, creamy vanilla buttercream frosting, and whimsical decorations including a golden horn, ears, and colorful mane. Perfect for birthday parties and special celebrations!
- Prep Time: 45 minutes
- Cook Time: 25 minutes
- Total Time: 4 hours (including cooling and decorating)
- Yield: 12-16 servings 1x
- Category: Dessert
- Method: Baking
- Cuisine: American
- Diet: Vegetarian
Ingredients
For the Rainbow Cake:
- 3 cups all-purpose flour
- 2½ cups granulated sugar
- 1 cup (2 sticks) unsalted butter, softened
- 4 large eggs, room temperature
- 1 cup whole milk, room temperature
- ½ cup sour cream, room temperature
- 2 teaspoons vanilla extract
- 1 tablespoon baking powder
- ½ teaspoon baking soda
- ½ teaspoon salt
- Gel food coloring (red, orange, yellow, green, blue, purple)
For the Vanilla Buttercream:
- 2 cups (4 sticks) unsalted butter, softened
- 8 cups powdered sugar
- ⅓ cup heavy cream (or whole milk)
- 2 teaspoons vanilla extract
- Pinch of salt
- Gel food coloring in pastel shades (pink, purple, blue – optional)
For Decorations:
- 8 oz white fondant
- 2 oz pink fondant
- Gold luster dust
- Vodka or lemon extract (for painting gold)
- White chocolate candy melts (for horn structure)
- Additional buttercream for piping flowers/rosettes
Instructions
- Prepare your pans and preheat oven: Preheat oven to 350°F (175°C). Grease three 8-inch round cake pans with butter or cooking spray, line the bottoms with parchment paper circles, then grease the parchment. Lightly dust with flour and tap out excess. This ensures easy cake release.
- Mix dry ingredients: In a medium bowl, whisk together flour, baking powder, baking soda, and salt. Set aside. This distributes the leavening agents evenly throughout the flour.
- Cream butter and sugar: In a large bowl or stand mixer, beat softened butter on medium speed for 1 minute until smooth. Add sugar and beat on medium-high speed for 4-5 minutes until light, fluffy, and pale in color. This incorporates air for a tender cake.
- Add eggs: Add eggs one at a time, beating well after each addition (about 30 seconds). Scrape down the bowl between additions. Beat in vanilla extract and sour cream until combined.
- Alternate dry and wet ingredients: With mixer on low speed, add flour mixture in three additions, alternating with milk in two additions, beginning and ending with flour. Mix each addition just until combined – don’t overmix or the cake will be tough. The batter should be smooth and thick.
- Divide and color batter: Divide batter evenly among 6 small bowls (about 1⅓ cups per bowl). Add gel food coloring to each bowl – start with 3-4 drops and add more until you reach desired vibrancy. Colors should be bold as they’ll lighten slightly when baked. Stir each bowl thoroughly until color is evenly distributed with no streaks.
- Layer the batter: Pour two colored batters into each prepared pan, creating two layers per pan. For example: Pan 1 gets red on bottom, orange on top; Pan 2 gets yellow on bottom, green on top; Pan 3 gets blue on bottom, purple on top. Gently spread each color to the edges without mixing the layers. Each layer will naturally level as it bakes.
- Bake: Bake for 23-27 minutes, or until a toothpick inserted into the center comes out with just a few moist crumbs. The tops should spring back when gently pressed. Don’t overbake or the cake will be dry.
- Cool completely: Let cakes cool in pans for 10 minutes, then carefully invert onto wire racks. Remove parchment paper and let cool completely (about 1 hour). Cakes must be completely cool before frosting or the buttercream will melt.
- Make buttercream: Beat softened butter on medium speed for 3-4 minutes until very light and fluffy. Reduce speed to low and gradually add powdered sugar, one cup at a time, beating after each addition. Add vanilla, salt, and 2 tablespoons of heavy cream. Increase speed to medium-high and beat for 3-4 minutes until light and fluffy. Add more cream if needed for spreading consistency. Reserve ¼ of buttercream white for decorating; tint remaining buttercream with pastel food coloring if desired.
- Level cake layers: If cake tops are domed, use a serrated knife to carefully level them so layers stack evenly.
- Assemble the cake: Place first layer (purple side up) on a cake stand or serving plate. Spread about ¾ cup buttercream evenly on top. Add second layer (blue side up), more buttercream, and continue stacking all six rainbow layers in order. Apply a thin “crumb coat” of buttercream around the entire cake to seal in crumbs. Refrigerate for 20 minutes to set.
- Final frosting: Apply a thicker, smooth layer of buttercream over the crumb coat, using an offset spatula to create smooth sides and top. Create texture with the spatula or keep it smooth. Refrigerate while making decorations.
- Make fondant decorations: Roll out white fondant to ⅛-inch thickness. Cut out two ear shapes (triangle with rounded edges). Roll out pink fondant thinner and cut smaller inner ear shapes. Attach pink to white with a bit of water. Let dry on a curved surface so they hold shape. For the horn, roll white fondant into a cone shape about 4 inches long, twist slightly, and let dry completely (this takes several hours or overnight). Once dry, mix gold luster dust with a few drops of vodka or lemon extract and paint the horn. Let dry.
- Create the mane: Use piping bags fitted with different sized star tips. Fill bags with different colored buttercream (pink, purple, yellow, blue). Pipe rosettes or stars around the top edge of the cake in a rainbow pattern, creating the unicorn’s colorful mane.
- Attach decorations: Gently press the ears into the cake at the top. Insert the horn into the center. Use any remaining buttercream to pipe additional flowers, stars, or details around the base or sides of the cake.
- Final touches: Add edible pearls, sprinkles, or edible glitter if desired. Refrigerate until ready to serve.
Notes
- Room temperature ingredients are crucial – Cold eggs and milk will cause the butter to seize and create a lumpy batter.
- Gel food coloring works best – Liquid food coloring can thin the batter too much and won’t give you vibrant colors.
- Don’t overmix – Once you add flour, mix just until combined. Overmixing develops gluten and makes the cake tough.
- Weigh your batter – For perfectly even layers, use a kitchen scale to divide colored batters equally (about 190g per bowl).
- Make horn ahead – The fondant horn needs several hours or overnight to dry completely before painting and decorating.
- Chill between steps – Refrigerating after the crumb coat and between decorating steps keeps everything stable and easier to work with.
- Use a turntable – A rotating cake stand makes frosting much easier and more professional-looking.
Nutrition
- Serving Size: 1 slice (1/14 of cake)
- Calories: 685
- Sugar: 82g
- Sodium: 285mg
- Fat: 32g
- Saturated Fat: 20g
- Unsaturated Fat: 10g
- Trans Fat: 0g
- Carbohydrates: 94g
- Fiber: 1g
- Protein: 5g
- Cholesterol: 135mg
Tips & Variations
Flavor Variations:
- Funfetti version – Add ½ cup rainbow sprinkles to the batter before dividing for extra celebration vibes
- Almond unicorn cake – Replace vanilla extract with almond extract for a different flavor profile
- Chocolate lover’s twist – Make two layers chocolate instead of all vanilla for a rainbow-chocolate hybrid
- Lemon rainbow cake – Add 2 tablespoons lemon zest and replace milk with lemon juice for a citrus variation
Frosting Options:
- Cream cheese frosting – Swap half the butter for cream cheese for tangier, less sweet frosting
- Swiss meringue buttercream – Use this silkier, less sweet alternative for a more sophisticated taste
- Whipped cream frosting – Lighter option, but cake must be kept refrigerated and served within 24 hours
Dietary Adaptations:
- Gluten-free – Use 1:1 gluten-free baking flour blend (add ½ teaspoon xanthan gum if blend doesn’t include it)
- Dairy-free – Replace butter with vegan butter, milk with almond/oat milk, and use dairy-free cream for buttercream
- Reduced sugar – You can reduce cake sugar by ¼ cup, but don’t reduce buttercream sugar or it won’t hold shape
Decoration Ideas:
- Galaxy theme – Use deep purple, blue, and black colors with star sprinkles for a space unicorn
- Pastel perfection – Keep everything soft pink, lavender, and mint green for a shabby chic look
- Rainbow ombre – Instead of distinct layers, create a gradual color transition from red to purple
- Minimalist unicorn – Skip elaborate piping and do simple smooth frosting with just horn and ears
- Flower crown – Add fresh edible flowers around the base of the horn for a boho unicorn look
Size Adjustments:
- Smaller cake – Recipe can be halved for three thin layers (still rainbow but less tall)
- Sheet cake version – Bake in a 9×13 pan with rainbow stripes instead of layers, frost, and add unicorn face decorations on top
- Cupcake version – Makes 36 cupcakes; divide batter into 6 bowls, fill cupcake liners with 2 tablespoons of each color for rainbow cupcakes, top with unicorn decorations
Pro Chef Tips
Temperature is everything – The single most important factor in achieving a perfectly moist, tender cake is having all your ingredients at the proper room temperature (about 70°F). Cold ingredients don’t emulsify properly, creating a dense, tough texture. Set butter, eggs, milk, and sour cream out 60-90 minutes before baking.
Reverse creaming technique – For an even more tender crumb, try this professional method: Add softened butter to the dry ingredients and mix until crumbly, then add wet ingredients. This coats flour particles with fat before liquid is added, preventing gluten development.
Weigh your flour – Volume measurements can vary significantly. For foolproof results, use a kitchen scale: 1 cup flour = 120g. Too much flour is the #1 reason for dry cake.
The toothpick trick refinement – Don’t wait for a completely clean toothpick. When the toothpick comes out with a few moist crumbs (not wet batter), remove the cakes immediately. They’ll continue cooking slightly as they cool, and this prevents overbaking.
Syrup soak for extra moisture – Professional bakers brush each layer with simple syrup (equal parts sugar and water, boiled and cooled) before frosting. This keeps the cake incredibly moist and adds subtle sweetness. You can flavor the syrup with vanilla or almond extract.
Stabilize your buttercream – If your kitchen is warm or you’re serving the cake outdoors, add 2 tablespoons of meringue powder to your buttercream. This helps it hold its shape and prevents melting in warm conditions.
Freeze for cleaner slicing – After assembling and crumb-coating the cake, freeze it for 30 minutes before applying the final frosting layer. The firm cake is much easier to frost smoothly without crumbs mixing in.
Professional smoothing technique – For perfectly smooth sides, hold your offset spatula at a 45-degree angle against the cake and spin the turntable continuously in one direction. Use a bench scraper for ultra-smooth sides – hold it vertically against the cake and spin the turntable slowly, wiping the scraper clean between passes.
Common Mistakes to Avoid
Opening the oven door too early – Resist the urge to check on your cakes before 20 minutes of baking time. Opening the door releases heat and can cause cakes to sink in the center. The temperature drop interrupts the rising process.
Overmixing the batter – Once you add flour to wet ingredients, mix only until you can’t see dry flour anymore. Overmixing develops gluten strands, resulting in a tough, chewy cake instead of tender and fluffy. A few small lumps are okay and will bake out.
Using expired leavening agents – Baking powder and baking soda lose potency over time. If yours are more than 6 months old, test them: add ½ teaspoon to hot water (baking soda) or warm water (baking powder). If they don’t bubble vigorously, they’re dead and your cake won’t rise properly.
Frosting a warm cake – This is the fastest way to ruin your beautiful creation. Even slightly warm cake will melt buttercream, causing it to slide off and mix with crumbs. Always wait until cakes are completely cool to room temperature, or better yet, chill them for 20 minutes in the refrigerator before frosting.
Not securing the bottom layer – Always place a small dollop of frosting on your cake board or plate before adding the first layer. This “glues” the cake down and prevents sliding, especially when transporting or when people are cutting slices.
Making fondant decorations last minute – Fondant pieces need several hours to dry and harden, especially the horn. If you try to attach wet fondant, it’ll be floppy and won’t stand up. Make decorations at least 24 hours ahead for best results, or even a week in advance (store at room temperature in a box).
Using too much food coloring – More isn’t always better. Gel food coloring is highly concentrated – start with just 2-3 drops and add more gradually. Too much can create a bitter taste and even affect the cake’s texture by adding too much liquid.
Storage & Meal Prep
Room Temperature Storage: Due to the buttercream frosting, this cake can sit at cool room temperature (below 70°F) for up to 2 days if covered with a cake dome or large bowl. However, if your home is warm or humid, refrigeration is safer.
Refrigerator Storage: Store the decorated cake in the refrigerator, covered loosely with plastic wrap or in a cake carrier, for up to 5 days. The cake actually tastes better after a day in the fridge – the flavors meld and the texture becomes even more moist. Before serving, let the cake sit at room temperature for 30-45 minutes so the buttercream softens to the perfect creamy texture.
Sliced Portions: If you have leftover slices, place them on a plate and cover tightly with plastic wrap. They’ll keep in the refrigerator for 5 days. You can also wrap individual slices in plastic wrap for grab-and-go treats.
Protecting Decorations: If storing a fully decorated cake, be careful not to let the plastic wrap touch the frosting decorations. Insert toothpicks around the top of the cake and drape the plastic wrap over them, creating a tent that protects your beautiful piped mane and fondant pieces.
Reheating: While this cake is delicious cold, if you prefer it at room temperature, simply let slices sit out for 20-30 minutes before serving. Never microwave slices, as this will melt the frosting and make the cake gummy.
Make-Ahead & Freezer Notes
Baking Ahead: This cake is perfect for advance preparation! Bake the cake layers up to 3 days ahead. Let them cool completely, then wrap each layer tightly in plastic wrap followed by aluminum foil. Store at room temperature for same-day use, or refrigerate for up to 3 days.
Freezing Cake Layers: For ultimate make-ahead convenience, freeze unfrosted cake layers for up to 3 months. Wrap each cooled layer in plastic wrap, then aluminum foil, and place in a freezer bag. Label with the date and color if doing rainbow layers. Thaw overnight in the refrigerator (still wrapped), then bring to room temperature before assembling. Frozen cakes actually frost more easily because they’re firmer and produce fewer crumbs!
Make-Ahead Buttercream: Buttercream can be made up to 1 week ahead and stored in an airtight container in the refrigerator, or frozen for up to 3 months. Before using, bring to room temperature (this takes several hours) and re-beat with a mixer for 2-3 minutes until light and fluffy again. The texture needs to be re-emulsified after cold storage.
Freezing Decorated Cake: Yes, you can freeze a fully decorated cake! Place it in the freezer unwrapped for 30 minutes to firm up the frosting, then wrap carefully in plastic wrap and aluminum foil. Freeze for up to 2 months. Thaw overnight in the refrigerator (still wrapped to prevent condensation on the frosting), then bring to room temperature before serving.
Fondant Decorations: These can be made weeks in advance! Store dried fondant pieces in an airtight container with parchment paper between layers, at room temperature in a cool, dry place. Don’t refrigerate fondant as humidity causes it to become sticky and the colors can bleed.
Best Assembly Timeline: For a stress-free party experience, bake and freeze layers 1 week ahead, make fondant decorations 2-3 days ahead, and assemble/frost the cake 1-2 days before the event. This spreads out the work and ensures everything is fresh and beautiful.
Serving Suggestions
Party Pairings:
This magical unicorn cake is a stunning centerpiece all on its own, but here are some complementary items to complete your celebration spread:
Ice Cream Bar – Set up a DIY ice cream station with vanilla, strawberry, and rainbow sherbet so guests can enjoy a scoop alongside their cake. Provide toppings like sprinkles, whipped cream, and rainbow chocolate chips.
Fresh Fruit Platter – Balance the sweetness with a colorful fruit arrangement featuring strawberries, raspberries, blueberries, green grapes, pineapple, and mandarin oranges arranged in rainbow order.
Beverage Station – For kids: fruit punch, pink lemonade, or blue raspberry Italian sodas with whipped cream. For adults: champagne, prosecco, or a signature cocktail like a lavender lemonade spritz.
Rainbow Snacks – Continue the theme with rainbow fruit kabobs, colored popcorn, or veggie sticks with colorful hummus options (regular, beet, and herb).
Themed Cookies – Serve small rainbow or unicorn-shaped sugar cookies as an additional take-home treat for guests.
Coffee Service – For adult gatherings, offer fresh coffee or a vanilla latte bar with flavored syrups and whipped cream to complement the sweet cake.
Plating Presentation:
For an Instagram-worthy presentation, serve slices on white or pastel-colored plates to make the rainbow layers pop. Add a small dollop of whipped cream, a fresh edible flower (like pansies or violets), or a sprinkle of edible glitter to each plate. Position the slice so the rainbow layers are visible from the side – this is what everyone wants to photograph!
FAQs Section
Can I make this cake without a stand mixer?
Absolutely! A hand mixer works perfectly fine for this recipe. You’ll just need to beat the butter and sugar for an extra minute or two to achieve that light, fluffy texture. If you don’t have any electric mixer, you can make it by hand with a whisk and some serious arm workout, though I’d recommend reserving this method for when you really have no other option. The key is making sure the butter is very soft and beating vigorously for several minutes.
Why are my cake layers uneven or domed?
Doming happens when the outside of the cake sets faster than the center, causing the middle to rise more. To prevent this, try these tricks: use light-colored aluminum pans (dark pans absorb more heat), don’t place pans too close to oven walls (leave 2 inches of space), and consider using baking strips soaked in water wrapped around pans to regulate temperature. If doming still occurs, simply level the tops with a serrated knife before stacking – that’s what professionals do!
Can I use regular food coloring instead of gel?
While you can use liquid food coloring, I strongly advise against it for this recipe. You’ll need so much liquid coloring to achieve vibrant rainbow shades that you’ll thin out the batter, affecting both texture and baking time. The cake may come out dense or gummy. Gel or paste food coloring is highly concentrated, so you only need a tiny amount to get brilliant colors without changing the batter consistency. Gel colors are inexpensive and last forever – they’re worth the investment!
How far in advance can I decorate the cake?
The fully decorated cake is actually at its best 1-2 days after assembly. The layers have time to settle, flavors meld together, and the cake becomes even more moist. I recommend baking layers 2-3 days ahead, assembling and crumb coating 2 days before serving, and finishing decorations 1 day before. Just keep it refrigerated and bring to room temperature 30 minutes before serving. The buttercream stays stable and the fondant decorations hold up beautifully during this time.
What if I don’t have six cake pans?
No problem! This recipe uses three pans with two colors layered in each. If you only have two pans, bake in batches. Make all the colored batters, keep them covered at room temperature, and bake two pans at a time. Wash and re-prep the pans between batches. The batter can sit for 30-40 minutes without issues. Alternatively, bake all the colors in one large pan with a swirled rainbow pattern and cut out layers with a biscuit cutter for mini rainbow cakes!
My buttercream is too soft/too stiff – how do I fix it?
If your buttercream is too soft and won’t hold its shape, it’s usually because the butter was too warm or there’s too much liquid. Fix it by refrigerating for 15-20 minutes, then re-beating. Or add more powdered sugar, ½ cup at a time. If it’s too stiff and difficult to spread, add more heavy cream, 1 tablespoon at a time, beating well after each addition until you reach the perfect spreadable consistency. The ideal buttercream should hold peaks but spread smoothly without tearing the cake.
Can I make this as cupcakes instead?
Yes! This recipe makes about 36-40 cupcakes. For rainbow cupcakes, divide the batter into 6 bowls as directed. Place about 2 tablespoons of each colored batter into lined cupcake tins, layering the colors carefully. Fill each cup about ⅔ full total. Bake at 350°F for 18-22 minutes. Top with swirled rainbow buttercream and mini fondant unicorn decorations. They’re perfect for parties where a large cake isn’t practical!
Help! My cake is dry – what went wrong?
Dry cake usually results from one of these issues: overbaking (even 3-4 minutes too long makes a difference), too much flour (always spoon flour into measuring cups, don’t pack it), or ingredients that were too cold and didn’t emulsify properly. For next time, check cake at the minimum time, measure carefully, and use room temperature ingredients. If your cake is already baked and dry, brush each layer generously with vanilla simple syrup before frosting – this adds moisture and will save your cake!
Conclusion
Creating this Unicorn Cake is more than just baking – it’s about bringing magic and joy to your celebrations! While it might seem like an intimidating project at first glance, I promise that when you break it down step by step, it’s absolutely achievable for any home baker. The look on everyone’s faces when you slice into those vibrant rainbow layers makes every minute of effort worthwhile.
This cake has become my go-to for special occasions because it never fails to impress. Kids squeal with delight, adults pull out their phones for photos, and everyone asks for seconds. The best part? You’ll feel like a baking rockstar when you present this masterpiece at your next celebration.
Don’t be intimidated by the decorating – remember, even a simply frosted version with just a horn and ears will look magical. As you gain confidence, you can add more elaborate piping and details. Every unicorn cake is unique and beautiful in its own way!
I’d absolutely love to see your unicorn cake creations! Share your photos in the comments below, and let me know what colors you chose for your rainbow layers. Did you make it for a birthday party? A baby shower? Or just because you wanted to add some magic to your week? Tag your photos with #MagicalUnicornCake so I can see your beautiful work!
If you loved this recipe, please save it to your Pinterest boards and share it with other baking enthusiasts. Your support helps me create more magical recipes like this one. Now grab your mixing bowls and let’s create some unicorn magic in your kitchen! 🦄🌈✨