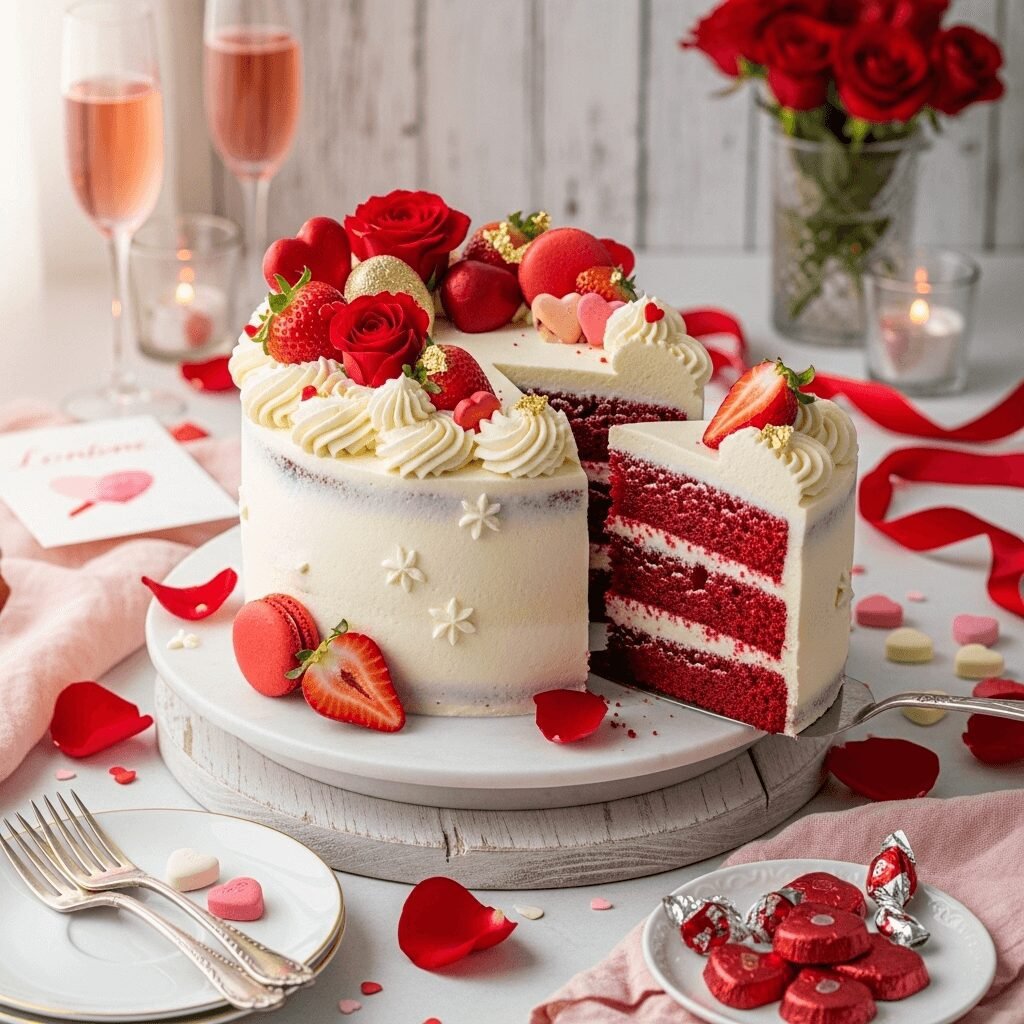
Easy Valentine’s Day Cake Recipe (Perfect Heart-Shaped Dessert!)

Get ready to sweep your loved ones off their feet with the most romantic Valentine’s Day cake recipe that’s as stunning as it is delicious! This beautiful dessert features moist, tender layers of pink or red velvet cake filled with luscious cream cheese frosting and decorated with hearts, roses, or your favorite romantic touches. Whether you’re celebrating with your partner, surprising your kids, or treating yourself to something special, this easy Valentine cake is guaranteed to make hearts flutter.
What makes this homemade Valentine’s Day cake so perfect for the occasion? It’s the ideal combination of flavor, presentation, and ease. You can customize it with classic red velvet, pink champagne, strawberry, or chocolate flavors – all equally romantic and delicious. The recipe works beautifully as a layer cake, sheet cake, or even cupcakes, and it’s surprisingly simple to create that wow-factor presentation. This cake is perfect for Valentine’s Day dinner parties, classroom celebrations, Galentine’s gatherings, or a cozy date night at home. Plus, making it from scratch shows that extra touch of love that store-bought just can’t match!
History / Background
While there’s no single “Valentine’s Day cake” with centuries of tradition, the practice of baking special desserts for February 14th has deep roots in romantic customs and confectionery history.
The celebration of Valentine’s Day itself dates back to ancient Roman times, though the modern romantic holiday we know emerged during the Middle Ages in England and France. By the Victorian era (1837-1901), Valentine’s Day had become a significant occasion for exchanging cards, gifts, and sweets. Elaborate sugar confections, heart-shaped boxes of chocolates, and decorative cakes became symbols of affection.
Red velvet cake, often chosen for Valentine’s Day due to its romantic red color, has an interesting American history. While its exact origin is debated, red velvet cake gained popularity in the 1920s and 1930s. The Adams Extract Company in Texas famously marketed red food coloring alongside a recipe for red velvet cake during the Great Depression, cementing its place in American baking. The cake’s striking red color (originally from a chemical reaction between cocoa and acidic buttermilk, later enhanced with food coloring) made it a natural choice for romantic occasions.
Pink champagne cakes and strawberry cakes also became associated with Valentine’s Day throughout the 20th century, as pink became increasingly linked with romance, femininity, and sweetness in Western culture. The tradition of heart-shaped cakes emerged as specialty baking pans became commercially available in the mid-1900s, making it easy for home bakers to create romantic shapes without professional pastry skills.
Today’s Valentine’s Day cake represents a beautiful fusion of these traditions. Modern home bakers draw inspiration from classic red velvet, vintage pink cakes, and contemporary decoration trends from social media and food blogs. The cake has evolved from a simple layer cake to an Instagram-worthy centerpiece, often featuring ombré frosting, fresh flowers, chocolate-covered strawberries, gold leaf, or elaborate piped decorations.
What makes the modern Valentine’s cake special is its versatility and personal touch. Unlike mass-produced Valentine treats, a homemade cake allows you to customize flavors, decorations, and size to perfectly suit your celebration – whether that’s an intimate dinner for two, a classroom party for thirty, or a Galentine’s brunch with your besties.
Why You’ll Love This Recipe
This romantic Valentine’s Day cake is absolutely spectacular, and once you make it, it might just become your February tradition!
Here’s why this recipe will steal your heart:
- Stunning presentation – Creates that “wow” moment when you bring it to the table
- Surprisingly easy to make – Looks professional but uses simple techniques
- Perfectly moist and tender – Never dry, stays fresh for days
- Multiple flavor options – Choose red velvet, strawberry, pink champagne, or chocolate
- Customizable decorations – Simple or elaborate, you decide the style
- Works for any group size – Make as layer cake, sheet cake, or cupcakes
- Kid-friendly and fun – Children love helping decorate Valentine treats
- Makes great leftovers – If there are any! Cake freezes beautifully
- Budget-friendly romance – More affordable than fancy restaurant desserts
- Shows genuine effort – Homemade always says “I care” better than store-bought
- Perfect for parties – Great for classroom celebrations or Galentine’s Day
- Versatile serving options – Elegant dinner party or casual family dessert
Whether you’re an experienced baker or trying your first layer cake, this recipe delivers beautiful, delicious results that show your loved ones just how much you care!
Ingredient Notes
Let’s break down the ingredients for this Valentine’s Day layer cake:
All-Purpose Flour – Creates the cake’s structure. Measure carefully using the spoon-and-level method. Substitution: Cake flour creates even more tender crumb (use 2¾ cups cake flour in place of 2½ cups all-purpose).
Granulated Sugar – Sweetens and helps create tender texture. Substitution: Can’t be reduced significantly without affecting texture, but superfine sugar dissolves more easily.
Butter (Unsalted) – Provides rich flavor and moist texture. Must be room temperature for proper creaming. Substitution: For dairy-free, use vegan butter sticks (not spreads).
Eggs (Large) – Provide structure and richness. Use room temperature. Substitution: For egg-free, try commercial egg replacer, though texture will differ.
Buttermilk – Creates tender crumb and subtle tang. The acidity reacts with baking soda for perfect rise. Substitution: Make your own by adding 1 tablespoon lemon juice or vinegar to 1 cup regular milk; let sit 5 minutes.
Vegetable Oil – Adds extra moisture that butter alone can’t provide. Substitution: Canola oil works perfectly; avoid strong-flavored oils like olive oil.
Vanilla Extract – Essential for flavor depth. Use pure extract, not imitation. Substitution: Vanilla bean paste adds lovely specks.
Food Coloring (Red or Pink) – Creates that Valentine color! Gel food coloring provides vibrant color with less liquid. Substitution: For natural coloring, use beet juice or strawberry puree (reduce other liquid slightly), though color will be less vibrant.
Cocoa Powder (for Red Velvet) – Adds subtle chocolate flavor. Use unsweetened Dutch-process or natural cocoa. Substitution: Cannot be omitted in red velvet without changing the cake entirely.
Baking Powder & Baking Soda – Leavening agents that make the cake rise. Make sure they’re fresh! Substitution: Cannot substitute one for the other.
Salt – Enhances all flavors. Don’t skip it!
For the Frosting:
- Cream Cheese – Classic pairing with red velvet and Valentine cakes. Must be full-fat and softened.
- Butter – Creates smooth, spreadable texture. Room temperature is essential.
- Powdered Sugar – Sweetens and thickens frosting. Sift for smoothest results.
- Vanilla – Flavor enhancement.
Equipment Needed
You’ll need these tools for your Valentine cake:
Essential:
- Two 9-inch round cake pans (or heart-shaped pans if you have them!)
- Electric mixer (stand mixer or hand mixer)
- Large mixing bowls (at least 2)
- Measuring cups and spoons (dry and liquid measures)
- Rubber spatulas (for folding and scraping)
- Wire cooling racks (for cooling cakes properly)
- Parchment paper (for lining pans)
- Toothpick or cake tester (for checking doneness)
- Offset spatula or butter knife (for frosting)
- Cake board or serving plate (for presentation)
Optional but helpful:
- Cake turntable (makes frosting much easier)
- Piping bags and tips (for decorative frosting)
- Bench scraper (for smooth frosting sides)
- Cake leveler (for even layers)
- Kitchen scale (for precise measuring)
Valentine’s Day Cake Recipe

A stunning Valentine’s Day cake with moist, tender red velvet (or pink!) layers and luscious cream cheese frosting. Perfect for celebrating love with beautiful presentation and delicious flavor. Easy enough for beginners but impressive enough for any romantic occasion!
- Prep Time: 25 minutes
- Cook Time: 30 minutes
- Total Time: 55 minutes
- Yield: 12 servings 1x
- Category: Dessert
- Method: Baking
- Cuisine: American
- Diet: Vegetarian
Ingredients
For the Cake:
- 2½ cups (300g) all-purpose flour
- 1½ cups (300g) granulated sugar
- 1 teaspoon baking soda
- 1 teaspoon baking powder
- 1 teaspoon salt
- 2 tablespoons (14g) unsweetened cocoa powder
- ½ cup (115g) unsalted butter, room temperature
- ½ cup (120ml) vegetable oil
- 2 large eggs, room temperature
- 1 cup (240ml) buttermilk, room temperature
- 1 teaspoon vanilla extract
- 1 teaspoon white vinegar
- 2 tablespoons red food coloring (or pink for lighter color)
For the Cream Cheese Frosting:
- 16 oz (452g) cream cheese, softened
- ¾ cup (170g) unsalted butter, softened
- 4 cups (480g) powdered sugar, sifted
- 2 teaspoons vanilla extract
- Pinch of salt
For Decoration (Optional):
- Fresh strawberries
- Chocolate hearts
- Sprinkles or edible glitter
- Fresh roses or edible flowers
Instructions
Step 1: Prepare Pans and Preheat
Preheat oven to 350°F (175°C). Grease two 9-inch round cake pans with butter or cooking spray. Line bottoms with parchment paper rounds, then grease the parchment. Lightly dust with flour or cocoa powder, tapping out excess. Set aside.
Step 2: Mix Dry Ingredients
In a large bowl, whisk together flour, sugar, baking soda, baking powder, salt, and cocoa powder. Whisk thoroughly to combine and remove any lumps. Set aside.
Step 3: Cream Butter and Oil
In the bowl of an electric mixer fitted with paddle attachment (or using a hand mixer), beat the softened butter on medium speed until creamy, about 1 minute. Add the oil and beat until combined and smooth.
Step 4: Add Eggs
Add eggs one at a time, beating well after each addition. Scrape down the sides of the bowl as needed. The mixture should be smooth and fluffy.
Step 5: Mix Wet Ingredients
In a measuring cup or small bowl, combine buttermilk, vanilla extract, vinegar, and food coloring. Stir until food coloring is evenly distributed.
Step 6: Alternate Adding Ingredients
With the mixer on low speed, add the flour mixture in three additions, alternating with the buttermilk mixture in two additions. Begin and end with flour mixture. Mix each addition just until combined – don’t overmix! Scrape down the bowl and give it a final stir by hand to ensure everything is incorporated. The batter will be smooth and deep red (or pink).
Step 7: Divide and Bake
Divide batter evenly between prepared pans (use a kitchen scale for precision – about 550g per pan). Smooth tops with a spatula. Gently tap pans on counter 2-3 times to release air bubbles.
Bake for 28-32 minutes, or until a toothpick inserted in the center comes out clean or with just a few moist crumbs. Don’t overbake! Cakes should spring back when lightly touched.
Step 8: Cool Cakes
Remove from oven and cool in pans on wire racks for 10 minutes. Run a knife around edges, then carefully invert onto wire racks. Peel off parchment paper. Flip cakes right-side up and cool completely before frosting (at least 1 hour).
Step 9: Make Cream Cheese Frosting
In a large bowl using an electric mixer, beat softened cream cheese and butter together on medium speed until smooth and creamy, about 2 minutes. Reduce speed to low and gradually add sifted powdered sugar, one cup at a time. Add vanilla and salt. Increase speed to medium-high and beat for 2-3 minutes until light and fluffy. Don’t overbeat or frosting can become too soft.
Step 10: Assemble and Frost
Level cake tops if domed (use a serrated knife or cake leveler). Place one cake layer on serving plate or cake board. Spread about 1 cup of frosting evenly over the top. Place second layer on top, pressing gently. Apply a thin “crumb coat” of frosting over entire cake to seal in crumbs. Refrigerate 15-20 minutes until firm.
Apply final coat of frosting, smoothing top and sides with offset spatula or bench scraper. Decorate as desired with piped swirls, fresh strawberries, chocolate hearts, or sprinkles.
Step 11: Serve
Refrigerate cake for at least 30 minutes to set frosting before slicing. Remove from fridge 20-30 minutes before serving for best flavor and texture. Slice with a sharp knife, wiping clean between cuts.
Notes
- Room temperature ingredients are crucial: Cold ingredients don’t mix smoothly and can create dense cake.
- Don’t overmix batter: Mix just until combined to keep cake tender.
- Use gel food coloring: Liquid coloring can thin the batter too much.
- Cool completely before frosting: Warm cake will melt frosting!
- Make it pink: Use pink food coloring and omit cocoa powder for pink vanilla cake.
- Frosting quantity: Recipe makes generous frosting. Use all for thick coating or reduce by 1/3 for thinner layers.
- Buttermilk substitute: 1 cup milk + 1 tablespoon lemon juice, let sit 5 minutes.
Nutrition
- Serving Size: 1 slice (1/12 of cake)
- Calories: 565
- Sugar: 58g
- Sodium: 385mg
- Fat: 28g
- Saturated Fat: 16g
- Unsaturated Fat: 10g
- Trans Fat: 0g
- Carbohydrates: 74g
- Fiber: 1g
- Protein: 6g
- Cholesterol: 105mg
Tips & Variations
The beauty of Valentine’s Day cake is how customizable it is! Here are wonderful ways to make it your own:
Pink Champagne Cake: Omit cocoa powder. Replace buttermilk with ¾ cup champagne + ¼ cup milk. Use pink food coloring. Add 1 teaspoon almond extract.
Strawberry Valentine Cake: Replace ½ cup buttermilk with ½ cup strawberry puree (fresh or frozen strawberries blended smooth). Add pink coloring if desired.
Chocolate Lover’s Version: Increase cocoa to ¼ cup and use chocolate cream cheese frosting (add ½ cup cocoa powder to frosting).
Ombré Effect: Divide frosting into 3 bowls. Color each a different shade (dark pink, medium pink, light pink). Frost cake with darkest shade on bottom, gradually transitioning to lightest on top.
Heart-Shaped Cake Without Special Pan: Bake one 9-inch round and one 9-inch square cake. Cut round in half. Position square like a diamond, place half-rounds on adjacent sides to form heart shape.
Cupcake Version: Divide batter among 24 lined muffin cups, filling ⅔ full. Bake 18-22 minutes. Perfect for classroom parties!
Naked Cake Style: Apply thin layer of frosting between layers and minimal frosting on sides, allowing cake to show through. Decorate with fresh berries and flowers.
White Chocolate Ganache: Drizzle white chocolate ganache over frosted cake for elegant touch.
Raspberry Filling: Spread raspberry jam between layers before frosting.
Gluten-Free: Use 1:1 gluten-free baking flour blend. Results may be slightly denser.
Pro Chef Tips
Want bakery-perfect results? Here are professional secrets:
Bring all ingredients to room temperature first. This is non-negotiable for proper mixing and texture. Cold ingredients create lumpy batter and dense cake. Set eggs, butter, buttermilk, and cream cheese out 1-2 hours before baking (or use warm water tricks for quick warming).
Measure flour correctly using spoon-and-level method. Don’t scoop directly from bag – this packs flour and you’ll use too much, creating dry, dense cake. Spoon flour into measuring cup, then level with knife.
Don’t skip the crumb coat. This thin layer of frosting seals in crumbs and creates smooth base for final coat. It seems like extra work but makes HUGE difference in professional appearance.
Use parchment paper rounds in pans. Even with greased pans, parchment ensures perfect release. Trace pan bottom on parchment, cut out circle, place in greased pan. Game changer!
Rotate pans halfway through baking. Most ovens have hot spots. Rotating at the midpoint ensures even baking and prevents one side from over-browning.
Let frosting come to room temperature before using. If you make frosting ahead and refrigerate it, let it sit at room temperature 30-60 minutes before using. Cold frosting is difficult to spread smoothly.
Add a simple syrup soak for extra moisture. Brush each layer with simple syrup (equal parts sugar and water, boiled then cooled) before frosting. This bakery trick keeps cake incredibly moist.
Use a cake turntable for smooth frosting. Place cake on turntable, hold offset spatula still against cake, and spin turntable for perfectly smooth sides. If you don’t have turntable, use a large inverted bowl.
Freeze cake layers before frosting. Wrap cooled layers in plastic wrap and freeze 30-60 minutes. Frozen cake is much easier to level and frost without creating crumbs.
Warm your knife for clean slices. Dip knife in hot water, wipe dry, then slice. Clean and warm knife between each cut for beautiful, professional slices.
Common Mistakes to Avoid
Even experienced bakers can stumble with layer cakes. Here are pitfalls to watch for:
Using cold ingredients: This is the #1 mistake! Cold butter won’t cream properly, cold eggs can curdle the batter, and cold buttermilk creates lumps. Everything should be room temperature (about 70°F). Cold ingredients create dense, uneven texture. Take time to bring everything to room temp!
Overmixing the batter: Once you add flour, mix only until just combined. Overmixing develops gluten, creating tough, chewy cake instead of tender, soft crumb. Mix on low speed and stop as soon as no flour streaks remain. A few small lumps are fine!
Frosting a warm cake: This guarantees disaster! Warm cake will melt frosting, causing it to slide off and creating a goopy mess. Always cool cakes completely (at least 1 hour at room temperature, or 30 minutes in refrigerator). Test by touching – should feel completely cool.
Not softening cream cheese and butter properly: Rock-hard cream cheese creates lumpy frosting no matter how long you beat it. Both should be soft enough to leave finger indentation when pressed, but not melting or greasy. If you forget to set them out, cut into cubes for faster softening (don’t microwave or you’ll get melted spots).
Overbaking the cake: Red velvet and delicate cakes dry out quickly when overbaked. Start checking at minimum time. Toothpick should have a few moist crumbs – not wet batter, but not completely clean. Cake continues cooking from residual heat, so slightly underbaked is better than overdone.
Using liquid food coloring: Liquid food coloring requires so much to get vibrant color that it can thin your batter too much, affecting texture. Always use gel or paste food coloring for best results and intense color with less liquid.
Storage & Meal Prep
Valentine’s Day cake stores well with proper handling!
Room Temperature Storage: Unfrosted cake layers can be wrapped tightly in plastic wrap and stored at room temperature for 1-2 days. However, once frosted with cream cheese frosting, the cake MUST be refrigerated due to perishable ingredients.
Refrigerator Storage: Store frosted cake covered in a cake keeper or loosely tented with plastic wrap (don’t let plastic touch frosting) for up to 5 days. The cream cheese frosting requires refrigeration. Before serving, let cake sit at room temperature 30-45 minutes – cold cake tastes muted and frosting is hard.
Storing Slices: Wrap individual slices in plastic wrap, then place in airtight container. Refrigerate up to 5 days. Great for portion control and grab-and-go treats!
Preventing Dry Cake: The buttermilk and oil keep this cake moist, but proper storage is key. Always wrap tightly to prevent air exposure. If storing unfrosted layers, place plastic wrap directly on cut surface.
Decoration Storage: Fresh flowers and strawberries should be added just before serving. They will wilt and deteriorate in refrigerator. If decorating ahead, use sugar decorations, chocolate, or dried/silk flowers instead.
Make-Ahead & Freezer Notes
Perfect for stress-free Valentine’s preparation!
Freezing Unfrosted Cake Layers: Cool completely, wrap each layer tightly in plastic wrap (2 layers), then aluminum foil. Freeze up to 3 months. Thaw overnight in refrigerator, still wrapped, then bring to room temperature before frosting. Texture will be perfect!
Freezing Frosted Cake: Freeze assembled, frosted cake uncovered for 1-2 hours until frosting is firm. Wrap carefully in plastic wrap and foil. Freeze up to 2 months. Thaw overnight in refrigerator. Cream cheese frosting may weep slightly when thawed but still tastes great. For best results, freeze layers unfrosted and frost after thawing.
Freezing Individual Slices: Wrap slices individually in plastic wrap, place in freezer bags. Freeze up to 3 months. Thaw in refrigerator or at room temperature. Perfect for enjoying Valentine cake long after the holiday!
Make-Ahead Baking Schedule:
- 2-3 months ahead: Bake and freeze layers
- 1 week ahead: Make frosting, refrigerate in airtight container
- 2 days ahead: Thaw cake layers in fridge
- 1 day ahead: Frost cake, refrigerate
- Day of: Add fresh decorations, bring to room temperature, serve
Make-Ahead Frosting: Cream cheese frosting can be made up to 5 days ahead. Store in airtight container in refrigerator. Before using, let come to room temperature (1-2 hours), then beat briefly with mixer to restore fluffy texture.
Pro Make-Ahead Strategy: Bake layers 1-2 weeks ahead and freeze. Make frosting 2-3 days ahead. Assemble and frost 1 day before Valentine’s. Add fresh decorations day-of. This spreads out work and reduces stress!
Serving Suggestions
Valentine’s Day cake is versatile for different celebrations!
Romantic Dinner for Two: Serve elegant plated slices with fresh berry compote, whipped cream rosette, and chocolate drizzle. Pair with champagne or dessert wine.
Galentine’s Party: Cut into squares or small rectangles for easy serving. Display on tiered stand with other treats. Pair with mimosas, pink lemonade, or coffee.
Family Valentine’s: Serve generous slices with glasses of cold milk for kids. Add ice cream for extra special treat!
Classroom Party: Make as cupcakes for easy distribution. Top each with conversation heart candy or small Valentine decoration.
Brunch Celebration: Serve alongside fresh fruit salad and yogurt parfaits for balanced sweet-and-light brunch menu.
Perfect Accompaniments:
- Fresh strawberries or mixed berries
- Raspberry or strawberry sauce
- Vanilla ice cream or whipped cream
- Chocolate-covered strawberries
- Champagne or sparkling cider
- Coffee, hot chocolate, or tea
- Fresh raspberry compote
Plating Ideas:
- Dust plate with cocoa powder
- Drizzle with chocolate or caramel sauce
- Add fresh mint sprig
- Place chocolate heart on top of slice
- Arrange fresh berries alongside
- Add edible flower petal
Occasion Ideas:
- Valentine’s Day dinner
- Galentine’s Day celebration
- Anniversary dessert
- Engagement party
- Wedding shower
- Date night at home
- Classroom Valentine party
- “Just because” romantic gesture
FAQs Section
Can I make this cake the day before Valentine’s Day?
Absolutely! In fact, the cake tastes even better the next day as flavors meld. Bake and frost the cake up to 2 days ahead. Store covered in refrigerator. Add fresh decorations just before serving.
What if I don’t have buttermilk?
Easy fix! Add 1 tablespoon lemon juice or white vinegar to a measuring cup, then add enough regular milk to reach 1 cup. Stir and let sit 5 minutes. This creates “soured milk” that works just like buttermilk.
Can I make this without food coloring?
Yes! The cake will be brown rather than red (essentially a chocolate cake) but will taste delicious. For pink cake without coloring, you could try adding strawberry or raspberry puree, though color will be subtle and you’ll need to reduce other liquid slightly.
Why is my frosting too soft/runny?
Usually from ingredients being too warm, overbeating, or not enough powdered sugar. Chill frosting 30 minutes in refrigerator, then beat briefly. If still soft, add more powdered sugar 2 tablespoons at a time. Cream cheese frosting should be spreadable but hold its shape.
Can I use this recipe for cupcakes?
Definitely! This batter makes about 24 cupcakes. Fill lined muffin cups ⅔ full. Bake at 350°F for 18-22 minutes until toothpick comes out clean. Cool completely before frosting.
Do I have to use cream cheese frosting?
Not at all! While cream cheese frosting is classic for red velvet/Valentine cakes, you can use vanilla buttercream, chocolate ganache, whipped cream frosting, or even a simple glaze. Choose what you love!
How do I make a heart-shaped cake without a heart pan?
Clever trick: Bake one 8-inch round and one 8-inch square cake. Cut the round in half. Rotate the square to look like a diamond. Place the half-rounds on two adjacent sides of the square – instant heart shape!
Conclusion
And there you have it – everything you need to create the most beautiful, delicious Valentine’s Day cake that’ll make this February 14th extra special! This isn’t just any cake – it’s a love letter in dessert form, showing your loved ones just how much you care through the time, effort, and heart you put into creating something truly special.
Whether you’re baking for your sweetheart, your children, your best friends, or treating yourself to something wonderful, this easy Valentine cake delivers stunning results that taste every bit as amazing as they look. The moist, tender layers and creamy frosting create that perfect bite, while the romantic presentation makes hearts flutter and cameras click!
I’d love to hear about your Valentine’s baking adventures! Did you try any of the flavor variations? How did you decorate yours? Was it the romantic centerpiece of your celebration? Drop a comment below and share your experience – I read every one and love seeing how you make this recipe your own! If this recipe inspired you to bake something special for Valentine’s Day, please save it to your Pinterest boards and share it with friends who love celebrating love. Let’s spread the sweetness!
Now grab your mixing bowls and preheat that oven – the most romantic cake of the year is waiting to be baked! Happy Valentine’s Day and happy baking!