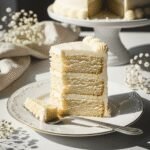
The Ultimate White Cake Recipe – Soft, Fluffy & Perfect Every Time!

There’s something magical about a classic white cake. With its tender, fluffy crumb, pure vanilla flavor, and snowy-white appearance, this timeless dessert has been gracing celebration tables for generations. Whether you’re planning a birthday party, bridal shower, wedding celebration, or simply craving a slice of nostalgia, this white cake recipe delivers bakery-quality results right in your home kitchen.
Unlike yellow cake that gets its color from egg yolks, white cake uses only egg whites, creating that signature bright, clean appearance that makes it the perfect canvas for any frosting or filling. This recipe produces a moist, tender cake with a delicate vanilla flavor that isn’t overly sweet – making it incredibly versatile for any occasion. The light, airy texture practically melts in your mouth, and the best part? It’s surprisingly easy to make from scratch! You don’t need fancy ingredients or professional equipment – just a few pantry staples and about an hour of your time will give you a showstopping dessert that’ll have everyone asking for seconds.
History / Background
The white cake has a fascinating history rooted in both culinary innovation and social significance. In the 19th century, white cake became a symbol of purity, celebration, and affluence. Before modern baking techniques and refined ingredients became widely available, achieving a pure white cake was actually quite difficult and expensive, making it a luxury item reserved for special occasions.
The traditional white cake gained prominence during the Victorian era when white wedding cakes became fashionable among the upper classes. The white color symbolized virginity and purity, making it the ideal choice for weddings. However, creating a truly white cake was challenging because most sugar available at the time had a brownish tint, and bakers relied heavily on egg yolks which added yellow color.
The invention of baking powder in the 1850s revolutionized cake-making, and by the early 1900s, refined white sugar became more accessible to average households. This democratization of ingredients meant that white cake was no longer just for the wealthy – it became an American classic that every home baker could master.
The key distinction of traditional white cake lies in its use of egg whites only (rather than whole eggs), which gives it that characteristic snow-white crumb. This technique, combined with careful creaming of butter and sugar, creates the tender, fine-textured cake we know and love today. Regional variations exist across the United States, with Southern bakers often adding a touch of almond extract alongside vanilla, while New England recipes might incorporate sour cream for extra moisture.
Today, white cake remains the most popular choice for wedding cakes, birthday celebrations, and any occasion that calls for an elegant, crowd-pleasing dessert. It’s a blank canvas that works beautifully with everything from classic buttercream to fresh fruit fillings, making it endlessly versatile and timelessly delicious.
Why You’ll Love This Recipe
This isn’t just any white cake recipe – it’s the one you’ll turn to again and again for every special occasion. After testing countless variations, I’ve perfected this recipe to give you consistent, bakery-quality results every single time.
Here’s what makes this recipe absolutely irresistible:
- Incredibly moist and tender – No dry, crumbly cake here! This recipe produces a perfectly moist crumb that stays fresh for days
- Pure, delicate vanilla flavor – Not overly sweet, with a subtle vanilla taste that complements any frosting
- Foolproof method – Clear, detailed instructions mean even beginner bakers will succeed
- Made from scratch – No cake mix required! You’ll know exactly what goes into your cake
- Versatile and customizable – Works perfectly as a layer cake, sheet cake, or cupcakes
- Impressive presentation – The bright white color looks stunning and professional
- Budget-friendly – Made with simple pantry ingredients you probably already have
- Freezer-friendly – Make ahead and freeze for stress-free party planning
- Crowd-pleaser – Everyone loves a classic white cake – kids and adults alike
- Perfect for any occasion – Birthdays, weddings, showers, holidays, or Tuesday night dessert!
Ingredient Notes
Understanding your ingredients is the secret to baking success. Here’s what you’ll need and why each component matters:
Cake Flour – This is the secret to that ultra-tender, fine crumb. Cake flour has less protein than all-purpose flour, resulting in a softer, more delicate texture. If you don’t have cake flour, you can make a substitute by combining 1 cup all-purpose flour with 2 tablespoons cornstarch for every cup of cake flour needed.
Granulated Sugar – Provides sweetness and helps create structure. The sugar crystals incorporate air when creamed with butter, contributing to the cake’s light texture.
Unsalted Butter – Must be at room temperature for proper creaming. Butter adds richness and flavor while keeping the cake moist. Using unsalted allows you to control the salt level in your recipe.
Egg Whites – This is what makes white cake “white”! Using only the whites (no yolks) gives you that pure, bright color. Make sure they’re at room temperature for better volume and incorporation.
Whole Milk – Adds moisture and richness. The fat content in whole milk contributes to the tender crumb. You can substitute with buttermilk for a slight tang, but avoid skim milk as it won’t provide enough richness.
Pure Vanilla Extract – Essential for that classic white cake flavor. Don’t skimp on quality here – pure vanilla extract makes a noticeable difference over imitation.
Baking Powder – The leavening agent that makes your cake rise and creates that light, fluffy texture. Make sure yours is fresh (check the expiration date) for best results.
Salt – Enhances all the flavors and balances the sweetness. Even though it’s a small amount, don’t skip it!
Sour Cream – This secret ingredient adds incredible moisture and a subtle tang that enhances flavor without making the cake taste sour. It also helps create that tender, velvety crumb.
Equipment Needed
Gathering your equipment before you start makes the baking process smooth and enjoyable:
- Three 8-inch or 9-inch round cake pans (or two 9-inch pans for thicker layers)
- Stand mixer or hand mixer
- Large mixing bowls (at least 2)
- Measuring cups and spoons
- Rubber spatula
- Whisk
- Parchment paper
- Cooling racks
- Offset spatula (for frosting)
- Toothpick or cake tester
- Sifter or fine-mesh strainer
- Kitchen scale (optional but recommended for precision)
White Cake Recipe
This classic white cake recipe produces a moist, tender, and fluffy cake with a pure vanilla flavor and snow-white crumb. Perfect for any celebration, this from-scratch recipe delivers bakery-quality results that’ll impress everyone!
- Prep Time: 20 minutes
- Cook Time: 25-30 minutes
- Total Time: 50 minutes (plus cooling)
- Yield: 12 servings (one 3-layer 8-inch cake) 1x
- Category: Dessert
- Method: Baking
- Cuisine: American
- Diet: Vegetarian
Ingredients
For the Cake:
- 3 cups cake flour, sifted
- 1 tablespoon baking powder
- ½ teaspoon salt
- 1 cup (2 sticks) unsalted butter, room temperature
- 2 cups granulated sugar
- 6 large egg whites, room temperature
- 1 cup whole milk, room temperature
- ½ cup sour cream, room temperature
- 2 teaspoons pure vanilla extract
- ½ teaspoon almond extract (optional)
For Simple Buttercream Frosting:
- 1½ cups (3 sticks) unsalted butter, room temperature
- 6 cups powdered sugar, sifted
- ⅓ cup heavy cream or whole milk
- 2 teaspoons pure vanilla extract
- Pinch of salt
Instructions
- Prep Your Pans: Preheat your oven to 350°F (175°C). Grease three 8-inch round cake pans with butter or non-stick spray, line the bottoms with parchment paper circles, then grease the parchment. Lightly dust with flour and tap out excess. This ensures easy release after baking.
- Combine Dry Ingredients: In a medium bowl, sift together the cake flour, baking powder, and salt. Sifting is crucial – it removes lumps and aerates the flour for a lighter cake. Set aside.
- Cream Butter and Sugar: In your stand mixer fitted with the paddle attachment (or using a hand mixer), beat the room-temperature butter on medium speed for about 2 minutes until smooth and creamy. Gradually add the sugar and continue beating on medium-high speed for 4-5 minutes until the mixture is light, fluffy, and pale in color. This step incorporates air and creates the foundation for a tender cake. Scrape down the sides of the bowl as needed.
- Add Egg Whites: With the mixer on medium-low speed, add the egg whites one at a time, beating well after each addition (about 30 seconds between each). The mixture may look slightly curdled after adding the egg whites – this is normal. Make sure your egg whites are at room temperature for better incorporation.
- Combine Wet Ingredients: In a measuring cup or small bowl, whisk together the milk, sour cream, vanilla extract, and almond extract (if using) until smooth and well combined.
- Alternate Mixing: With your mixer on low speed, add the flour mixture in three parts, alternating with the milk mixture in two parts. Begin and end with the flour mixture. The pattern should be: flour, milk, flour, milk, flour. Mix each addition just until combined – do not overmix! Overmixing develops gluten and creates a tough, dense cake. Scrape down the sides and bottom of the bowl and give the batter a few final gentle folds with a rubber spatula to ensure everything is incorporated.
- Divide and Bake: Divide the batter evenly among your prepared pans (about 2 cups of batter per 8-inch pan). Use a kitchen scale for precision if you have one. Smooth the tops with an offset spatula. Gently tap each pan on the counter 2-3 times to release any air bubbles.
- Bake to Perfection: Bake for 25-30 minutes, rotating the pans halfway through for even baking. The cakes are done when a toothpick inserted in the center comes out clean or with just a few moist crumbs (not wet batter), and the edges are just starting to pull away from the sides of the pan. The tops should spring back when lightly pressed.
- Cool Properly: Let the cakes cool in their pans on wire racks for 10 minutes. This allows them to set and makes them easier to handle. Run a knife around the edges, then carefully invert onto the racks, peel off the parchment paper, and flip right-side up. Allow to cool completely before frosting (at least 1-2 hours). Frosting warm cake will cause your frosting to melt!
- Make the Buttercream: While your cakes cool, make the frosting. Beat the room-temperature butter on medium speed for 3-4 minutes until creamy and smooth. Gradually add the powdered sugar, 1 cup at a time, beating on low speed after each addition. Add the cream, vanilla, and salt. Increase speed to medium-high and beat for 3-4 minutes until light and fluffy. If the frosting is too thick, add more cream 1 tablespoon at a time. If too thin, add more powdered sugar.
- Assemble Your Cake: Place one cake layer on your serving plate or cake stand. Spread about ¾ cup of frosting evenly over the top using an offset spatula. Add the second layer and repeat. Top with the final layer and spread a thin “crumb coat” of frosting over the entire cake to seal in crumbs. Refrigerate for 15-20 minutes to set, then apply the final layer of frosting, creating swirls or a smooth finish as desired.
- Finishing Touches: Decorate as desired with sprinkles, fresh flowers, fruit, or keep it elegantly simple. Refrigerate until ready to serve, then bring to room temperature 30 minutes before serving for the best flavor and texture.
Notes
- Room Temperature Ingredients: This is crucial! Cold ingredients don’t combine properly and can result in a dense cake. Remove butter, eggs, milk, and sour cream from the refrigerator 1-2 hours before baking.
- Don’t Overmix: Once you add the flour, mix just until combined. Overmixing develops gluten and creates a tough, chewy cake instead of a tender one.
- Measure Flour Correctly: Spoon flour into your measuring cup and level with a knife. Don’t scoop directly from the bag, which compacts the flour and leads to dry, heavy cake.
- Pan Size Matters: This recipe makes three 8-inch layers or two 9-inch layers. Adjust baking time accordingly – 9-inch layers may need a few extra minutes.
- Test for Doneness: Oven temperatures vary. Start checking at 25 minutes. The cake is done when it springs back when touched and a toothpick comes out clean.
Nutrition
- Serving Size: 1 slice (1/12 of cake with frosting)
- Calories: 685
- Sugar: 78g
- Sodium: 195mg
- Fat: 35g
- Saturated Fat: 22g
- Unsaturated Fat: 11g
- Trans Fat: 0g
- Carbohydrates: 89g
- Fiber: 0.5g
- Protein: 5g
- Cholesterol: 95mg
Note: Nutrition information is approximate and will vary based on specific ingredients used and portion sizes.
Tips & Variations
Flavor Variations:
- Coconut White Cake: Replace the milk with coconut milk and add 1 teaspoon coconut extract. Top with coconut buttercream and toasted coconut flakes.
- Lemon White Cake: Add 2 tablespoons lemon zest to the batter and replace almond extract with lemon extract. Pair with lemon buttercream for a refreshing citrus cake.
- Almond White Cake: Increase almond extract to 1 teaspoon for a pronounced almond flavor (similar to wedding cake).
- Berry Swirl: Gently fold ½ cup of fresh or frozen berries (tossed in 1 tablespoon flour) into the batter before baking.
Dietary Modifications:
- Cupcakes: This recipe makes 30-36 standard cupcakes. Bake at 350°F for 18-22 minutes.
- Sheet Cake: Pour batter into a greased 9×13-inch pan and bake for 35-40 minutes.
- Reduced Sugar: You can reduce sugar by up to ¼ cup, though this will slightly affect texture and moisture.
Frosting Options:
- Cream cheese frosting for a tangy twist
- Swiss meringue buttercream for silky elegance
- Whipped cream and fresh fruit for a lighter option
- Chocolate ganache for chocolate lovers
- Strawberry or raspberry buttercream for fruity flavor
Pro Chef Tips
1. The Room Temperature Rule: Professional bakers swear by this. Room temperature ingredients emulsify better, creating a smoother batter and more even crumb. If you’re short on time, place eggs in warm water for 5 minutes and microwave milk for 10-15 seconds.
2. Weigh Your Flour: For the most consistent results, use a kitchen scale. 3 cups of cake flour should weigh approximately 340 grams. This eliminates measuring variations that can significantly impact your cake.
3. The Reverse Creaming Method: For an even more tender cake, try this pro technique: Mix your dry ingredients with the butter first until crumbly, then add the wet ingredients. This coats the flour particles with fat, limiting gluten development.
4. Cake Strips: Professional bakers use damp cake strips around their pans to ensure flat, even layers. You can buy these or make your own by soaking fabric strips in water and pinning them around your pans. This prevents domed tops and reduces the need for leveling.
5. Simple Syrup Secret: Brush each cake layer with simple syrup (equal parts sugar and water, heated until dissolved) before frosting. This professional trick keeps your cake incredibly moist and adds an extra touch of sweetness.
6. The Toothpick Test Timing: Pull your cake when the toothpick has a few moist crumbs, not when it’s completely clean. The cake continues cooking from residual heat as it cools, and you want to prevent overbaking.
7. Freeze Before Frosting: For the cleanest frosting job, freeze your cooled layers for 30 minutes before applying the crumb coat. The firm cake won’t shed crumbs into your frosting.
Common Mistakes to Avoid
1. Using Cold Ingredients: This is the #1 mistake home bakers make! Cold butter won’t cream properly, and cold eggs can cause the batter to curdle. Always allow ingredients to come to room temperature – it makes a dramatic difference in texture.
2. Opening the Oven Door Too Early: Resist the temptation to peek! Opening the oven before the cake has set (at least 20 minutes in) can cause it to collapse. The sudden temperature change affects the rising process.
3. Overmixing the Batter: Once you add flour, mix only until you no longer see streaks of flour. Overmixing activates gluten, resulting in a tough, chewy cake instead of a tender one. It’s okay if the batter isn’t perfectly smooth.
4. Incorrect Oven Temperature: Even a 25-degree difference can affect your cake. Use an oven thermometer to verify accuracy. Too hot, and your cake will dome and crack; too cool, and it will be dense.
5. Not Preparing Pans Properly: Skipping the parchment paper or inadequate greasing causes cakes to stick. Always grease, line with parchment, then grease again and dust with flour for foolproof release.
6. Frosting a Warm Cake: Patience is key! Frosting a cake before it’s completely cooled will result in melted, sliding frosting and a messy disaster. Wait at least 2 hours, or refrigerate for 30 minutes to speed up cooling.
Storage & Meal Prep
Room Temperature Storage: An unfrosted white cake can be stored at room temperature, tightly wrapped in plastic wrap, for up to 2 days. Keep it in a cool, dry place away from direct sunlight.
Refrigerator Storage: A frosted cake should be stored in the refrigerator. Place it in a cake carrier or cover loosely with plastic wrap (after the frosting has set) for up to 5 days. The sour cream in this recipe helps keep the cake moist even when refrigerated.
Bringing to Room Temperature: For the best flavor and texture, remove the cake from the refrigerator 30-60 minutes before serving. Cold cake can taste less sweet and have a firmer texture.
Leftover Slices: Individual slices can be wrapped in plastic wrap and stored in an airtight container in the refrigerator for up to 5 days. You can also freeze individual slices for grab-and-go treats.
Make-Ahead & Freezer Notes
This white cake is incredibly freezer-friendly, making it perfect for stress-free party planning!
Freezing Unfrosted Layers: This is my preferred method for make-ahead baking. Once the cake layers are completely cooled, wrap each layer tightly in plastic wrap (two layers), then wrap in aluminum foil. Freeze for up to 3 months. To use, thaw in the refrigerator overnight, then bring to room temperature before frosting. Frozen cake is actually easier to frost because it’s firmer and produces fewer crumbs!
Freezing Frosted Cake: Yes, you can freeze a fully frosted cake! Place the frosted cake in the freezer uncovered for 30 minutes to firm up the frosting, then wrap carefully in plastic wrap and foil. Freeze for up to 2 months. Thaw in the refrigerator overnight, then bring to room temperature before serving.
Baking in Advance: You can bake the cake layers up to 2 days ahead. Let them cool completely, wrap tightly in plastic wrap, and store at room temperature. This actually makes frosting easier as the cake has time to settle.
Buttercream Frosting: Buttercream can be made up to 1 week ahead and stored in the refrigerator, or frozen for up to 3 months. Bring to room temperature and re-whip before using to restore its fluffy texture.
Pro Tip: Label everything with the date! I like to write the date and contents on a piece of masking tape placed on the wrapped cake.
Serving Suggestions
White cake’s versatility means it pairs beautifully with almost anything! Here are some delicious serving ideas:
Classic Pairings:
- Fresh berries (strawberries, raspberries, blueberries) and whipped cream
- Hot coffee or espresso for an afternoon dessert
- Cold milk for the kids (and kids at heart!)
- Champagne or sparkling wine for celebrations
Side Accompaniments:
- Vanilla ice cream or gelato
- Fresh fruit salad with mint
- Lemon curd or berry compote
- Chocolate sauce for drizzling
- Caramel sauce for extra decadence
Beverage Pairings:
- English breakfast tea or Earl Grey
- Hot chocolate for a comforting dessert
- Sweet dessert wine like Moscato
- Vanilla latte or cappuccino
Occasion Ideas:
- Birthday celebrations with rainbow sprinkles
- Wedding showers with elegant white frosting and fresh flowers
- Baby showers decorated in pastels
- Easter dessert with coconut “nest” decoration
- Christmas cake with peppermint frosting
Make It Extra Special: Serve each slice on a pretty dessert plate with a dollop of whipped cream, fresh berries, and a sprig of mint for a restaurant-quality presentation.
FAQs Section
Q: Can I use all-purpose flour instead of cake flour?
A: While cake flour produces the best texture, you can substitute. For every cup of cake flour, use 1 cup minus 2 tablespoons of all-purpose flour plus 2 tablespoons cornstarch. Sift together several times to ensure it’s well mixed. Your cake will be slightly less tender but still delicious.
Q: Why did my cake turn out dense?
A: Dense cake usually results from overmixing the batter (which develops too much gluten), using cold ingredients (which don’t incorporate properly), or measuring too much flour. Make sure to mix just until combined once you add the flour, bring all ingredients to room temperature, and measure flour by spooning it into the cup rather than scooping.
Q: Can I make this cake without egg whites?
A: Egg whites are essential to this recipe’s structure and white color. However, you can use aquafaba (chickpea liquid) as a vegan substitute – use 3 tablespoons of aquafaba per egg white. The texture will be slightly different but still good.
Q: My cake domed in the middle – what happened?
A: Doming occurs when the oven temperature is too high, causing the outside to set before the middle finishes rising. Use an oven thermometer to verify temperature, and consider using cake strips (damp fabric wrapped around pans) to promote even baking. You can also level the domes with a serrated knife.
Q: How do I get pure white frosting?
A: Use clear vanilla extract instead of regular vanilla (which is brown), and make sure your butter is very pale. Some bakers add a tiny bit of violet gel food coloring to counteract any yellow tones. Using a pure white frosting starts with using shortening instead of butter, though this sacrifices flavor.
Q: Can I make this dairy-free?
A: Yes! Substitute the butter with vegan butter, use dairy-free milk (almond, oat, or soy work well), and replace sour cream with dairy-free yogurt or sour cream. The flavor will be slightly different, but the cake will still be delicious.
Q: How do I prevent my cake layers from sticking to the pan?
A: The key is proper pan preparation. Grease the pan thoroughly with butter or baking spray, line the bottom with parchment paper, then grease the parchment and dust everything with flour. Also, let the cakes cool for 10 minutes in the pan before attempting to remove them – this allows them to set properly.
Conclusion
There you have it – your complete guide to baking the perfect white cake! This classic recipe is a true labor of love that yields incredible results every single time. Whether you’re celebrating a milestone birthday, hosting a bridal shower, or simply treating yourself to something special, this tender, fluffy white cake with its pure vanilla flavor is guaranteed to impress.
The beauty of this recipe lies in its simplicity and versatility. Once you master this base, you can customize it endlessly with different frostings, fillings, and decorations to suit any occasion or preference. And with proper storage and freezing techniques, you can bake in advance and stress less when party time arrives.
I’d love to hear how your white cake turns out! Did you try any of the variations? What frosting did you pair it with? Drop a comment below with your experience, and don’t forget to rate this recipe if you loved it. Your feedback helps fellow bakers and means the world to me!
Ready to bake? Pin this recipe to your favorite Pinterest board so you can find it easily when you’re ready to create some magic in your kitchen. And if you share your beautiful creation on social media, tag me so I can see your masterpiece – I love seeing your baking adventures!
Happy baking, friends! May your cake be fluffy, your frosting smooth, and your celebrations sweet! 🎂