Easy Impossible Pie Recipe – The Magic Self-Layering Dessert!

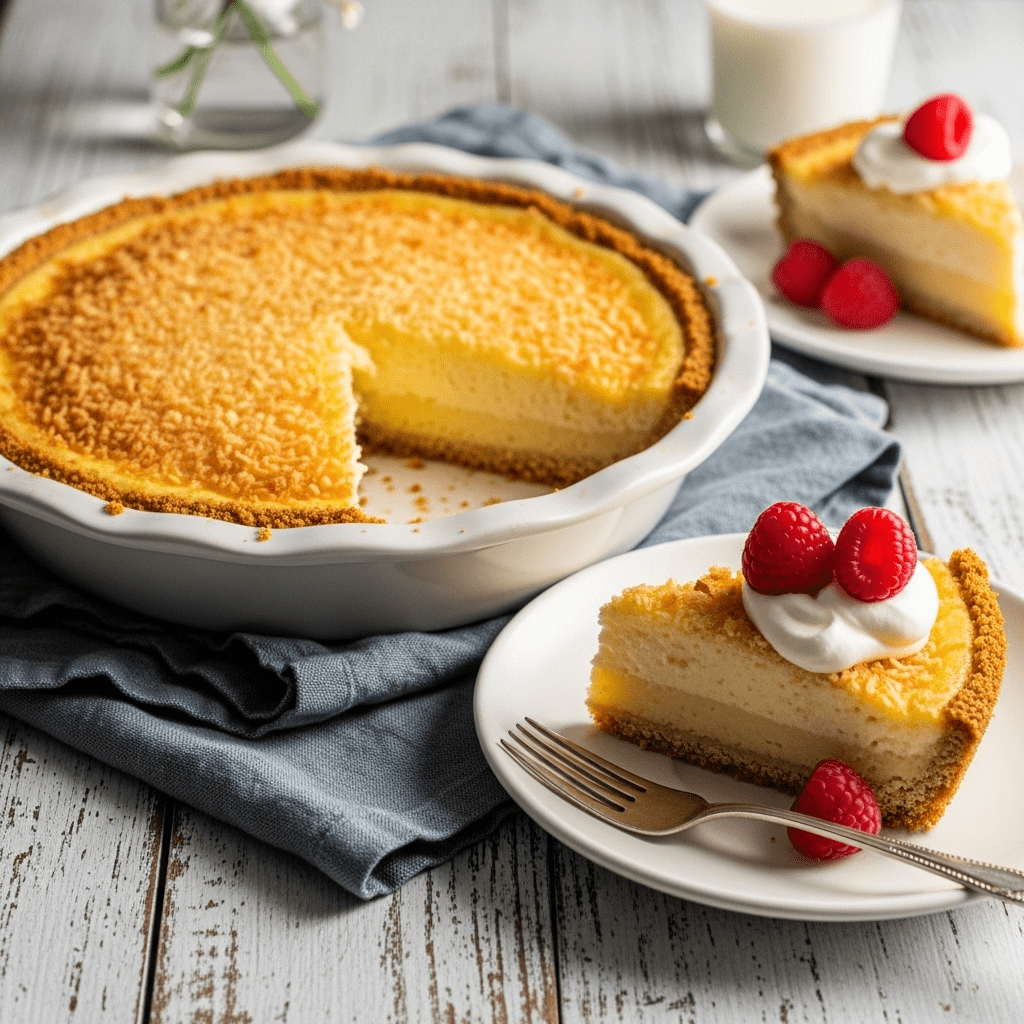
Have you ever wanted to bake a pie but dreaded making the crust? Let me introduce you to Impossible Pie – the magical dessert that creates its own crust while baking! This vintage gem is called “impossible” because it seems impossible that one simple batter can separate into three distinct layers: a golden crust on the bottom, a creamy custard center, and a delicate cake-like topping. All you do is blend a handful of basic ingredients, pour them into a pie dish, and let your oven work its magic.
Impossible Pie is perfect for weeknight desserts, potlucks, church gatherings, holiday dinners, or anytime you want to impress guests without spending hours in the kitchen. It’s beginner-friendly, incredibly forgiving, and uses ingredients you probably already have in your pantry. Whether you serve it warm with a scoop of vanilla ice cream or chilled with fresh berries, this self-crusting coconut custard pie will become your new go-to dessert!
History / Background
Impossible Pie emerged during the 1970s as part of the “impossible” recipe craze that swept through American kitchens. The concept was brilliantly simple: create baked goods that formed their own crusts through the magic of Bisquick baking mix. Bisquick, introduced by General Mills in 1931, became a household staple and the foundation for countless quick recipes.
The original Impossible Pie recipe appeared on Bisquick boxes and in community cookbooks throughout the ’70s and ’80s, becoming a beloved retro dessert across the United States. Home cooks were fascinated by the science behind it – how could one batter magically separate into distinct layers? The secret lies in the density of ingredients: heavier elements like coconut sink to form the crust, while lighter ingredients rise to create the cake-like top, leaving the custard perfectly suspended in the middle.
This pie represents an era of convenience cooking when homemakers sought impressive results with minimal effort. It spread through church potlucks, family reunions, and community cookbooks, with each region adding its own twist. Some versions included chocolate chips, others featured different extracts, and many families swore by their secret technique for the perfect texture.
Today, Impossible Pie is experiencing a revival as home bakers rediscover vintage recipes and appreciate the charm of no-fuss desserts. It’s a wonderful connection to mid-century American baking traditions while remaining completely relevant for modern busy households.
Why You’ll Love This Recipe
Impossible Pie is the ultimate stress-free dessert that delivers maximum impact with minimum effort. It’s like having a personal pastry chef hiding in your mixing bowl! This recipe eliminates the most intimidating part of pie-making – the crust – while still delivering that satisfying homemade taste everyone craves.
Here’s why this recipe will become your favorite:
- No pie crust needed – Save time and skip the intimidating pastry-making process entirely
- One-bowl wonder – Everything mixes together in minutes with just a whisk or blender
- Self-layering magic – Watch in amazement as three distinct layers form automatically during baking
- Beginner-friendly – Perfect for first-time bakers or anyone who’s intimidated by traditional pies
- Pantry-friendly ingredients – Uses basic staples you likely already have on hand
- Impressive presentation – Looks like you spent hours making it when it only took 10 minutes of prep
- Versatile flavor profile – Sweet coconut custard pairs beautifully with berries, chocolate, or citrus
- Crowd-pleaser – Appeals to kids and adults alike at any gathering
- Budget-friendly – Costs just a few dollars to make an entire pie
- Foolproof results – Very hard to mess up, even if you’re not an experienced baker
- Make-ahead friendly – Can be prepared in advance for stress-free entertaining
Ingredient Notes
Let’s talk about the simple ingredients that create this magical pie. Understanding what each component does will help you achieve perfect results every time!
Eggs: The foundation of the custard layer. They provide structure and richness while helping the layers separate during baking. Use large eggs at room temperature for best blending. They create that silky custard center that makes this pie so irresistible.
Granulated Sugar: Sweetens the pie and helps with browning. The sugar content is perfectly balanced – sweet enough to be dessert-worthy but not cloyingly sweet. You can reduce it slightly if you prefer less sweetness, but don’t eliminate it entirely as it affects texture.
Butter: Adds richness and helps form that golden bottom crust. Use real butter (not margarine) for the best flavor. Melted butter distributes evenly through the batter. Some bakers use salted butter for a subtle salty-sweet contrast.
Bisquick or Baking Mix: This is the magic ingredient that creates the self-forming crust! Bisquick contains flour, leavening agents, and fats that separate from the liquid ingredients during baking, sinking to form the bottom crust. Substitution: You can make homemade baking mix by combining 1 cup flour + 1½ teaspoons baking powder + ½ teaspoon salt + 1 tablespoon cold butter (cut in until crumbly).
Milk: Provides moisture and creaminess to the custard. Whole milk gives the richest results, but 2% works well too. Substitution: Can use evaporated milk for extra richness, or dairy-free milk alternatives (though texture may vary slightly).
Vanilla Extract: Enhances all the flavors and adds warmth. Pure vanilla extract tastes best, but imitation works in a pinch. Don’t skip this – it makes a noticeable difference!
Shredded Coconut: Creates texture and tropical flavor while contributing to the crust formation. Use sweetened shredded coconut for traditional results. Substitution: Can omit for coconut-free version (though the texture will be slightly different), or use unsweetened coconut to reduce sugar content.
Equipment Needed
You’ll need minimal equipment for this easy recipe – another reason it’s so beginner-friendly!
- 9-inch pie dish (glass or ceramic works best for even heat distribution)
- Blender or large mixing bowl (blender gives smoothest results, but whisking by hand works perfectly)
- Measuring cups and spoons (for accurate measurements)
- Whisk (if mixing by hand instead of using a blender)
- Microwave-safe bowl or small saucepan (for melting butter)
- Cooking spray or butter (for greasing the pie dish)
- Oven mitts (safety first!)
- Wire cooling rack (for cooling the pie after baking)
- Sharp knife (for slicing and serving)
Impossible Pie Recipe
This magical Impossible Pie creates its own crust while baking! With just one simple batter, you’ll get three delicious layers: a golden coconut crust on the bottom, a creamy custard center, and a light cake-like topping. Perfect for busy weeknights or impressive enough for company, this vintage recipe uses pantry staples and comes together in just 10 minutes of prep time.
- Prep Time: 10 minutes
- Cook Time: 45 minutes
- Total Time: 55 minutes (plus cooling time)
- Yield: 8 servings 1x
- Category: Dessert
- Method: Baking
- Cuisine: American
- Diet: Vegetarian
Ingredients
- 4 large eggs (room temperature preferred)
- 1¾ cups (420ml) whole milk
- ½ cup (115g) unsalted butter, melted and slightly cooled
- ¾ cup (150g) granulated sugar
- ½ cup (60g) Bisquick baking mix
- 1 teaspoon pure vanilla extract
- 1 cup (85g) sweetened shredded coconut
- ¼ teaspoon salt (optional, if using unsalted butter)
- Pinch of ground nutmeg (optional, for a hint of warmth)
Instructions
- Preheat and Prepare: Preheat your oven to 350°F (175°C). Generously grease a 9-inch pie dish with butter or cooking spray, making sure to coat the bottom and sides completely. This prevents sticking and helps achieve a golden crust.
- Blend the Batter: Add eggs, milk, melted butter, sugar, Bisquick, vanilla extract, and salt (if using) to a blender. Blend on medium-high speed for about 30 seconds until completely smooth and well combined. Alternatively, whisk vigorously by hand in a large bowl for 2-3 minutes until no lumps remain and the mixture is homogenous.
- Add the Coconut: Add the shredded coconut to the blender or bowl. Pulse a few times or stir gently just until the coconut is evenly distributed throughout the batter. Don’t over-blend – you want the coconut to maintain some texture.
- Pour and Settle: Pour the batter into your prepared pie dish. Tap the dish gently on the counter a few times to release any air bubbles and help the batter settle evenly. The coconut may float to the top at this stage – that’s perfectly normal!
- Bake to Perfection: Place the pie dish on the center rack of your preheated oven. Bake for 45-50 minutes, or until the top is golden brown and the center is just set with only a slight jiggle. A knife inserted near (but not in) the center should come out mostly clean. The pie will continue cooking slightly as it cools due to residual heat.
- Cool and Set: Remove from the oven and place on a wire cooling rack. Let the pie cool for at least 30 minutes before slicing. As it cools, you’ll notice the layers have magically formed! The pie can be served warm, at room temperature, or chilled – all three ways are delicious. For cleanest slices, chill for 2-3 hours before cutting.
- Slice and Serve: Use a sharp knife dipped in hot water (and dried) for the cleanest cuts. Wipe the knife between slices. Serve with whipped cream, vanilla ice cream, fresh berries, or a dusting of powdered sugar.
Notes
- Testing for Doneness: The center should have just a slight jiggle when you gently shake the dish. It will continue to set as it cools. Overbaking can make the custard layer rubbery.
- Layer Formation: Don’t worry if you can’t see distinct layers while baking – they become more defined as the pie cools.
- Milk Temperature: Using room temperature milk helps the butter stay incorporated and prevents it from solidifying into small lumps.
- Coconut-Free Version: You can omit the coconut entirely, though the texture will be more like a custard pie. Add an extra 2 tablespoons of Bisquick to help with crust formation.
- High Altitude Adjustments: If baking above 3,500 feet, reduce sugar by 2 tablespoons and increase baking time by 5-8 minutes.
Nutrition
- Serving Size: 1 slice (⅛ of pie)
- Calories: 285
- Sugar: 22g
- Sodium: 215mg
- Fat: 16g
- Saturated Fat: 10g
- Unsaturated Fat: 5g
- Trans Fat: 0g
- Carbohydrates: 29g
- Fiber: 1g
- Protein: 6g
- Cholesterol: 120mg
Note: Nutrition information is approximate and calculated based on the recipe as written. Values may vary based on specific brands and ingredient substitutions used.
Tips & Variations
One of the best things about Impossible Pie is how easily you can customize it to suit your preferences or what you have on hand!
Flavor Variations:
- Chocolate Coconut: Add ¼ cup cocoa powder to the batter and sprinkle mini chocolate chips on top before baking
- Lemon Coconut: Replace vanilla with lemon extract and add 1 tablespoon lemon zest for a bright citrus twist
- Almond Joy: Use almond extract instead of vanilla and top with sliced almonds and chocolate drizzle after baking
- Tropical Paradise: Add ½ cup crushed pineapple (well-drained) and use coconut milk instead of regular milk
- Maple Pecan: Replace ¼ cup sugar with maple syrup and sprinkle chopped pecans over the top
- Berry Swirl: Gently fold ½ cup fresh or frozen berries into the batter before baking (they’ll sink and create beautiful pockets)
Dietary Modifications:
- Gluten-Free: Use gluten-free baking mix in place of Bisquick – the recipe works perfectly!
- Dairy-Free: Use coconut milk and dairy-free butter substitute (results will be slightly different but still delicious)
- Lower Sugar: Reduce sugar to ½ cup and use unsweetened coconut – it will still taste sweet enough
- Keto-Friendly: Use almond flour instead of Bisquick, erythritol instead of sugar, and increase eggs to 5 (results will vary significantly)
Texture Adjustments:
- For a creamier custard, add an extra egg yolk
- For a thicker crust, increase Bisquick to ⅔ cup
- For more coconut flavor, use 1½ cups coconut and add ¼ teaspoon coconut extract
Pro Chef Tips
Want to take your Impossible Pie from good to absolutely incredible? Here are professional tips that make all the difference!
Temperature Control is Key: Room temperature ingredients blend more smoothly and bake more evenly. Take your eggs and milk out of the refrigerator 30 minutes before starting. This simple step prevents uneven cooking and helps achieve those perfect distinct layers.
Don’t Skip the Greasing: Even if you have a non-stick pie dish, generously grease it with butter (not just spray). The butter adds flavor to the crust and creates a beautiful golden brown edge that releases perfectly from the dish.
Master the Blend Time: If using a blender, 30 seconds is your magic number. Over-blending incorporates too much air, which can create bubbles and uneven texture. Under-blending leaves lumps. When you see a smooth, homogeneous mixture, stop immediately.
The Toothpick Test Doesn’t Work Here: Unlike cakes, you don’t want a completely clean toothpick. The center should have a slight custard coating on the toothpick. Remember, it’s a custard pie, not a cake! Look for a gentle jiggle in just the center when you shake the dish.
Cool on a Rack, Not the Counter: Air circulation underneath helps prevent a soggy bottom and allows the layers to set properly. The bottom crust needs this cooling airflow to maintain its texture.
Let Chemistry Work: The magic happens during the first 15 minutes of baking when the layers separate. Resist the urge to open the oven door during this time, as temperature fluctuations can disrupt the layering process.
Chill for Clean Slices: If presentation matters (hello, Pinterest!), chill the pie completely before slicing. A cold pie cuts into beautiful, clean wedges that show off those gorgeous layers. Warm pie tastes amazing but slices messily.
Toast the Coconut First: For an extra depth of flavor, spread your coconut on a baking sheet and toast it at 350°F for 5-7 minutes until golden before adding to the batter. This amplifies the coconut flavor tremendously.
Common Mistakes to Avoid
Even though Impossible Pie is incredibly forgiving, there are a few common pitfalls that can affect your results:
Mistake #1: Using Cold Ingredients – Cold eggs and milk don’t blend as smoothly, and cold milk can cause the melted butter to solidify into small lumps throughout the batter. Always let your dairy and eggs come to room temperature, or give them a quick 10-second warm water bath.
Mistake #2: Skipping the Pan Preparation – Forgetting to grease your pie dish or not greasing it thoroughly enough leads to a stuck pie that won’t release in pretty slices. Even non-stick dishes need greasing for this recipe! Use butter for extra flavor.
Mistake #3: Overbaking – The most common error! The pie should still have a slight jiggle in the center when you remove it from the oven. If it’s completely firm, you’ve gone too far and the custard will be rubbery instead of creamy. Remember, it continues cooking as it cools.
Mistake #4: Cutting Too Soon – I know it smells amazing and you’re excited, but slicing into a hot pie results in a liquidy mess. The layers need cooling time to fully set. Give it at least 30 minutes, or chill it completely for the best presentation.
Mistake #5: Not Measuring the Bisquick Correctly – Too much Bisquick creates a thick, cake-like pie without the distinct layers. Too little means no crust formation. Spoon the Bisquick into your measuring cup and level it off without packing it down.
Mistake #6: Using the Wrong Size Pie Dish – A dish that’s too small causes overflow, while one that’s too large makes a thin, overcooked pie. Stick with a standard 9-inch pie dish for the recipe as written.
Storage & Meal Prep
Impossible Pie stores beautifully and actually tastes even better the next day as the flavors meld together!
Refrigerator Storage: Once completely cooled, cover the pie tightly with plastic wrap or aluminum foil, or transfer slices to an airtight container. Store in the refrigerator for up to 4-5 days. The pie will firm up considerably when chilled, creating an even more pronounced layer distinction.
Room Temperature: The pie can sit at room temperature for up to 2 hours after baking, making it perfect for serving at potlucks or dinners. However, because of the dairy and egg content, it shouldn’t be left out longer than 2 hours for food safety reasons.
Reheating Instructions: For best results, reheat individual slices in the microwave for 20-30 seconds on 50% power. You can also warm the entire pie in a 300°F oven for 10-15 minutes, covered with foil to prevent over-browning. The pie is equally delicious served cold, at room temperature, or gently warmed – it’s really a matter of personal preference!
Shelf Life: The pie is best within the first 3 days but remains safe to eat for up to 5 days when properly refrigerated. The texture becomes denser and more custard-like over time, which many people actually prefer.
Make-Ahead & Freezer Notes
Planning a party or want to prep dessert in advance? Impossible Pie is incredibly make-ahead friendly!
Make-Ahead Instructions: You can bake the pie up to 2 days in advance. Let it cool completely, then cover tightly and refrigerate. This actually works in your favor because the layers become more distinct and the flavors develop beautifully. Remove from the refrigerator 30 minutes before serving if you prefer it at room temperature, or serve it chilled straight from the fridge.
Freezing the Baked Pie: Yes, you can freeze Impossible Pie! Once completely cooled, wrap the entire pie tightly in plastic wrap, then again in aluminum foil to prevent freezer burn. Freeze for up to 2 months. Alternatively, slice the pie and wrap individual pieces for grab-and-go dessert portions.
Thawing Instructions: For best texture, thaw the frozen pie slowly in the refrigerator overnight. This prevents moisture accumulation and maintains the layer structure. Once thawed, you can serve it cold or bring it to room temperature. Reheating from frozen isn’t recommended as it can create uneven texture.
Freezing Unbaked Batter: I don’t recommend freezing the unbaked batter as the ingredients need to be freshly mixed for proper layer separation during baking.
Best Reheating Method from Frozen: If you froze individual slices, you can microwave them directly from frozen for 60-90 seconds on 50% power, or let them thaw for 2 hours at room temperature first.
Serving Suggestions
Impossible Pie is wonderfully versatile and pairs beautifully with so many accompaniments! Here are some delicious ways to serve it:
Classic Pairings:
- Vanilla ice cream (the contrast of warm pie and cold ice cream is heavenly)
- Fresh whipped cream with a sprinkle of cinnamon
- A dusting of powdered sugar for an elegant presentation
- Caramel sauce drizzle for extra decadence
Fresh Fruit Companions:
- Fresh berries (strawberries, raspberries, or blueberries)
- Sliced bananas with a drizzle of chocolate sauce
- Macerated strawberries (berries tossed with a little sugar and left to release their juices)
- Tropical fruit salad with pineapple, mango, and kiwi
Beverage Pairings:
- Hot coffee or espresso (the coconut and coffee are a magical combination)
- Chai tea or vanilla rooibos
- Cold milk for the kids
- Dessert wine like Moscato or late-harvest Riesling for special occasions
- Coconut milk iced coffee for a tropical vibe
Brunch Ideas: This pie works beautifully as a brunch dessert alongside quiche, fruit salad, breakfast casseroles, and coffee cake. It’s substantial enough to feel special but not too heavy for a morning meal.
Holiday Serving: At Thanksgiving or Christmas, serve it alongside traditional pumpkin pie for guests who want something different. Garnish with candied cranberries and fresh rosemary for a festive touch.
FAQs Section
Q: Why is my Impossible Pie called “impossible”?
A: It’s called Impossible Pie because it seems impossible that one simple batter can magically separate into three distinct layers during baking – a crust, custard, and cake topping – all without any special techniques. The ingredients naturally separate by density as they bake, creating this “impossible” effect!
Q: Can I make Impossible Pie without coconut?
A: Absolutely! While coconut is traditional and helps with crust formation, you can omit it entirely. Add an extra 2 tablespoons of Bisquick to compensate for crust structure. The result will be more like a classic custard pie without the coconut flavor and texture. Some people substitute chopped nuts or leave it plain.
Q: My pie didn’t form distinct layers. What went wrong?
A: Several factors can affect layering: over-mixing the batter (which distributes ingredients too evenly), incorrect oven temperature, using expired Bisquick (leavening loses effectiveness), or opening the oven door during the first 15 minutes of baking. The layers also become more pronounced as the pie cools, so be patient! Sometimes the layers are subtle but still there.
Q: Can I use a different type of milk?
A: Yes! Whole milk gives the richest, creamiest results, but 2% milk works perfectly fine. You can even use evaporated milk for extra richness (it’s actually amazing!). Non-dairy milk alternatives like almond, oat, or coconut milk can work but may slightly alter the texture and final layer formation. Coconut milk creates an extra coconutty version that fans love.
Q: Is Impossible Pie served warm or cold?
A: It’s delicious both ways! Warm pie (cooled for at least 30 minutes) has a softer, more pudding-like custard and is wonderful with ice cream. Cold pie from the refrigerator has firmer, more distinct layers and slices cleanly. Many people prefer it chilled, but it’s truly a matter of personal preference. Try it both ways and decide for yourself!
Q: Why did my pie sink in the middle after baking?
A: A slight dip in the center is completely normal as custard pies naturally deflate a bit during cooling. However, a dramatic collapse usually means the pie was underbaked. The center should be just slightly jiggly when you remove it from the oven – it will continue to set as it cools. Also, avoid moving the pie abruptly while it’s still hot.
Q: Can I double this recipe to make two pies?
A: Yes! The recipe doubles perfectly. Mix in batches if your blender is small, or whisk by hand in a very large bowl. Pour into two greased 9-inch pie dishes and bake as directed. The baking time should remain the same, but check both pies as ovens can have hot spots that cause uneven baking.
Conclusion
There you have it – the wonderfully impossible Impossible Pie! This vintage recipe proves that the best desserts don’t require complicated techniques or fancy ingredients. With just a few pantry staples and 10 minutes of prep, you can create a show-stopping pie that will have everyone asking for your secret. The magic happens in the oven, where science and deliciousness combine to create those three perfect layers that make this dessert truly special.
Whether you’re a nervous beginner baker looking for a foolproof recipe or an experienced cook seeking an easy, impressive dessert, Impossible Pie delivers every single time. It’s the recipe you’ll turn to for last-minute dinner parties, potluck contributions, lazy Sunday afternoons, and holiday gatherings. Once you make it, you’ll understand why it’s been beloved for decades.
I’d love to hear how your Impossible Pie turns out! Did you try any of the variations? Serve it with something amazing? Drop a comment below and let me know. And if you loved this recipe, please save it to your Pinterest boards so you can find it easily next time – your future self will thank you! Don’t forget to share your beautiful pie photos on social media and tag me so I can see your creations. Happy baking, and enjoy every magical bite! 🥧✨