Sunshine Orange Tart Recipe – A Bright & Beautiful Citrus Dessert

There’s something magical about a perfectly crafted orange tart that captures sunshine in every bite. This stunning Orange Tart is a sophisticated yet approachable dessert that combines a buttery, flaky crust with a silky-smooth orange filling that’s both tangy and sweet. Whether you’re hosting a spring brunch, celebrating a special occasion, or simply craving something that tastes like pure happiness, this orange tart delivers on every level.
The beauty of this recipe lies in its versatility and visual appeal. The vibrant orange color immediately catches the eye, making it an absolute showstopper on any dessert table. Unlike heavy, overly sweet desserts, this tart offers a refreshing citrus burst that cleanses the palate and leaves you wanting just one more slice. It’s elegant enough for dinner parties yet simple enough for weekend baking sessions when you want to treat yourself to something special.
What makes this orange tart particularly special is how it balances textures and flavors. The crisp, cookie-like crust provides the perfect foundation for the luscious orange curd filling, while optional whipped cream or candied orange slices add that final touch of elegance. It’s a recipe that looks like it came from a French patisserie but is completely achievable in your own kitchen with ingredients you can find at any grocery store.
History / Background
The orange tart has deep roots in French pastry-making traditions, where citrus tarts have been celebrated for centuries. The French have long mastered the art of tartes aux agrumes (citrus tarts), with orange versions being particularly popular in the sun-drenched regions of southern France, especially Provence and the French Riviera, where orange trees flourish in the Mediterranean climate.
The technique of combining fruit curd with pastry crust dates back to medieval times, though the refined version we know today developed during the 17th and 18th centuries when French pastry chefs elevated dessert-making to an art form. Orange tarts became especially fashionable in European aristocratic circles, where imported citrus fruits were considered luxury items and a symbol of wealth and sophistication.
In America, citrus tarts gained popularity during the early 20th century, particularly in states like California and Florida where orange cultivation became a major industry. The introduction of readily available oranges made these once-exclusive desserts accessible to home bakers across the country. Today’s orange tart represents a beautiful marriage of classic French technique and American accessibility, making gourmet desserts achievable for everyday home cooks.
The orange tart also holds cultural significance in various celebrations around the world. In some European traditions, citrus desserts are associated with winter holidays when oranges are at their peak. In modern times, this tart has become a favorite for spring and summer celebrations, Easter brunches, Mother’s Day gatherings, and any occasion that calls for something both beautiful and delicious.
Why You’ll Love This Recipe
This Orange Tart recipe strikes the perfect balance between impressive presentation and straightforward preparation. Unlike complicated French pastries that require specialized training, this recipe breaks down each step into manageable tasks that any home baker can master. The result is a dessert that looks and tastes professionally made but doesn’t require you to spend all day in the kitchen.
Here’s why this recipe will become your new favorite:
- Bursting with Fresh Citrus Flavor – Real orange juice and zest create an authentic, vibrant taste that store-bought desserts simply cannot match
- Stunning Visual Appeal – The bright orange filling against the golden crust creates a Pinterest-perfect presentation every single time
- Make-Ahead Friendly – Prepare components in advance and assemble when ready, perfect for stress-free entertaining
- Not Too Sweet – The natural tartness of oranges balances the sweetness, creating a refined dessert that won’t overwhelm your palate
- Customizable – Easily adapt with blood oranges, Meyer lemons, or mixed citrus for different flavor profiles
- Crowd-Pleaser – Appeals to both kids and adults, making it ideal for family gatherings and dinner parties
- Impressive Yet Achievable – Looks like you ordered it from a fancy bakery, but it’s completely homemade
- Refreshing Alternative – Offers a lighter option compared to heavy chocolate or cream-based desserts
Ingredient Notes
For the Tart Crust:
All-Purpose Flour – Forms the structure of your crust. For best results, measure by spooning flour into your measuring cup and leveling off. You can substitute with a 1:1 gluten-free baking blend if needed.
Unsalted Butter – Must be cold and cubed for a flaky, tender crust. Cold butter creates steam pockets during baking, resulting in that desirable texture. European-style butter with higher fat content creates an even richer crust.
Powdered Sugar – Sweetens the dough while creating a tender, cookie-like texture. Granulated sugar can be used but creates a slightly different texture.
Egg Yolk – Adds richness and helps bind the dough together. This creates a sturdier crust that holds the filling beautifully.
Vanilla Extract – Enhances the overall flavor and adds depth to the buttery crust.
Salt – Balances sweetness and enhances all the other flavors.
For the Orange Filling:
Fresh Orange Juice – The star ingredient! Use freshly squeezed juice from 4-5 medium oranges. Navel or Valencia oranges work wonderfully. Avoid bottled juice as it lacks the bright, fresh flavor.
Orange Zest – Contains aromatic oils that intensify the orange flavor exponentially. Always zest before juicing!
Granulated Sugar – Sweetens the tart filling and helps achieve the right consistency.
Eggs and Egg Yolks – Create the silky, custard-like texture. The combination of whole eggs and extra yolks produces the richest, smoothest filling.
Cornstarch – Helps thicken the filling and provides stability so it slices beautifully without being runny.
Butter – Added at the end for richness and a glossy, luxurious finish.
Heavy Cream (Optional) – For topping; adds a beautiful contrast to the bright orange filling.
Equipment Needed
- 9-inch tart pan with removable bottom – Essential for easy removal and beautiful presentation
- Food processor or pastry cutter – For making the crust (hands work too!)
- Rolling pin – To roll out the dough evenly
- Medium saucepan – For cooking the orange filling
- Whisk – For smooth, lump-free filling
- Fine-mesh strainer – Removes any cooked egg bits for ultra-smooth filling
- Mixing bowls – Various sizes for different components
- Citrus zester or microplane – For finely grating orange zest
- Citrus juicer – Manual or electric, for extracting maximum juice
- Pie weights or dried beans – For blind-baking the crust
- Parchment paper – Lines the crust during blind-baking
- Rubber spatula – For stirring and scraping
- Measuring cups and spoons – For accurate measurements
- Cooling rack – Allows proper cooling
Orange Tart Recipe

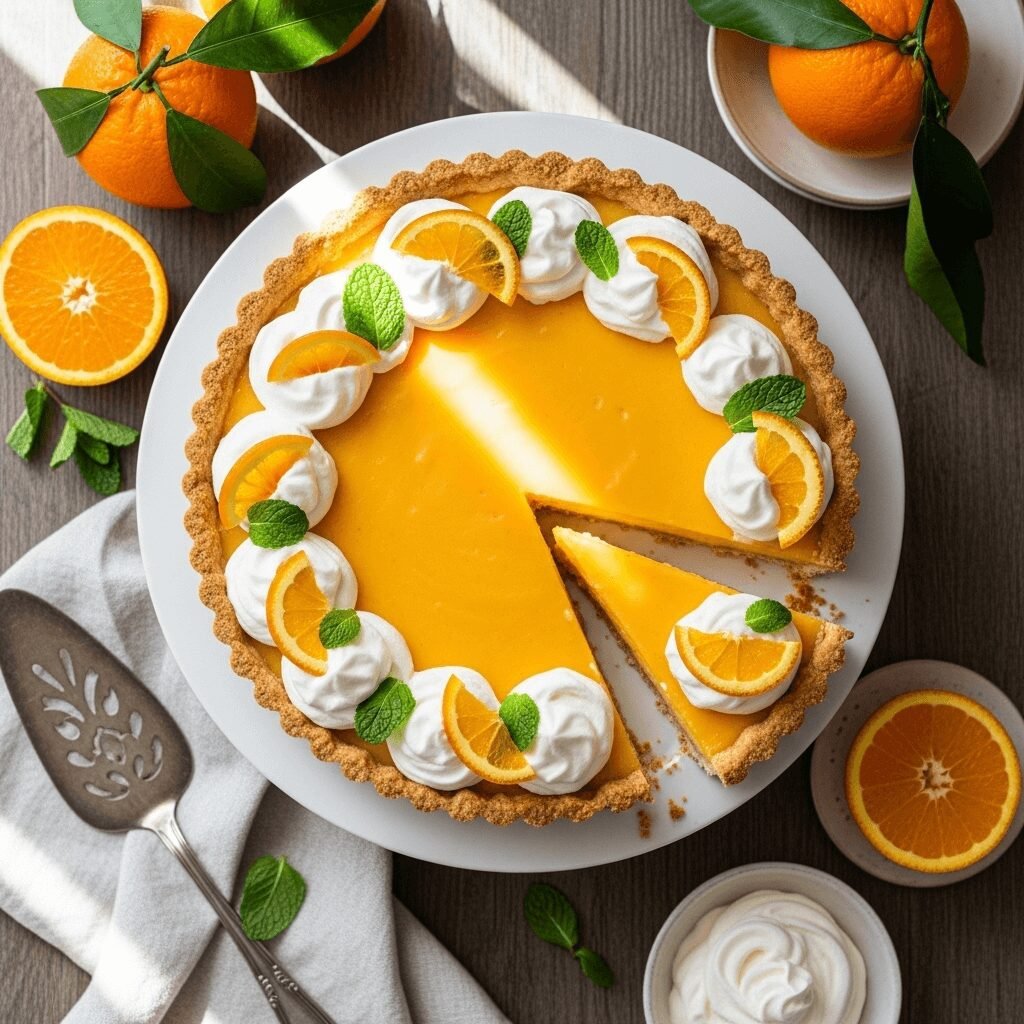
This gorgeous Orange Tart features a buttery, crisp pastry crust filled with silky-smooth, tangy-sweet orange curd. It’s a showstopping dessert that’s surprisingly easy to make and perfect for any celebration or special occasion.
- Prep Time: 30 minutes (plus 1 hour chilling)
- Cook Time: 35 minutes
- Total Time: 2 hours 5 minutes
- Yield: 8-10 servings 1x
- Category: Dessert
- Method: Baking
- Cuisine: American
- Diet: Vegetarian
Ingredients
For the Tart Crust:
- 1½ cups (190g) all-purpose flour
- ½ cup (115g) unsalted butter, cold and cubed
- ¼ cup (30g) powdered sugar
- 1 large egg yolk
- 1 teaspoon vanilla extract
- ¼ teaspoon salt
- 1-2 tablespoons ice water (if needed)
For the Orange Filling:
- 1 cup (240ml) fresh orange juice (from 4-5 medium oranges)
- 2 tablespoons orange zest (from 2-3 oranges)
- ¾ cup (150g) granulated sugar
- 3 large eggs
- 2 large egg yolks
- 3 tablespoons cornstarch
- ¼ cup (60g) unsalted butter, cut into pieces
- Pinch of salt
For Topping (Optional):
- 1 cup heavy cream, whipped
- Candied orange slices
- Fresh orange segments
- Powdered sugar for dusting
Instructions
Make the Tart Crust:
- Prepare the dough: In a food processor, combine flour, powdered sugar, and salt. Pulse to mix. Add cold butter cubes and pulse 10-12 times until mixture resembles coarse crumbs with some pea-sized butter pieces remaining. Add egg yolk and vanilla, then pulse until dough just begins to come together. If dough seems too dry, add ice water one tablespoon at a time.
- Chill the dough: Turn dough out onto a clean surface and gently press into a disk. Wrap tightly in plastic wrap and refrigerate for at least 1 hour or up to 2 days.
- Roll out the dough: On a lightly floured surface, roll chilled dough into an 11-inch circle, about ⅛-inch thick. Carefully transfer to a 9-inch tart pan with removable bottom, pressing dough into the bottom and up the sides. Trim excess dough by rolling your rolling pin across the top of the pan. Prick the bottom all over with a fork.
- Chill again: Place the tart shell in the freezer for 15 minutes. Meanwhile, preheat oven to 375°F (190°C).
- Blind-bake the crust: Line the chilled tart shell with parchment paper and fill with pie weights or dried beans. Bake for 15 minutes, then carefully remove parchment and weights. Bake for an additional 10-12 minutes until the crust is golden brown. Remove from oven and let cool completely.
Make the Orange Filling:
- Prepare the oranges: Zest 2-3 oranges to get 2 tablespoons of zest (zest before juicing!). Juice enough oranges to get 1 cup of fresh juice. Strain out any pulp or seeds.
- Cook the filling: In a medium saucepan, whisk together sugar, eggs, egg yolks, and cornstarch until smooth. Add orange juice, orange zest, and a pinch of salt. Whisk to combine thoroughly.
- Heat and thicken: Place the saucepan over medium heat. Cook, whisking constantly, for 5-7 minutes until the mixture thickens considerably and begins to bubble. It should coat the back of a spoon and leave a clear path when you run your finger through it.
- Finish the curd: Remove from heat and immediately whisk in the butter pieces until completely melted and incorporated. The filling should be smooth and glossy.
- Strain for smoothness: Pour the orange curd through a fine-mesh strainer into a clean bowl to remove any cooked egg bits or zest pieces. This ensures an ultra-smooth filling.
Assemble the Tart:
- Fill the tart: Pour the warm orange filling into the cooled tart shell. Use a spatula to spread it evenly to the edges.
- Chill and set: Refrigerate the tart for at least 3-4 hours, or until the filling is completely set and firm to the touch. For best results, chill overnight.
- Serve: Before serving, carefully remove the outer ring of the tart pan. Top with whipped cream, candied orange slices, fresh orange segments, or a dusting of powdered sugar if desired. Slice with a sharp knife, wiping clean between cuts for the cleanest slices.
Notes
- Orange selection: Use fresh, juicy oranges for best flavor. Navel, Valencia, or blood oranges all work beautifully.
- Crust tips: Don’t overwork the dough or it will become tough. Handle as little as possible.
- Preventing cracks: Let the baked crust cool completely before adding the filling to prevent cracking.
- Smooth filling: Constant whisking while cooking prevents lumps and ensures a silky texture.
- Storage: Store covered in the refrigerator for up to 4 days. The crust may soften slightly over time.
- Make-ahead: Both the crust and filling can be made a day ahead and assembled the next day.
Nutrition
- Serving Size: 1 slice (based on 10 servings)
- Calories: 285
- Sugar: 22g
- Sodium: 95mg
- Fat: 15g
- Saturated Fat: 9g
- Unsaturated Fat: 5g
- Trans Fat: 0g
- Carbohydrates: 34g
- Fiber: 1g
- Protein: 5g
- Cholesterol: 145mg
Tips & Variations
Flavor Variations:
Transform this basic orange tart into something completely different with these creative twists. Try using blood oranges for a deeper, more complex flavor and stunning ruby-red color that’s absolutely gorgeous. Create a mixed citrus tart by using half orange juice and half grapefruit or tangerine juice for an interesting flavor profile. Add a tablespoon of Grand Marnier or Cointreau to the filling for a sophisticated, adult version perfect for dinner parties.
Dietary Modifications:
Make this recipe work for various dietary needs without sacrificing flavor. For a gluten-free version, substitute the all-purpose flour in the crust with a 1:1 gluten-free baking blend – the result is nearly identical to the original. Reduce sugar by up to ¼ cup if you prefer a more tart flavor; the natural sweetness of the oranges will still shine through. For a dairy-free option, use coconut oil in place of butter in the crust and coconut cream in the filling, though the flavor will be noticeably different.
Texture Modifications:
Customize the texture to your preferences. For an extra-crispy crust, brush the blind-baked shell with a beaten egg white and return to the oven for 2 minutes before adding the filling – this creates a waterproof barrier. Add toasted almond flour (¼ cup) to the crust for a nutty flavor and more delicate texture. Top with Italian meringue instead of whipped cream for a dramatic presentation similar to lemon meringue pie.
Serving Style Variations:
Present your tart in different ways for various occasions. Make individual mini tarts using a muffin tin and 4-inch tart pans for elegant single servings at dinner parties. Create a rustic galette-style version by folding the edges of a free-form crust over the filling – less refined but equally delicious. Layer with fresh berries like blueberries or raspberries for added color and a complementary flavor that pairs beautifully with citrus.
Pro Chef Tips
Achieving the Perfect Crust: The secret to a flaky, tender crust lies in keeping everything cold. Professional bakers know that cold butter creates steam pockets during baking, resulting in that coveted flaky texture. If your kitchen is warm, work quickly and consider chilling your flour and food processor bowl in advance. When pressing dough into the tart pan, use your knuckles rather than your fingertips to prevent the butter from melting from your body heat. Another pro trick is to freeze the assembled, unbaked tart shell for 15 minutes before blind-baking – this prevents shrinkage and helps the crust hold its shape perfectly.
Mastering Orange Curd Consistency: Professional pastry chefs cook orange curd to exactly 170°F for the ideal texture – thick enough to hold its shape when sliced but still creamy and luscious. If you don’t have a thermometer, look for the mixture to coat the back of a wooden spoon and hold a clear line when you run your finger through it. The curd will continue to thicken as it cools, so don’t overcook it or you’ll end up with a rubbery texture. Always strain the finished curd through a fine-mesh sieve for that restaurant-quality smoothness that eliminates any bits of cooked egg or zest.
Maximizing Orange Flavor: Here’s a chef’s secret: bloom the orange zest in the sugar before making the filling. Rub the zest into the sugar with your fingertips for 30 seconds – this releases the essential oils and distributes the flavor more evenly throughout the curd. For even more intense orange flavor, reduce ¼ cup of the orange juice in a small saucepan until it becomes syrupy (about 2 tablespoons), then add it back to the remaining juice. This concentrates the flavor without adding more liquid.
Perfect Slicing Technique: Professional bakers always serve tarts at cool room temperature, not ice-cold from the refrigerator. Remove your tart 30 minutes before serving for the best flavor and texture. When slicing, use a thin, sharp knife dipped in hot water and wiped clean between each cut. This prevents the filling from dragging and creates those picture-perfect slices you see in bakery displays.
Professional Presentation: Garnish like a pro by creating candied orange wheels: slice oranges thinly, simmer in simple syrup for 15 minutes, then let cool on parchment paper. These translucent, jewel-like garnishes add both beauty and a sweet-tart crunch that complements the smooth filling perfectly. For an extra touch of elegance, pipe small rosettes of whipped cream around the perimeter of the tart and top each with a candied orange segment.
Common Mistakes to Avoid
Overworking the Tart Dough: One of the biggest mistakes home bakers make is handling the dough too much, which develops gluten and results in a tough, chewy crust instead of a tender, cookie-like texture. Mix just until the dough comes together, and use a light touch when pressing it into the pan. If you notice the dough becoming warm or sticky while working with it, immediately return it to the refrigerator for 10 minutes to firm up again.
Skipping the Blind-Baking Step: Never pour filling into an unbaked tart shell! Without blind-baking, your crust will become soggy and undercooked. The weights or beans hold the dough in place and prevent puffing, while the initial baking creates a barrier that keeps the crust crisp even after adding the wet filling. Skipping this step is the number one reason for soggy-bottom disasters.
Not Whisking Constantly When Cooking the Filling: Orange curd can go from perfect to scrambled eggs in seconds if you’re not careful. The eggs need constant whisking while cooking to prevent them from curdling or forming lumps. Use a steady, consistent whisking motion and never step away from the stove. If you do notice small lumps forming, remove from heat immediately and whisk vigorously – the residual heat will usually smooth things out. Straining catches any remaining lumps.
Adding Filling to a Warm Crust: This mistake causes the crust to crack and the filling to leak underneath. Always let your baked crust cool completely to room temperature before adding the filling. The temperature difference between hot crust and warm filling creates stress cracks. Patience here ensures a beautiful, intact tart that slices cleanly.
Cutting Into the Tart Too Soon: We know it’s tempting to dive right in, but cutting into the tart before it’s properly set results in a runny filling that won’t hold its shape. The tart needs at least 3-4 hours in the refrigerator for the filling to firm up properly. Overnight chilling is even better and actually improves the flavor as the ingredients have time to meld together. A properly chilled tart will slice beautifully with clean edges that showcase all your hard work.
Storage & Meal Prep
Refrigerator Storage:
Your finished orange tart stores beautifully in the refrigerator, making it a perfect make-ahead dessert for entertaining. Cover the tart loosely with plastic wrap or aluminum foil, being careful not to let it touch the surface of the filling. Alternatively, place toothpicks around the perimeter to hold the covering away from the tart. Store in the refrigerator for up to 4 days. The filling will maintain its texture and flavor beautifully, though the crust may soften slightly over time – this is normal and doesn’t affect the taste.
Shelf Life and Quality:
The tart tastes best within the first 2-3 days when the crust is at its crispest. By day four, the crust will have absorbed some moisture from the filling and become softer, more cookie-like in texture. While still delicious, it won’t have that same textural contrast. If you notice any condensation forming under the plastic wrap, gently dab it away with a paper towel to prevent the top from becoming too moist.
Reheating (If Desired):
While this tart is meant to be served chilled, some people enjoy it at cool room temperature for the fullest flavor experience. Remove from the refrigerator about 30 minutes before serving. Never microwave or reheat this tart in the oven – it’s a chilled dessert and heating will cause the filling to become runny and lose its structure. The butter in the crust and filling will also melt, ruining the carefully achieved texture.
Individual Slice Storage:
If you’ve cut the entire tart and have individual slices remaining, wrap each slice separately in plastic wrap for easy grab-and-go portions. This also prevents the cut edges from drying out. Individual slices can be stacked carefully in an airtight container with parchment paper between layers. This method is perfect for portion control and making sure your tart stays fresh longer.
Make-Ahead & Freezer Notes
Advance Preparation Strategy:
This tart is an excellent make-ahead dessert that actually benefits from overnight chilling. For maximum convenience, divide the work across two days. On day one, make and blind-bake the tart shell (it can sit at room temperature, covered, for up to 24 hours). Also prepare the orange filling and store it separately in the refrigerator in an airtight container with plastic wrap pressed directly against the surface to prevent a skin from forming. On day two, simply pour the filling into the crust and chill for 3-4 hours before serving.
Freezing the Tart Shell:
The unbaked tart shell freezes exceptionally well for up to 3 months. After fitting the dough into the tart pan, wrap it tightly in plastic wrap, then aluminum foil. Freeze flat. When ready to use, do not thaw – bake directly from frozen, adding a few extra minutes to the blind-baking time. You can also freeze the baked, cooled crust for up to 2 months. Thaw overnight in the refrigerator before filling. This is a game-changer for holiday entertaining when you can prep components weeks in advance.
Freezing the Complete Tart:
While possible, freezing the complete assembled tart is less ideal as it affects texture. The filling can become slightly grainy and the crust may become soggy upon thawing. However, if necessary, freeze the completed tart (without any whipped cream topping) tightly wrapped for up to 1 month. Thaw slowly in the refrigerator overnight. The flavor remains excellent even if the texture is slightly compromised. Add fresh whipped cream and garnishes after thawing.
Freezing the Orange Curd Separately:
Orange curd freezes beautifully on its own for up to 3 months. Pour the cooled curd into an airtight container, press plastic wrap directly onto the surface, seal with a lid, and freeze. Thaw overnight in the refrigerator, then whisk briefly to restore the smooth consistency before pouring into your prepared crust. This allows you to make large batches of filling when oranges are in season and at their peak.
Best Reheating/Thawing Method:
Always thaw frozen components slowly in the refrigerator, never at room temperature or in the microwave. This gradual thawing preserves texture and prevents condensation from forming. Allow at least 8 hours for complete thawing. Once thawed, consume within 2-3 days for best quality. Never refreeze previously frozen components.
Serving Suggestions
Classic Accompaniments:
This orange tart shines brightest with simple, complementary accompaniments that don’t compete with its bright citrus flavor. A dollop of lightly sweetened whipped cream is classic for a reason – its mild, creamy richness provides the perfect contrast to the tangy filling. Vanilla bean ice cream or crème fraîche also work beautifully, melting slightly against the cool tart and creating a luxurious experience. For a French-inspired presentation, serve with a small glass of Champagne or Prosecco – the bubbles and acidity complement the citrus beautifully.
Coffee and Tea Pairings:
Serve this tart alongside hot beverages for a complete dessert experience. Earl Grey tea with its bergamot notes pairs wonderfully with orange, creating a cohesive citrus theme. Chamomile or mint tea offers a lighter, refreshing option that won’t overwhelm the delicate flavors. For coffee lovers, a medium-roast coffee or a cappuccino provides a pleasant contrast without overpowering the bright orange flavor. Avoid dark, bitter roasts which can clash with the tart’s sweetness.
Brunch and Breakfast Settings:
This tart is a spectacular addition to brunch spreads. Serve alongside fresh fruit platters with berries, melon, and grapes for a colorful, refreshing dessert course. It pairs beautifully with quiche, smoked salmon bagels, and mimosas for a complete brunch experience. The citrus notes make it feel appropriate for morning meals in a way that chocolate or heavy desserts wouldn’t. Cut smaller slices for brunch service since it’s rich and your guests will likely be eating other dishes.
Dinner Party Presentation:
After a hearty dinner, this tart provides a refreshing, palate-cleansing finish. It’s particularly wonderful after rich meals with roasted meats, pasta dishes, or anything with heavy sauces. Serve with a selection of fresh berries (raspberries and blueberries are especially pretty) and perhaps a small tuile cookie or biscotti for textural contrast. For an impressive presentation, top each slice with a candied orange wheel and a sprig of fresh mint.
Holiday and Special Occasion Ideas:
This tart adapts beautifully to various celebrations. For Easter, garnish with sugared flowers and pastel-colored macarons. For spring showers and celebrations, top with edible flowers like pansies or violets. During summer gatherings, serve alongside mixed berry compote or fresh stone fruits. The bright color and sophisticated flavor make it appropriate for everything from Mother’s Day brunches to wedding showers to anniversary dinners.
FAQs Section
Can I use bottled orange juice instead of fresh?
While you technically can use bottled juice in a pinch, fresh-squeezed orange juice makes a tremendous difference in the final flavor of this tart. Fresh juice has a brightness and complexity that bottled juice simply cannot match. Bottled juice often tastes flat and slightly metallic by comparison, and it lacks the aromatic oils from the zest that really make this tart special. If you must use bottled juice, choose a premium “not from concentrate” variety and definitely still use fresh orange zest – that’s where much of the flavor comes from.
Why is my orange filling runny even after chilling?
There are several possible reasons for runny filling. First, you may not have cooked the curd long enough – it needs to reach 170°F and should visibly thicken on the stove before removing from heat. Second, check your cornstarch measurement; too little will result in a looser filling. Third, the filling needs adequate chilling time (at least 3-4 hours, preferably overnight) to fully set. If your filling was properly cooked and just needs more time, return it to the refrigerator for several more hours. If it was undercooked, you’ll need to gently reheat it in a saucepan, whisking constantly, until it thickens properly.
Can I make this tart with other citrus fruits?
Absolutely! This recipe works beautifully as a template for various citrus tarts. Meyer lemons create a sweeter, more floral version that’s absolutely divine. Blood oranges produce a stunning deep red color with a slightly berry-like flavor. Grapefruit makes a sophisticated, more tart version (you may want to increase the sugar slightly). You can even create a mixed citrus tart using equal parts orange, lemon, and lime juice for a complex, layered flavor. The technique remains exactly the same regardless of which citrus you choose.
How do I prevent my tart crust from shrinking during baking?
Crust shrinkage is a common frustration, but it’s preventable! First, avoid overworking the dough, which develops gluten and causes shrinkage. Second, make sure to chill the dough adequately before rolling – at least one hour. Third, after pressing the dough into the pan, chill it again for 15-30 minutes before blind-baking. Fourth, don’t stretch the dough when fitting it into the pan; let it naturally fall into place and gently press it into the corners. Finally, freezing the shaped crust for 15 minutes before blind-baking significantly reduces shrinkage.
Can I use a regular pie pan instead of a tart pan?
Yes, you can adapt this recipe to a 9-inch pie pan, though the presentation won’t be quite as elegant. A tart pan with a removable bottom allows you to remove the outer ring for a beautiful, professional presentation with the fluted edges exposed. In a pie pan, you’ll need to slice and serve directly from the pan. The recipe quantities remain the same, though your slices will be slightly thicker. If using a pie pan, you can create a decorative crimped edge for a pretty presentation.
What’s the best way to get maximum juice from my oranges?
To extract the most juice possible, first bring your oranges to room temperature – cold oranges yield less juice. Roll each orange firmly on the counter with your palm, applying pressure to break down the interior membranes. Cut the orange in half crosswise (through the equator, not pole to pole) for easier juicing. Use a citrus reamer or juicer and really work each half, rotating and squeezing to get every last drop. You should get about 3-4 tablespoons of juice from each medium orange. If your oranges seem dry, microwave them for 10-15 seconds to warm them up and increase juice yield.
How can I tell when my tart is properly set and ready to serve?
A properly set tart should feel firm to a gentle touch in the center – it shouldn’t jiggle or feel liquid underneath the surface. The filling should look glossy and smooth, not wet or runny. When you gently press the center with your fingertip, it should feel set like a soft custard, not liquid. If you’re still unsure, insert a toothpick into the center; it should come out mostly clean with just a bit of filling on it. Remember that the filling continues to firm up even after it feels set, so overnight chilling produces the best slicing results. If you cut into it too soon and it’s slightly soft, just serve with a spoon rather than trying to get perfect slices!
Conclusion
This beautiful Orange Tart is more than just a dessert – it’s a celebration of bright citrus flavors, buttery pastry, and the joy of homemade baking. Every slice reveals the care you put into creating something truly special, from the crisp, golden crust to the silky-smooth, tangy-sweet filling that tastes like captured sunshine.
What makes this recipe so wonderful is how it transforms simple, accessible ingredients into something that looks and tastes absolutely spectacular. You don’t need professional training or expensive equipment – just good-quality ingredients, a little patience, and the willingness to try something new. The result is a dessert that will have your family and friends convinced you’ve been hiding secret pastry chef skills.
Whether you’re making this tart for a special celebration, a weekend treat, or simply because you’re craving something bright and beautiful, we hope this recipe brings as much joy to your kitchen as it has to ours. There’s something deeply satisfying about creating a dessert this lovely with your own two hands.
Now it’s your turn to bake! We’d love to hear how your Orange Tart turns out. Did you try any of the variations? What did your family think? Leave a comment below sharing your experience, and don’t forget to rate the recipe!
📌 Save this recipe to your Pinterest boards so you can find it easily when you’re ready to bake. Pin it to your dessert boards, citrus recipe collections, or any board where you save your favorite tried-and-true recipes. And if you make it, tag us on social media – we absolutely love seeing your beautiful creations!
Happy baking, and may your kitchen always smell like fresh citrus and butter! 🍊✨