Hot Chocolate Bombs Recipe: The Ultimate Guide to Making This Viral Winter Treat
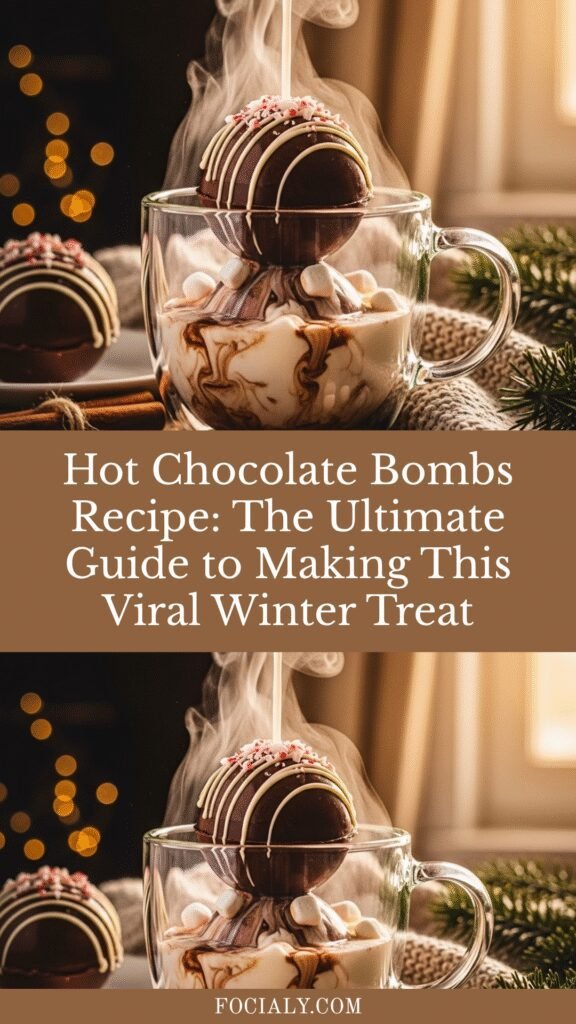
Hot chocolate bombs have taken the internet by storm, and for good reason! These magical chocolate spheres are filled with cocoa mix and marshmallows that explode into a delicious, creamy hot chocolate when you pour warm milk over them. They’re not just a beverage—they’re an experience that delights kids and adults alike.
Perfect for cozy winter evenings, holiday gift-giving, Christmas morning traditions, or even a fun weekend baking project with the family, hot chocolate bombs bring a touch of whimsy to your everyday hot cocoa routine. Whether you’re hosting a winter gathering, planning a movie night, or looking for handmade gift ideas, these chocolate spheres are guaranteed to impress. They’re Instagram-worthy, Pinterest-perfect, and absolutely delicious!
The best part? Making hot chocolate bombs at home is easier than you might think. With just a few simple ingredients and some basic kitchen tools, you can create these stunning treats that look like they came from a fancy chocolate shop. Get ready to become everyone’s favorite gift-giver this holiday season!
History / Background
Hot chocolate bombs emerged as a viral sensation around 2019-2020, initially gaining traction on social media platforms like TikTok and Instagram. While the concept of dissolving chocolate in hot milk dates back centuries to ancient Mesoamerican cultures who first enjoyed cacao drinks, the modern hot chocolate bomb as we know it is a delightful innovation of the 21st century.
The trend exploded during the COVID-19 pandemic when people were spending more time at home and looking for creative, fun activities to do with their families. Bakers and chocolatiers began experimenting with hollow chocolate spheres, filling them with cocoa powder, marshmallows, and other sweet surprises. Videos showing these chocolate orbs “exploding” in hot milk went viral, amassing millions of views and inspiring home cooks everywhere to try making their own.
The concept draws inspiration from traditional European chocolate-making techniques, particularly the art of creating hollow chocolate shells used in fine confections and Easter eggs. However, the American twist of filling them with hot cocoa mix and marshmallows, plus the dramatic presentation of watching them melt and release their contents, made hot chocolate bombs uniquely suited for social media sharing.
Today, hot chocolate bombs have evolved beyond the basic chocolate sphere. Creative bakers now make them in countless flavors—peppermint, caramel, peanut butter, cookies and cream, and even themed versions for holidays and special occasions. They’ve become a staple at winter farmers markets, craft fairs, and boutique gift shops, but making them at home remains the most budget-friendly and customizable option.
Why You’ll Love This Recipe
This homemade hot chocolate bombs recipe gives you all the magic of store-bought versions at a fraction of the cost, with the added bonus of customization and the satisfaction of creating something truly special with your own hands. Once you master the basic technique, you’ll find yourself making these for every occasion!
Here’s why this recipe is absolutely perfect:
- Budget-Friendly: Store-bought hot chocolate bombs can cost $5-10 each, but you can make a dozen at home for the same price
- Customizable: Choose your favorite chocolate type, add flavored cocoa mixes, or include special add-ins like candy canes or caramel
- Gift-Worthy: These make stunning homemade gifts that feel luxurious and thoughtful
- Kid-Friendly Activity: Children love helping with the decorating process (supervision required for melting chocolate)
- No Special Skills Required: If you can melt chocolate and use a silicone mold, you can make these
- Make-Ahead Friendly: Prepare batches in advance and store them for weeks
- Impressive Presentation: They look professionally made and create a “wow” moment every time
- Perfect for Parties: Make hot chocolate bar stations at gatherings where guests can watch the magic happen
- Endless Variations: Once you know the basics, you can create unlimited flavor combinations
Ingredient Notes
Semi-Sweet or Milk Chocolate Chips (or Melting Wafers): The star of the show! Chocolate melting wafers (also called candy melts) are easier for beginners because they’re formulated to melt smoothly and set quickly without tempering. However, good-quality chocolate chips work beautifully too—just be sure to melt them gently. Semi-sweet chocolate creates a more sophisticated, less-sweet bomb, while milk chocolate is sweeter and more kid-friendly. Dark chocolate works for adults who prefer less sugar. Substitution: White chocolate creates a beautiful “snowball” effect and pairs wonderfully with peppermint or cookies and cream flavors.
Hot Cocoa Mix: Use your favorite brand! Traditional hot cocoa mix works perfectly, but you can also use gourmet drinking chocolate powder for a richer flavor. The mix should be fairly fine—if it’s too chunky, it may not dissolve as smoothly. Substitution: Try flavored cocoa mixes like peppermint mocha, salted caramel, or Mexican hot chocolate for variety.
Mini Marshmallows: These add that classic hot chocolate experience and look adorable when they float to the top. Mini marshmallows work best because they fit easily inside the spheres. Substitution: Marshmallow bits, dehydrated marshmallows, or even a few large marshmallows chopped up. For a gourmet touch, use flavored marshmallows like vanilla bean or peppermint.
Optional Add-Ins & Decorations: This is where you can get creative! Crushed peppermint candies, mini chocolate chips, caramel bits, crushed cookies, edible glitter, sprinkles, or even a pinch of cinnamon or cayenne pepper can be added inside. For decorating the outside, use melted white chocolate for drizzling, edible gold dust, or themed sprinkles.
Equipment Needed
- Silicone sphere molds (2-3 inch diameter works best; you’ll need molds that create half-spheres)
- Microwave-safe bowls (for melting chocolate)
- Spoon or small silicone spatula (for spreading chocolate in molds)
- Plate or small flat pan (for sealing the spheres)
- Parchment or wax paper (to prevent sticking during assembly)
- Small measuring spoons (for portioning cocoa mix and marshmallows)
- Microwave or double boiler (for melting chocolate)
- Piping bag or squeeze bottle (optional, for decorative drizzles)
- Gloves (optional, but helpful to avoid fingerprints on finished bombs)
Hot Chocolate Bombs Recipe

Learn how to make magical hot chocolate bombs at home! These hollow chocolate spheres are filled with cocoa mix and marshmallows, creating the ultimate cozy winter drink when melted in hot milk. Perfect for gifts, parties, or treating yourself to something special.
- Prep Time: 30 minutes
- Cook Time: 0 minutes (no cooking required)
- Total Time: 1 hour
- Yield: 6 hot chocolate bombs (12 half-spheres) 1x
- Category: Beverage / Dessert / Gift
- Method: No-Bake, Chocolate Molding
- Cuisine: American
- Diet: Vegetarian
Ingredients
For the Chocolate Shells:
- 12 oz (340g) semi-sweet, milk, or dark chocolate chips or melting wafers
- 1-2 oz (28-56g) additional chocolate for sealing the spheres
For the Filling (per bomb):
- 1-2 tablespoons hot cocoa mix (adjust to taste)
- 2-3 tablespoons mini marshmallows
- Optional: 1/2 teaspoon crushed peppermint, mini chocolate chips, or other add-ins
For Decoration (optional):
- 2 oz white chocolate or colored candy melts for drizzling
- Sprinkles, edible glitter, or crushed candy canes
- Edible gold or silver dust
To Serve:
- 8-10 oz hot milk per bomb
- Whipped cream and additional toppings (optional)
Instructions
Step 1: Prepare Your Workspace
Set up your silicone sphere molds on a flat, stable surface. Have all your ingredients and tools within reach. Line a tray with parchment paper for setting the completed bombs.
Step 2: Melt the Chocolate
Place chocolate chips or wafers in a microwave-safe bowl. Microwave in 30-second intervals, stirring between each interval, until chocolate is smooth and completely melted (usually 1.5-2 minutes total). Be careful not to overheat. Alternatively, melt chocolate using a double boiler for more controlled melting. The chocolate should be warm and fluid but not hot.
Step 3: Coat the Molds (First Layer)
Using a spoon or small silicone spatula, add about 1 tablespoon of melted chocolate to each sphere cavity. Use the back of the spoon to spread the chocolate up the sides of each mold, creating an even coating. The layer should be about 1/8 inch thick—not too thin or it will crack, not too thick or the sphere will be too heavy. Make sure to coat all the way to the edges.
Step 4: Chill the First Layer
Place the molds in the refrigerator for 5-10 minutes until the chocolate is set and no longer shiny. This creates a sturdy base layer.
Step 5: Apply Second Layer (Optional but Recommended)
For sturdier bombs, apply a second thin layer of melted chocolate over the first layer, focusing on any thin spots. Use the back of the spoon to smooth it out. Return to the refrigerator for another 10-15 minutes until completely firm.
Step 6: Remove from Molds
Gently press on the bottom of each mold cavity to release the chocolate half-spheres. They should pop out easily if properly chilled. If they stick, chill for a few more minutes. Handle carefully as they can be fragile. You should now have 12 perfect half-spheres.
Step 7: Fill the Half-Spheres
Take 6 of your half-spheres and place them on your parchment-lined tray, hollow side up. Fill each with 1-2 tablespoons of hot cocoa mix (don’t overfill or it will be difficult to seal). Add 2-3 tablespoons of mini marshmallows on top. Add any optional mix-ins like crushed peppermint or mini chocolate chips.
Step 8: Prepare to Seal
Warm a plate in the microwave for about 30 seconds, or place a flat-bottomed pan on the stove over low heat for a few seconds. You want it warm but not hot to the touch.
Step 9: Seal the Spheres
Take one of your empty half-spheres (the ones without filling) and gently press the rim against the warm plate for 2-3 seconds to slightly melt the edge. Quickly but carefully place it on top of a filled half-sphere, pressing gently to seal them together. The melted chocolate will act as “glue.” Hold for a few seconds until set. Repeat with remaining spheres. Work quickly as the melted edge will begin to cool and harden.
Step 10: Smooth the Seams
If there are any gaps or rough seams, dip your finger in melted chocolate and gently smooth it around the seam line. This creates a seamless appearance.
Step 11: Decorate (Optional)
Once all spheres are sealed and seams are smooth, you can decorate! Drizzle melted white chocolate over the top using a piping bag or spoon. Add sprinkles, crushed candy canes, or edible glitter while the chocolate is still wet. Get creative with colors and designs!
Step 12: Final Chill
Refrigerate the completed bombs for 15-20 minutes until all decorations are set and the bombs are completely firm.
Step 13: Store or Gift
Wrap each bomb individually in cellophane bags tied with ribbon, or store in an airtight container with parchment paper between layers to prevent sticking.
To Use:
Place one hot chocolate bomb in a large mug. Heat 8-10 oz of milk (dairy or non-dairy) until steaming but not boiling. Pour the hot milk over the bomb and watch it melt and release its contents. Stir well and enjoy! Top with whipped cream, extra marshmallows, or a candy cane stirrer.
Notes
- Chocolate Quality Matters: Higher quality chocolate creates smoother, more stable shells. Avoid chocolate with added oils if possible.
- Temperature Control: The chocolate should be melted but not hot when working with the molds. Too hot and it will be too thin; too cool and it won’t spread smoothly.
- Thickness is Key: Shells that are too thin will crack; too thick and they won’t melt properly in hot milk. Aim for 1/8 inch thickness.
- Don’t Overfill: Leave a little room at the top of each filled half-sphere so you can seal them properly without the filling spilling out.
- Smooth Sealing: The warm plate method is crucial for creating seamless spheres. If your first attempt doesn’t seal well, you can re-melt and try again.
- Handling: Once completed, handle bombs with clean, dry hands to avoid fingerprints. Wearing food-safe gloves helps.
- Serving Temperature: Use hot milk, not boiling. Boiling milk can splash and doesn’t give the bomb time to melt properly for that magical effect.
Nutrition
- Serving Size: 1 hot chocolate bomb + 8 oz whole milk
- Calories: 385
- Sugar: 42g
- Sodium: 180mg
- Fat: 18g
- Saturated Fat: 11g
- Unsaturated Fat: 5g
- Trans Fat: 0g
- Carbohydrates: 49g
- Fiber: 3g
- Protein: 9g
- Cholesterol: 25mg
Note: Nutrition information is approximate and will vary based on specific ingredients used, chocolate type, and milk choice. Values shown are for semi-sweet chocolate bombs prepared with whole milk.
Tips & Variations
Flavor Variations to Try:
Peppermint Mocha: Use dark chocolate shells, add crushed peppermint candy inside, and drizzle with white chocolate. Include a tablespoon of mini chocolate chips with the cocoa mix.
Salted Caramel: Use milk chocolate shells, add caramel bits and a tiny pinch of sea salt inside with the cocoa mix. Drizzle with caramel-flavored melts.
Cookies and Cream: Use white chocolate shells (or milk chocolate), crush Oreo cookies and add to the cocoa mix, top with crushed cookie pieces.
Mexican Hot Chocolate: Add a pinch of cinnamon and a tiny pinch of cayenne pepper to the cocoa mix. Use dark chocolate shells.
S’mores Style: Use milk chocolate shells, add mini chocolate chips and crushed graham crackers inside with extra marshmallows.
Nutty Delight: Add a teaspoon of peanut butter powder or Nutella powder to the cocoa mix, use milk chocolate shells, top with chopped peanuts.
Vegan/Dairy-Free: Use dairy-free chocolate chips and ensure your cocoa mix and marshmallows are vegan-friendly. Serve with oat milk, almond milk, or coconut milk.
Sugar-Free Option: Use sugar-free chocolate and sugar-free hot cocoa mix for a lower-sugar version.
Adult Version: Add a small piece of chocolate liquor candy or mention that users can add their favorite liqueur when serving (not inside the bomb itself as it can affect chocolate stability).
Themed Decorations: Make holiday-themed bombs with red and green drizzles for Christmas, pink and white for Valentine’s Day, or orange and black for Halloween.
Pro Chef Tips
Temperature Control is Everything: Professional chocolatiers know that chocolate has specific temperature requirements. While home cooks don’t need to temper chocolate when using melting wafers, keeping your chocolate at around 88-90°F (31-32°C) ensures the best consistency for coating molds. Too hot and it will be too thin and develop chocolate bloom (white streaks) when set; too cool and it won’t spread smoothly.
Polish Your Spheres: For an ultra-professional finish, wear food-safe gloves when handling your finished bombs. Use a soft, dry cloth to gently buff any fingerprints or imperfections on the chocolate surface. The warmth from your hand through the glove will create a beautiful shine.
The Dry Mold Rule: Any moisture in your molds will cause the chocolate to seize and become grainy. Make absolutely certain your silicone molds are completely dry before adding chocolate. Even a tiny drop of water can ruin a batch.
Layer for Strength: Professional chocolatiers often use three thin layers rather than one thick layer. This creates stronger shells that are less likely to crack. The total thickness remains the same, but the layering technique bonds better.
Test Your Seal: Before filling all your spheres, seal one empty one first to test your technique and the temperature of your warming plate. This “practice run” helps you perfect your method before working with filled spheres.
Control the Drip: When decorating with drizzled chocolate, use a disposable piping bag with just a tiny corner cut off, or a squeeze bottle with a small opening. Hold it high above the bomb (about 8-10 inches) and move quickly in zigzag motions for those perfect Instagram-worthy drizzles.
The Chill Factor: Patience with chilling makes all the difference. Rushing the chilling process results in chocolate that’s still soft in the center, leading to collapsed shells or difficulty removing from molds. When in doubt, chill longer rather than shorter.
Common Mistakes to Avoid
Mistake #1: Chocolate Too Hot: Adding chocolate that’s too hot to the molds causes it to be too thin and can melt through, creating weak spots or holes. Fix: Let melted chocolate cool for 2-3 minutes before coating molds. It should be fluid but not steaming.
Mistake #2: Uneven Coating: Rushing when spreading chocolate in molds creates thin spots that will crack. Fix: Take your time with the first layer, making sure the chocolate is evenly distributed, especially around the edges. Use the back of a spoon in gentle circular motions.
Mistake #3: Touching Chocolate with Wet Hands: Any moisture causes chocolate to seize (become grainy and lumpy). Fix: Always ensure your hands, tools, and work surface are completely dry. Even humidity can be an issue—avoid making chocolate bombs on very humid days if possible.
Mistake #4: Overfilling the Spheres: Adding too much cocoa mix and marshmallows makes it impossible to seal properly. Fix: Leave at least 1/4 inch of space at the rim of each filled half-sphere. Remember, the marshmallows are fluffy and need room to compress slightly when you seal.
Mistake #5: Forcing Them Out of Molds Too Soon: Trying to remove chocolate half-spheres before they’re completely set leads to fingerprints, cracks, or collapse. Fix: Be patient! They should feel completely firm and cold to the touch. If you’re unsure, chill for an extra 5 minutes.
Mistake #6: Using Boiling Milk: Pouring boiling milk over your bomb melts it too quickly and doesn’t create that magical slow-melt effect. It can also splash. Fix: Heat milk until steaming and just starting to bubble around the edges—around 160-170°F (71-77°C) is perfect.
Mistake #7: Not Smoothing the Seam: Visible seams and bumps make your bombs look homemade in a not-so-good way. Fix: Take an extra minute to smooth any excess chocolate around the seam line with your finger or a small tool dipped in melted chocolate.
Storage & Meal Prep
Room Temperature Storage: Hot chocolate bombs store beautifully at cool room temperature (below 70°F/21°C) in an airtight container for up to 2 weeks. Place parchment or wax paper between layers to prevent them from sticking together. Keep them away from direct sunlight, heat sources, and humidity.
Refrigerator Storage: In warmer climates or during summer months, store hot chocolate bombs in the refrigerator for up to 1 month. Keep them in an airtight container with parchment between layers. Before serving, let them sit at room temperature for 5-10 minutes so they melt properly in hot milk.
Avoiding Chocolate Bloom: White streaks or spots on chocolate (called bloom) occur from temperature fluctuations or moisture. While safe to eat, they look unappetizing. Store bombs in a consistent temperature environment and always in airtight containers.
Gifting and Transportation: When wrapping as gifts, place each bomb in a cellophane bag or small box. If transporting during warm weather, use a cooler with ice packs, but keep the bombs separated from direct contact with ice. Include storage instructions with your gift.
Shelf Life Signs: Properly stored hot chocolate bombs last 2-4 weeks. Discard if you notice any of these signs: white coating doesn’t disappear when gently rubbed (fat bloom vs dust), any moisture inside the packaging, cracks that expose the filling, or any off-odors.
No Freezing Recommended: While chocolate can technically be frozen, freezing hot chocolate bombs often leads to condensation issues when thawing, which can cause the chocolate to bloom and the cocoa powder inside to clump. It’s better to make fresh batches as needed.
Make-Ahead & Freezer Notes
Perfect Make-Ahead Timeline: Hot chocolate bombs are ideal make-ahead treats! Plan to make them 3-5 days before you need them for optimal freshness. This gives you time to perfect your technique, make multiple batches, and have them ready for gifting or serving without last-minute stress.
Batch Production Strategy: Set aside an afternoon to make a large batch. You can easily double or triple the recipe. Make different flavors and variations in the same session—just keep track of what’s what by decorating differently or using different colored chocolates.
Pre-Making Components: You can make the chocolate shells several days ahead (up to a week if stored properly) and fill them 1-2 days before needed. This is helpful if you’re making large quantities. Store unfilled shells in airtight containers with parchment between layers.
Holiday Prep Schedule: Planning for holiday gifting? Make your bombs 1-2 weeks in advance, then store in airtight containers in a cool, dry place. Wrap or package them 2-3 days before giving to prevent any handling damage.
About Freezing: As mentioned, freezing isn’t ideal for hot chocolate bombs because condensation when thawing can affect chocolate quality and cause the cocoa powder to clump. However, if you must freeze: Wrap each bomb individually in plastic wrap, then place in a freezer-safe container for up to 2 months. Thaw in the refrigerator overnight, then bring to room temperature before using. Note that decorative drizzles may crack or discolor slightly.
Best Reheating Method: There’s no reheating needed! These are served by adding to hot milk. However, if your bombs have been refrigerated and you want them at room temperature for better melting, simply remove from the fridge 15-20 minutes before serving.
Assembly Line Efficiency: For large batches, work in stages: Day 1 – Make all shells and chill. Day 2 – Fill and seal all bombs. Day 3 – Decorate and package. This prevents fatigue and ensures quality control at each stage.
Serving Suggestions
Classic Presentation: Place the hot chocolate bomb in a large, clear glass mug so guests can watch the magic happen. Pour 8-10 oz of steaming milk over it and let everyone enjoy watching it melt and release its contents. Stir well and serve immediately.
Build a Hot Chocolate Bar: Create a festive hot chocolate bomb station for parties! Set out various bombs with flavor labels, different milk options (whole milk, oat milk, almond milk), and a topping bar with whipped cream, extra marshmallows, candy canes, chocolate shavings, caramel sauce, and cinnamon.
Perfect Pairings:
- Baked Goods: Serve alongside sugar cookies, biscotti, gingerbread, shortbread, or chocolate chip cookies for dunking
- Breakfast: Pair with cinnamon rolls, waffles, or French toast for a special weekend breakfast
- Snacks: Set out a bowl of pretzels, popcorn, or roasted nuts for sweet-and-salty balance
- Desserts: Serve as the beverage alongside brownies, cake, or pie
Seasonal Serving Ideas:
- Christmas Morning: Make this a holiday tradition alongside cinnamon rolls or breakfast casserole
- Movie Night: Pair with popcorn and cozy blankets for the ultimate winter night in
- After Sledding/Skiing: The perfect way to warm up after winter outdoor activities
- Valentine’s Day: Make special two-pack gift sets with heart-decorated bombs
- Birthday Parties: Create custom decorated bombs as party favors that double as an activity
Adult Beverage Version: While you shouldn’t add alcohol inside the bombs (it affects chocolate stability), you can create an “adult hot chocolate” by adding a shot of peppermint schnapps, Baileys, Kahlua, or bourbon to the finished hot chocolate. Garnish with whipped cream and serve with small dessert spoons.
Brunch Addition: Add hot chocolate bombs to your brunch menu alongside coffee and tea options. They’re especially popular with both kids and adults who want something special.
Milk Alternatives: These work beautifully with various milk types. Whole milk creates the creamiest result, but oat milk is a close second. Almond milk and coconut milk work but are thinner. Soy milk can have a slightly different flavor but melts the bombs well.
FAQs Section
Q: Why won’t my chocolate come out of the molds?
A: This usually happens when the chocolate isn’t fully chilled or the molds are too warm. Make sure to chill for at least 15-20 minutes until the chocolate is completely firm and cold to the touch. If your kitchen is warm, chill for longer. Silicone molds work best because they’re flexible—gently press on the bottom of each cavity and the shells should pop right out. If they’re still sticking, place back in the fridge for another 5-10 minutes.
Q: Can I use regular chocolate bars instead of chips or melting wafers?
A: Yes! You can use high-quality chocolate bars, but you’ll need to chop them finely first for even melting. Be aware that chocolate bars may require tempering for the best results (this involves careful temperature control to prevent bloom). For beginners, chocolate chips or candy melts are easier because they’re formulated to melt smoothly without tempering. If using chocolate bars, choose ones with cocoa butter rather than vegetable oils for better quality.
Q: My chocolate bombs aren’t melting properly in hot milk—why?
A: This could be due to several factors: (1) Chocolate shells are too thick—aim for 1/8 inch thickness; (2) Milk isn’t hot enough—it should be steaming, around 160-170°F; (3) Using cold bombs straight from the fridge—let them come to room temperature first; or (4) Not enough milk—use at least 8 oz per bomb. The magic happens when hot milk slowly melts the chocolate and releases the contents!
Q: How do I prevent my hot chocolate bombs from cracking?
A: Cracks occur when shells are too thin, handled too roughly, or experience temperature shock. Solutions: Apply two thin layers of chocolate rather than one thick layer; handle gently when removing from molds and assembling; avoid extreme temperature changes (don’t move from freezer directly to warm room); ensure molds are completely dry before adding chocolate (moisture causes cracks); and when sealing, don’t press too hard—gentle pressure is enough.
Q: Can I make hot chocolate bombs without silicone molds?
A: Silicone sphere molds are really the best option for achieving perfect round bombs. However, you can get creative with alternatives: Use the back of a ladle or large spoon to create dome shapes on parchment paper (messy but possible); use small balloon dipped in chocolate (pop once set—not ideal); or use other silicone molds like half-spheres from bath bomb molds. The sphere shape is key for that “bomb” effect, so other shapes won’t give the same visual impact.
Q: What’s the best chocolate to use for beginners?
A: Candy melts (also called melting wafers) are absolutely the best choice for beginners. They’re specifically designed to melt smoothly, set quickly, and don’t require tempering. Brands like Ghirardelli melting wafers, Wilton candy melts, or Make’n Mold wafers work beautifully. If you want to use real chocolate for better flavor, go with high-quality chocolate chips like Ghirardelli or Guittard—they’re more forgiving than bar chocolate.
Q: How long do homemade hot chocolate bombs last?
A: When stored properly in an airtight container in a cool, dry place (below 70°F), hot chocolate bombs last 2-4 weeks. In the refrigerator, they last up to a month. The cocoa mix and marshmallows inside are shelf-stable, so the chocolate shell is your main concern. Signs they’ve gone bad include white coating that won’t rub off, moisture inside packaging, or any off-smell. For best quality and appearance, use within 2 weeks.
Q: Can kids help make hot chocolate bombs?
A: Absolutely! This is a wonderful family activity. Kids can help with: stirring chocolate as it melts (with supervision), helping spread chocolate in molds (if they’re old enough to be gentle), measuring and adding the cocoa mix and marshmallows, choosing decorations and sprinkles, and decorating the finished bombs. Adults should handle removing bombs from molds, sealing with the warm plate, and any work with hot chocolate or tools. It’s a great rainy day or weekend project!
Conclusion
There you have it—everything you need to create stunning, delicious, magical hot chocolate bombs right in your own kitchen! These delightful chocolate spheres are more than just a trendy beverage; they’re an experience that brings joy, warmth, and a little bit of magic to cold winter days.
Whether you’re making them as thoughtful homemade gifts, preparing for a cozy family movie night, or simply treating yourself to something special, hot chocolate bombs are guaranteed to impress. The best part is that once you master the basic technique, the creative possibilities are absolutely endless. From peppermint mocha to salted caramel, cookies and cream to Mexican hot chocolate, you can customize these bombs to suit any taste preference or occasion.
Remember, practice makes perfect! Your first batch might not be Instagram-perfect, but they’ll still taste amazing and get easier every time you make them. Don’t be afraid to experiment with flavors, decorations, and presentations. Each bomb is an opportunity to add your own personal touch.
So grab your silicone molds, melt some chocolate, and start creating your own hot chocolate bomb masterpieces! Your friends and family will be amazed that you made these gorgeous treats at home. And when you see their faces light up as they watch the bomb explode in their mug, you’ll understand why these have become such a beloved winter tradition.
Ready to make your own hot chocolate bombs? Pin this recipe to your Pinterest boards so you can find it easily when you’re ready to create some chocolate magic! And don’t forget to leave a comment below and let me know which flavor variation you tried—I love hearing about your hot chocolate bomb adventures!
Happy chocolate bomb making, and here’s to many cozy, delicious moments this winter! ☕✨