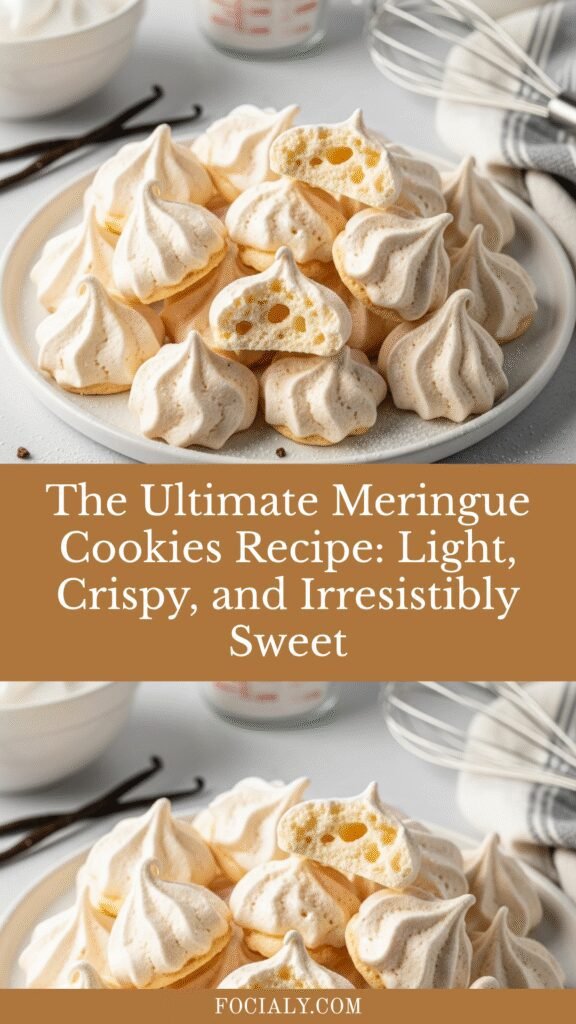
The Ultimate Meringue Cookies Recipe: Light, Crispy, and Irresistibly Sweet
If you’ve ever wanted to create something that looks like it came straight from a French patisserie but is surprisingly simple to make at home, meringue cookies are your answer. These delightful little clouds of sweetness are made from just a handful of ingredients—primarily egg whites and sugar—yet they deliver an elegant, melt-in-your-mouth experience that never fails to impress.
Meringue cookies are perfect for so many occasions. Serve them at baby showers, bridal showers, or holiday gatherings where their pristine appearance fits right in with elegant décor. They’re wonderful as edible gifts, packaged in clear cellophane bags tied with ribbons. These cookies also make fantastic accompaniments to coffee, tea, or hot chocolate, and they’re a delightful addition to dessert platters alongside brownies and fruit tarts. The best part? They’re naturally gluten-free and can be customized with different colors, flavors, and mix-ins to match any theme or preference.
History / Background
Meringue has a fascinating history that food historians have debated for centuries. The creation of meringue is attributed to either Switzerland or France, with the earliest known recipe appearing in a French cookbook from 1692. The name “meringue” itself is believed to have originated from the Swiss town of Meiringen, where an Italian chef named Gasparini supposedly invented it in the early 18th century. However, French pastry chefs also claim credit, suggesting that a chef named Massialot created it in the French town of Mehrinyghen.
Regardless of its true origins, meringue became a cornerstone of French pastry-making during the reign of Louis XV, when it was popularized by Queen Marie Antoinette’s pastry chef. The technique spread throughout Europe and eventually to America, where it became a beloved component of Southern desserts like lemon meringue pie and baked Alaska.
Meringue cookies specifically gained popularity in the mid-20th century as a way to use up leftover egg whites from recipes that required only yolks. Resourceful home bakers discovered that these simple cookies could be piped into beautiful shapes, dried out in a low oven, and stored for weeks—making them both economical and practical. Today, meringue cookies have experienced a renaissance on social media platforms, particularly Pinterest and Instagram, where their photogenic qualities and endless customization options make them perfect for modern home bakers looking to create stunning yet accessible desserts.
Why You’ll Love This Recipe
This meringue cookie recipe is a game-changer for home bakers who want maximum impact with minimal effort. The process is straightforward and almost therapeutic—there’s something incredibly satisfying about watching glossy peaks form as you whip the egg whites. These cookies look incredibly fancy and taste divine, yet they require no special skills or complicated techniques.
Here’s why this recipe will become your new favorite:
- Simple ingredients: You only need three basic ingredients for classic meringues—egg whites, sugar, and cream of tartar
- Naturally gluten-free: Perfect for guests with gluten sensitivities or celiac disease
- Low in calories: Each cookie contains minimal calories compared to butter-based cookies
- Endlessly customizable: Add food coloring, extracts, chocolate chips, or nuts to create countless variations
- Long shelf life: Store properly, and these cookies stay crisp for up to two weeks
- Budget-friendly: Eggs are inexpensive, making this an economical treat for large gatherings
- Make-ahead friendly: Bake them days in advance without sacrificing quality
- Impressive presentation: They look professionally made and elevate any dessert spread
- Great for using extra egg whites: Perfect solution when you’ve made custards or pasta that only needed yolks
- Kid-friendly activity: Children love helping pipe the cookies and choosing colors
Ingredient Notes
Egg whites: The star of the show. Use room temperature egg whites for the best volume—they whip up faster and create more stable peaks. Fresh eggs actually work better than older ones for meringues because they have a higher pH, which helps create a more stable foam. Never let even a speck of yolk get into your whites, as fat prevents proper whipping. Three large egg whites typically yield about 24-30 small cookies.
Granulated sugar: Regular white sugar is essential for the structure and sweetness. Superfine (caster) sugar dissolves even more quickly, creating an ultra-smooth texture. Don’t substitute with powdered sugar, as the cornstarch it contains will affect the texture. The ratio of sugar to egg whites is crucial—typically one cup of sugar to three egg whites.
Cream of tartar: This acidic powder stabilizes the egg white foam and helps maintain those beautiful stiff peaks. It also prevents the sugar from crystallizing. If you don’t have cream of tartar, substitute with ½ teaspoon of lemon juice or white vinegar per egg white.
Vanilla extract: Pure vanilla extract adds depth and warmth to the sweet cookies. You can substitute with almond extract, peppermint extract, or any flavoring you prefer. Use clear vanilla extract if you want pure white meringues.
Salt: Just a pinch enhances all the flavors and helps stabilize the egg white foam. It’s a small addition that makes a big difference.
Food coloring (optional): Gel food coloring works best because it doesn’t add extra liquid that could deflate your meringue. Start with a tiny amount—you can always add more, but you can’t take it away.
Equipment Needed
- Stand mixer or hand mixer: A stand mixer is ideal because your hands will be free to add ingredients gradually, but a hand mixer works perfectly well with patience
- Large glass or metal mixing bowl: Must be completely clean and free of any grease—even a tiny amount will prevent egg whites from whipping
- Measuring cups and spoons: For accurate ingredient measurements
- Rubber spatula: For folding and scraping down the sides of the bowl
- Piping bags: Disposable or reusable piping bags for creating beautiful shapes
- Piping tips: Star tips (like Wilton 1M) create beautiful swirls, while round tips make classic kisses
- Baking sheets: Two or three half-sheet pans
- Parchment paper or silicone baking mats: Essential for preventing sticking—don’t use wax paper or foil
- Oven thermometer: To ensure your oven temperature is accurate, which is critical for meringues
- Wire cooling racks: For cooling the cookies completely
- Paper towels: For wiping the bowl with vinegar to remove any residual grease
Meringue Cookies Recipe

Light, airy, and perfectly crisp meringue cookies that melt in your mouth. These elegant treats require just a few simple ingredients and make an impressive addition to any dessert table. Naturally gluten-free and customizable with your favorite colors and flavors.
- Prep Time: 15 minutes
- Cook Time: 1 hour 30 minutes
- Total Time: 2 hours 45 minutes
- Yield: 30-36 cookies 1x
- Category: Dessert
- Method: Baking
- Cuisine: French
- Diet: Gluten Free
Ingredients
- 3 large egg whites, room temperature
- ¾ cup (150g) granulated sugar
- ¼ teaspoon cream of tartar
- 1 teaspoon pure vanilla extract
- Pinch of salt
- Gel food coloring (optional)
Instructions
- Prepare your workspace: Position the oven rack to the middle position and preheat your oven to 200°F (95°C). Line two baking sheets with parchment paper or silicone baking mats. Set aside.
- Prepare the bowl: Wipe your mixing bowl and whisk attachment with white vinegar or lemon juice, then dry thoroughly. This removes any invisible grease that could prevent proper whipping.
- Start whipping the egg whites: Add room temperature egg whites to your clean, dry mixing bowl. Using a stand mixer fitted with the whisk attachment (or a hand mixer), begin beating on medium speed until the eggs become foamy, about 1 minute.
- Add cream of tartar and salt: Once foamy, add the cream of tartar and pinch of salt. Continue beating on medium-high speed until soft peaks form—when you lift the whisk, the peaks should curl over gently. This takes about 2-3 minutes.
- Gradually add sugar: With the mixer running on medium speed, add the granulated sugar very slowly, about 1 tablespoon at a time. Wait about 10-15 seconds between additions. This gradual process allows the sugar to dissolve completely, creating a stable, glossy meringue.
- Add vanilla and food coloring: Once all the sugar is incorporated, add the vanilla extract and gel food coloring (if using). Increase speed to high and continue beating until stiff, glossy peaks form—this means when you lift the whisk, the peaks stand straight up without curling. The meringue should look smooth and shiny, and when you rub a bit between your fingers, you shouldn’t feel any sugar granules. This final beating takes about 3-5 minutes.
- Prepare the piping bag: Fit a piping bag with your desired tip (star tips create beautiful swirls, round tips make classic kisses). Fold down the top of the bag to create a cuff, then use a spatula to fill the bag about two-thirds full with meringue. Don’t overfill or it will be difficult to pipe.
- Pipe the cookies: Hold the piping bag perpendicular to the baking sheet, about ½ inch above the surface. Squeeze with steady pressure, creating 1½-inch rounds. For classic swirls, pipe in a circular motion, starting from the outside and working inward, then release pressure and pull up quickly. Space cookies about 1 inch apart—they won’t spread.
- Bake the meringues: Place both baking sheets in the preheated oven. Bake at 200°F (95°C) for 1 hour and 30 minutes. The meringues should be completely dry and lift easily from the parchment. They should remain white or retain their color—not brown.
- Cool in the oven: Turn off the oven but DO NOT open the door. Leave the meringues inside for at least 1 hour or up to overnight. This additional drying time ensures they’re crispy throughout and prevents cracking from sudden temperature changes.
- Remove and store: Once completely cool, carefully remove the meringues from the parchment. They should sound hollow when tapped. Store immediately in an airtight container to maintain crispness.
Notes
- Humidity is the enemy: Meringues hate moisture. Avoid making them on rainy or very humid days, as they’ll absorb moisture from the air and become sticky or chewy.
- Sugar must dissolve completely: Under-dissolved sugar creates a grainy texture and can cause “weeping” (sticky beads on the surface).
- Don’t rush the cooling: Cracking often occurs when meringues cool too quickly. Always let them cool in the turned-off oven.
- Oven temperature matters: Too high, and they’ll brown; too low, and they’ll take forever. Verify with an oven thermometer.
- Room temperature eggs: Cold egg whites take longer to reach full volume. Set eggs out 30-60 minutes before baking.
Nutrition
- Serving Size: 1 cookie
- Calories: 17
- Sugar: 4g
- Sodium: 8mg
- Fat: 0g
- Saturated Fat: 0g
- Unsaturated Fat: 0g
- Trans Fat: 0g
- Carbohydrates: 4g
- Fiber: 0g
- Protein: 0.5g
- Cholesterol: 0mg
Tips & Variations
Flavor variations:
- Chocolate meringues: Sift 2 tablespoons of unsweetened cocoa powder over the finished meringue and gently fold it in
- Peppermint meringues: Replace vanilla with ½ teaspoon peppermint extract and add pink or red food coloring
- Lemon meringues: Add 1 teaspoon lemon zest and ½ teaspoon lemon extract
- Almond meringues: Replace vanilla with almond extract and fold in ¼ cup finely chopped toasted almonds
- Espresso meringues: Add 1 tablespoon instant espresso powder with the vanilla
Color customization:
- Create an ombre effect by dividing the meringue into portions and coloring each a different shade
- Paint stripes of gel coloring inside the piping bag before filling for a marbled effect
- Leave them classic white for an elegant, timeless look
- Make rainbow meringues by dividing the batch into multiple colors
Add-in ideas:
- Mini chocolate chips (fold in gently at the end)
- Chopped nuts (pistachios, pecans, or hazelnuts)
- Crushed freeze-dried fruit (strawberries, raspberries)
- Shredded coconut
- Sprinkles (add just before baking)
Texture preferences:
- For chewier centers: Reduce baking time to 1 hour at 225°F (107°C)
- For extra-crisp cookies: Bake the full time and let cool in the oven overnight
- For melt-in-your-mouth texture: Stick to the recipe exactly as written
Pro Chef Tips
The vinegar trick: Professional pastry chefs wipe their bowls with vinegar before whipping egg whites. This removes invisible fat residue that home dish soap might miss, ensuring maximum volume and stability.
Sugar dissolving test: After adding all the sugar, rub a bit of meringue between your fingers. If you feel graininess, keep beating. Properly dissolved sugar creates a smooth, glossy, stable meringue that holds its shape beautifully.
The upside-down bowl test: When you think you’ve reached stiff peaks, turn the bowl upside down over your head (carefully at first!). If the meringue doesn’t budge, it’s ready. This is the test professional bakers use.
Create a template: Trace circles on the parchment paper with a pencil, then flip the parchment over. You’ll still see the circles as guides for consistent sizing, but won’t transfer pencil marks to your cookies.
The convection setting: If your oven has a convection fan, use it. The circulating air creates even drying and helps prevent browning. Just reduce the temperature by 25°F.
Pipe practice shapes on parchment: Before piping your meringues, practice your technique on a separate piece of parchment. Once you’re satisfied with your swirls, scrape the practice meringue back into the bowl and start fresh.
Save those egg yolks: Place leftover yolks in a container, cover with water, and refrigerate for up to 2 days. Use them for custards, carbonara, crème brûlée, or homemade mayonnaise.
Common Mistakes to Avoid
Mistake #1: Any trace of fat in your equipment – Even a tiny amount of egg yolk, oil residue, or butter will prevent egg whites from whipping properly. Always use glass or metal bowls (never plastic, which can harbor invisible grease), and wipe everything with vinegar before starting.
Mistake #2: Adding sugar too quickly – Dumping all the sugar in at once doesn’t give it time to dissolve, resulting in grainy, weeping meringues that never achieve the proper glossy texture. Patience is key—add sugar gradually over several minutes.
Mistake #3: Under-beating the meringue – Soft peaks won’t hold their shape during piping or baking. You need truly stiff, glossy peaks where the meringue stands straight up when you lift the whisk. When in doubt, beat a little longer.
Mistake #4: Opening the oven door during baking or cooling – Temperature fluctuations cause cracking and collapsing. Resist the temptation to peek. Trust the process and keep that door closed until the full cooling time is complete.
Mistake #5: Making meringues on humid days – Meringues are hydrophilic (they attract moisture). High humidity prevents proper drying and creates sticky, chewy cookies instead of crisp ones. Check the weather before baking—save this recipe for dry days, or use a dehumidifier in your kitchen.
Storage & Meal Prep
Room temperature storage: Store completely cooled meringue cookies in an airtight container at room temperature for up to 2 weeks. Place parchment paper between layers to prevent sticking. The key is keeping moisture out—even a slightly loose lid will allow humid air in, making them soft and sticky.
What happens if they get soft: If your meringues absorb moisture and lose their crispness, you can re-crisp them. Place them on a baking sheet in a 200°F (95°C) oven for 15-20 minutes, then let cool completely in the turned-off oven.
Avoid refrigeration: Never store meringues in the refrigerator. Refrigerators are humid environments, and your crisp cookies will quickly become sticky and chewy. Room temperature in an airtight container is always best.
Container choices: Use airtight plastic containers, glass jars with tight-fitting lids, or tins with secure closures. Adding a silica gel packet (the kind that comes in shoe boxes) to the container helps absorb any moisture that might sneak in.
Packaging as gifts: Meringues make beautiful edible gifts. Package them in clear cellophane bags tied with ribbon, in decorative tins lined with tissue paper, or in glass jars with fabric toppers. Just make sure recipients know to keep them sealed until ready to serve.
Make-Ahead & Freezer Notes
Make-ahead timeline: Meringue cookies are one of the best make-ahead desserts. You can bake them up to 2 weeks in advance and store them at room temperature in an airtight container. This makes them perfect for holidays, parties, and gift-giving during busy seasons.
Can you freeze meringues?: Yes, but with caution. While meringues can be frozen for up to 1 month in airtight containers or freezer bags with all air removed, they’re so long-lasting at room temperature that freezing is rarely necessary. The texture can sometimes become slightly softer after freezing.
Freezing instructions: If you do choose to freeze them, layer the meringues in a rigid airtight container with parchment paper between layers. Make sure no air can get in. Freeze for up to 1 month.
Thawing frozen meringues: Remove from the freezer and let them come to room temperature in the sealed container. Don’t open the container until they’ve fully reached room temperature (about 30 minutes), otherwise condensation will form and make them sticky. If needed, re-crisp in a low oven.
Can you freeze meringue mixture?: Don’t freeze unbaked meringue. The foam structure breaks down during freezing and won’t reconstitute properly when thawed. Always bake first, then freeze if necessary.
Best practice: Because meringues store so well at room temperature and take minimal effort to make fresh, I recommend simply making them a few days before you need them rather than freezing. You’ll get the best texture and appearance this way.
Serving Suggestions
Meringue cookies are incredibly versatile and pair beautifully with many accompaniments:
Beverage pairings: Serve alongside hot coffee, espresso, cappuccino, or lattes for an elegant afternoon treat. They’re also wonderful with hot chocolate, tea (especially Earl Grey or chamomile), or dessert wines like Moscato or late-harvest Riesling.
Dessert platter additions: Include meringues on a mixed dessert platter with brownies, lemon bars, chocolate truffles, and fresh berries. The light, airy texture provides contrast to richer desserts.
Ice cream accompaniment: Crush meringues and sprinkle over ice cream sundaes, or serve whole cookies alongside a scoop of gelato or sorbet. They add a delightful textural element.
Eton mess: Create the classic British dessert by crushing meringues and layering them with whipped cream and fresh strawberries or mixed berries. It’s rustic, beautiful, and absolutely delicious.
Pavlova base: While this recipe creates crisp cookies throughout, you can use the same technique to create individual pavlova nests—just pipe larger rounds and create an indentation in the center for filling with cream and fruit.
Coffee bar addition: Set out a bowl of small meringues at your coffee or tea station for guests to enjoy with their beverages. They’re the perfect not-too-sweet accompaniment.
Holiday treats: During Christmas, serve peppermint meringues with candy canes and hot cocoa. For Easter, create pastel-colored meringues for an elegant spring dessert table. They work for any celebration.
FAQs Section
Q: Why did my meringues turn brown?
A: Brown meringues indicate the oven temperature was too high. Meringues should dry rather than bake. Make sure your oven is accurately calibrated at 200°F (95°C) using an oven thermometer. Avoid placing the baking sheets too close to heating elements. If your oven runs hot even at its lowest setting, prop the door open slightly with a wooden spoon.
Q: Can I make meringues without cream of tartar?
A: Absolutely! Substitute ½ teaspoon of white vinegar or lemon juice for every ¼ teaspoon cream of tartar. These acids serve the same purpose—stabilizing the egg white foam and helping create stiff peaks. The flavor difference is undetectable in the finished cookies.
Q: Why are my meringues chewy instead of crisp?
A: Chewy meringues haven’t dried out completely. This can happen if: you didn’t bake them long enough, you opened the oven door during baking or cooling, the oven temperature was too high (causing the outside to set before the inside dried), or you made them on a humid day. Try re-crisping them in a 200°F oven for 15-20 minutes.
Q: What can I do with leftover egg yolks?
A: Don’t waste those yolks! Use them to make custard, crème brûlée, homemade ice cream, carbonara, hollandaise sauce, lemon curd, homemade mayonnaise, or rich pound cake. You can also store yolks covered with water in the refrigerator for up to 2 days.
Q: Why did my meringues crack?
A: Cracking usually occurs from temperature shock—when meringues cool too quickly after being removed from the oven. Always let them cool gradually in the turned-off oven with the door closed for at least an hour. Minor cracking can also occur from over-beating (too much air), too-high oven temperature, or humidity.
Q: Can I use a hand mixer instead of a stand mixer?
A: Yes! A hand mixer works perfectly well for meringues. It takes approximately the same amount of time, though your arm might get tired. Make sure to use the highest speed for the final beating stage to achieve stiff, glossy peaks.
Q: How do I know when the meringues are done baking?
A: Properly baked meringues should be completely dry to the touch, lift easily from the parchment paper without sticking, and sound hollow when gently tapped. The bottoms should be dry, not tacky. If they’re still soft or stick to the parchment, they need more time in the oven.
Conclusion
There’s something truly magical about transforming humble egg whites and sugar into these ethereal, cloud-like treats. Meringue cookies prove that simple ingredients, when handled with care and patience, can create something extraordinary. Whether you’re making them for a special celebration, packaging them as heartfelt gifts, or simply satisfying your sweet tooth with a guilt-free treat, these delicate cookies never disappoint.
The beauty of this recipe lies not just in its simplicity, but in its versatility. Once you master the basic technique, you’ll find yourself experimenting with colors, flavors, and shapes—creating custom meringues for every season and occasion. They’re conversation starters, crowd-pleasers, and a testament to your baking skills, even though the process is wonderfully straightforward.
I hope this recipe inspires you to try your hand at meringue-making. There’s something deeply satisfying about watching those egg whites transform into glossy, stiff peaks, and even more rewarding when you bite into that first perfectly crisp cookie. Don’t be intimidated by the techniques—follow the steps, trust the process, and you’ll be amazed at what you can create.
Ready to make these gorgeous meringue cookies? Save this recipe to your Pinterest boards so you can find it easily when you’re ready to bake. Have you made meringues before? Share your tips and variations in the comments below—I love hearing how you customize this recipe! And if you try these, please snap a photo and share it on Pinterest or Instagram. Happy baking!