The Ultimate Chocolate Babka Recipe: A Heavenly Swirl of Rich Chocolate Goodness
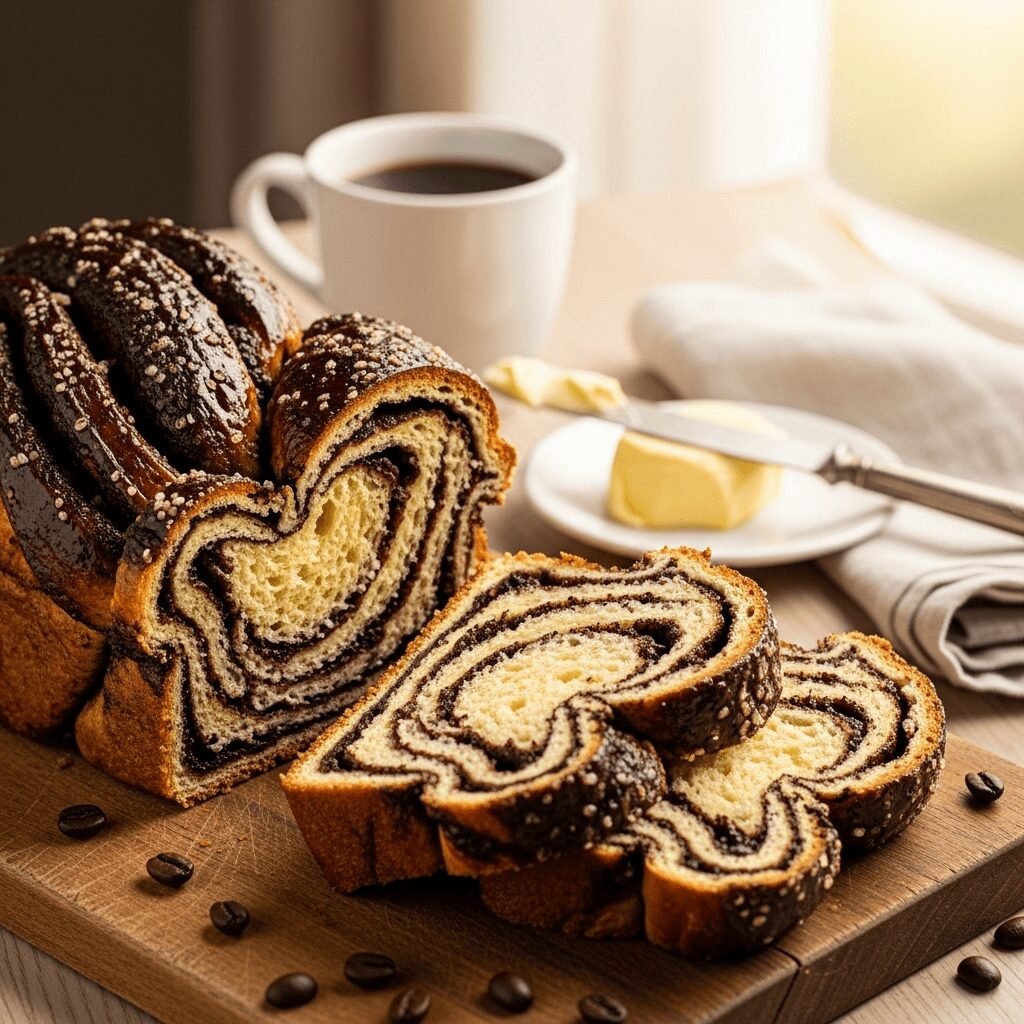
If you’ve never experienced the pure joy of pulling apart warm, freshly baked chocolate babka, you’re in for an absolute treat. This stunning braided bread is a showstopper that combines buttery, enriched yeast dough with ribbons of intensely chocolatey filling, creating layers upon layers of pure indulgence. While it might look intimidating with its gorgeous twisted appearance, making chocolate babka at home is absolutely achievable for home bakers of all skill levels.
Chocolate babka is perfect for special weekend breakfasts, holiday brunches, or any time you want to impress guests with something that looks professionally made. The aroma alone—a heavenly combination of yeasty bread, melted chocolate, and butter—will have everyone gathering in your kitchen long before it’s ready to slice. This recipe yields two beautiful loaves, so you can keep one for yourself and gift the other, or freeze one for later enjoyment.
What makes this chocolate babka truly special is the perfect balance between bread and dessert. It’s not quite as sweet as cake but far more decadent than regular bread, making it ideal for breakfast with coffee, afternoon tea, or even a light dessert. The slightly crispy, sugary exterior gives way to impossibly soft, pull-apart layers that practically melt in your mouth.
History / Background
Chocolate babka has a rich history that spans continents and cultures, originating in the Jewish communities of Eastern Europe during the early 19th century. The word “babka” actually means “little grandmother” in Polish, Ukrainian, and Yiddish, supposedly because the bread’s fluted shape resembled a grandmother’s gathered skirt. Originally, babka was created as a way to use up leftover challah dough and bits of filling, transforming scraps into something delicious and special.
The earliest versions of babka were often filled with cinnamon, nuts, or dried fruit rather than chocolate. Chocolate babka as we know it today didn’t emerge until Jewish bakers immigrated to America, particularly to New York City, in the late 1800s and early 1900s. These entrepreneurial bakers began experimenting with chocolate fillings to appeal to American tastes, and chocolate babka quickly became a beloved staple in Jewish bakeries throughout New York.
The pastry experienced a major cultural resurgence thanks to a famous “Seinfeld” episode in the 1990s where characters debate the superiority of chocolate versus cinnamon babka (spoiler: chocolate won). This pop culture moment introduced babka to mainstream America and sparked renewed interest in the traditional treat.
Today, chocolate babka has transcended its Eastern European Jewish roots to become a beloved artisan baking project worldwide. High-end bakeries from Los Angeles to London charge premium prices for this labor-of-love bread, but making it at home allows you to experience the tradition and create something truly special with your own hands.
Why You’ll Love This Recipe
This chocolate babka recipe strikes the perfect balance between authentic tradition and home-kitchen accessibility. While it does require some time and patience, the actual hands-on work is minimal, and the results are absolutely spectacular—rivaling anything you’d find in an expensive bakery.
Here’s why this recipe will become your new favorite baking project:
- Impressive presentation: The beautiful twisted swirl pattern looks incredibly professional and will wow everyone who sees it
- Make-ahead friendly: The dough can be prepared the night before, making this perfect for special occasion mornings
- Two loaves: This recipe makes two gorgeous loaves, so you can share, gift, or freeze one
- Deeply chocolatey: The rich chocolate filling creates intense flavor in every bite without being overly sweet
- Perfect texture: Soft, pull-apart layers with a slightly crispy, sugary exterior create amazing textural contrast
- Versatile serving: Works beautifully for breakfast, brunch, dessert, or an afternoon snack with coffee
- Freezer-friendly: Babka freezes exceptionally well, so you can enjoy fresh-tasting bread weeks later
- Customizable: Once you master the basic technique, you can experiment with different fillings and flavors
Ingredient Notes
For the Dough:
All-purpose flour forms the structure of your babka. Bread flour can be substituted for a slightly chewier texture, but all-purpose creates the perfect tender crumb. Make sure to measure correctly by spooning flour into your measuring cup rather than scoking it directly.
Active dry yeast or instant yeast both work beautifully. If using instant yeast, you can skip the proofing step and add it directly to the dry ingredients. Fresh yeast can also be used (use 1.5 times the amount).
Whole milk adds richness and creates a tender crumb. The fat content matters here, so don’t substitute with skim milk. Whole milk can be replaced with half-and-half for even richer babka.
Unsalted butter should be at room temperature for easy incorporation. European-style butter with higher fat content will make your babka even more luxurious, though regular unsalted butter works perfectly.
Eggs provide structure, richness, and that beautiful golden color. Make sure they’re at room temperature so they incorporate smoothly into the dough.
Granulated sugar sweetens the dough just enough without making it cake-like. The amount is intentionally moderate since the filling provides plenty of sweetness.
For the Chocolate Filling:
Dark chocolate (60-70% cacao) provides intense chocolate flavor without being bitter. You can use chocolate chips in a pinch, but chopped chocolate bars melt more smoothly. Semi-sweet chocolate can be substituted for a slightly sweeter filling.
Cocoa powder intensifies the chocolate flavor and helps create the right consistency. Dutch-processed cocoa creates a smoother, less acidic taste, but natural cocoa powder works well too.
Butter binds the filling and adds richness. Make sure it’s fully softened or melted for easy mixing.
Powdered sugar sweetens without adding grittiness. Granulated sugar doesn’t dissolve as well in this application.
For the Simple Syrup:
This magical finishing touch keeps your babka incredibly moist and adds a subtle sweetness to the exterior. It’s absolutely essential—don’t skip it!
Equipment Needed
- Stand mixer with dough hook attachment (or large mixing bowl and sturdy wooden spoon for hand mixing)
- Two 9×5-inch loaf pans (metal works best for even browning)
- Rolling pin for rolling out the dough
- Pastry brush for applying egg wash and simple syrup
- Sharp knife or bench scraper for cutting and shaping
- Medium saucepan for making the simple syrup
- Mixing bowls (various sizes)
- Measuring cups and spoons
- Kitchen towel or plastic wrap for covering rising dough
- Offset spatula or butter knife for spreading filling
- Instant-read thermometer (optional but helpful for checking dough temperature)
- Parchment paper for easier cleanup
Chocolate Babka Recipe

This homemade chocolate babka features buttery, enriched yeast dough swirled with rich chocolate filling, twisted into a stunning braided loaf, and brushed with sweet syrup for the ultimate tender, pull-apart texture.
- Prep Time: 45 minutes (plus 3 hours rising time)
- Cook Time: 45 minutes
- Total Time: 4 hours 30 minutes
- Yield: 2 loaves (16 servings) 1x
- Category: Breakfast/Brunch/Dessert
- Method: Baking
- Cuisine: Eastern European/Jewish-American
- Diet: Vegetarian
Ingredients
For the Dough:
- 4 cups (500g) all-purpose flour, plus more for dusting
- ½ cup (100g) granulated sugar
- 2¼ teaspoons (1 packet) active dry yeast
- 1 teaspoon salt
- ¾ cup (180ml) whole milk, warmed to 110°F
- 3 large eggs, room temperature
- 1 teaspoon vanilla extract
- ½ cup (115g) unsalted butter, room temperature, cut into pieces
For the Chocolate Filling:
- 6 ounces (170g) dark chocolate (60-70% cacao), finely chopped
- ½ cup (45g) unsweetened cocoa powder
- ½ cup (100g) granulated sugar
- ⅓ cup (75g) unsalted butter, melted
- 1 teaspoon vanilla extract
- Pinch of salt
For the Egg Wash:
- 1 large egg
- 1 tablespoon water
For the Simple Syrup:
- ½ cup (100g) granulated sugar
- ½ cup (120ml) water
Instructions
Make the Dough:
- In the bowl of a stand mixer, combine warm milk, 1 tablespoon of the sugar, and yeast. Let stand for 5-10 minutes until foamy and activated.
- Add remaining sugar, flour, salt, eggs, and vanilla to the yeast mixture. Using the dough hook attachment, mix on low speed until ingredients come together, about 2 minutes.
- Increase speed to medium-low and knead for 5-6 minutes until the dough becomes smooth. Add butter pieces gradually, a few at a time, allowing each addition to incorporate before adding more. Continue kneading for another 5-7 minutes until the dough is elastic, smooth, and slightly tacky but not sticky.
- Transfer dough to a lightly greased bowl, cover with plastic wrap or a damp kitchen towel, and let rise in a warm place for 1.5-2 hours until doubled in size.
Prepare the Chocolate Filling:
- While the dough rises, make the filling. Place chopped chocolate in a heatproof bowl and microwave in 30-second intervals, stirring between each, until melted and smooth. Let cool slightly.
- In a medium bowl, whisk together melted chocolate, melted butter, cocoa powder, sugar, vanilla, and salt until completely smooth and spreadable. Set aside at room temperature.
Shape the Babka:
- Once dough has doubled, punch it down and turn it out onto a lightly floured surface. Divide dough in half. Work with one half at a time, keeping the other covered.
- Roll one portion into a large rectangle, approximately 10×16 inches. The dough should be about ¼-inch thick.
- Using an offset spatula, spread half of the chocolate filling evenly over the dough, leaving a ½-inch border on one long side.
- Starting from the long side with filling, tightly roll the dough into a log, like a jelly roll. Pinch the seam to seal.
- Using a sharp knife, cut the log lengthwise down the middle to create two long halves, leaving about 1 inch intact at one end to keep them attached. Turn the cut sides up to expose the layers.
- Twist the two halves around each other, keeping the cut sides facing up as much as possible to show off those beautiful chocolate swirls. Tuck the ends under.
- Carefully transfer the twisted dough to a greased 9×5-inch loaf pan. Cover loosely and let rise for 1-1.5 hours until puffy and nearly doubled.
- Repeat steps 8-13 with the second portion of dough and remaining filling.
Bake the Babka:
- Preheat oven to 350°F (175°C). Position rack in the center of the oven.
- Make egg wash by whisking together egg and water. Brush generously over the risen babka loaves, making sure to get into all the nooks and crannies.
- Bake for 40-45 minutes until deeply golden brown and an instant-read thermometer inserted into the center reads 190°F. If the tops are browning too quickly after 30 minutes, tent loosely with aluminum foil.
Make Simple Syrup and Finish:
- While babka bakes, make simple syrup. Combine sugar and water in a small saucepan over medium heat. Stir until sugar dissolves completely, then simmer for 2-3 minutes. Remove from heat.
- As soon as the babka comes out of the oven, generously brush the hot loaves with simple syrup while they’re still in the pans. Let them soak in for 5 minutes.
- Carefully remove babka from pans and transfer to a wire rack. Brush any remaining syrup all over the loaves. Let cool for at least 30 minutes before slicing (if you can wait that long!).
Notes
- Room temperature ingredients are crucial for proper dough development. Take butter and eggs out of the fridge 1-2 hours before starting.
- Don’t skip the simple syrup—it’s what makes babka incredibly moist and gives it that signature slightly sticky, shiny finish.
- If your kitchen is cold, create a warm rising environment by turning your oven to the lowest setting for 1 minute, then turning it off and placing covered dough inside.
- The dough can be made the night before and refrigerated after the first rise. Bring to room temperature before rolling and shaping.
- Babka is best enjoyed within 3-4 days of baking, though it freezes beautifully for up to 3 months.
Nutrition
- Serving Size: 1 slice (1/8 of one loaf)
- Calories: 385
- Sugar: 24g
- Sodium: 180mg
- Fat: 18g
- Saturated Fat: 11g
- Unsaturated Fat: 6g
- Trans Fat: 0g
- Carbohydrates: 52g
- Fiber: 2g
- Protein: 7g
- Cholesterol: 85mg
Note: Nutrition information is approximate and calculated per serving based on the recipe yielding 16 slices total.
Tips & Variations
Make it Extra Decadent: Add ½ cup of mini chocolate chips to the filling for pockets of melted chocolate throughout.
Cinnamon Babka: Replace the chocolate filling with a mixture of 1 cup brown sugar, ½ cup softened butter, 3 tablespoons cinnamon, and a pinch of salt. Proceed with recipe as written.
Nutella Swirl: Spread ½ cup of Nutella over the chocolate filling before rolling for an extra hazelnut dimension.
Add Crunch: Sprinkle chopped toasted nuts (walnuts, pecans, or hazelnuts) over the filling before rolling.
Espresso Boost: Add 2 teaspoons of instant espresso powder to the chocolate filling to intensify the chocolate flavor.
Orange Chocolate: Add 1 tablespoon of orange zest to the chocolate filling for a sophisticated chocolate-orange combination.
Streusel Topping: Before baking, sprinkle the top with a mixture of ⅓ cup flour, ⅓ cup sugar, and 3 tablespoons cold butter worked together until crumbly.
Smaller Portions: Divide dough into quarters and bake in mini loaf pans (5.75×3 inches) for gift-giving. Reduce baking time to 30-35 minutes.
Pro Chef Tips
Temperature is everything: When working with yeast dough, temperature control matters tremendously. Your milk should be between 105-110°F—too hot kills the yeast, too cold won’t activate it properly. An instant-read thermometer takes the guesswork out.
Don’t rush the rise: While it’s tempting to speed things along, proper fermentation develops flavor and creates that characteristic tender crumb. If your dough hasn’t doubled in the suggested time, give it more time rather than proceeding prematurely.
Chill before shaping: For the cleanest cuts and easiest handling, refrigerate your rolled logs for 15-20 minutes before slicing them lengthwise. The slightly firmer dough is much easier to twist without losing shape.
Expose those layers: When twisting the two halves together, consciously keep the cut sides facing upward. This showcases those gorgeous chocolate swirls and is what makes babka so visually stunning. Don’t worry about perfection—rustic is beautiful here.
Syrup while hot: The simple syrup must be applied to piping hot babka. The heat causes the bread to absorb the syrup, creating that signature moist texture. Waiting until it cools means the syrup will just sit on the surface.
Low and slow baking: If your babka is browning too quickly on top but still needs more time, reduce temperature to 325°F and tent with foil. This allows the interior to cook through without burning the exterior.
Common Mistakes to Avoid
Using cold ingredients: Cold butter, eggs, and milk won’t incorporate properly and can shock the yeast, leading to dense, heavy babka. Always bring everything to room temperature first.
Over-flouring: Adding too much flour during kneading creates dry, tough dough. The dough should be slightly tacky but not sticky. Trust the process and resist adding flour unless absolutely necessary.
Spreading filling too thickly: While it’s tempting to pile on chocolate, too much filling will ooze out during baking and make twisting difficult. A thin, even layer distributes better and creates more distinct swirls.
Skipping the second rise: After shaping, babka needs that second rise to develop proper structure. Baking immediately after shaping results in dense, tight bread rather than light, pull-apart layers.
Under-baking: Babka needs to bake until deeply golden brown—not just lightly golden. The darker color indicates proper caramelization and development of flavor. Use an instant-read thermometer (internal temp should reach 190°F) if you’re unsure.
Storage & Meal Prep
Room Temperature Storage: Wrap cooled babka tightly in plastic wrap or store in an airtight container at room temperature for up to 4 days. The simple syrup keeps it moist, but it will gradually dry out over time.
Refrigerator Storage: While not necessary for the first few days, you can refrigerate babka for up to 1 week. Bring to room temperature or warm slightly before serving, as refrigeration firms up the butter in the dough.
Reviving Day-Old Babka: Warm individual slices in a 300°F oven for 5-7 minutes, or microwave for 15-20 seconds. This softens the bread and melts the chocolate filling slightly, making it taste freshly baked.
Gifting: Babka makes an incredible gift. Once completely cooled, wrap tightly in plastic wrap, then aluminum foil, and tie with a ribbon. Include reheating instructions for the recipient.
Make-Ahead & Freezer Notes
Make-Ahead Option #1: Prepare the dough through the first rise, then punch down, cover tightly, and refrigerate overnight. The next day, bring to room temperature (about 1 hour), then continue with rolling, filling, and shaping. The overnight fermentation actually develops more complex flavor.
Make-Ahead Option #2: Shape the babka completely, place in greased pans, cover tightly with plastic wrap, and refrigerate overnight. The next morning, remove from fridge, let come to room temperature and complete the second rise (this may take 2-3 hours), then bake as directed.
Freezing Unbaked Babka: After shaping and placing in pans, cover tightly with plastic wrap and aluminum foil, then freeze for up to 2 months. When ready to bake, thaw overnight in the refrigerator, bring to room temperature, let complete the second rise, then bake.
Freezing Baked Babka: This is the method I recommend most. Bake completely, apply simple syrup, and let cool to room temperature. Wrap each loaf tightly in plastic wrap, then aluminum foil, and freeze for up to 3 months. Thaw overnight at room temperature (still wrapped to prevent moisture loss).
Reheating Frozen Baked Babka: Once thawed, warm the entire loaf in a 300°F oven for 10-15 minutes, or warm individual slices as needed. The babka will taste remarkably fresh, with the simple syrup preserving moisture beautifully.
Serving Suggestions
Chocolate babka is incredibly versatile and can be enjoyed throughout the day in various ways:
Classic Breakfast: Serve thick slices alongside hot coffee or espresso. The chocolate intensity pairs beautifully with strong coffee, and the butter-rich dough makes it substantial enough for breakfast.
Brunch Spread: Present a whole loaf on a wooden cutting board with softened butter, cream cheese, and fresh berries. Let guests pull apart their own slices for an interactive, casual brunch experience.
French Toast: Day-old babka makes extraordinary French toast. Slice thick, dip in a mixture of eggs, milk, and cinnamon, then pan-fry until golden. Top with powdered sugar and fresh berries.
Ice Cream Sandwich: Slice babka horizontally and use as the “bread” for an ice cream sandwich. Vanilla ice cream is classic, but coffee or chocolate ice cream takes it to another level.
Dessert Plating: Serve a warmed slice with a scoop of vanilla ice cream, a drizzle of chocolate sauce, and a sprinkle of flaky sea salt for an elegant dessert presentation.
Accompaniments: Fresh fruit like strawberries, raspberries, or sliced oranges provides a bright contrast to the rich chocolate. A dollop of whipped cream or mascarpone adds luxurious creaminess.
Beverage Pairings: Beyond coffee, babka pairs wonderfully with hot chocolate, chai lattes, Earl Grey tea, or even a glass of cold milk. For adults, a glass of port or dessert wine complements the chocolate beautifully.
FAQs Section
Can I use instant yeast instead of active dry yeast?
Absolutely! Instant yeast (also called rapid-rise or bread machine yeast) can be used in the same amount. The advantage is you can skip the proofing step and add it directly to the flour mixture. The rise times remain the same.
Why is my dough not rising?
The most common culprit is dead yeast. Make sure your yeast is fresh (check the expiration date) and that your milk wasn’t too hot, which kills yeast. Your kitchen temperature also matters—if it’s very cold, find a warmer spot like inside a turned-off oven with the light on.
Can I make this without a stand mixer?
Yes, though it requires more arm strength! Mix the dough ingredients in a large bowl with a wooden spoon until combined, then turn out onto a floured surface and knead by hand for 15-20 minutes until smooth and elastic. Add butter gradually during kneading.
My filling is oozing out during baking—what went wrong?
This usually means the filling layer was too thick or the roll wasn’t sealed tightly enough at the seam. Make sure to spread filling thinly and evenly, leave that ½-inch border, and pinch the seam firmly. Some oozing is normal and creates delicious caramelized edges!
Can I substitute the chocolate with something else?
Definitely! Cinnamon-sugar filling is traditional (see variations section). Nutella, almond paste, poppy seed filling, or even fruit preserves can work. The key is having a spreadable consistency that won’t soak into the dough.
How do I know when my babka is fully baked?
Color is your first indicator—it should be deeply golden brown, not pale. An instant-read thermometer inserted into the center should read 190-195°F. If you tap the bottom of the loaf, it should sound hollow.
Why is my babka dense instead of fluffy?
Dense babka usually results from under-risen dough. Make sure both rises fully double the dough. Other causes include using old yeast, adding too much flour, or not kneading long enough to develop gluten structure.
Conclusion
There’s something truly magical about pulling apart a slice of warm, homemade chocolate babka and revealing those gorgeous chocolate swirls spiraling through tender, buttery bread. While this recipe requires a time investment, the actual hands-on work is manageable, and the stunning results are absolutely worth it. The combination of rich chocolate filling, soft pull-apart layers, and that signature glossy finish from the simple syrup creates a bakery-quality treat that will have everyone asking for your secret.
Whether you’re making chocolate babka for a special holiday brunch, a weekend breakfast treat, or simply because you’re craving something extraordinary, this recipe delivers every single time. The beauty of making two loaves means you can be generous—share one with neighbors, bring it to a gathering, or keep one in the freezer for those moments when only chocolate babka will do.
I’d love to hear about your babka-making adventures! Leave a comment below with your results, any creative variations you tried, or questions you might have. And please, if you loved this recipe as much as I do, share it on Pinterest so other home bakers can discover the joy of making this incredible bread. Happy baking!