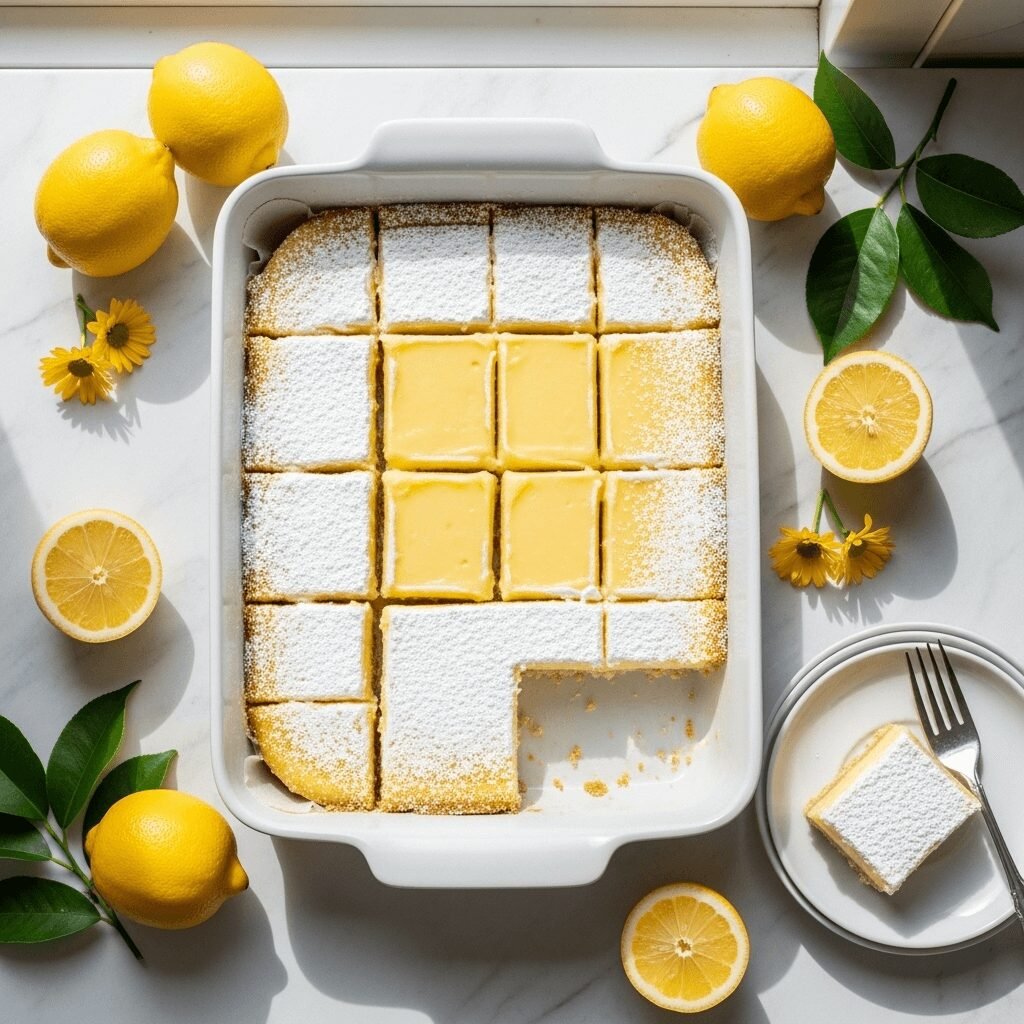
The BEST Lemon Bars Recipe – Tangy, Sweet & Perfectly Buttery!

Few desserts capture the essence of sunshine quite like a perfectly baked lemon bar. These classic treats combine a buttery, crumbly shortbread crust with a smooth, tangy lemon custard filling that’s dusted with powdered sugar. They’re the perfect balance of sweet and tart, with a texture that’s simultaneously creamy and firm—absolutely irresistible!
Lemon bars are incredibly versatile and work beautifully for almost any occasion. They’re elegant enough for spring weddings, baby showers, and Easter brunch, yet simple enough for casual weekend baking or weeknight desserts. They’re a hit at potlucks, bake sales, picnics, and summer barbecues. The bright, refreshing lemon flavor makes them especially popular during warmer months, though honestly, these sunny treats are welcome year-round. Whether you’re hosting afternoon tea, need a make-ahead dessert for entertaining, or simply craving something sweet and citrusy, these homemade lemon bars deliver every single time. They’re also wonderfully portable—perfect for packing in lunch boxes, bringing to office parties, or gifting to friends and neighbors. One bite of that tangy-sweet filling against the buttery crust, and you’ll understand why lemon bars have remained an American baking staple for decades.
History / Background
The lemon bar as we know it today is a distinctly American creation, though its roots trace back to European lemon dessert traditions. The recipe emerged in the United States sometime in the mid-20th century, likely evolving from lemon curd tarts and chess pie traditions. While the exact origin is debated, most food historians agree that lemon bars gained widespread popularity in the 1960s and 1970s, coinciding with America’s growing love affair with citrus desserts and bar cookies.
The genius of lemon bars lies in their simplicity and practicality. Unlike traditional lemon tarts that require crimping pastry and blind-baking pie crusts, lemon bars simplified the process by using a pressed shortbread base that bakes directly in a rectangular pan. This innovation made elegant lemon desserts accessible to home bakers who might have been intimidated by more complex pastry techniques. The result was a dessert that looked sophisticated but was remarkably easy to execute.
Some culinary historians suggest that lemon bars were inspired by lemon chess pie, a Southern classic, but adapted for easier serving at social gatherings and potlucks. The bar format meant no slicing of pie—just cut into squares and serve. Others trace influence to British lemon curd tarts, which were adapted and Americanized with a simpler preparation method and a more casual presentation style.
By the 1980s, lemon bars had become a beloved staple at church potlucks, community gatherings, and home kitchens across America. They embodied the country’s love for practical, crowd-pleasing desserts that delivered maximum flavor with minimal fuss. Today, lemon bars remain one of the most requested bar cookie recipes, celebrated for their perfect balance of buttery richness and bright citrus zing. They’ve inspired countless variations—from lime bars to key lime versions—but the classic lemon bar with its signature powdered sugar dusting continues to reign supreme. It’s a testament to timeless American home baking: simple ingredients, straightforward technique, and absolutely delicious results.
Why You’ll Love This Recipe
These classic lemon bars are about to become your go-to citrus dessert, and here’s why they’re absolutely worth making. This recipe creates lemon bars with a perfect textural contrast—a crisp, buttery shortbread crust that melts in your mouth, topped with a silky-smooth lemon filling that’s both tangy and sweet. They look bakery-quality but are surprisingly simple to make at home, and they never fail to impress guests!
Here’s what makes this recipe special:
- Perfect balance of sweet and tart – The lemon filling has just the right amount of pucker-inducing tanginess balanced with sweetness, creating an addictive flavor profile
- Buttery shortbread crust – Made with real butter for that rich, melt-in-your-mouth texture that complements the bright lemon filling beautifully
- Simple ingredients – Uses everyday pantry staples plus fresh lemons—nothing fancy or hard to find required
- Make-ahead friendly – Actually tastes better the next day after the flavors meld, making them perfect for entertaining and meal prep
- Crowd-pleaser – Appeals to virtually everyone; the bright, refreshing flavor is universally loved across all age groups
- Beautiful presentation – That classic powdered sugar topping creates an elegant, professional look with zero effort
- Easy to transport – Cut into neat squares that travel well to potlucks, parties, and picnics without falling apart
- Foolproof recipe – Clear instructions ensure perfect results even for beginner bakers; hard to mess up!
- Refreshing dessert – The bright citrus flavor is lighter and more refreshing than heavy chocolate desserts, perfect for spring and summer
- Versatile for occasions – Works beautifully for everything from casual family dinners to elegant spring weddings and baby showers
- Budget-friendly – Lemons are affordable year-round, and the other ingredients are basic baking staples you likely already have
Ingredient Notes
Understanding your ingredients helps you create the perfect lemon bars every time. Here’s what you’ll need and why each component matters:
For the Shortbread Crust:
All-Purpose Flour – Creates the structure for your buttery crust. Measure correctly by spooning into the measuring cup and leveling off—don’t pack it down. All-purpose flour gives the best texture; cake flour will make it too tender and crumbly.
Unsalted Butter – The star of the shortbread crust! Use high-quality unsalted butter for best flavor and to control salt levels. The butter should be softened to room temperature for easy mixing. European-style butter with higher fat content creates an even richer crust.
Powdered Sugar – Also called confectioners’ sugar, this dissolves easily and creates a tender, melt-in-your-mouth texture in the shortbread. Granulated sugar would make the crust grainy rather than smooth.
Salt – Just a pinch enhances the butter flavor and balances the sweetness. Don’t skip it!
For the Lemon Filling:
Fresh Lemon Juice – Absolutely use fresh-squeezed lemon juice, never bottled! Fresh juice has bright, vibrant flavor that bottled lemon juice simply cannot match. You’ll need about 4-5 medium lemons to yield ⅔ cup of juice. Roll lemons on the counter before juicing to extract maximum juice.
Lemon Zest – The oils in lemon zest add intense lemon flavor and aroma that juice alone can’t provide. Use a microplane or fine grater to zest only the yellow outer layer—the white pith underneath is bitter.
Eggs – The binding agent that creates that smooth, custard-like texture. Use large eggs at room temperature for best incorporation. The eggs also provide structure and richness to the filling.
Granulated Sugar – Sweetens the tart lemon juice and helps create the right consistency for the filling. The sugar also helps the filling set properly during baking.
All-Purpose Flour – Just a small amount helps thicken the lemon filling and gives it structure so it slices cleanly. Don’t omit this or your filling will be too runny.
Baking Powder – A tiny amount helps the filling puff up slightly during baking, creating a lighter texture. It’s optional but recommended for best results.
For Topping:
Powdered Sugar – Dusted over the top after cooling for that classic bakery look. It also adds a final touch of sweetness that complements the tangy lemon perfectly.
Equipment Needed
Having the right tools makes baking lemon bars easier and ensures beautiful results:
- 9×13-inch baking pan – The standard size for this recipe. Metal pans conduct heat well, but glass works too (may need slightly longer baking time).
- Parchment paper or aluminum foil – Line the pan with overhang on two sides for easy removal. This creates “handles” to lift the entire slab out for perfect cutting.
- Two mixing bowls – One for the crust, one for the filling. Medium to large size works best.
- Electric mixer or wooden spoon – For creaming butter and sugar for the crust. A hand mixer, stand mixer, or good old-fashioned elbow grease all work.
- Whisk – For mixing the lemon filling until smooth and well-combined. A balloon whisk works best.
- Microplane or zester – For zesting lemons. A fine grater can work in a pinch, but a microplane gives the best results.
- Citrus juicer – Manual or electric juicer makes extracting lemon juice easier. You can also use a fork and squeeze by hand.
- Measuring cups and spoons – Accurate measurements are crucial in baking for consistent results.
- Fine-mesh sieve – For dusting powdered sugar evenly over the finished bars. A small strainer works perfectly.
- Sharp knife – For cutting clean squares. Wipe the blade between cuts for neat edges.
- Spatula – For spreading the crust mixture evenly in the pan.
The BEST Lemon Bars Recipe – Tangy, Sweet & Perfectly Buttery!

Classic homemade lemon bars with a buttery shortbread crust and tangy-sweet lemon custard filling. These bright, refreshing dessert bars are perfectly balanced, elegantly simple, and absolutely delicious!
- Prep Time: 15 minutes
- Cook Time: 45 minutes
- Total Time: 3 hours (including cooling time)
- Yield: 16 large bars or 24 small bars 1x
- Category: Dessert
- Method: Baking
- Cuisine: American
- Diet: Vegetarian
Ingredients
For the Shortbread Crust:
- 2 cups (250g) all-purpose flour
- ½ cup (60g) powdered sugar
- ¼ teaspoon salt
- 1 cup (226g) unsalted butter, softened to room temperature
For the Lemon Filling:
- 4 large eggs, room temperature
- 1½ cups (300g) granulated sugar
- ⅔ cup (160ml) fresh lemon juice (about 4-5 lemons)
- 2 tablespoons lemon zest (from about 2 lemons)
- ¼ cup (30g) all-purpose flour
- ¼ teaspoon baking powder
- Pinch of salt
For Topping:
- Powdered sugar, for dusting
Instructions
- Preheat and prepare pan: Preheat your oven to 350°F (175°C). Line a 9×13-inch baking pan with parchment paper, leaving overhang on two opposite sides for easy removal. Lightly grease the parchment paper with butter or cooking spray.
- Make the crust: In a large mixing bowl, combine 2 cups flour, ½ cup powdered sugar, and ¼ teaspoon salt. Add the softened butter and mix with an electric mixer on medium speed (or use a wooden spoon) until the mixture comes together and resembles coarse crumbs, about 2-3 minutes. The mixture should hold together when pressed.
- Press crust into pan: Transfer the crumbly crust mixture into your prepared pan. Using your hands or the bottom of a flat measuring cup, press the mixture firmly and evenly into the bottom of the pan, creating a compact, smooth layer. Make sure to press it all the way to the edges and into the corners.
- Par-bake the crust: Bake the crust for 18-20 minutes until lightly golden around the edges. It should look set and slightly firm to the touch. Remove from oven but keep the oven on.
- Make the lemon filling: While the crust bakes, prepare the filling. In a large mixing bowl, whisk together the eggs and granulated sugar until well combined and slightly pale. Add the fresh lemon juice and lemon zest, whisking until smooth.
- Add dry ingredients to filling: In a small bowl, whisk together ¼ cup flour, baking powder, and a pinch of salt. Add this to the lemon mixture and whisk thoroughly until completely smooth with no lumps. The mixture should be liquid but slightly thickened.
- Pour filling over hot crust: Immediately after removing the crust from the oven, give the lemon filling a good stir, then carefully pour it over the hot crust. The hot crust helps the filling set properly. Use a spoon to spread it evenly if needed, making sure it reaches all corners.
- Bake the bars: Return the pan to the oven and bake for 22-25 minutes. The filling should be set around the edges but still have a slight jiggle in the center—it will firm up as it cools. Don’t overbake or the filling will crack and become rubbery.
- Cool completely: Remove from oven and place the pan on a wire rack. Let the lemon bars cool to room temperature in the pan for about 1 hour, then refrigerate for at least 2 hours or until completely chilled and firm. This cooling and chilling step is crucial for clean slicing!
- Cut and serve: Once thoroughly chilled, use the parchment overhang to lift the entire slab out of the pan onto a cutting board. Using a sharp knife wiped clean between cuts, slice into 16 large squares or 24 smaller bars. Just before serving, dust generously with powdered sugar using a fine-mesh sieve. Store any leftovers in the refrigerator.
Notes
- Fresh lemon juice is essential: Do not use bottled lemon juice—it lacks the bright, fresh flavor needed for exceptional lemon bars.
- Room temperature ingredients: Both eggs and butter should be at room temperature for best texture and easy mixing.
- Don’t skip chilling: The bars must be completely chilled before cutting or they’ll be messy and won’t slice cleanly.
- Pour filling on hot crust: Adding the filling to the hot crust helps it adhere and creates better layers.
- Powdered sugar timing: Dust with powdered sugar just before serving, not ahead of time, as it can absorb moisture and disappear into the bars.
- Pan size matters: Using a different pan size will affect baking time and the thickness of your bars.
Nutrition
- Serving Size: 1 large bar (based on 16 servings)
- Calories: 245
- Sugar: 25g
- Sodium: 85mg
- Fat: 12g
- Saturated Fat: 7g
- Unsaturated Fat: 4g
- Trans Fat: 0g
- Carbohydrates: 32g
- Fiber: 0.5g
- Protein: 3g
- Cholesterol: 75mg
Note: Nutrition information is approximate and will vary based on exact ingredients used and portion size.
Tips & Variations
The classic lemon bar is perfection on its own, but here are some delicious ways to customize this recipe:
Lime Bars: Substitute lime juice and zest for the lemon to create tangy lime bars. Use key limes for an even more intense citrus flavor. You’ll need more key limes since they’re smaller.
Meyer Lemon Bars: If you can find Meyer lemons, they create a slightly sweeter, more floral flavor profile that’s absolutely divine. Meyer lemons are less tart than regular lemons, so you might want to increase the lemon juice by 2 tablespoons.
Raspberry Lemon Bars: Press fresh raspberries into the filling before baking, or swirl raspberry puree through the lemon filling for beautiful color and added fruit flavor.
Lavender Lemon Bars: Add 1 tablespoon of culinary lavender to the crust mixture for a sophisticated, aromatic twist. The floral notes complement lemon beautifully.
Coconut Crust: Replace ½ cup of flour in the crust with ½ cup sweetened shredded coconut for a tropical variation. Press it in well so it adheres.
Gluten-Free Version: Use a 1:1 gluten-free flour blend in place of all-purpose flour in both the crust and filling. The texture will be slightly more delicate but still delicious.
Lemon Blueberry Bars: Scatter fresh or frozen blueberries over the crust before adding the lemon filling. They sink slightly and create beautiful bursts of berry flavor.
Brown Butter Crust: Brown the butter before making the crust for a nutty, caramelized flavor that adds incredible depth. Let it cool slightly before using.
Orange or Grapefruit Bars: Experiment with other citrus! Blood orange bars are stunning with their pink hue, and grapefruit creates a more sophisticated, less sweet bar.
Pro Chef Tips
Elevate your lemon bars from good to absolutely extraordinary with these professional secrets:
Zest Before Juicing: Always zest your lemons before cutting and juicing them. It’s nearly impossible to zest a juiced lemon half! Plus, zesting whole lemons is much easier and safer.
Use a Microplane: A microplane zester gives you the finest zest with maximum lemon oil and minimal bitter white pith. It makes a noticeable difference in flavor intensity.
Room Temperature Eggs: Cold eggs don’t incorporate as smoothly into the filling. Set them out 30 minutes before baking, or place them in warm water for 5-10 minutes to bring to room temperature quickly.
Don’t Overbake the Crust: The crust should be lightly golden but not brown. Overbaking makes it too hard and crumbly. It continues to bake when you add the filling and return it to the oven.
Pour Filling on Hot Crust: This technique helps the layers bond together and prevents the filling from seeping under the crust. Work quickly and carefully when transferring from oven to counter.
The Jiggle Test: The filling is done when the edges are set but the center still has a slight jiggle when you gently shake the pan. It firms up significantly during cooling. Overbaking creates a rubbery, cracked filling.
Complete Cooling is Critical: This is the hardest tip to follow but the most important for clean slicing! Warm or room-temperature lemon bars will squish and tear when cut. Full refrigeration ensures neat, bakery-perfect squares.
Clean Cuts: Wipe your knife with a damp cloth between each cut. This removes filling and creates pristine edges on each bar. A thin-bladed sharp knife works best.
Powdered Sugar Timing: Always dust with powdered sugar just before serving, never hours ahead. The sugar will absorb moisture from the lemon filling and disappear or become gummy.
Common Mistakes to Avoid
Even experienced bakers encounter lemon bar pitfalls. Here’s how to avoid the most common issues:
1. Using Bottled Lemon Juice
This is the cardinal sin of lemon bar baking! Bottled juice has a flat, artificial flavor that produces disappointing results. Fresh lemon juice is absolutely non-negotiable for bright, vibrant flavor. Budget for real lemons—they make all the difference.
2. Cutting the Bars While Warm
This creates a sticky, messy disaster with ragged edges and filling that oozes everywhere. Patience is essential! The bars must be fully chilled (minimum 2 hours in the refrigerator) for clean slicing. Plan ahead and bake them the day before serving.
3. Skipping the Parchment Paper
Trying to cut lemon bars in the pan or scooping them out creates mangled, unattractive servings. Parchment paper with overhang allows you to lift the entire slab out for easy, clean cutting on a cutting board. It’s worth the extra 30 seconds of prep.
4. Overbaking the Filling
The filling should have a slight jiggle in the center when you remove it from the oven. Overbaking creates a rubbery texture and can cause cracking on the surface. Remember that carryover heat continues cooking the filling as it cools, so slightly underdone is perfect.
5. Undermixing the Crust
The crust mixture should come together and hold its shape when pressed. If it’s too crumbly and dry, it won’t hold together when baked. Make sure the butter is properly softened and mixed thoroughly until the mixture resembles coarse crumbs that clump together.
6. Not Pressing the Crust Firmly
A loosely pressed crust will be crumbly and fall apart. Use firm, even pressure to pack the crust mixture into the pan, creating a compact layer that will hold together beautifully when baked.
Storage & Meal Prep
Refrigerator Storage:
Store lemon bars in an airtight container in the refrigerator for up to 5 days. Layer parchment paper between stacked bars to prevent them from sticking together. Keep them chilled at all times—lemon bars should be served cold or at cool room temperature for best texture and food safety (they contain eggs).
Bringing to Room Temperature:
While lemon bars are delicious straight from the fridge, you can let them sit at room temperature for 15-20 minutes before serving if you prefer a slightly softer texture. Don’t leave them out longer than 2 hours, especially in warm weather.
Powdered Sugar Storage:
If you’ve already dusted bars with powdered sugar, be aware it may absorb into the filling over time. For best presentation, store un-dusted bars and add powdered sugar just before serving. If the sugar does absorb, simply dust with a fresh layer before serving.
Transporting Tips:
Lemon bars travel beautifully! Keep them in a covered container in a cooler with ice packs if you’re heading to a picnic or outdoor event. The cold temperature keeps them firm and food-safe.
Make-Ahead & Freezer Notes
Make-Ahead Instructions:
Lemon bars are an ideal make-ahead dessert! In fact, they often taste even better on day two as the flavors meld and develop. Bake them up to 3 days ahead, let cool completely, cover tightly, and refrigerate. Add powdered sugar just before serving.
Freezing Baked Lemon Bars:
Lemon bars freeze exceptionally well for up to 3 months! Let them cool completely and chill thoroughly. Cut into squares, then freeze in a single layer on a baking sheet for 1-2 hours. Once frozen solid, transfer to a freezer-safe container or zip-top bag with parchment paper between layers. This prevents them from sticking together.
Thawing Instructions:
Thaw frozen lemon bars in the refrigerator overnight or at room temperature for 1-2 hours. Don’t microwave them—it will make the filling watery and ruin the texture. Once thawed, dust with fresh powdered sugar before serving.
Freezing Unbaked Crust:
You can prepare and press the crust into the pan, wrap it tightly in plastic wrap and foil, and freeze for up to 2 months. When ready to bake, no need to thaw—bake from frozen, adding 3-5 minutes to the initial crust baking time.
Freezing Just the Filling:
You can mix the filling and freeze it in a freezer-safe container for up to 1 month. Thaw in the refrigerator overnight, whisk well, and pour over freshly baked hot crust. This is great for meal prep or if you want to bake in stages.
Best Serving After Freezing:
For best quality, consume frozen bars within 2-3 months. While they’re safe longer, the lemon flavor gradually loses intensity over extended freezer storage.
Serving Suggestions
Lemon bars are delicious on their own, but here are wonderful ways to serve them for different occasions:
Classic Presentation:
Serve chilled lemon bars on a pretty platter with a generous dusting of powdered sugar. The simple, elegant look is perfect for afternoon tea, baby showers, bridal showers, or any spring gathering.
With Whipped Cream:
Top each lemon bar with a dollop of freshly whipped cream or sweetened whipped cream for added richness. You can fold a little lemon zest into the whipped cream for extra citrus flavor.
Fresh Berry Garnish:
Serve lemon bars with fresh raspberries, blueberries, or sliced strawberries on the side. The berries add beautiful color and complement the lemon flavor perfectly. Fresh mint leaves also make a lovely garnish.
Coffee and Tea Service:
Lemon bars pair beautifully with hot beverages! Serve them alongside coffee, hot tea (especially Earl Grey or chamomile), or iced tea for a refreshing afternoon treat. The citrus flavor is a perfect complement to tea.
Ice Cream Pairing:
While not traditional, a small scoop of vanilla ice cream or lemon sorbet alongside a lemon bar creates an amazing dessert combination. The cold, creamy contrast with the tangy bar is delightful.
Dessert Platter:
Include lemon bars on a mixed dessert platter with other bar cookies like brownies, blondies, and fruit bars for variety at large gatherings or potlucks.
Brunch Table:
Lemon bars are perfect for brunch! Serve them alongside other brunch treats like coffee cake, muffins, and fruit salad for a complete spread.
Gift Packaging:
Layer lemon bars in a decorative tin or box with parchment paper between layers for a thoughtful homemade gift. They’re perfect for teacher appreciation, hostess gifts, or thanking neighbors.
FAQs Section
Q: Can I use bottled lemon juice instead of fresh?
A: While technically possible, I strongly advise against it. Bottled lemon juice has a flat, almost metallic flavor that produces inferior lemon bars. Fresh lemon juice is essential for that bright, vibrant citrus flavor that makes lemon bars special. The difference is dramatic—please use fresh lemons!
Q: Why are my lemon bars runny or not setting?
A: This usually happens for one of three reasons: not enough baking time (the filling needs to be set around the edges with just a slight jiggle in the center), not enough cooling/chilling time (you must fully chill them for at least 2 hours), or accidentally omitting the flour in the filling (double-check your ingredients). Make sure you’re baking at the correct temperature and allowing proper cooling time.
Q: Can I make lemon bars without eggs?
A: Eggs are crucial for the custard-like texture of lemon bars, but you can try using a commercial egg replacer designed for baking. However, the texture will be different—less creamy and custard-like. Vegan lemon bars typically use cornstarch or agar agar as thickeners, but require a completely different recipe formulation.
Q: How do I prevent the crust from being too hard?
A: Make sure not to overbake the crust—it should be lightly golden but not brown. Also, don’t pack it too hard; firm pressure is good, but you’re not trying to create concrete! Using room temperature butter that’s properly creamed with the other ingredients also helps create a tender, melt-in-your-mouth crust.
Q: Why did my lemon filling crack on top?
A: Cracking usually indicates overbaking. The filling should still have a slight jiggle in the center when you remove it from the oven—it continues to set as it cools. Also, avoid opening the oven door repeatedly during baking, which causes temperature fluctuations. Minor cracks are cosmetic only and will be covered by powdered sugar!
Q: Can I use a different size pan?
A: Using a different pan size will significantly affect the results. An 8×8 pan will make thicker bars that need longer baking time (add 5-10 minutes). A larger pan like 9×13 is standard for this recipe. A smaller pan than 8×8 may overflow and bake unevenly. If you must use a different size, watch carefully and adjust baking time accordingly.
Q: Do lemon bars need to be refrigerated?
A: Yes, absolutely! Lemon bars contain eggs and should be refrigerated for food safety. They can sit at room temperature for up to 2 hours during serving, but should be refrigerated otherwise. They actually taste best when served chilled or slightly cool anyway.
Q: Can I double this recipe?
A: Yes! Double all ingredients and use two 9×13 pans, or make one massive batch in a large sheet pan (adjust baking time accordingly—it will take longer). This is perfect for feeding crowds at parties or bake sales.
Conclusion
There you have it—the ultimate classic lemon bars recipe that’s guaranteed to bring sunshine to your table! These beautiful bars strike that perfect balance between buttery richness and bright, tangy citrus flavor. They’re elegant enough to serve at the fanciest occasions yet simple enough to whip up on a weeknight when you’re craving something sweet and refreshing.
Whether you’re baking for a spring celebration, bringing dessert to a potluck, or simply treating yourself to something special, these lemon bars never disappoint. That buttery shortbread crust combined with silky lemon custard is pure magic—and the fact that they’re so easy to make is just the icing on the cake (or should I say, the powdered sugar on the lemon bar!).
Now it’s time to grab some fresh lemons and get baking! Your kitchen is about to smell absolutely amazing, and you’re about to taste the best lemon bars you’ve ever had. Don’t forget to let them chill completely before cutting—I know it’s hard to wait, but I promise it’s worth it for those perfect, clean squares.
I’d love to see your lemon bars! Drop a comment below and let me know how they turned out. Did you try any of the variations? What occasion are you serving them for? And if you loved this recipe as much as I think you will, please save it to your Pinterest boards so you can find it easily next time. Share your beautiful lemon bar photos and tag me on social media—I absolutely love seeing your baking creations!
Happy baking, friends! May your lemons be fresh, your crust be buttery, and your lemon bars be absolutely perfect! 🍋✨