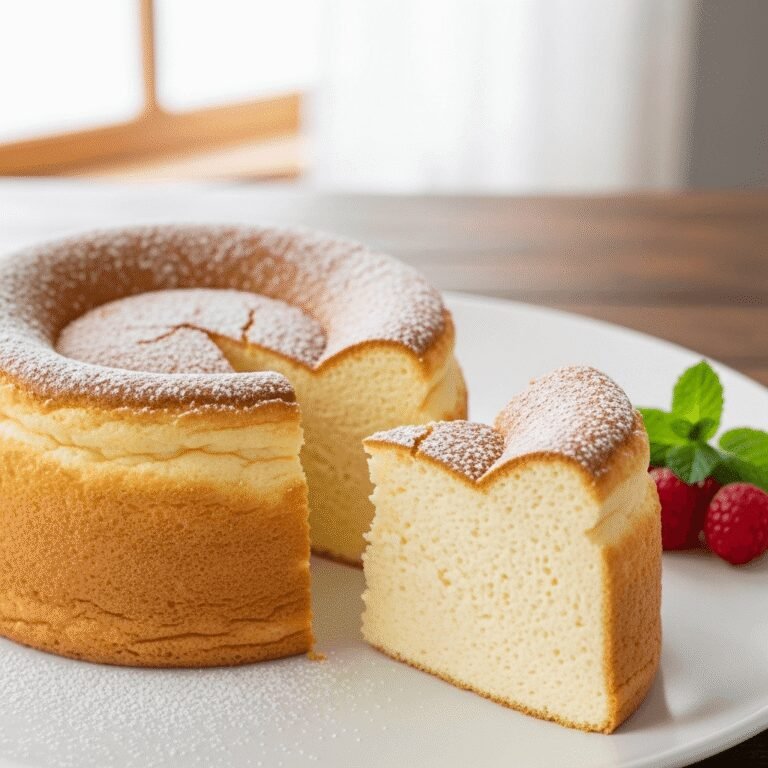
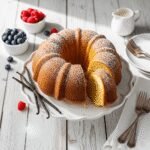
Classic Vanilla Bundt Cake Recipe – Moist, Buttery Perfection Every Time

There’s something undeniably elegant about a beautifully formed Bundt cake sitting proudly on a cake stand, its distinctive ridges and curves practically begging to be sliced and savored. This classic vanilla Bundt cake represents everything wonderful about homemade baking – it’s buttery, moist, tender, and infused with rich vanilla flavor that fills your kitchen with the most heavenly aroma as it bakes.
Unlike fussy layer cakes that require precise frosting techniques or delicate assembly, a Bundt cake delivers maximum impact with minimal stress. The signature fluted pan does all the decorating work for you, creating an impressive presentation that looks like it came from a fancy bakery. A simple dusting of powdered sugar or a light glaze is all you need to make this cake absolutely stunning.
This versatile vanilla Bundt cake is perfect for virtually any occasion. Serve it at Sunday brunch with fresh coffee, bring it to potlucks and bake sales where it’s guaranteed to disappear quickly, present it as a thoughtful homemade gift, or simply keep it on your counter for afternoon snacking throughout the week. The dense yet tender crumb holds up beautifully, making it an ideal make-ahead dessert that actually tastes better the day after baking. Whether you’re a nervous beginner or a confident baker, this foolproof recipe will become your go-to Bundt cake that you’ll make again and again.
History / Background
The Bundt cake’s fascinating journey from European kitchens to American icon is a story of innovation, persistence, and one determined businessman who revolutionized home baking. While the distinctive fluted tube pan shape can trace its roots back centuries to European baking traditions, the Bundt cake as we know it today is decidedly American.
The original inspiration came from the Gugelhupf, a traditional yeasted cake baked in ornate ceramic molds that were popular in Germany, Austria, and Eastern European countries for centuries. These decorative ring-shaped cakes were often served for special occasions and holidays, with recipes passed down through generations. When European immigrants arrived in America, they brought their cherished Gugelhupf recipes and treasured ceramic molds with them.
The modern Bundt pan story begins in 1950s Minneapolis, when members of the Hadassah Society, a Jewish women’s organization, approached H. David Dalquist, owner of Nordic Ware kitchenware company. These women wanted a modern version of the heavy ceramic Gugelhupf pans their grandmothers had used – something lighter, more durable, and better suited to American ovens. Dalquist, an innovative engineer, created a cast aluminum version with the now-iconic fluted design and center tube that promotes even baking.
He named it the “Bundt” pan, a creative spelling inspired by the German word “bund,” meaning a gathering of people – fitting for a cake meant to bring communities together. However, despite its practical design, the Bundt pan didn’t immediately catch on. For nearly fifteen years, it remained a regional specialty with modest sales.
Everything changed in 1966 when Ella Helfrich entered her “Tunnel of Fudge Cake” made in a Bundt pan into the Pillsbury Bake-Off competition. Her chocolate creation took second place, but it sparked a sensation. Suddenly, everyone wanted a Bundt pan to recreate this trendy cake. Nordic Ware could barely keep up with demand, eventually selling more than 70 million pans and cementing the Bundt cake as an American baking staple.
Throughout the 1970s and 1980s, Bundt cakes became synonymous with home baking, appearing at every church potluck, family gathering, and community bake sale. The pan’s design meant even novice bakers could create impressive-looking cakes without complicated decorating skills. Today, the Bundt cake continues to enjoy popularity, with creative bakers developing endless flavor variations while honoring the classic vanilla version that started it all.
Why You’ll Love This Recipe
This classic vanilla Bundt cake combines old-fashioned flavor with modern convenience, delivering a dessert that tastes like grandma’s kitchen but fits perfectly into today’s busy lifestyle. The beauty of this recipe lies in its simplicity – no complicated techniques, no fancy equipment beyond the pan itself, and no stress about whether it will turn out.
Here’s why this vanilla Bundt cake deserves a permanent spot in your recipe collection:
- Foolproof formula – The straightforward mixing method and reliable ingredient ratios mean consistent results every single time, even if you’re a nervous baker
- Make-ahead friendly – This cake actually improves after a day, making it perfect for stress-free entertaining and busy schedules
- Impressive presentation – The decorative pan does all the work, creating a bakery-worthy cake that looks far more complicated than it actually is
- Rich, buttery flavor – Real butter, quality vanilla, and a hint of sour cream create incredible depth and moisture that boxed mixes simply cannot match
- Feeds a crowd – One Bundt cake easily serves 12-14 people, making it economical and practical for gatherings
- Budget-friendly ingredients – Made entirely from pantry staples without requiring expensive specialty items or hard-to-find components
- Versatile canvas – This vanilla base accepts endless variations, from citrus zest to chocolate chips to fresh berries
- Room temperature stable – Unlike frosted cakes that require refrigeration, this cake sits perfectly on your counter for days, ready whenever you want a slice
- Freezer-friendly – Make multiple cakes when you have time and freeze them for future occasions
- No special decorating skills needed – A simple glaze or powdered sugar dusting looks absolutely beautiful and takes seconds
- Perfect texture – Dense enough to hold together beautifully but tender and moist enough to melt in your mouth
Whether you need a last-minute dessert, a reliable potluck contribution, or simply want the comfort of homemade cake in your kitchen, this recipe delivers every time without drama or difficulty.
Ingredient Notes
Understanding your ingredients and their roles will help you achieve Bundt cake perfection and make smart substitutions when needed.
All-Purpose Flour – The foundation of your cake’s structure. Measure correctly by spooning flour into your measuring cup and leveling it off rather than scooping directly from the bag, which compacts the flour and can make your cake dense. Cake flour can be substituted for an even more tender crumb, but all-purpose works beautifully.
Unsalted Butter – Provides rich flavor and tender texture. It must be at room temperature (soft enough to leave an indent when pressed but not melted or greasy). Room temperature butter creams properly with sugar, creating the air pockets that give your cake its structure. European-style butter with higher fat content yields even more flavor. In a pinch, salted butter can work, but reduce the added salt by half.
Granulated Sugar – Sweetens the cake while helping create structure and moisture retention. When creamed with butter, sugar crystals cut into the butter, creating air pockets essential for proper rise. Don’t substitute with other sweeteners in this recipe, as sugar’s chemical properties are crucial to the texture.
Eggs – Provide structure, moisture, richness, and help bind everything together. Large eggs are standard; using room temperature eggs is crucial as cold eggs can cause the batter to curdle. Let them sit out for 30 minutes or place them (in shells) in warm water for 5 minutes before using.
Sour Cream – The secret weapon for incredible moisture and tender crumb. The acidity reacts with baking soda to create lift while adding richness. Full-fat sour cream is essential; low-fat versions contain more water and less fat, affecting texture. Greek yogurt can substitute in equal amounts, though the flavor will be slightly tangier.
Whole Milk – Adds moisture and helps create a tender crumb. Whole milk’s fat content is important for texture; while 2% milk can work in a pinch, avoid skim milk as it produces a drier cake. Buttermilk can be substituted for extra tang and tenderness.
Pure Vanilla Extract – Not just flavoring but essential for enhancing all other flavors. Use real vanilla extract, not imitation, for best results. The amount might seem generous, but vanilla is the star of this cake. Vanilla bean paste can elevate it even further.
Baking Powder & Baking Soda – Work together to create proper rise and texture. Baking powder is double-acting, providing lift during mixing and again in the oven. Baking soda reacts with the sour cream’s acidity for additional lift and helps browning. Check expiration dates; old leavening agents won’t work properly.
Salt – Essential for enhancing sweetness and balancing flavors. Even though the amount seems small, don’t skip it. Salt makes everything taste more like itself and prevents the cake from tasting flat.
Equipment Needed
Gathering your equipment before starting makes the baking process smooth and enjoyable. Here’s what you’ll need:
- 10-12 cup Bundt pan – The star of the show. Traditional fluted design works best; avoid intricate designs for your first attempts as they’re harder to remove cleanly
- Stand mixer or hand mixer – For properly creaming butter and sugar; a stand mixer is easier but hand mixer works fine
- Large mixing bowl – For mixing batter if using hand mixer, or additional prep work
- Medium mixing bowl – For combining dry ingredients
- Measuring cups and spoons – Accurate measurements are crucial for baking success
- Rubber spatula – For scraping bowl sides and ensuring everything is evenly mixed
- Wire whisk – For combining dry ingredients thoroughly
- Cooling rack – Essential for proper cooling; the center tube needs air circulation from all sides
- Pastry brush – For applying melted butter or shortening to every crevice of your Bundt pan
- Small saucepan or microwave-safe bowl – For melting butter for greasing the pan
- Offset spatula or butter knife – Helpful for loosening cake edges if needed
- Cake stand or serving platter – For presenting your beautiful creation
- Fine-mesh sieve or sifter – For dusting powdered sugar or mixing dry ingredients
- Toothpick or cake tester – For checking doneness
Classic Vanilla Bundt Cake Recipe – Moist, Buttery Perfection Every Time
A classic, buttery vanilla Bundt cake with a tender, moist crumb and rich flavor. This foolproof recipe creates a beautiful, bakery-worthy cake that’s perfect for any occasion – from casual family dinners to special celebrations.
- Prep Time: 20 minutes
- Cook Time: 50-60 minutes
- Total Time: 1 hour 20 minutes (plus cooling)
- Yield: Yield: 12-14 servings
- Category: Dessert, Cake
- Method: Baking
- Cuisine: American
- Diet: Vegetarian
Ingredients
For the Cake:
- 3 cups all-purpose flour
- 1 teaspoon baking powder
- ½ teaspoon baking soda
- ½ teaspoon salt
- 1 cup (2 sticks) unsalted butter, room temperature
- 2 cups granulated sugar
- 4 large eggs, room temperature
- 1 cup sour cream, room temperature
- ½ cup whole milk, room temperature
- 2 teaspoons pure vanilla extract
For Greasing the Pan:
- 2 tablespoons melted butter or 1 tablespoon shortening plus 1 tablespoon flour
For Topping (Optional):
- Powdered sugar for dusting, OR
- Simple vanilla glaze: 1 cup powdered sugar + 2-3 tablespoons milk + ½ teaspoon vanilla extract
Instructions
- Prepare the pan: Preheat your oven to 325°F (165°C). Generously grease every crevice, ridge, and corner of your Bundt pan using melted butter and a pastry brush, or use the shortening and flour method (coat with shortening, then dust with flour, tapping out excess). This step is crucial for easy release.
- Combine dry ingredients: In a medium bowl, whisk together flour, baking powder, baking soda, and salt until evenly combined. Set aside.
- Cream butter and sugar: In a large bowl using a stand mixer (or hand mixer), beat the room temperature butter on medium speed for about 1 minute until smooth. Add sugar and beat on medium-high speed for 4-5 minutes until light, fluffy, and pale in color. Stop to scrape down the bowl sides at least twice during this process. Proper creaming is essential for texture.
- Add eggs: Reduce mixer speed to medium-low. Add eggs one at a time, beating well after each addition (about 30 seconds per egg). The mixture should look smooth and emulsified. Scrape down the bowl after adding all eggs.
- Combine wet ingredients: In a small bowl or measuring cup, whisk together sour cream, milk, and vanilla extract until smooth.
- Alternate additions: With mixer on low speed, add the flour mixture in three additions, alternating with the sour cream mixture in two additions. Begin and end with flour. Mix each addition just until the flour streaks disappear – about 10-15 seconds. Stop and scrape down the bowl between additions. Do not overmix or your cake will be tough.
- Fill the pan: Pour batter into your prepared Bundt pan, spreading it evenly. Tap the pan firmly on the counter 3-4 times to release any large air bubbles.
- Bake: Bake for 50-60 minutes, until the cake is golden brown and a toothpick inserted into the thickest part comes out clean or with just a few moist crumbs (no wet batter). Start checking at 50 minutes. The top should spring back when lightly pressed.
- Cool in pan: Remove from oven and place the pan on a wire cooling rack. Let the cake cool in the pan for exactly 15 minutes – no more, no less. This allows it to firm up enough to release cleanly without sticking.
- Unmold: After 15 minutes, place your serving plate upside-down on top of the Bundt pan. Holding both firmly, quickly flip them over together. Let the pan sit for a minute, then carefully lift it off. If the cake sticks, gently tap the pan or use an offset spatula to loosen stubborn spots. Let the cake cool completely on the rack before glazing or serving.
- Finish (optional): Once completely cool, dust generously with powdered sugar using a fine-mesh sieve, or drizzle with vanilla glaze (whisk powdered sugar, milk, and vanilla until smooth and pourable).
Notes
- Room temperature ingredients are crucial – Cold ingredients don’t combine properly and can cause a dense cake. Set everything out 30-60 minutes before baking.
- Don’t skip the greasing step – This is the most common reason Bundt cakes stick. Every ridge must be thoroughly coated.
- Measure flour correctly – Spoon flour into your measuring cup and level off with a knife. Scooping directly from the bag compacts flour, resulting in dry, dense cake.
- Don’t overmix – Once flour is added, mix just until combined. Overmixing develops gluten, making the cake tough.
- Oven temperature matters – Use an oven thermometer to verify accuracy. Too hot causes over-browning; too cool causes poor rise.
- The 15-minute cooling time is critical – Too short and the cake falls apart; too long and it sticks to the pan.
Nutrition
- Serving Size: 1 slice (1/12 of cake)
- Calories: 385
- Sugar: 32g
- Sodium: 195mg
- Fat: 18g
- Saturated Fat: 11g
- Unsaturated Fat: 6g
- Trans Fat: 0g
- Carbohydrates: 51g
- Fiber: 1g
- Protein: 5g
- Cholesterol: 105g
Note: Nutrition information is approximate and will vary based on specific ingredients and portion sizes.
Tips & Variations
The beauty of this vanilla Bundt cake lies in its versatility. Once you’ve mastered the basic recipe, try these delicious variations to keep things interesting.
Citrus Variations:
- Lemon Bundt Cake – Add zest of 2 lemons to the batter and replace ¼ cup milk with fresh lemon juice. Top with lemon glaze (powdered sugar + lemon juice).
- Orange Cream Cake – Add zest of 1 large orange and 1 teaspoon orange extract. Glaze with orange-flavored icing.
- Lime Coconut – Add lime zest and ½ cup shredded coconut to batter, top with lime glaze and toasted coconut.
Chocolate Lover’s Versions:
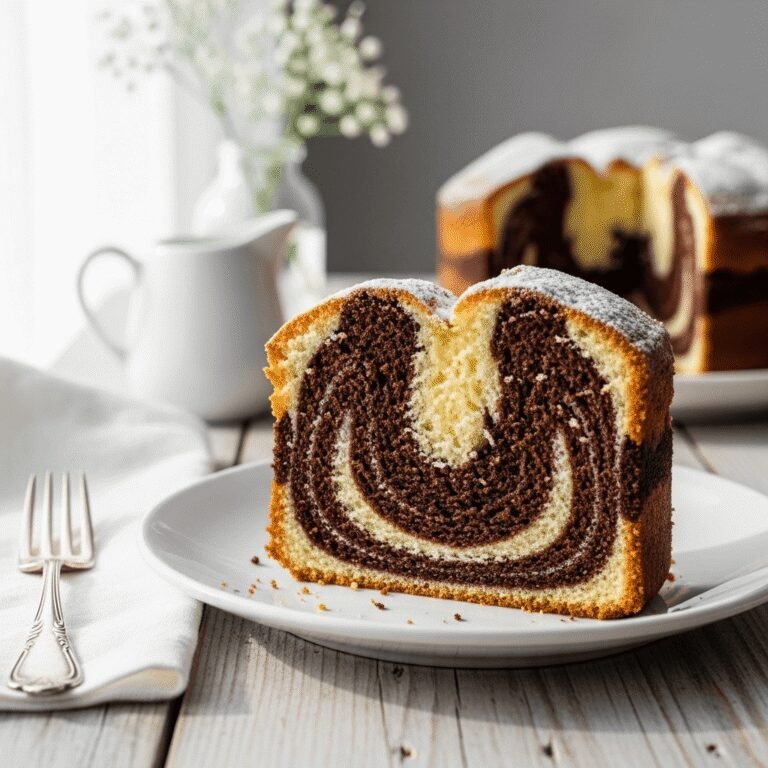
- Marble Bundt – Divide batter in half. Mix 3 tablespoons cocoa powder with 2 tablespoons milk and stir into one portion. Alternate spoonfuls of vanilla and chocolate batter in the pan, then swirl with a knife.
- Chocolate Chip – Fold 1 cup mini chocolate chips into finished batter before baking.
- Chocolate Drizzle – Keep cake vanilla but drizzle with melted chocolate instead of glaze.
Fruit & Berry Options:
- Blueberry – Toss 1 cup fresh blueberries with 1 tablespoon flour and gently fold into finished batter.
- Strawberry – Add ½ cup finely chopped fresh strawberries and ½ teaspoon strawberry extract.
- Apple Cinnamon – Fold in 1 cup finely diced apple and 1 teaspoon cinnamon.
Nutty Additions:
- Toast and chop ½ cup pecans, walnuts, or almonds and fold into batter
- Add ½ teaspoon almond extract along with vanilla for subtle nuttiness
Spice It Up:
- Vanilla Bean – Replace extract with seeds from 2 vanilla beans for intense vanilla flavor
- Cinnamon Sugar – Mix 2 teaspoons cinnamon into batter, dust cooled cake with cinnamon-sugar
- Chai Spice – Add 1 teaspoon cinnamon, ½ teaspoon cardamom, ¼ teaspoon ginger, pinch of cloves
Healthier Modifications:
- Replace half the butter with unsweetened applesauce (texture will be slightly different)
- Use Greek yogurt instead of sour cream
- Replace ½ cup sugar with mashed banana (reduce milk slightly)
Pro Chef Tips
Professional bakers rely on specific techniques that home bakers often overlook. These insider secrets will elevate your Bundt cake from good to absolutely exceptional.
Room temperature is non-negotiable: This cannot be stressed enough. Butter should be soft enough to leave an indent when pressed but still hold its shape – not greasy or melted. Cold eggs added to room temperature butter will cause the mixture to curdle and seize, creating a dense, uneven texture. Set all refrigerated ingredients out 60 minutes before baking, or use the warm water trick for eggs.
Master the pan preparation: The number one Bundt cake disaster is sticking. Professional bakers use a foolproof method: brush melted butter thoroughly into every crevice using a pastry brush, making sure to get into all the ridges and details. Then dust with flour, tapping out excess. Alternatively, use a baking spray that contains flour. Never use just cooking spray alone or just butter – you need both fat and flour for proper release.
Don’t rush the creaming process: When you cream butter and sugar together, you’re creating tiny air pockets that will expand during baking, giving your cake its structure. This takes time – a full 4-5 minutes at medium-high speed. The mixture should be noticeably lighter in color (pale yellow rather than bright yellow) and fluffy in texture. Rushing this step results in dense cake.
Alternate additions matter: Adding flour and liquid alternately in small batches prevents overmixing and creates a more tender crumb. Start and end with flour, which helps protect the protein structure. Mix each addition only until just combined – you should still see a few flour streaks before adding the next portion.
The toothpick test isn’t always reliable: Because Bundt cakes are thick and dense, a toothpick test can be misleading. Instead, look for these signs: the cake should pull away slightly from the pan edges, the top should spring back when gently pressed, and the color should be deep golden brown. If in doubt, an instant-read thermometer inserted into the thickest part should read 205-210°F.
Master the unmolding timing: Too soon and your cake falls apart; too long and it sticks forever. The magic number is 15 minutes for most Bundt cakes. Set a timer. During this time, the cake firms up just enough to hold its shape but hasn’t yet cooled enough to bond with the pan. If your cake does stick, don’t panic – let it cool completely, then try warming the pan bottom with a warm towel before inverting again.
Level baking is crucial: An uneven oven or unlevel racks cause lopsided cakes. Use an oven thermometer to verify temperature and check that your oven rack is perfectly level. Rotate the pan 180 degrees halfway through baking if your oven has hot spots.
Cool completely before glazing: Any warmth will cause glaze to melt and run off rather than setting into a beautiful coating. Wait at least 2 hours, or until the cake is completely cool to the touch throughout.
Common Mistakes to Avoid
Even experienced bakers encounter Bundt cake troubles. Here are the most frequent pitfalls and how to avoid them completely.
Insufficient greasing causes sticking: This is the most common Bundt cake disaster and also the most preventable. You cannot be too thorough when greasing a Bundt pan. Every single ridge, crevice, and corner must be coated. Use a pastry brush dipped in melted butter to really get into all the details, then follow with a dusting of flour. Pay special attention to the center tube and the intricate designs. Don’t use aerosol cooking spray alone – it doesn’t provide enough coverage for these detailed pans.
Adding cold ingredients creates texture problems: When cold eggs hit room temperature butter, the mixture can curdle or seize up, creating a grainy, separated batter that never properly emulsifies. This results in dense, uneven texture with a slightly curdled appearance. Similarly, cold milk and sour cream won’t blend smoothly. Always bring ingredients to room temperature – this is not optional advice but essential chemistry for proper cake structure.
Overmixing after adding flour makes tough cake: Once flour hits liquid, gluten begins forming. The more you mix, the more gluten develops, and the tougher your cake becomes. Mix on low speed just until you can no longer see dry flour streaks – usually 10-15 seconds per addition. Some small lumps are fine and will bake out. Stop the mixer frequently to scrape the bowl rather than running it continuously.
Incorrect baking time ruins texture: Underbaking leaves you with a gummy, wet interior that collapses when removed from the pan. Overbaking creates dry, crumbly cake that tastes stale even when fresh. Start checking at 50 minutes but don’t be surprised if your cake needs the full 60 minutes. Ovens vary wildly, and factors like pan material and kitchen temperature affect baking time. Trust visual cues and doneness tests more than the clock.
Removing from pan too soon or too late causes disaster: The 15-minute cooling window is critical. Too soon, and your soft cake will break apart as you try to remove it. Too long, and the cooling cake contracts and binds to the pan, refusing to release. Set a timer for exactly 15 minutes after removing the pan from the oven. If you accidentally let it go longer, try warming the outside of the pan with a warm towel to help release the cake.
Not tapping out air bubbles creates holes: Large air pockets in your batter will create tunnels and holes in the finished cake. After pouring batter into the pan, firmly tap it on the counter 3-4 times to bring large bubbles to the surface. You can also use a knife to swirl through the batter once.
Storage & Meal Prep
One of the Bundt cake’s greatest virtues is how well it keeps, making it ideal for make-ahead entertaining and extended enjoyment.
Room Temperature Storage: Once completely cooled, wrap the cake tightly in plastic wrap or store in an airtight cake keeper at room temperature for up to 4 days. The cake actually improves on day two as the crumb settles and flavors meld. Keep it in a cool, dry place away from direct sunlight. Do not refrigerate unless your kitchen is very hot, as refrigeration dries out the cake.
Maintaining Moisture: If you’ve glazed your cake, the glaze creates a seal that helps lock in moisture. For unglazed cakes, wrapping tightly is essential to prevent drying. If the cake seems slightly dry after a few days, serve it with whipped cream, ice cream, or fruit compote to add moisture.
Portioning for Storage: If you’re serving the cake over several days, cut only what you need and keep the rest whole. The exposed cut surfaces dry out faster than the intact exterior. Once sliced, wrap the remaining cake even more carefully, pressing plastic wrap directly against the cut surface.
Best Storage Containers: A dome-style cake keeper is ideal as it protects the cake without compressing it. If using plastic wrap, be gentle around any glazed areas to avoid messing up the finish. For transport to potlucks or gifts, invest in a sturdy cake carrier with a secure lid.
No Reheating Needed: Bundt cake is best served at room temperature. However, if you want to recreate that fresh-from-the-oven warmth, microwave individual slices for 10-15 seconds or warm slices in a 300°F oven for 5 minutes. Be careful not to overheat, which will dry out the cake.
Make-Ahead & Freezer Notes
Bundt cakes are exceptional make-ahead desserts, and they freeze beautifully for up to three months without any loss of quality.
Baking in Advance: You can bake this cake 2-3 days before serving. In fact, many bakers prefer the texture on day two when the crumb has settled and the flavors have mellowed. Bake, cool completely, wrap tightly, and store at room temperature. Add glaze or powdered sugar just before serving for the freshest appearance.
Freezing Whole Cake: Once completely cooled, wrap the cake tightly in two layers of plastic wrap, ensuring every bit is covered. Then wrap in a layer of aluminum foil or place in a large freezer bag, squeezing out as much air as possible. Label with the date. Freeze for up to 3 months. To thaw, remove from freezer and let sit at room temperature (still wrapped) for 3-4 hours or overnight. Do not unwrap while thawing, as condensation will form on the exposed cake.
Freezing Slices: Pre-slice the cake and wrap individual slices in plastic wrap, then place all wrapped slices in a freezer bag. This allows you to thaw single servings as needed. Thaw wrapped slices at room temperature for 30-45 minutes.
Freezing Glazed vs. Unglazed: For best results, freeze the cake unglazed and add glaze or powdered sugar after thawing. Glazes can become sticky or crack during freezing and thawing. If you must freeze a glazed cake, freeze unwrapped until the glaze is solid (about 1 hour), then wrap as directed.
Refreshing After Freezing: Thawed cake may seem slightly drier than fresh. Serve it with whipped cream, ice cream, or berries to add moisture and freshness. You can also brush thawed cake lightly with simple syrup (equal parts sugar and water, heated until dissolved) to refresh it.
Make-Ahead Assembly: Bake the cake up to 3 months in advance and freeze. The morning of your event, remove from freezer to thaw. Glaze or dust with powdered sugar 1-2 hours before serving. This strategy allows you to spread out your baking workload during busy seasons.
Serving Suggestions
While a beautiful Bundt cake is stunning on its own, the right accompaniments can transform it from simple dessert to memorable experience.
Classic Presentations: A traditional dusting of powdered sugar through a fine-mesh sieve creates an elegant, snow-dusted appearance. For more visual impact, place a doily or stencil on top before dusting for a patterned effect. Simple vanilla glaze drizzled over the ridges creates beautiful drips and adds sweetness without overwhelming the cake’s buttery flavor.
With Coffee & Tea: This vanilla Bundt cake is the perfect companion to afternoon coffee or tea service. Pair with robust coffee drinks like cappuccino or dark roast, delicate Earl Grey or English breakfast tea, chai lattes for a cozy vibe, or espresso for an Italian-inspired dessert course.
Fruit Accompaniments: Fresh berries bring color, freshness, and tartness that balance the cake’s richness. Try macerated strawberries (sliced berries tossed with sugar and left to release juices), fresh berry compote warmed with a little sugar, mixed berry salad with mint, or caramelized peaches or nectarines in summer.
Cream & Ice Cream: Add richness and temperature contrast with sweetened whipped cream rosettes, vanilla bean ice cream, salted caramel ice cream for a sophisticated twist, or lemon curd and whipped cream for a tart contrast.
Brunch Service: Bundt cake makes a wonderful brunch dessert or sweet bread. Serve it alongside coffee and fresh orange juice, Greek yogurt parfaits with granola, fresh fruit salad with honey-lime dressing, or quiche and savory breakfast items for a balanced spread.
Holiday Presentations: Dress up your Bundt cake for special occasions with sugared cranberries and rosemary for winter holidays, edible flowers and lemon curd for spring celebrations, fresh berries and American flag theme for July 4th, or caramel glaze and toasted pecans for fall gatherings.
Plated Dessert: Slice the cake and plate individually for an elegant presentation. Add a pool of raspberry or chocolate sauce on the plate, top with a small scoop of ice cream or dollop of whipped cream, garnish with fresh mint or berries, and dust the plate edges with cocoa powder or powdered sugar.
FAQs Section
Q: Why did my Bundt cake stick to the pan even though I greased it?
A: Sticking is usually caused by insufficient or improper greasing. You need to coat every single crevice – use a pastry brush dipped in melted butter to really get into all the details, then dust with flour. Baking spray with flour also works well. The second most common cause is incorrect cooling time. Wait exactly 15 minutes before unmolding; longer and the cake will stick as it cools and contracts.
Q: Can I use a different size Bundt pan?
A: This recipe is designed for a 10-12 cup Bundt pan. A smaller pan will overflow, while a larger pan will produce a flatter cake with altered baking time. If you must use a different size, fill the pan only 2/3 full and adjust baking time accordingly – smaller pans bake faster (check at 40 minutes), larger pans take longer (may need 65-70 minutes).
Q: My cake has a tunnel or large holes inside. What went wrong?
A: Large tunnels are caused by overmixing the batter after adding flour, which develops too much gluten. Mix on low speed just until combined. Holes can also result from not tapping out air bubbles – firmly tap the filled pan on the counter several times before baking. Finally, too much leavening (old baking powder that’s clumped, or incorrect measurements) can cause tunneling.
Q: How do I know when my Bundt cake is fully baked?
A: Look for multiple signs: the cake should be deep golden brown, it should pull away slightly from the pan edges, and the top should spring back when lightly pressed. A toothpick inserted into the thickest part should come out clean or with just a few moist crumbs (no wet batter). The most reliable method is an instant-read thermometer – the cake’s internal temperature should read 205-210°F.
Q: Can I make this recipe as cupcakes or in a regular cake pan?
A: Yes, but with adjustments. For cupcakes, fill liners 2/3 full and bake at 350°F for 18-22 minutes. This recipe makes about 30 cupcakes. For two 9-inch round pans, bake at 350°F for 28-35 minutes. For a 9×13 inch pan, bake at 350°F for 35-40 minutes. Note that baking times vary, so watch carefully and use the toothpick test.
Q: Why is my Bundt cake dry even though I followed the recipe exactly?
A: The most common culprits are overbaking (even 5 minutes too long can dry out a cake) or measuring flour incorrectly. Always spoon flour into your measuring cup and level it off – scooping directly from the bag compacts the flour, giving you too much, which produces dry cake. Also ensure your leavening agents are fresh; old baking powder doesn’t work properly. Finally, make sure your oven temperature is accurate using an oven thermometer.
Q: Do I need to refrigerate Bundt cake, especially if it has glaze?
A: No, this cake is best stored at room temperature where it stays moist and tender. The glaze doesn’t contain ingredients that require refrigeration. Refrigeration actually dries out butter-based cakes. Store wrapped or in a cake keeper at room temperature for up to 4 days. If your kitchen is extremely hot (over 80°F), you might consider refrigeration, but let the cake
come to room temperature before serving for best texture and flavor.
Q: Can I make this cake dairy-free or with substitutions?
A: Yes, with some modifications. Replace butter with solid coconut oil (measured solid, not melted), use dairy-free sour cream (cashew or coconut-based), and substitute the milk with unsweetened almond, oat, or coconut milk. The texture will be slightly different but still delicious. For gluten-free, use a 1:1 gluten-free baking flour blend that contains xanthan gum, though the texture will be more delicate and crumbly.
Conclusion
There’s a reason Bundt cakes have remained beloved for generations – they deliver impressive results with approachable techniques, making even novice bakers feel like accomplished pastry chefs. This classic vanilla Bundt cake embodies everything wonderful about homemade baking: rich butter flavor, tender crumb, beautiful presentation, and the soul-satisfying aroma that fills your home while it bakes.
Whether you’re baking for a special occasion, preparing treats for a bake sale, looking for the perfect make-ahead dessert, or simply craving a slice of something sweet with your afternoon coffee, this recipe won’t let you down. The straightforward method means you can mix it up on a weeknight without stress, and the incredible shelf life means you can enjoy it all week long – if it lasts that long!
The beauty of mastering this foundational recipe is that it opens the door to endless creative variations. Once you’re comfortable with the basic technique, you can experiment with different flavors, mix-ins, and glazes to create your own signature Bundt cake that friends and family will request again and again.
Ready to experience the joy of pulling a golden, perfectly formed Bundt cake from your oven? Dust off that Bundt pan sitting in your cabinet and give this recipe a try this weekend. The combination of simple ingredients and foolproof technique makes this the perfect recipe for bakers of all skill levels.
I’d love to hear how your Bundt cake turns out! Drop a comment below sharing your results, any creative variations you tried, or questions you have. Did you add citrus zest? Try a chocolate drizzle? Serve it for a special occasion? Your feedback helps fellow bakers and creates a wonderful community of home cooks learning together.
Don’t forget to pin this recipe to your Pinterest boards so you can find it whenever that Bundt cake craving hits – and trust me, once you make this once, you’ll be craving it regularly! Share it with your baking friends who need a reliable, show-stopping cake recipe in their arsenal. Here’s to many delicious slices and the sweet satisfaction of homemade baking success!