The Ultimate Ice Cream Cake Recipe – Easy, No-Bake Dessert Everyone Will Love
Ice cream cake is the dessert that makes everyone’s eyes light up at birthday parties, summer gatherings, and special celebrations. This showstopping treat combines the best of both worlds – the creamy, cold satisfaction of ice cream with the celebratory joy of cake. What makes this homemade ice cream cake recipe truly special is that it’s surprisingly simple to make at home, requires no baking, and can be customized endlessly to match your favorite flavors.
Unlike store-bought versions that can be expensive and filled with artificial ingredients, this homemade ice cream cake lets you control every layer. You’ll create a crunchy cookie crust, add layers of your favorite ice cream flavors, incorporate a fudgy middle layer, and top it all with whipped cream and your choice of decorations. Whether you’re celebrating a birthday, hosting a summer barbecue, or just treating your family to something special, this ice cream cake recipe delivers big on taste and presentation while keeping the process stress-free.
The best part? You can make this several days ahead, which means zero last-minute dessert panic. Just pull it from the freezer, let it sit for a few minutes, slice, and watch your guests marvel at your dessert-making skills.
History / Background
Ice cream cake has a fascinating history that dates back to the Victorian era when elaborate molded ice cream desserts became fashionable at high-society gatherings. These early versions, sometimes called “ice cream bombes,” required servants to carefully layer different flavored ice creams in decorative molds, then freeze them solid before unmolding for an impressive presentation.
The modern ice cream cake as we know it truly took off in America during the 1970s and 1980s when ice cream chains like Carvel, Dairy Queen, and Baskin-Robbins began mass-producing decorated ice cream cakes for birthdays and celebrations. Carvel’s Fudgie the Whale and Cookie Puss became cultural icons, cementing ice cream cake’s place in American celebration culture.
What started as a luxury dessert requiring special equipment has evolved into something home cooks can easily recreate. The introduction of Oreo cookies in 1912 eventually gave home bakers the perfect ready-made crust solution, while the availability of quality ice cream brands in every supermarket made the dessert accessible to everyone. Today, homemade ice cream cake represents both nostalgia for those childhood birthday parties and the modern desire to create personalized, Instagram-worthy desserts at home.
The beauty of ice cream cake is its adaptability across cultures and preferences. While the American version typically features cookie crusts and fudge layers, variations exist worldwide – from Italian semifreddo cakes to Japanese ice cream mochi cakes. This recipe honors the classic American tradition while giving you the freedom to make it uniquely yours.
Why You’ll Love This Recipe
This homemade ice cream cake recipe solves the biggest challenge of impressive desserts: looking like you spent hours when you actually didn’t. It’s the perfect make-ahead dessert that feeds a crowd, allows for creative customization, and guarantees smiles all around. Here’s what makes it absolutely irresistible:
Key Benefits:
- No baking required – Your oven can stay off, making this perfect for hot summer days when you don’t want to heat up the kitchen
- Make-ahead friendly – Prepare it 2-3 days before your event and forget about dessert stress
- Completely customizable – Choose any ice cream flavors, cookie types, and toppings to match your preferences or party theme
- Feeds a crowd – One 9-inch cake serves 10-12 people generously, making it budget-friendly for parties
- Kid-friendly project – Children love helping layer the ice cream and choosing toppings, making this a fun family activity
- Impressive presentation – Looks professional and elegant despite being simple to assemble
- Freezer stable – Keeps perfectly for up to 2 weeks, so you can make it well in advance
- Allergy adaptable – Easy to make gluten-free, dairy-free, or nut-free based on your needs
- Better than store-bought – Tastes fresher, costs less, and contains ingredients you can pronounce
Ingredient Notes
Understanding your ingredients helps you make smart substitutions and achieve the best results. Here’s what you’ll need and why each component matters:
Chocolate Sandwich Cookies (Oreos): The classic choice for the crust provides both chocolate flavor and structure. The cookies crush into fine crumbs that bind together with butter. You can substitute with chocolate graham crackers, chocolate wafer cookies, or even vanilla sandwich cookies for a different flavor profile. Gluten-free sandwich cookies work perfectly for dietary needs.
Unsalted Butter: Acts as the binder for your cookie crust, helping it hold together when frozen and sliced. Melted butter coats each crumb evenly. If you only have salted butter, use it but reduce any additional salt in the recipe. For dairy-free versions, use melted coconut oil or vegan butter.
Ice Cream (Two Flavors): The star of the show! Using two complementary flavors creates visual interest and satisfies different taste preferences. Classic combinations include vanilla and chocolate, cookies and cream with chocolate, or strawberry and vanilla. Choose ice creams that are slightly softened but not melted – they should be spreadable but not soupy. Premium ice creams with higher fat content create creamier, more luxurious layers.
Hot Fudge Sauce: Creates that classic ice cream cake experience with a rich, gooey middle layer that stays slightly soft even when frozen. Store-bought hot fudge works beautifully, or make your own. You can substitute with caramel sauce, peanut butter, Nutella, fruit preserves, or cookie butter for creative variations.
Heavy Whipping Cream: Whipped into soft peaks for the topping, it provides a light, creamy contrast to the dense ice cream layers. Must be very cold for best whipping results. For stabilized whipped cream that holds up longer, add a tablespoon of powdered sugar and half a teaspoon of vanilla extract while whipping.
Powdered Sugar: Sweetens the whipped cream without the grittiness of granulated sugar. The cornstarch in powdered sugar also helps stabilize the whipped cream.
Vanilla Extract: Enhances all the flavors and adds depth to the whipped cream topping.
Toppings: Completely your choice! Sprinkles, chocolate chips, crushed cookies, fresh fruit, chocolate shavings, nuts, candy pieces, or chocolate sauce drizzles all work beautifully. Choose toppings that complement your ice cream flavors and match your occasion.
Equipment Needed
Having the right tools makes assembly smooth and stress-free. Here’s what you’ll need:
- 9-inch springform pan – Essential for easy removal and clean slices. The removable sides make serving simple without breaking the cake
- Food processor or plastic bag + rolling pin – For crushing cookies into fine, even crumbs
- Large mixing bowl – For combining cookie crumbs with melted butter
- Small saucepan – To melt butter (or use microwave)
- Measuring cups and spoons – For accurate ingredient amounts
- Rubber spatula or offset spatula – For spreading ice cream layers evenly
- Electric mixer or whisk – For whipping cream (stand mixer or hand mixer works best)
- Plastic wrap or aluminum foil – To cover the cake between freezing stages
- Sharp knife – For clean slicing; dip in hot water between cuts
- Ice cream scoop – Helps portion out ice cream for easier spreading
The Ultimate Ice Cream Cake Recipe – Easy, No-Bake Dessert Everyone Will Love

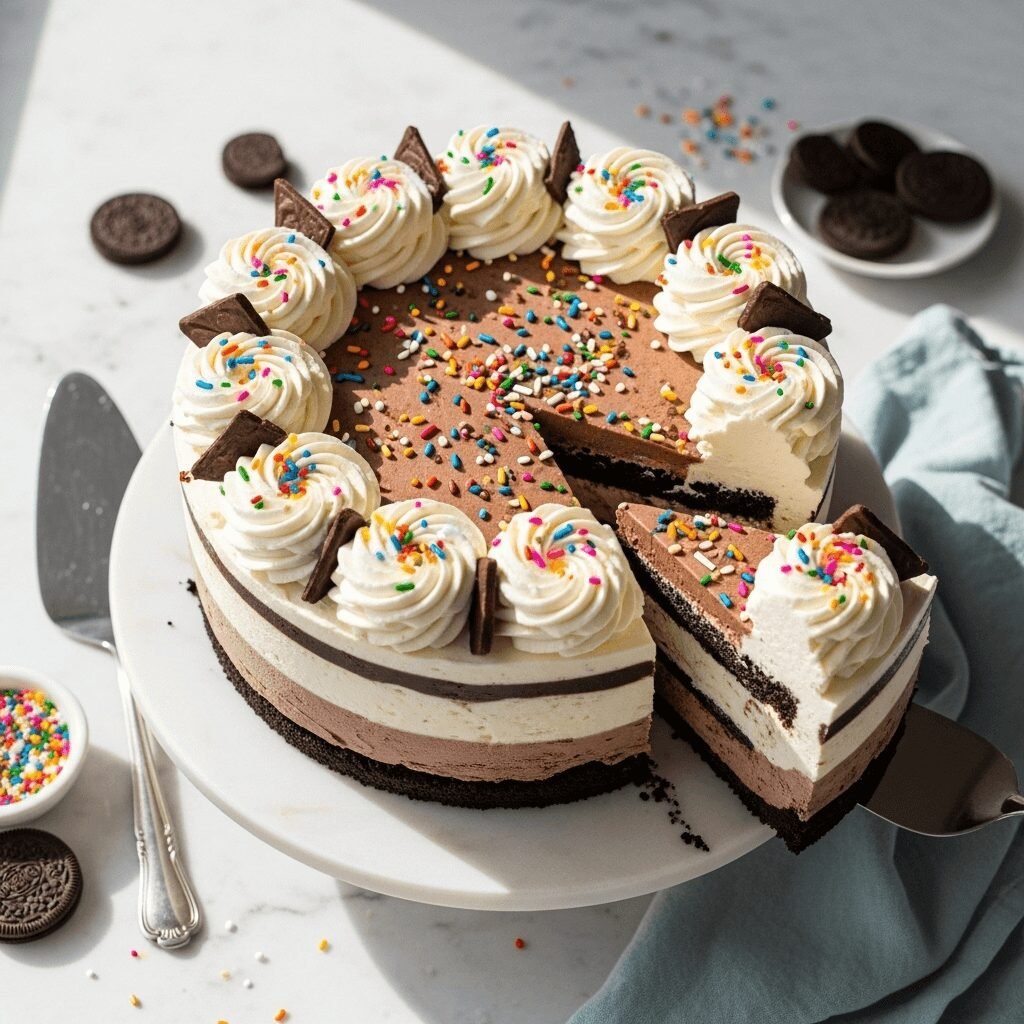
This homemade ice cream cake features a chocolate cookie crust, two layers of your favorite ice cream flavors, a rich fudge center, and whipped cream topping. It’s the perfect make-ahead dessert for birthdays, summer parties, and special celebrations that looks impressive but requires no baking!
- Prep Time: 30 minutes
- Cook Time: 6 hours (or overnight)
- Total Time: 6 hours 30 minutes
- Yield: 12 servings 1x
- Category: Dessert
- Method: No-Bake, Freezer
- Cuisine: American
- Diet: Vegetarian
Ingredients
For the Crust:
- 24 chocolate sandwich cookies (such as Oreos), about 2½ cups crushed
- 5 tablespoons unsalted butter, melted
For the Filling:
- 1½ quarts (6 cups) ice cream, first flavor, slightly softened
- 1 cup hot fudge sauce, warmed to pourable consistency
- 1½ quarts (6 cups) ice cream, second flavor, slightly softened
For the Topping:
- 2 cups heavy whipping cream, very cold
- ¼ cup powdered sugar
- 1 teaspoon vanilla extract
- Optional toppings: sprinkles, chocolate chips, crushed cookies, chocolate sauce, fresh berries, or candy pieces
Instructions
Step 1: Prepare the Pan
Line the bottom of a 9-inch springform pan with parchment paper for easy removal. Lightly spray the sides with cooking spray or brush with a thin layer of melted butter to prevent sticking.
Step 2: Make the Cookie Crust
Place chocolate sandwich cookies (including the cream filling) in a food processor and pulse until fine crumbs form, about 30-45 seconds. Alternatively, place cookies in a large zip-top bag and crush with a rolling pin until finely ground. Transfer crumbs to a large bowl, add melted butter, and stir with a fork until mixture resembles wet sand and holds together when pressed. All crumbs should be evenly moistened.
Step 3: Press the Crust
Pour cookie crumb mixture into the prepared springform pan. Using the bottom of a measuring cup or your fingers, press crumbs firmly and evenly across the bottom of the pan, creating a compact layer that extends slightly up the sides (about ½ inch). Place pan in freezer while preparing the first ice cream layer, at least 15 minutes.
Step 4: Add First Ice Cream Layer
Remove ice cream from freezer and let sit at room temperature for 5-10 minutes until slightly softened and spreadable (it should have the consistency of thick frosting, not melted). Remove springform pan from freezer. Scoop first ice cream flavor over the cookie crust. Using a rubber spatula or offset spatula, spread ice cream evenly across the crust, smoothing the top as much as possible. Work relatively quickly to prevent excessive melting. Return pan to freezer and freeze until firm, at least 1 hour or up to overnight.
Step 5: Add Fudge Layer
Warm hot fudge sauce according to package directions until pourable but not hot (you want it fluid but not so hot it melts the ice cream). Remove cake from freezer. Pour fudge sauce over the first ice cream layer, using a spatula to spread it evenly to the edges. Return to freezer for 30 minutes to set the fudge layer.
Step 6: Add Second Ice Cream Layer
Soften the second ice cream flavor the same way you did the first. Remove cake from freezer. Scoop second ice cream flavor over the fudge layer. Spread evenly and smooth the top with a spatula, creating a flat surface for the whipped cream topping. Cover pan completely with plastic wrap or aluminum foil, pressing directly onto the surface to prevent ice crystals. Freeze until very firm, at least 4 hours or preferably overnight.
Step 7: Make Whipped Cream Topping
When ready to serve (or up to 4 hours before), make the whipped cream topping. Place a large mixing bowl and beaters in the freezer for 10 minutes to chill. Pour cold heavy cream into the chilled bowl. Beat on medium speed until cream begins to thicken, about 1-2 minutes. Add powdered sugar and vanilla extract. Increase speed to medium-high and continue beating until stiff peaks form, about 2-3 minutes total. Be careful not to overbeat, or cream will become grainy.
Step 8: Frost and Decorate
Remove cake from freezer and remove plastic wrap. Run a thin knife around the inside edge of the springform pan to loosen any stuck areas. Carefully release and remove the springform ring. Transfer cake (still on the springform base) to a serving plate. Spread whipped cream evenly over the top of the cake, creating swirls or a smooth finish as desired. You can also pipe the whipped cream using a piping bag for a more decorative look. Add your chosen toppings immediately – sprinkles, chocolate chips, crushed cookies, drizzled chocolate sauce, or whatever complements your ice cream flavors.
Step 9: Final Freeze and Serve
If not serving immediately, return decorated cake to freezer for at least 30 minutes to set the whipped cream. The fully assembled cake can be frozen for up to 5 days, covered loosely with plastic wrap once the whipped cream is frozen solid. When ready to serve, remove cake from freezer and let sit at room temperature for 5-10 minutes to make slicing easier. Dip a sharp knife in hot water, wipe dry, and slice into wedges, cleaning the knife between cuts for neat slices.
Notes
- Softening Ice Cream: The key to easy spreading is properly softened ice cream. Set it on the counter for 5-10 minutes – it should be spreadable but still very cold. Don’t let it melt completely or it will become soupy and form ice crystals when refrozen.
- Flavor Combinations: Classic pairings include vanilla + chocolate, cookies & cream + chocolate, mint chocolate chip + chocolate, strawberry + vanilla, coffee + chocolate, or peanut butter + chocolate.
- Working Quickly: Ice cream melts fast! Have all your tools ready before starting each layer, and work efficiently to maintain the right consistency.
- Make-Ahead Success: This cake actually improves when made 1-2 days ahead, allowing flavors to meld and layers to set perfectly firm.
- Clean Slices: For picture-perfect slices, keep a tall glass of very hot water next to your cutting board. Dip the knife in hot water before each cut, wipe it clean with a towel, then slice. This prevents dragging and creates professional-looking pieces. 1 slice (1/12 of cake)
Nutrition
- Serving Size: 1 slice (1/12 of cake)
- Calories: 465
- Sugar: 42g
- Sodium: 185mg
- Fat: 26g
- Saturated Fat: 16g
- Unsaturated Fat: 8g
- Trans Fat: 0g
- Carbohydrates: 52g
- Fiber: 2g
- Protein: 6g
- Cholesterol: 85mg
Note: Nutrition information is approximate and will vary based on specific brands and ice cream flavors chosen. These values are calculated using standard chocolate and vanilla ice cream.
Tips & Variations
Flavor Variations:
- Birthday Cake Ice Cream Cake: Use birthday cake or cake batter ice cream with vanilla, add rainbow sprinkles throughout and on top
- Mint Lover’s Dream: Layer mint chocolate chip with chocolate ice cream, crush Andes mints for topping
- Peanut Butter Cup Heaven: Use chocolate and peanut butter ice cream, add chopped peanut butter cups and peanuts
- Berry Bliss: Combine strawberry and vanilla ice cream, add fresh berries and berry sauce drizzle
- S’mores Style: Use a graham cracker crust, chocolate and toasted marshmallow ice cream, top with mini marshmallows and chocolate chips
- Coffee House Cake: Layer coffee and mocha ice cream, drizzle with espresso caramel sauce, top with chocolate-covered espresso beans
Dietary Adaptations:
- Gluten-Free: Use gluten-free chocolate sandwich cookies or graham crackers for the crust
- Dairy-Free/Vegan: Substitute coconut oil for butter, use dairy-free ice cream, and top with coconut whipped cream
- Lower Sugar: Choose no-sugar-added ice cream varieties and use sugar-free hot fudge sauce
- Nut-Free: Ensure all mix-ins and ice cream flavors are nut-free; many ice creams are processed in facilities with nuts, so read labels carefully
Crust Variations:
- Swap chocolate cookies for vanilla wafers, graham crackers, gingersnaps, or brownie pieces
- Add 2 tablespoons cocoa powder to any cookie crust for deeper chocolate flavor
- Mix in ¼ cup mini chocolate chips or chopped nuts to the crust before pressing
Creative Add-Ins:
- Swirl cookie dough pieces, brownie chunks, or candy pieces between ice cream layers
- Add a layer of crushed cookies or chopped candy bars in the middle
- Drizzle caramel sauce, peanut butter, or Nutella between layers instead of fudge
Pro Chef Tips
Temperature Control is Everything: Professional pastry chefs know that managing temperature is the difference between a beautiful ice cream cake and a melted mess. Keep your freezer at 0°F (-18°C) or below. Work on one layer at a time, returning the cake to the freezer between each addition. On hot days, chill your mixing bowls and spatulas in the freezer for 10 minutes before working with ice cream.
The Perfect Spreadable Consistency: Ice cream should be the texture of thick frosting – spreadable but not melting. Microwave pints in 10-second bursts, checking frequently, or let quarts sit at room temperature. The goal is to soften just the outer inch while keeping the center frozen, allowing you to spread easily without losing structure.
Create an Even Fudge Layer: For a fudge layer that doesn’t crack when sliced, warm your fudge sauce until it’s pourable (about 30 seconds in the microwave), then let it cool slightly so it’s warm but not hot. Pour it in a spiral pattern from the center outward, which helps achieve even coverage. If it starts to harden before you finish spreading, very briefly warm your spatula under hot water and dry it before continuing.
Professional Whipped Cream Technique: Start with cream, bowl, and beaters straight from the fridge or briefly chilled in the freezer. Beat on medium speed first to allow air bubbles to form gradually, which creates more stable whipped cream. Only increase speed once the cream begins to thicken. Stop the moment you see stiff peaks – overbeaten cream separates and becomes grainy. For whipped cream that stays beautiful for days, add 2 tablespoons of cream cheese (softened) while whipping for stabilization.
The Hot Knife Method: This restaurant trick ensures every slice looks magazine-worthy. Fill a tall glass with very hot (not boiling) water. Dip your knife completely in the water, wipe both sides dry with a clean towel, then make one smooth cut through the cake. Clean any residue off the knife, dip again, wipe, and cut. Never saw back and forth – use one decisive downward motion for each cut.
Advance Decoration Strategy: If decorating ahead, freeze the cake completely before adding delicate decorations. Add whipped cream and freeze until solid, then loosely tent with plastic wrap (don’t press it against the cream or you’ll ruin the design). Add final sprinkles or chocolate drizzle within 2-3 hours of serving for the best appearance.
Common Mistakes to Avoid
Not Freezing Between Layers: Rushing the process by adding the next layer before the previous one is completely frozen leads to layers bleeding together and a muddy appearance. Each layer needs to be solid before continuing. Plan for at least 1 hour between ice cream layers.
Using Fully Melted Ice Cream: Completely melted ice cream seems easier to spread, but when refrozen, it becomes icy and crystalline instead of creamy. The melting and refreezing process damages the ice cream’s structure. Always work with softened (not melted) ice cream that’s still very cold and thick.
Forgetting to Line the Pan: Attempting to remove the cake from an unlined springform pan often results in the bottom layer sticking stubbornly. Always line the bottom with parchment paper and lightly grease the sides. This simple step ensures your beautiful creation comes out intact.
Not Softening the Cake Before Slicing: Trying to cut a rock-hard cake straight from the freezer results in cracked slices, bent knives, and frustration. Let the cake sit at room temperature for 5-10 minutes before slicing. It should be firm but not rock-hard. You want the texture of premium ice cream, not a frozen brick.
Overbeating the Whipped Cream: Whipped cream goes from perfect to separated and grainy in just a few seconds. Stop beating the moment you see stiff peaks that hold their shape. Overbeaten cream looks curdled and will eventually separate. If you accidentally overbeat, you can’t save it – you’ll need to start over with fresh cream.
Adding Hot Fudge That’s Too Hot: Pouring hot fudge directly from the microwave or saucepan onto frozen ice cream creates a melted crater and uneven layers. Always let heated fudge cool for 1-2 minutes until it’s warm but not hot. You want it pourable but not steaming. Test by touching the outside of the container – it should be warm, not hot.
Storage & Meal Prep
Refrigerator Storage: Ice cream cake should never be stored in the refrigerator, as the warmer temperature will cause it to melt and become soupy. Always keep it in the freezer at 0°F (-18°C) or below.
Freezer Storage (Whole Cake): Cover the decorated cake loosely with plastic wrap or place inside a large freezer bag once the whipped cream topping is frozen solid. Properly stored, the cake will maintain excellent quality for up to 2 weeks. For longer storage (up to 1 month), wrap more securely, but note that ice cream quality gradually declines over time and may develop ice crystals.
Freezer Storage (Individual Slices): For grab-and-go portions, pre-slice the cake and wrap individual pieces in plastic wrap, then place in a freezer bag. This method works brilliantly for portion control and makes serving easy. Individual slices keep well for 2 weeks.
Preventing Freezer Burn: Ice cream is particularly susceptible to freezer burn and absorbing other freezer odors. After the whipped cream is frozen solid, press plastic wrap directly against all exposed surfaces before wrapping the whole cake in aluminum foil or placing in an airtight container.
Serving After Storage: Always remove the cake from the freezer 5-10 minutes before serving to allow it to reach the perfect scooping temperature. If serving pre-cut slices, they may need only 3-5 minutes to soften slightly.
Reheating Notes: There’s no reheating needed or recommended for ice cream cake – it’s always served frozen or slightly softened. However, if your fudge layer or chocolate drizzle becomes too hard in the freezer, letting the cake sit at room temperature for 8-10 minutes will soften those elements nicely.
Make-Ahead & Freezer Notes
Perfect Make-Ahead Timeline: Ice cream cake is one of the best make-ahead desserts because it actually improves with time. The ideal make-ahead window is 2-3 days before your event, which allows all layers to set perfectly and flavors to meld beautifully. Avoid making it more than 1-2 weeks ahead, as ice cream quality gradually declines even when properly stored.
Day-by-Day Preparation Schedule:
- 3 Days Before: Make crust, press into pan, and freeze solid
- 2 Days Before: Add first ice cream layer, freeze; add fudge layer, freeze; add second ice cream layer, freeze overnight
- 1 Day Before (or Day Of, 4+ hours ahead): Make and add whipped cream topping, add decorations, freeze until serving time
- 2 Hours Before Serving: Add final delicate decorations like fresh fruit or chocolate drizzle that might not freeze well
Freezing the Undecorated Cake: For maximum flexibility, you can freeze the cake through the second ice cream layer (before adding whipped cream) for up to 2 weeks. Wrap very securely in plastic wrap and aluminum foil. On serving day, prepare fresh whipped cream topping and decorations. This method gives you the convenience of advance prep with the fresh appearance of day-of decorating.
Freezing Individual Components: You can also prep components separately: freeze the pressed cookie crust in the pan (wrapped well) for up to 1 month, or make and freeze portions of whipped cream on a parchment-lined baking sheet, then transfer frozen dollops to a freezer bag. This allows you to speed up final assembly.
Best Reheating Method for Fudge Layer: If you want to recreate that gooey, warm fudge experience, serve slices and microwave individual portions for 10-15 seconds just before eating. This warms the fudge layer slightly while keeping the ice cream frozen – a delicious hot-and-cold contrast that elevates the entire dessert.
Transport Tips: If bringing this to a party, transport in a cooler with plenty of ice packs. Keep it frozen until the last possible moment, then let it soften slightly before serving. Consider decorating at your destination if traveling more than 30 minutes to prevent decorations from shifting.
Serving Suggestions
Ice cream cake is a complete dessert on its own, but these accompaniments can elevate your presentation and create a memorable dessert experience:
Classic Accompaniments:
- Fresh berries – Strawberries, raspberries, or blueberries add color, freshness, and a tart contrast to the sweet, creamy cake
- Extra sauce drizzles – Warm chocolate sauce, caramel, or strawberry sauce drizzled over individual slices creates a restaurant-style presentation
- Whipped cream rosettes – Pipe additional whipped cream around the base of each slice for elegance
- Chocolate shavings or curls – Made with a vegetable peeler and a chocolate bar, these add sophisticated visual appeal
Beverage Pairings:
- Hot coffee or espresso provides a perfect temperature and flavor contrast
- Milk shooters for kids (serve in small mason jars with striped straws for a party feel)
- Dessert wine like Moscato or Port for adult celebrations
- Hot chocolate during winter celebrations
- Sparkling cider or champagne for New Year’s or wedding celebrations
Party Presentation Ideas:
- Serve on a cake stand with a decorative knife for an elegant buffet presentation
- Use colored plates that complement your party theme
- Add birthday candles for celebrations
- Surround the cake base with fresh flowers or greenery for garden parties
- Place on a mirror or decorative platter to reflect the beautiful layers
Create a Dessert Bar: Turn your ice cream cake into an interactive experience by setting up a topping bar alongside it. Offer bowls of crushed cookies, candy pieces, sprinkles, multiple sauce options, whipped cream, and cherries so guests can customize their slice. This works especially well for children’s birthday parties or casual summer gatherings.
Plating for Special Occasions: For elegant dinners, plate individual slices on chilled dessert plates, add a small mint sprig, a few fresh berries, and a delicate sauce drizzle. This transforms your homemade ice cream cake into a restaurant-quality dessert.
FAQs Section
Can I use ice cream that’s already very soft from the store?
If your ice cream became very soft on the drive home, it’s best to refreeze it completely before using it in this recipe. Spread it out in a shallow container to speed up refreezing (2-3 hours), then soften it again just to spreadable consistency. Ice cream that’s been fully melted and refrozen once will have some texture changes, but it’s still usable for ice cream cake where you’ll be refreezing it anyway.
Do I have to use a springform pan?
A springform pan makes life much easier because you can release the sides for perfect presentation and easy slicing. However, you can use a regular 9-inch round cake pan lined with parchment paper with long overhanging sides (like handles). When ready to serve, use the parchment to lift the entire cake out. You can also use a loaf pan for a different shape, though slicing will be slightly messier without removable sides.
How do I prevent ice crystals from forming on my cake?
Ice crystals form when moisture in the freezer comes in contact with your cake. The best prevention is proper wrapping – press plastic wrap directly against all exposed surfaces of the cake before covering the entire pan with aluminum foil or placing in a freezer bag. Avoid opening your freezer repeatedly while the cake is in there, and keep your freezer temperature at a constant 0°F (-18°C) or below. Making sure your ice cream layers are spread evenly without air pockets also helps.
Can I make this with gelato or frozen yogurt instead of ice cream?
Absolutely! Gelato, frozen yogurt, sherbet, or sorbet all work beautifully in this recipe. Keep in mind that gelato has less air than American ice cream, so it will be denser and harder when frozen – let it soften a bit longer at room temperature before serving. Frozen yogurt has a tangier flavor that pairs wonderfully with berry or vanilla layers. Sorbet creates a dairy-free, refreshing option perfect for summer.
My whipped cream is weeping/separating on the cake. What happened?
This typically happens when whipped cream isn’t beaten to stiff peaks, or when it’s stored too long. Make sure you beat the cream until it holds very firm peaks that don’t droop when you lift the beaters. For longer storage, add 1-2 tablespoons of powdered sugar (beyond what the recipe calls for) or a small amount of cream cheese as a stabilizer. If you’ve decorated the cake more than 3-4 days in advance, the whipped cream may naturally break down slightly – for cakes made far ahead, consider adding whipped cream topping closer to serving time.
Can I make mini ice cream cakes instead of one large one?
Yes! Use a muffin tin lined with cupcake liners or small (4-inch) springform pans. Follow the same layering process with reduced amounts – each mini cake will need about 2 tablespoons of crust, ½ cup of each ice cream flavor, and 2 tablespoons of fudge sauce. Freezing time will be shorter (about 30 minutes between layers instead of 1 hour). Mini cakes are perfect for portion control and cute party presentations. You’ll get approximately 12 mini cakes from this recipe’s ingredient quantities.
The fudge layer is rock-hard and impossible to cut through. Help!
This is common when using certain types of fudge sauce. To prevent it, choose a fudge sauce with a softer consistency (check the ingredients – ones with more cream and less cocoa powder stay softer when frozen). For next time, you can also mix 1-2 tablespoons of heavy cream into the fudge sauce before adding it to keep it slightly softer when frozen. For your current cake, let it sit at room temperature for 10-12 minutes before slicing to soften the fudge layer, or serve slices and microwave each for 5-10 seconds to soften just the fudge while keeping the ice cream frozen.
Conclusion
Creating a homemade ice cream cake is one of those magical kitchen accomplishments that looks incredibly impressive but is actually wonderfully simple once you know the process. The beauty of this recipe is how forgiving and adaptable it is – you can customize every single layer to match your tastes, your party theme, or whatever ice cream flavors are calling your name from the freezer aisle.
Whether you’re making this for a child’s birthday party, a summer backyard barbecue, a bridal shower, or just because your family deserves something special on a random Tuesday, this ice cream cake delivers joy in every slice. The combination of crunchy cookie crust, creamy ice cream layers, gooey fudge, and fluffy whipped cream creates the perfect bite that makes everyone smile.
Remember, the key to success is patience between layers and not overthinking the process. This is meant to be fun! Get your kids involved in choosing flavors and decorations. Experiment with wild flavor combinations. Make mistakes and learn what works best in your kitchen with your freezer. That’s the beauty of homemade desserts – each one gets better as you practice.
So grab your springform pan, pick out your favorite ice cream flavors, and get ready to become everyone’s favorite dessert hero. This homemade ice cream cake is about to become your go-to celebration dessert, and trust me, once people taste it, you’ll be getting requests to make it again and again.