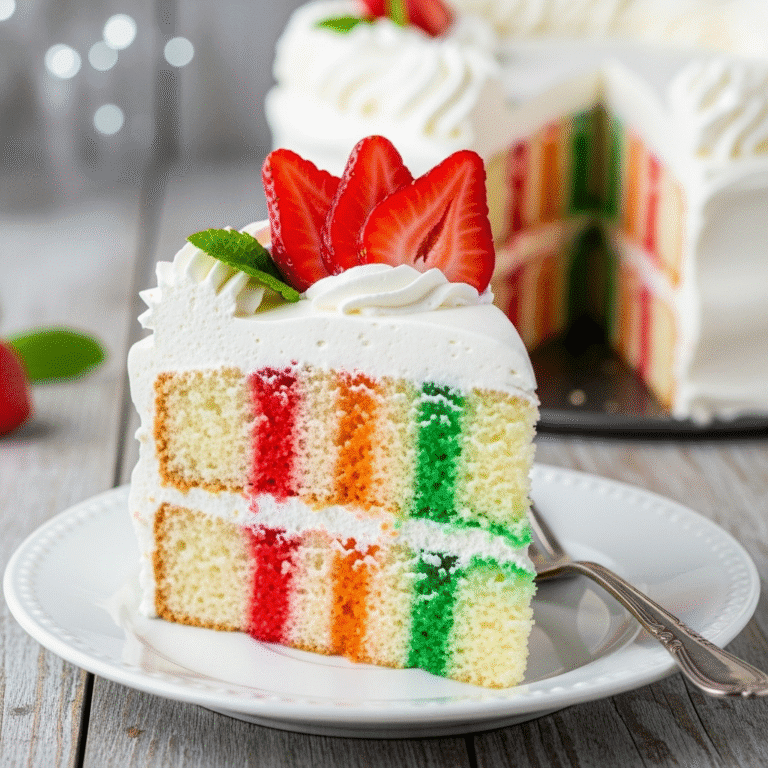
Rainbow Cake Recipe – Colorful, Fun, and Perfect for Any Celebration!

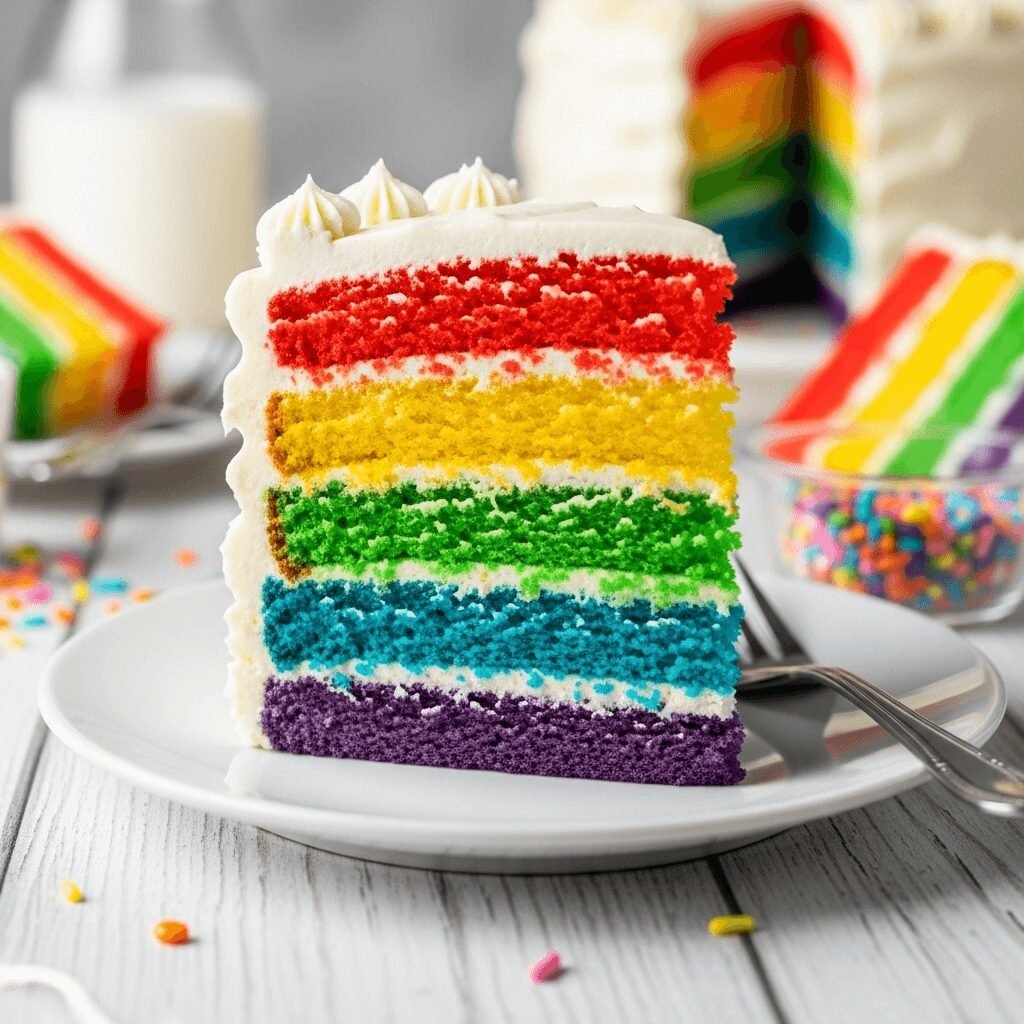
There’s something absolutely magical about slicing into a cake and revealing layers of vibrant rainbow colors inside. A Rainbow Cake is exactly what it sounds like – a stunning, multi-layered cake featuring six beautiful colors (red, orange, yellow, green, blue, and purple) stacked together and covered in fluffy frosting. This show-stopping dessert isn’t just visually spectacular; it’s also incredibly delicious with its moist, tender vanilla cake layers and creamy buttercream frosting.
Rainbow cakes have become a Pinterest favorite and party staple for good reason. They’re perfect for birthday celebrations, Pride events, baby showers, gender-neutral celebrations, or simply when you want to bring extra joy and color to someone’s day. Kids absolutely adore them, but trust me – adults light up just as much when they see those colorful layers revealed! Whether you’re celebrating a special occasion or just want to create something that brings smiles all around, this Rainbow Cake delivers both in presentation and taste.
The best part? While it looks professionally made and incredibly impressive, this recipe is surprisingly approachable for home bakers. You don’t need special skills or expensive equipment – just some basic baking essentials, gel food coloring, and a bit of patience as you assemble those gorgeous layers.
History / Background
The Rainbow Cake as we know it today rose to prominence in the early 2010s, largely thanks to social media platforms like Pinterest, Instagram, and food blogs that showcased its stunning visual appeal. However, the concept of colorful, multi-layered cakes has deeper roots in American baking history.
Layered cakes became popular in America during the 19th century when baking powder became commercially available, making it easier to create light, fluffy cakes. The tradition of stacking multiple cake layers with frosting between them became a hallmark of celebration cakes, particularly in the Southern United States.
The rainbow variation specifically gained momentum as food coloring became more accessible and vibrant in the mid-20th century. Betty Crocker and other home baking brands began encouraging creative uses of food coloring in their recipes. But it wasn’t until the internet age that Rainbow Cake truly exploded in popularity.
The modern Rainbow Cake trend can be partially credited to the LGBTQ+ community’s adoption of rainbow symbolism, making these cakes especially popular during Pride Month celebrations. Additionally, the rise of gender-neutral baby showers and celebrations has made rainbow themes increasingly popular as they move away from traditional pink-or-blue color schemes.
Today, the Rainbow Cake represents joy, inclusivity, celebration, and the pure fun of baking. It’s become a rite of passage for home bakers who want to challenge themselves with something that looks spectacular while still being fundamentally a straightforward vanilla cake recipe.
Why You’ll Love This Recipe
This Rainbow Cake recipe is designed specifically for home bakers who want impressive results without professional pastry chef training. The cake itself uses a reliable vanilla base that’s been tested countless times, ensuring you get perfectly moist, tender layers every single time. The buttercream frosting is silky smooth and not overly sweet, complementing the cake layers beautifully.
Here’s why this recipe will become your go-to celebration cake:
- Visually Stunning – The “wow factor” is unbeatable when you slice into those colorful layers
- Easier Than It Looks – Despite the impressive appearance, this uses basic cake-making techniques
- Customizable – Adjust colors, add different extracts, or switch up the frosting flavor
- Crowd-Pleaser – Appeals to all ages, from toddlers to grandparents
- Make-Ahead Friendly – Cake layers can be baked in advance and frozen
- Reliable Recipe – This isn’t a finicky recipe; it works consistently well
- Perfect for Photos – Pinterest and Instagram-worthy from every angle
- Uses Common Ingredients – No specialty items needed except gel food coloring
- Feeds a Crowd – Makes approximately 12-16 generous servings
- Adaptable for Dietary Needs – Can be modified for different dietary requirements
Whether you’re baking for your child’s birthday party, hosting a Pride celebration, or simply want to brighten someone’s day, this Rainbow Cake delivers happiness on a plate!
Ingredient Notes
All-Purpose Flour – The foundation of our cake structure. All-purpose flour provides the right protein content for tender but stable cake layers. If you only have cake flour, you can use it for even more tender layers, but all-purpose works beautifully. Avoid bread flour as it will make the cake too dense.
Granulated Sugar – Provides sweetness and helps create a tender crumb through its interaction with the butter. Don’t substitute with powdered sugar, as the texture will be different.
Unsalted Butter – Creates rich flavor and a tender, moist crumb. Using unsalted allows you to control the salt level. Make sure it’s at room temperature (should leave a slight indent when pressed) for proper creaming. Can substitute with margarine in a pinch, though butter tastes better.
Eggs – Provide structure, moisture, and richness. Use large eggs at room temperature – they incorporate better into the batter. Room temperature eggs create more volume when beaten.
Whole Milk – Adds moisture and creates a tender crumb. Whole milk is preferable for the richest flavor, but 2% works in a pinch. Avoid skim milk as it can make the cake drier. Can substitute with buttermilk for extra tanginess.
Vanilla Extract – Pure vanilla extract adds wonderful flavor depth. Use the real thing, not imitation, for best results. This is where much of your cake’s flavor comes from.
Baking Powder & Baking Soda – These leavening agents work together to create light, fluffy cake layers. Make sure they’re fresh (less than 6 months old) for proper rising.
Salt – Enhances all the other flavors and balances sweetness. Don’t skip it!
Gel Food Coloring – This is crucial! Use gel or paste food coloring, NOT liquid. Gel colors are highly concentrated, won’t thin your batter, and create vibrant, true colors. You’ll need red, orange, yellow, green, blue, and purple (or you can mix blue and red to make purple).
For the Frosting:
Unsalted Butter – The base of American buttercream. Must be room temperature for smooth, fluffy frosting.
Powdered Sugar (Confectioners’ Sugar) – Creates the sweet, smooth texture of buttercream. Sifting helps prevent lumps.
Heavy Cream or Milk – Thins the frosting to spreadable consistency. Heavy cream creates a richer frosting.
Vanilla Extract – Flavors the frosting beautifully.
Equipment Needed
Six 8-inch or 9-inch Round Cake Pans – Yes, six! This is the most challenging requirement. If you don’t have six pans, you can bake in batches using 2-3 pans, washing them between batches. Just keep unbaked batter in the fridge while waiting.
Electric Mixer – A stand mixer is ideal, but a hand mixer works fine. You’ll be doing quite a bit of mixing, so a stand mixer saves arm fatigue.
Mixing Bowls – You’ll need six small bowls for dividing and coloring the batter, plus larger bowls for mixing.
Measuring Cups and Spoons – For accurate measurements. Baking is science!
Rubber Spatula – For scraping bowls and folding in ingredients.
Whisk – For combining dry ingredients.
Cooling Racks – For cooling cake layers completely before frosting.
Offset Spatula – Makes frosting the cake much easier, though a regular butter knife works in a pinch.
Cake Turntable – Optional but highly recommended for easier frosting. Makes achieving smooth sides much simpler.
Parchment Paper – For lining cake pans to prevent sticking.
Toothpicks – For testing cake doneness.
Cake Board or Serving Plate – Sturdy base for assembling your cake.
Bench Scraper – Optional but helpful for smoothing frosting on the sides.
PrintRainbow Cake Recipe

A spectacular Rainbow Cake featuring six colorful layers of moist vanilla cake covered in smooth vanilla buttercream. This show-stopping dessert is perfect for birthdays, celebrations, and any time you want to spread joy through baking!
- Prep Time: 45 minutes
- Cook Time: 25 minutes
- Total Time: 1 hour 10 minutes (plus cooling and frosting time)
- Yield: 12-16 servings 1x
- Category: Dessert
- Method: Baking
- Cuisine: American
- Diet: Vegetarian
Ingredients
For the Cake Layers:
- 3 cups all-purpose flour
- 1 tablespoon baking powder
- ½ teaspoon baking soda
- ½ teaspoon salt
- 1 cup (2 sticks) unsalted butter, room temperature
- 2 cups granulated sugar
- 4 large eggs, room temperature
- 1 tablespoon pure vanilla extract
- 1½ cups whole milk, room temperature
- Gel food coloring in red, orange, yellow, green, blue, and purple (or red and blue to make purple)
For the Vanilla Buttercream Frosting:
- 1½ cups (3 sticks) unsalted butter, room temperature
- 6 cups powdered sugar, sifted
- ⅓ cup heavy cream (or whole milk)
- 2 teaspoons pure vanilla extract
- Pinch of salt
Instructions
Prepare for Baking:
- Preheat your oven to 350°F (175°C). Grease six 8-inch or 9-inch round cake pans generously with butter or baking spray, then line the bottoms with parchment paper circles. Grease the parchment too. This double preparation ensures your colorful layers come out perfectly intact.
- In a medium bowl, whisk together the flour, baking powder, baking soda, and salt. Set aside. This ensures your leavening agents are evenly distributed throughout the flour.
Make the Cake Batter:
- In a large mixing bowl or stand mixer fitted with the paddle attachment, beat the room temperature butter on medium speed for about 2 minutes until smooth and creamy. Gradually add the sugar and continue beating for 3-4 minutes until the mixture is light, fluffy, and pale in color. This creaming process is crucial for creating a tender cake texture.
- Add the eggs one at a time, beating well after each addition (about 30 seconds per egg). Scrape down the sides of the bowl between additions. Mix in the vanilla extract.
- With the mixer on low speed, add the flour mixture in three additions, alternating with the milk in two additions (beginning and ending with flour). Mix just until combined after each addition – do not overmix! The batter should be smooth and thick but pourable. Scrape down the sides and bottom of the bowl to ensure everything is incorporated.
Color the Batter:
- Divide the batter evenly among six small bowls (about 1 cup of batter per bowl). Use a kitchen scale for precision if you have one, or eyeball it – slight variations are fine.
- Add gel food coloring to each bowl: red to one, orange to another, yellow, green, blue, and purple to the remaining bowls. Start with 3-4 drops (gel is concentrated!), then mix thoroughly. Add more coloring gradually until you achieve vibrant, saturated colors. The colors should be bright before baking – they’ll stay true as they bake.
Bake the Layers:
- Pour each colored batter into its own prepared pan, spreading evenly with a spatula. Gently tap the pans on the counter a few times to release any air bubbles.
- Bake for 22-27 minutes, or until a toothpick inserted in the center comes out clean or with just a few moist crumbs. The tops should spring back when lightly pressed. Baking time may vary based on your oven and pan size – 8-inch pans may need closer to 27 minutes, while 9-inch pans bake faster.
- Remove from the oven and let cool in the pans for 10 minutes. Then run a knife around the edges and carefully invert onto cooling racks. Peel off the parchment paper. Allow the layers to cool COMPLETELY before frosting (at least 1-2 hours, or speed up the process by refrigerating for 30-45 minutes).
Make the Buttercream Frosting:
- In a large mixing bowl or stand mixer fitted with the paddle attachment, beat the room temperature butter on medium speed for 3-4 minutes until very smooth, creamy, and pale in color.
- Reduce speed to low and gradually add the sifted powdered sugar, one cup at a time, beating well after each addition. The mixture will look dry and crumbly at first – this is normal.
- Add the vanilla extract, salt, and 2 tablespoons of heavy cream. Increase speed to medium-high and beat for 3-5 minutes until the frosting is light, fluffy, and smooth. If the frosting is too thick, add more cream one tablespoon at a time. If it’s too thin, add more powdered sugar ¼ cup at a time.
Assemble the Rainbow Cake:
- Place your first layer (traditionally purple, but you can start with any color) on a cake board or serving plate. If your layers domed on top, use a serrated knife to level them for easier stacking.
- Spread about ½ cup of frosting evenly over the first layer, going right to the edges. Place the next color layer on top (blue), and repeat with frosting. Continue stacking in rainbow order: purple, blue, green, yellow, orange, red (or reverse the order – it’s your cake!).
- Once all layers are stacked, apply a thin “crumb coat” of frosting all over the entire cake (top and sides). This seals in any crumbs. Don’t worry about it looking perfect – you’ll barely see the cake through this layer. Refrigerate for 30 minutes to let the crumb coat set.
- Apply the final coat of frosting, using more generous amounts and smoothing with an offset spatula. Work from the top down, and use a bench scraper or offset spatula to smooth the sides while rotating the cake (a turntable makes this much easier). You can create a smooth finish, or leave it textured and rustic.
- Refrigerate the finished cake for at least 1 hour before slicing to let the frosting firm up. When ready to serve, use a sharp knife wiped clean between each slice to reveal those gorgeous rainbow layers!
Notes
- Food Coloring Quality: Invest in good gel food colors (Wilton and AmeriColor are excellent brands). Liquid food coloring won’t create vibrant colors and can affect batter consistency.
- Room Temperature Ingredients: This is crucial! Cold eggs and milk can cause butter to seize up, creating a lumpy batter. Set ingredients out 1-2 hours before baking.
- Pan Alternatives: Don’t have six pans? Bake in batches. Keep unbaked colored batter covered in the fridge for up to 2 hours while waiting. Wash and re-prep pans between batches.
- Freezing Layers: Cake layers freeze beautifully! Wrap cooled layers individually in plastic wrap, then foil. Freeze up to 3 months. Thaw wrapped in the fridge overnight before frosting.
- Altitude Adjustments: If baking above 3,000 feet, reduce baking powder to 2 teaspoons and increase oven temperature to 375°F.
Nutrition
- Serving Size: 1 slice (1/14 of cake)
- Calories: 685
- Sugar: 78g
- Sodium: 245mg
- Fat: 32g
- Saturated Fat: 20g
- Unsaturated Fat: 10g
- Trans Fat: 0g
- Carbohydrates: 95g
- Fiber: 1g
- Protein: 6g
- Cholesterol: 125mg
Tips & Variations
Flavor Variations:
- Add almond extract (½ teaspoon) along with vanilla for a subtle almond flavor
- Use lemon extract and add lemon zest for a Rainbow Lemon Cake
- Try coconut extract and add shredded coconut to the batter for tropical flair
- Make it chocolate by replacing ½ cup flour with cocoa powder (Rainbow Chocolate Cake!)
Color Customizations:
- Create an ombré effect by using different shades of one color
- Make pastel rainbow layers by using less food coloring for softer colors
- Try a galaxy theme with purples, blues, and black layers with edible glitter
- Make tie-dye layers by swirling two colors together in each pan
Frosting Options:
- Cream cheese frosting instead of buttercream for tanginess
- Swiss meringue buttercream for a less-sweet, silky option
- Chocolate buttercream for chocolate lovers
- White chocolate ganache for an elegant, smooth finish
- Leave it unfrosted as a “naked cake” with just filling between layers
Special Dietary Adaptations:
- Gluten-free: Use a 1:1 gluten-free flour blend with xanthan gum
- Dairy-free: Substitute butter with vegan butter, milk with almond or oat milk
- Reduced sugar: You can reduce cake sugar by ¼ cup without major texture changes
- Egg-free: Use flax eggs (1 tablespoon ground flax + 2.5 tablespoons water per egg)
Decoration Ideas:
- Top with rainbow sprinkles, colorful candies, or fresh berries
- Add white chocolate drips down the sides
- Pipe colorful buttercream rosettes on top
- Create a unicorn theme with a buttercream horn and ears
- Add edible flowers for an elegant garden party look
Pro Chef Tips
Weighing Ingredients: For the most consistent results, weigh your flour rather than using cup measurements. 3 cups of flour should weigh 375 grams. Scooping flour directly from the bag can result in too much flour and dry cake.
Testing Butter Temperature: Room temperature butter should be cool to the touch but leave an indent when pressed (around 65-68°F). If it’s too warm (shiny or greasy-looking), it won’t create the air pockets needed for light, fluffy cake. If too cold, it won’t cream properly with the sugar.
The Toothpick Test Isn’t Everything: Don’t rely solely on the toothpick test. Your cake should also spring back when lightly pressed in the center, and the edges should just be pulling away from the pan sides. Overbaking is one of the most common mistakes – it’s better to slightly underbake than overbake.
Achieving Perfect Layers: For professional-looking layers, weigh your colored batter portions to ensure they’re equal. This creates even-thickness layers that stack beautifully. Each portion should weigh approximately 200-220 grams.
Frosting Consistency is Key: Your buttercream should be spreadable but hold its shape. If it’s too soft (butter was too warm or you added too much cream), refrigerate for 15-20 minutes. If it’s too stiff, add cream one teaspoon at a time and beat well.
The Crumb Coat Secret: Don’t skip the crumb coat! This thin first layer of frosting traps all the crumbs against the cake. Let it set firm in the fridge before applying your final coat, and you’ll have a flawless finish with no crumbs showing through.
Sharp Knife, Clean Slices: When serving, use a long, sharp knife and wipe it clean with a damp towel between every single slice. This prevents color smearing and ensures each slice shows crisp, clean rainbow layers.
Common Mistakes to Avoid
Overmixing the Batter – Once you add the flour, mix just until you can’t see dry flour streaks anymore. Overmixing develops gluten, which creates tough, dense cake instead of tender, fluffy layers. If you see flour, fold gently with a spatula rather than continuing to beat.
Using Liquid Food Coloring – This is the biggest mistake! Liquid food coloring requires so much to achieve bright colors that it throws off the liquid ratio in your batter, potentially causing cake texture problems. Always use gel or paste food coloring for vibrant hues without compromising texture.
Frosting Warm Cake Layers – Patience is essential here! Frosting even slightly warm cake will cause the buttercream to melt, slide off, and create a messy disaster. Your layers must be completely cool – when you touch them, they should feel room temperature or cool, never even slightly warm.
Uneven Layer Distribution – When dividing batter into six bowls, uneven amounts mean some layers will be thicker than others, throwing off your rainbow proportions. Use a scale or measuring cup to ensure each portion is equal. Each bowl should get about 1 cup of batter (or approximately 210 grams if weighing).
Opening the Oven Door Too Early – Resist the temptation to check your cakes before 20 minutes of baking time has passed. Opening the oven door causes temperature drops that can make your cakes sink in the middle. Once they’ve set (around 20 minutes), you can check more frequently without risk.
Not Leveling Domed Layers – Most cakes dome slightly in the center during baking. If you stack domed layers, your cake will be wobbly and unstable. Use a serrated knife or cake leveler to trim off any domes before stacking, creating flat, stable surfaces.
Rushing the Assembly – Take your time stacking and frosting! Rushing leads to crooked layers, uneven frosting, and a cake that doesn’t look as impressive as it could. This is meant to be a showpiece – give it the time it deserves.
Storage & Meal Prep
Room Temperature Storage: If you’ll be serving the cake within 24 hours, you can keep it at cool room temperature (below 70°F) covered with a cake dome or large bowl. American buttercream is stable at room temperature for short periods, though the cake will be freshest if refrigerated.
Refrigerator Storage: For best results and longest freshness, store your Rainbow Cake covered in the refrigerator. It will keep beautifully for 5-6 days when properly stored. Use a cake container with a tight-fitting lid, or carefully cover with plastic wrap (try not to let the wrap touch the frosting – insert toothpicks around the top to create a “tent” if needed). The cake actually tastes better after a day in the fridge as the flavors meld and the texture becomes even more moist.
Preventing Drying Out: To keep your cake moist during storage, make sure it’s well-sealed. Exposed cake dries out quickly in the refrigerator. If you’ve cut into the cake, press a piece of plastic wrap directly against the cut surface to prevent that area from drying out.
Serving from Refrigerator: For best texture and flavor, let refrigerated cake sit at room temperature for 30-45 minutes before serving. This allows the buttercream to soften slightly and the cake layers to come to the perfect serving temperature. Cold cake is delicious but doesn’t showcase the texture as well.
Reheating Individual Slices: While you wouldn’t reheat the whole cake, if someone prefers a warm slice, microwave it for just 10-15 seconds. The buttercream will soften beautifully and the cake will be slightly warm and extra tender.
Leftover Slices: Wrap individual slices tightly in plastic wrap, then place in an airtight container or zip-top bag. This makes it easy to grab a slice of rainbow happiness whenever you want one! Individual slices store well for up to 5 days refrigerated.
Make-Ahead & Freezer Notes
Bake Layers in Advance: One of the best features of this recipe is that the cake layers freeze exceptionally well! Bake all six layers, let them cool completely, then wrap each layer individually in two layers of plastic wrap followed by a layer of aluminum foil. Freeze for up to 3 months. To thaw, unwrap and let sit at room temperature for 1-2 hours, or thaw overnight in the refrigerator. The layers will taste freshly baked!
Freeze Assembled, Unfrosted Cake: You can also stack all your cake layers with frosting between them (creating the “naked” stacked cake), wrap the entire stack tightly in plastic wrap and foil, and freeze for up to 2 months. Thaw in the fridge overnight, then apply your final crumb coat and frosting layer.
Make Buttercream Ahead: Buttercream frosting can be made up to 1 week ahead and stored in an airtight container in the refrigerator, or frozen for up to 3 months. Before using refrigerated buttercream, let it come to room temperature (this takes several hours), then re-whip it with your mixer for 2-3 minutes until fluffy again. If frozen, thaw in the fridge overnight, then bring to room temperature and re-whip.
Complete Assembly Timeline: You can fully frost and assemble your Rainbow Cake up to 2 days before serving. Store it covered in the refrigerator. In fact, many bakers prefer to frost the day before serving as it allows the frosting to set firmly and makes cleaner slices. Just remember to let it sit at room temperature for 30-45 minutes before serving.
Freezing Finished Cake: Yes, you can freeze a completely frosted Rainbow Cake! Place the finished cake (uncovered) in the freezer for 1-2 hours until the frosting is firm. Then wrap carefully in several layers of plastic wrap and one layer of foil. Freeze for up to 1 month. Thaw overnight in the refrigerator still wrapped. Remove wrapping once mostly thawed to prevent condensation from affecting the frosting.
Best Reheating Method for Frozen Layers: Don’t actually reheat frozen cake layers – simply thaw them properly. For quick thawing, leave wrapped layers at room temperature for 1-2 hours. For slower, more even thawing (which prevents condensation), thaw wrapped layers in the refrigerator overnight.
Day-Before Game Plan: This is the ideal timeline for a stress-free baking experience: Two days before serving, bake all cake layers and freeze them (or refrigerate if not freezing). One day before serving, make buttercream and assemble/frost the entire cake. Store in refrigerator. Day of serving, remove from fridge 30-45 minutes before serving and enjoy!
Serving Suggestions
Classic Pairings:
- Serve with vanilla ice cream or whipped cream for an extra indulgent dessert
- Pair with fresh berries (strawberries, raspberries, blueberries) for color and freshness
- Offer with a glass of cold milk (especially popular with kids!)
- Serve alongside fresh fruit salad for a lighter accompaniment
- Coffee or hot chocolate for adults, fruit punch for kids
Beverage Pairings:
- Champagne or prosecco for adult celebrations
- Sparkling lemonade or fruit-flavored sparkling water
- Iced tea (sweet or unsweetened)
- Hot tea – vanilla chai or Earl Grey complement the vanilla cake beautifully
- For kids’ parties: colorful fruit punches, lemonade, or milk
Special Occasion Presentations:
- Birthday parties: Add number candles and serve with birthday ice cream
- Pride celebrations: Serve with rainbow fruit skewers and colorful beverages
- Baby showers: Pair with pastel-colored punch and coordinating desserts
- Spring/Summer gatherings: Serve outdoors with fresh lemon water and light fruit
- Holiday parties: Add festive sprinkles that match your holiday theme
Complementary Desserts:
- Keep it simple – this cake is the star! Serve with just coffee/tea
- Rainbow cookies or macarons to continue the color theme
- White chocolate bark with colorful sprinkles
- Fresh fruit kabobs (make them rainbow order!)
- Vanilla or strawberry ice cream
Plating Suggestions:
- Serve slices on white plates to make the rainbow colors pop
- Dust plates lightly with powdered sugar for an elegant touch
- Add a small dollop of whipped cream and a fresh strawberry
- Drizzle plates with white chocolate or strawberry sauce
- Garnish with a small sprig of fresh mint for color contrast
Party Presentation:
- Display the whole cake on a pedestal cake stand before cutting
- Use a glass cake dome to showcase the height and layers
- Place on a colorful tablecloth that complements the rainbow theme
- Surround the cake base with fresh flowers or rainbow decorations
- Take that first slice photo for Pinterest before serving!
FAQs Section
Can I make this cake without six pans? Absolutely! If you only have 2-3 cake pans, you can bake the layers in batches. Divide your batter into six bowls and color them as directed. Bake the first batch, then wash and re-prep your pans while the first layers cool. Keep the remaining colored batter portions covered in the refrigerator (they’ll hold perfectly for 1-2 hours). Continue baking until all six layers are done. The cake will turn out exactly the same!
Why do I need to use gel food coloring instead of liquid? Gel or paste food coloring is much more concentrated than liquid food coloring, meaning you need only a tiny amount to achieve vibrant, saturated colors. Liquid food coloring requires so much to get bright colors that it adds excess liquid to your batter, which can affect the cake’s texture, make it too thin, and prevent it from rising properly. Gel coloring gives you brilliant rainbow colors without compromising the cake recipe’s carefully balanced liquid-to-dry ingredient ratio. Brands like Wilton, AmeriColor, or Chefmaster work beautifully.
Can I make this cake dairy-free or vegan? Yes, with substitutions! For dairy-free, use plant-based butter (Earth Balance or Miyoko’s work well), and replace milk with your favorite non-dairy milk like almond, oat, or soy milk. For the frosting, use vegan butter and non-dairy milk or cream. For fully vegan, you’ll also need to replace the eggs – use flax eggs (1 tablespoon ground flaxseed mixed with 2.5 tablespoons water per egg, let sit 5 minutes to thicken) or commercial egg replacer. The texture will be slightly different but still delicious!
Help! My cake layers came out dry. What went wrong? Dry cake usually results from one of three issues: overbaking, measuring too much flour, or not enough fat/liquid. Make sure you’re measuring flour correctly (spoon it into measuring cups and level off, don’t scoop directly from the bag which compacts it). Start checking for doneness at 22 minutes – cakes can go from perfect to overbaked in just 2-3 minutes. A toothpick should have a few moist crumbs, not come out completely clean. Also ensure your butter and eggs were at proper room temperature before mixing.
Can I use this recipe to make cupcakes instead? Definitely! This batter makes approximately 36-42 standard cupcakes. Fill cupcake liners about 2/3 full with the colored batters – you can do all one color, rainbow swirls (put small spoonfuls of each color in each liner), or six cupcakes of each color. Bake at 350°F for 18-22 minutes. These make fantastic rainbow cupcakes for parties where serving a large cake isn’t practical!
How far in advance can I make this cake? The cake layers can be baked up to 3 months ahead if frozen (wrap individually in plastic wrap and foil), or 2 days ahead if kept covered in the refrigerator. The buttercream can be made up to 1 week ahead and refrigerated, or frozen for 3 months. The fully assembled and frosted cake can be completed 1-2 days before your event and stored in the refrigerator – many bakers actually prefer making it a day ahead as it allows the frosting to set perfectly and makes cleaner slices.
My cake layers are different heights. How can I fix this? Uneven layers usually happen when the batter wasn’t divided equally among the bowls or the pans weren’t filled to the same level. The fix is simple: use a serrated knife or cake leveler to trim all layers to the same height before stacking. If you want to prevent this next time, weigh out each colored batter portion (should be about 200-220 grams each) or measure with a measuring cup to ensure equal amounts.
Conclusion
There’s something truly special about creating a cake that brings such joy and excitement when it’s sliced and those vibrant rainbow layers are revealed. This Rainbow Cake isn’t just a dessert – it’s an experience, a memory-maker, and a celebration of color and happiness that brings smiles to faces of all ages.
While it might seem like an ambitious project at first glance, I hope this detailed guide has shown you that it’s absolutely achievable for home bakers at any skill level. Yes, it requires a bit more time than a standard layer cake, but the process is straightforward and uses techniques you probably already know. The “wow factor” you’ll get when you present this cake makes every minute worth it!
Whether you’re baking this for a birthday celebration, Pride event, baby shower, or simply because you want to bring extra color and joy into your life, this Rainbow Cake delivers. The moist, tender vanilla layers combined with silky buttercream frosting taste every bit as good as they look. And let’s be honest – the photos you’ll take of this beauty will be some of your most-liked Pinterest and Instagram posts!
I’d love to hear about your Rainbow Cake adventures! Did you make it for a special occasion? What color combination did you choose? Did you add any fun variations or personal touches? Share your experiences, photos, and any questions in the comments below – I read every single one and love seeing your beautiful creations!
Ready to bake your own Rainbow Cake? Pin this recipe to your Pinterest boards so you can find it easily when you’re ready to create some colorful magic in your kitchen. Don’t forget to snap a photo of your finished masterpiece and tag me on social media – I can’t wait to see your gorgeous rainbow layers!
Happy baking, friends! Here’s to spreading joy, one colorful slice at a time! 🌈✨