The Best Homemade Butterfinger Recipe – Crispy, Chocolatey Candy Bars You Can Make at Home!

If you’ve ever found yourself craving that iconic crispy, flaky, peanut buttery center coated in rich chocolate that makes Butterfinger candy bars so irresistible, you’re in for a real treat! This homemade Butterfinger recipe brings that nostalgic candy counter favorite right into your kitchen, and honestly, it tastes even better than the store-bought version.
Making your own Butterfingers at home is surprisingly easy and requires just a handful of simple ingredients you probably already have in your pantry. The magic happens when you create that signature honeycomb-like texture using candy corn (yes, really!) and peanut butter, then coat it all in smooth, melted chocolate. These homemade candy bars are perfect for Halloween treats, Christmas cookie trays, birthday party favors, or just whenever that sweet tooth strikes. Plus, you can control the quality of ingredients and customize the size and thickness to your liking. Whether you’re making these for a special occasion or just because you deserve something sweet, this recipe is going to become your new favorite candy-making adventure!
History / Background
The Butterfinger candy bar has been an American favorite since 1923, originally created by the Curtiss Candy Company in Chicago, Illinois. The candy got its name through a public naming contest, and legend has it that the winning name was inspired by the clumsy, butter-fingered way people would drop things – though you definitely won’t want to drop this delicious treat!
Throughout its nearly 100-year history, Butterfinger has remained one of the most recognizable candy bars in America, known for its distinctive crispety, crunchety, peanut-buttery taste (as the famous commercial jingle goes). The Curtiss Candy Company, which also created the Baby Ruth bar, was eventually acquired by Nabisco, and the Butterfinger brand changed hands several times before landing with Ferrero in 2018, which gave the recipe a slight update to use more quality cocoa and remove artificial flavors.
The homemade version of Butterfinger candy has become increasingly popular among home cooks and candy makers who want to recreate childhood favorites with better ingredients and a personal touch. The ingenious use of candy corn to create that signature flaky texture was discovered by creative home bakers who experimented with melting various candies until they found the perfect combination that mimics the commercial version’s unique crunch. Today, making Butterfingers at home has become a beloved tradition, especially during Halloween season when candy corn is abundantly available, though you can make these treats year-round!
Why You’ll Love This Recipe
This homemade Butterfinger recipe is an absolute game-changer for candy lovers and home bakers alike. There’s something incredibly satisfying about making your own version of a beloved candy bar, and once you taste these, you’ll understand why so many people never go back to buying them at the store.
Here’s why this recipe will become your new obsession:
- Incredibly easy to make – Just 4 simple ingredients and no complicated candy-making techniques required
- Better than store-bought – You control the quality of chocolate and peanut butter, resulting in a richer, more flavorful candy
- Budget-friendly – Makes a large batch for a fraction of the cost of buying individual candy bars
- Perfectly customizable – Adjust the thickness, sweetness, or even add your own twists like dark chocolate or sea salt
- Great for gifting – These make impressive homemade gifts for holidays, teacher appreciation, or party favors
- Kid-friendly activity – Fun project to do with children (with adult supervision for melting)
- No special equipment needed – You likely have everything you need in your kitchen already
- Impressive results – Everyone will be amazed you made these yourself, and they look just as professional as store-bought
- Allergy-friendly options – Easy to adapt with gluten-free or dairy-free chocolate
- Stores beautifully – Keeps for weeks, making it perfect for advance preparation
Ingredient Notes
Let’s talk about the surprisingly simple ingredients that come together to create this candy magic. Each component plays a crucial role in achieving that authentic Butterfinger taste and texture.
Candy Corn – This is the secret ingredient that creates the signature crispy, flaky texture! When melted, candy corn transforms into a honeycomb-like structure that’s nearly identical to the commercial Butterfinger center. Use classic candy corn (not chocolate or pumpkin varieties) for best results. If you can’t find candy corn or prefer to avoid it, you can substitute with corn syrup mixed with granulated sugar, though the texture will be slightly different.
Creamy Peanut Butter – The star flavor of any Butterfinger! Use a standard creamy peanut butter like Jif or Skippy – not natural peanut butter, as the oils separate and won’t create the right consistency. The peanut butter adds that nutty richness and helps bind everything together. For a more pronounced peanut flavor, you can use crunchy peanut butter, though it will change the texture slightly.
Chocolate Chips or Chocolate Coating – This is your outer layer of pure chocolate bliss. You can use semi-sweet, milk chocolate, or dark chocolate chips depending on your preference. For the most authentic Butterfinger experience, milk chocolate is the way to go. Chocolate melting wafers or candy coating chocolate work beautifully and are easier to work with than regular chips. You can also use chocolate bars broken into pieces.
Chocolate for Drizzling (Optional) – For that professional bakery look, a contrasting chocolate drizzle on top adds visual appeal and an extra layer of chocolate flavor. White chocolate, dark chocolate, or even peanut butter chips work wonderfully here.
Equipment Needed
The beauty of this recipe is that it requires minimal specialized equipment. Here’s what you’ll need to make perfect homemade Butterfingers:
- 9×13-inch baking pan – For spreading the candy mixture
- Parchment paper or silicone baking mat – Essential for easy removal and preventing sticking
- Medium saucepan – For melting the candy corn and peanut butter mixture
- Microwave-safe bowls – For melting chocolate (or you can use a double boiler)
- Wooden spoon or heat-resistant spatula – For stirring the hot candy mixture
- Sharp knife – For cutting the finished candy into bars
- Cutting board – To protect your counter when cutting
- Measuring cups and spoons – For accurate ingredient measurements
- Fork or dipping tools – For coating the candy bars in chocolate
- Wire cooling rack – For placing chocolate-coated bars to set
- Candy thermometer (optional) – If you want to be precise with chocolate tempering
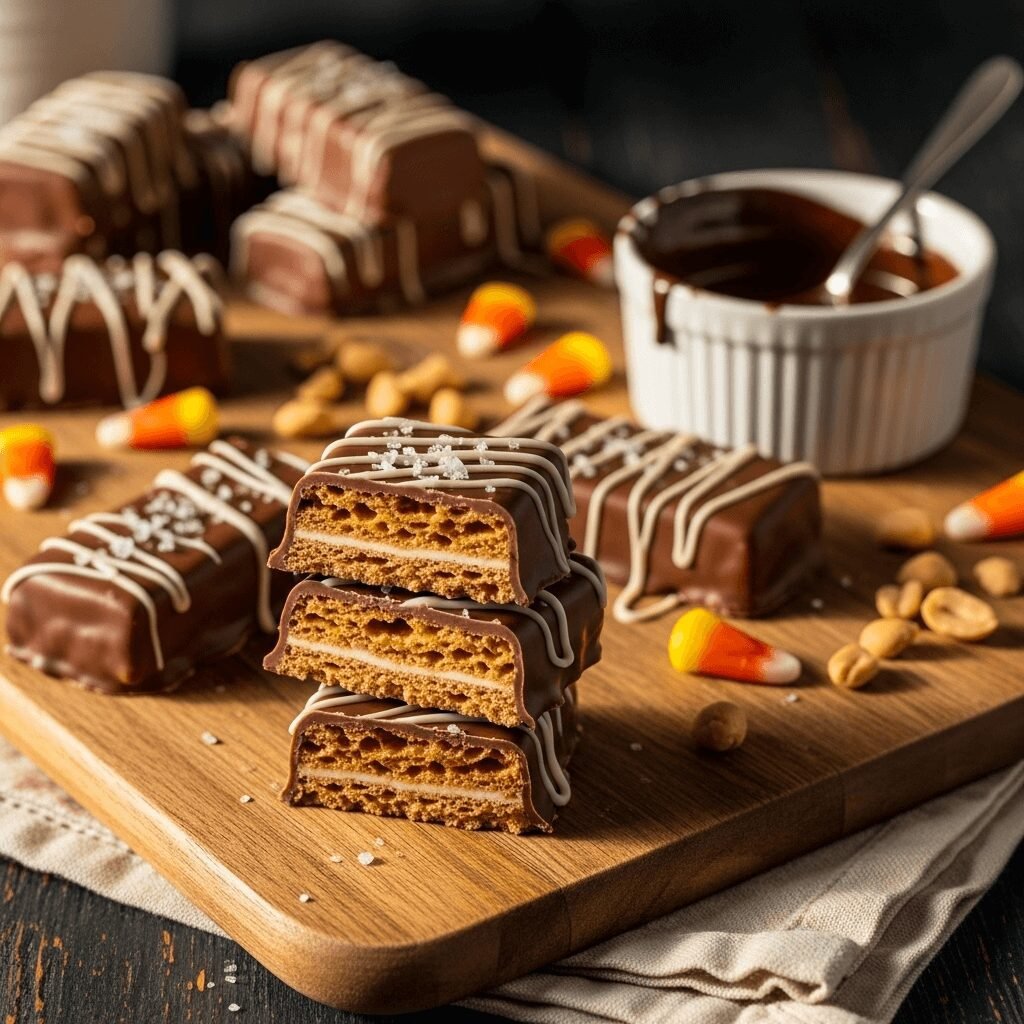
Butterfinger Recipe

Crispy, crunchy homemade Butterfinger candy bars with a flaky peanut butter center coated in rich chocolate. Better than store-bought and so easy to make with just 4 simple ingredients! Perfect for gift-giving or satisfying your candy cravings.
- Prep Time: 20 minutes
- Cooling/Setting Time: 2 hours
- Cook Time: 15 minutes
- Total Time: 2 hours 35 minutes
- Yield: 24 candy bars 1x
- Category: Dessert, Candy, Confection
- Method: Stovetop, No-Bake
- Cuisine: American
- Diet: Gluten Free
Ingredients
For the Butterfinger Center:
- 16 oz (1 pound) candy corn
- 1½ cups creamy peanut butter
- Pinch of salt (optional, enhances flavor)
For the Chocolate Coating:
- 3 cups chocolate chips (milk, semi-sweet, or dark chocolate)
- 1 tablespoon coconut oil or vegetable shortening (optional, for smoother coating)
For Decoration (Optional):
- ½ cup white chocolate or dark chocolate chips for drizzling
- Flaky sea salt for topping
Instructions
Step 1: Prepare Your Pan
Line a 9×13-inch baking pan with parchment paper, leaving some overhang on the sides for easy removal later. Lightly spray the parchment with non-stick cooking spray or brush with a thin layer of coconut oil. Set aside.
Step 2: Melt the Candy Corn
Place the candy corn in a medium saucepan over medium-low heat. Stir constantly with a wooden spoon or heat-resistant spatula. The candy corn will begin to melt after about 5-7 minutes. Continue stirring until it’s completely melted and smooth. This process requires patience – don’t rush it by turning up the heat, or the candy corn may burn.
Step 3: Mix in the Peanut Butter
Once the candy corn is fully melted and smooth, remove the pan from heat. Immediately add the peanut butter and stir vigorously until completely combined and the mixture is smooth and glossy. The mixture will be very thick and sticky. If desired, add a small pinch of salt to enhance the flavors.
Step 4: Spread the Mixture
Quickly pour the hot peanut butter mixture into your prepared pan. Using a spatula sprayed with cooking spray (to prevent sticking), spread the mixture evenly across the pan, smoothing the top as much as possible. Work quickly as the mixture begins to firm up as it cools.
Step 5: Cool the Candy Layer
Place the pan in the refrigerator and chill for at least 1-2 hours, or until the candy is completely firm and set. You can also leave it at room temperature for about 3-4 hours, but refrigeration speeds up the process.
Step 6: Cut into Bars
Once firm, lift the candy out of the pan using the parchment paper overhang. Place it on a cutting board. Using a sharp knife, cut the candy into bars (about 24 bars, approximately 1.5 x 3 inches each). For cleaner cuts, wipe your knife with a damp cloth between cuts. Place the cut bars on a parchment-lined baking sheet.
Step 7: Melt the Chocolate
Place chocolate chips in a microwave-safe bowl with the coconut oil (if using). Microwave in 30-second intervals, stirring between each interval, until completely melted and smooth. This usually takes about 2-3 minutes total. Alternatively, melt the chocolate using a double boiler on the stovetop for more control.
Step 8: Coat the Candy Bars
Working with one bar at a time, drop a candy bar into the melted chocolate. Using a fork, flip it to coat all sides, then lift it out, allowing excess chocolate to drip back into the bowl. Tap the fork gently on the edge of the bowl to remove excess chocolate. Place the coated bar on a parchment-lined baking sheet or wire rack.
Step 9: Add Finishing Touches
If desired, melt your contrasting chocolate (white or dark) and drizzle it over the coated bars using a fork or piping bag. You can also sprinkle with flaky sea salt while the chocolate is still wet for a gourmet touch.
Step 10: Set the Chocolate
Allow the chocolate coating to set completely at room temperature (about 1 hour) or speed up the process by refrigerating for 20-30 minutes. Once set, your homemade Butterfingers are ready to enjoy!
Notes
- Candy Corn Brands: Different brands of candy corn may have slightly different melting properties. Brach’s is the most commonly used and tested brand for this recipe.
- Peanut Butter Type: Do not use natural peanut butter, as the oils will separate and create a greasy texture. Stick with conventional brands like Jif, Skippy, or Peter Pan.
- Chocolate Coating Tips: If your chocolate is too thick for dipping, add a bit more coconut oil or shortening (1 teaspoon at a time) until you reach the desired consistency.
- Cutting Cleanly: For the cleanest cuts, dip your knife in hot water, wipe dry, then cut. Repeat between cuts.
- Make Them Thicker: For extra-thick candy bars, use an 8×8-inch pan instead of 9×13-inch.
- Flavor Variations: Try adding a teaspoon of vanilla extract to the peanut butter mixture for extra depth of flavor.
Nutrition
- Serving Size: 1 candy bar (1/24 of recipe)
- Calories: 245
- Sugar: 26g
- Sodium: 85mg
- Fat: 13g
- Saturated Fat: 5g
- Unsaturated Fat: 7g
- Trans Fat: 0g
- Carbohydrates: 30g
- Fiber: 1g
- Protein: 4g
- Cholesterol: 3mg
Nutrition information is approximate and will vary based on specific brands and ingredients used.
Tips & Variations
Make It Your Own:
- Dark Chocolate Version: Use dark chocolate chips for coating to create a more sophisticated, less sweet candy with deeper chocolate notes that pair beautifully with the sweet peanut butter center.
- Crunchy Butterfinger: Add ½ cup of crushed peanuts or Rice Krispies cereal to the peanut butter mixture for extra crunch and texture.
- Mini Butterfinger Bites: Instead of cutting into bars, cut the candy into small squares (about 1-inch pieces) for bite-sized treats perfect for parties or snacking.
- Butterfinger Bark: Skip cutting into individual bars altogether – just spread the chocolate over the entire uncut candy layer and break into irregular pieces once set for a rustic bark-style candy.
- Salted Caramel Butterfinger: Drizzle the finished bars with salted caramel sauce before the chocolate sets for an incredible sweet and salty combination.
- White Chocolate Coating: Coat the bars entirely in white chocolate for a sweeter, creamier version that’s visually stunning.
- Almond Butter Version: Substitute almond butter for peanut butter for a slightly different nutty flavor profile (great for those with peanut preferences).
- Holiday Themed: Use colored candy melts or festive sprinkles to match any holiday – red and green for Christmas, pastels for Easter, orange and black for Halloween.
Pro Chef Tips
Temperature Control is Key: When melting candy corn, maintain medium-low heat and be patient. Rushing this step by increasing heat can cause the sugar to burn, resulting in a bitter taste and grainy texture. The candy corn should melt smoothly without any brown spots.
Work Quickly with the Mixture: Once you add the peanut butter to the melted candy corn, work swiftly to spread it in the pan. The mixture firms up quickly as it cools, and if you wait too long, it becomes difficult to spread evenly. Having your pan prepared and tools ready before you start makes all the difference.
The Chocolate Coating Temperature: For the smoothest, most professional-looking chocolate coating, your chocolate should be completely melted but not hot. If it’s too warm, the coating will be too thin and won’t set properly. If it’s too cool, it will be thick and difficult to work with. The ideal temperature is around 88-90°F (31-32°C) for milk chocolate.
Tap, Don’t Wipe: When coating bars in chocolate, resist the urge to wipe the fork on the edge of the bowl. Instead, tap it gently. Wiping can create thin spots in the coating. Tapping allows excess chocolate to drip off while maintaining an even coat all around.
Room Temperature Matters: Let your candy bars come to room temperature before dipping in chocolate. If they’re too cold from the refrigerator, the chocolate will set too quickly and may crack. If you must dip cold bars, let them sit out for 15-20 minutes first.
Invest in Quality Chocolate: The chocolate coating is half the candy bar, so use good quality chocolate chips or chocolate made specifically for candy making. Avoid chocolate chips that contain stabilizers meant to help them hold their shape, as they don’t melt as smoothly. Look for “melting chocolate” or “candy coating chocolate” for best results.
The Two-Part Dipping Method: For a thicker, more luxurious coating, dip each bar twice. Do a thin first coat, let it set completely, then dip again. This creates a more substantial chocolate shell that’s closer to commercial candy bars.
Common Mistakes to Avoid
Mistake #1: Using Natural Peanut Butter
Natural peanut butter has separated oils that won’t properly bind with the melted candy corn, resulting in an oily, separated mixture that won’t set correctly. Always use conventional, no-stir peanut butter for this recipe. The mixture should be smooth and cohesive, not greasy.
Mistake #2: Overheating the Candy Corn
If you melt the candy corn on high heat or let it get too hot, it can burn and develop a bitter taste. You’ll also notice the color changing to a darker amber or brown, which means it’s overcooked. Keep your heat on medium-low and stir constantly. If you do see darkening, unfortunately, you’ll need to start over as the burnt flavor will permeate the entire batch.
Mistake #3: Skipping the Parchment Paper
Without parchment paper, the sticky candy mixture will glue itself to your pan, making removal nearly impossible and wasting your entire batch. Even greasing the pan isn’t sufficient – you really need that parchment paper barrier. Don’t skip this step!
Mistake #4: Adding Water to Seize Chocolate
If your chocolate seems thick during melting, never add water to thin it out. Water causes chocolate to “seize” – turning it into a grainy, unusable clump. Instead, add a small amount of coconut oil, vegetable shortening, or even a tiny bit of vegetable oil to thin the consistency.
Mistake #5: Not Chilling Long Enough
It’s tempting to rush the chilling process, but if the candy center isn’t completely firm before cutting and dipping, the bars will fall apart or lose their shape. Patience here ensures clean cuts and bars that hold together beautifully when coated in chocolate. If you’re unsure, chill longer rather than shorter.
Storage & Meal Prep
Room Temperature Storage:
Once fully set, homemade Butterfingers can be stored at room temperature in an airtight container for up to 2 weeks. Layer them with parchment or wax paper between rows to prevent sticking. Keep them in a cool, dry place away from direct sunlight and heat sources. Room temperature storage works best in climates that aren’t too warm (below 75°F/24°C).
Refrigerator Storage:
For longer storage or in warmer climates, keep your Butterfinger bars in the refrigerator in an airtight container for up to 1 month. The chocolate coating may develop a slight “bloom” (white streaks or dots) in the fridge, but this is just the cocoa butter rising to the surface and doesn’t affect the taste at all. Let them sit at room temperature for 5-10 minutes before eating for the best texture and flavor.
Best Practices:
Always store in an airtight container to prevent the candy from absorbing odors from other foods and to keep moisture out, which can make the chocolate coating sticky. If stacking bars, place parchment or wax paper between layers. Keep away from strong-smelling foods in the refrigerator.
Reheating Tips:
These are meant to be enjoyed at room temperature or slightly cool, so no reheating is needed. If they’ve been refrigerated, simply let them sit on the counter for 10-15 minutes to take the chill off for optimal flavor and texture.
Make-Ahead & Freezer Notes
Make-Ahead Timeline:
This recipe is perfect for making ahead! You can prepare these Butterfinger bars up to 3-4 weeks in advance when stored properly. In fact, many candy makers prefer to make them ahead because it allows plenty of time for the flavors to meld and mature. Make a batch, store them properly, and you’ll have homemade candy ready whenever you need it for gifts, parties, or snacking.
Freezer-Friendly Details:
Yes, these freeze beautifully! Wrap individual bars in wax paper or parchment, then place them in a freezer-safe container or heavy-duty freezer bag. Remove as much air as possible before sealing. They’ll keep in the freezer for up to 3 months without any loss of quality. Frozen Butterfingers have an amazing texture – the center becomes extra crispy and the chocolate shell has a satisfying snap.
Thawing Instructions:
Remove bars from the freezer and let them thaw at room temperature for about 30-45 minutes before enjoying. You can also eat them partially frozen for a firmer, more intense texture – perfect for summer! Don’t microwave to thaw as this will melt the chocolate.
Freezing at Different Stages:
You can also freeze just the candy center (before chocolate coating) for up to 3 months. When you’re ready, thaw it in the refrigerator, cut into bars, and proceed with chocolate coating. This is great if you want to break up the process or if you’re making multiple batches with different chocolate coatings.
Serving Suggestions
Perfect Pairings:
Homemade Butterfingers are delicious on their own, but here are some creative ways to serve and enjoy them:
- Ice Cream Sundaes: Chop Butterfingers into chunks and sprinkle over vanilla, chocolate, or peanut butter ice cream for the ultimate dessert experience. They add incredible crunch and flavor.
- Coffee or Tea: These pair beautifully with a hot cup of coffee, especially dark roast, or black tea. The sweetness of the candy balances the bitterness of coffee perfectly.
- Milkshakes: Blend a few Butterfinger bars into vanilla or chocolate milkshakes for a thick, creamy, candy bar-inspired treat.
- Dessert Boards: Include them on dessert charcuterie boards alongside other candies, cookies, fresh fruit, and nuts for entertaining.
- Gift Boxes: Arrange in decorative tins or boxes with tissue paper for beautiful homemade gifts. Include a mix of different chocolate coatings for variety.
- Movie Night: Serve alongside popcorn, pretzels, and other movie snacks for a fun treat during family movie nights.
- Hot Chocolate Toppers: Place a small Butterfinger bar on top of hot chocolate and watch it slowly melt – incredibly decadent!
- Cake Decorations: Chop and use as garnish for cakes, cupcakes, or brownies to add texture and visual appeal.
FAQs Section
Q: Can I make this recipe without candy corn?
A: While candy corn creates that authentic Butterfinger texture, you can substitute with a mixture of corn syrup (1 cup) and granulated sugar (1½ cups) heated together until melted. However, the texture will be slightly different – less flaky and more chewy. The candy corn method is tried and true for the closest match to commercial Butterfingers.
Q: Why is my candy mixture too hard/too soft?
A: If your mixture is too hard and crumbly, you may have overcooked the candy corn or used too much of it. If it’s too soft and won’t set, you may not have cooked the candy corn long enough, or the ratio of peanut butter to candy corn was off. The mixture should be thick but spreadable when hot, and firm but not rock-hard when cooled. Humidity can also affect the final texture.
Q: Can I use dark chocolate or white chocolate instead of milk chocolate?
A: Absolutely! Dark chocolate creates a more sophisticated, less sweet candy that many adults prefer. The slight bitterness of dark chocolate balances the sweet peanut butter center beautifully. White chocolate creates an ultra-sweet, creamy version. You can even do a combination – milk chocolate coating with white chocolate drizzle.
Q: My chocolate coating looks streaky or has white spots. What happened?
A: This is called “chocolate bloom” and happens when chocolate is exposed to temperature changes or moisture. It’s completely safe to eat and doesn’t affect the flavor, just the appearance. To prevent it, make sure your candy bars are completely dry before coating, don’t refrigerate too quickly after coating, and store in a cool, dry place with consistent temperature.
Q: Can I make these nut-free for allergies?
A: Unfortunately, peanut butter is essential to this recipe’s signature flavor. However, you could experiment with sunflower seed butter (SunButter) or soy nut butter as peanut-free alternatives. The flavor will be different, but the texture should be similar. Always check that your chocolate and candy corn are processed in nut-free facilities if dealing with severe allergies.
Q: How can I make the chocolate coating shiny like professional candies?
A: The shiniest chocolate coatings come from properly tempered chocolate, which involves carefully heating and cooling chocolate to specific temperatures. For a simpler approach, use candy melts or chocolate coating wafers (also called candy coating chocolate) which don’t require tempering. Adding a small amount of coconut oil or paramount crystals to regular chocolate chips also helps create a shinier finish.
Q: Can I double this recipe?
A: Yes! You can easily double the recipe. Use two 9×13-inch pans or one large baking sheet. Keep in mind that melting larger quantities of candy corn may take a bit longer, and you’ll want to work in batches when coating the bars in chocolate so the chocolate doesn’t start setting in the bowl while you work.
Conclusion
There you have it – your complete guide to making absolutely incredible homemade Butterfinger candy bars that rival (and in many cases, surpass!) the store-bought version. These crispy, crunchy, peanut buttery treats coated in rich chocolate are easier to make than you might think, requiring just a handful of ingredients and some patience while they set.
The beauty of this recipe is in its simplicity and versatility. Whether you stick with the classic milk chocolate coating or get creative with dark chocolate, sea salt, or festive decorations, you’re creating something truly special. There’s something deeply satisfying about pulling these gorgeous candy bars out of your own kitchen, knowing exactly what went into them and having complete control over the quality of ingredients.
These homemade Butterfingers make thoughtful gifts, impressive party contributions, or simply a wonderful treat for yourself and your family. They store beautifully, freeze perfectly, and always impress whoever is lucky enough to taste them. Plus, making candy at home is a fun activity that can become a beloved tradition, especially during the holidays or for special occasions.
So grab that bag of candy corn, get your peanut butter ready, and dive into this delicious candy-making adventure! Your kitchen is about to smell absolutely amazing, and your taste buds are in for a real treat. Once you make these, you’ll never look at store-bought Butterfingers the same way again.
Ready to make your own batch? Pin this recipe to your Pinterest boards so you can find it easily, and don’t forget to come back and leave a comment telling me how yours turned out! I love hearing about your candy-making adventures and any creative variations you tried. Happy candy making!