The Ultimate Cake Pops Recipe: Easy, Fun, and Perfectly Delicious Every Time

If you’ve ever scrolled through Pinterest looking for the perfect party dessert, you’ve probably stopped dead in your tracks when you spotted those adorable little spheres of cake perfection on a stick—yes, I’m talking about cake pops! These bite-sized beauties are more than just a trend; they’re a legitimate dessert sensation that brings together everything we love: moist cake, rich frosting, and a gorgeous candy coating that makes them look like tiny works of art.
Cake pops are perfect for absolutely any occasion—birthday parties, baby showers, wedding receptions, holiday gatherings, or just a fun weekend baking project with the kids. They’re portable, customizable, and honestly, way easier to make than you might think. Whether you’re a seasoned baker or someone who’s just starting to explore the world of homemade treats, this cake pops recipe will walk you through every single step to create show-stopping desserts that taste as amazing as they look.
What I love most about cake pops is their versatility. You can dress them up for elegant events or keep them casual and fun for a backyard barbecue. They’re a blank canvas waiting for your creativity—and trust me, once you master the basic technique, you’ll be hooked on making these adorable treats for every celebration on your calendar.
History / Background
The cake pop phenomenon as we know it today was popularized by Angie Dudley, better known as Bakerella, who brought these delightful desserts into the mainstream spotlight around 2008. She posted about cake pops on her blog, and the internet absolutely exploded with excitement. Suddenly, everyone wanted to learn how to make these Instagram-worthy (well, back then it was more Flickr-worthy!) treats.
But the concept of combining cake crumbs with frosting and coating them in chocolate actually has deeper roots. The idea is similar to traditional rum balls, cake truffles, and even the Australian lamington—desserts that have been around for decades. What Bakerella did was modernize the concept, add a stick for easy handling, and present them in a way that made them irresistibly photogenic and fun.
The cake pop craze quickly spread from home kitchens to professional bakeries. Even Starbucks jumped on the bandwagon, introducing their own version of cake pops that became a permanent fixture in their display cases. Today, cake pops have evolved into an art form, with bakers creating elaborate designs for every theme imaginable—from unicorns and superheroes to seasonal favorites and wedding-themed elegance.
What makes cake pops truly special is that they democratized fancy baking. You don’t need professional pastry skills or expensive equipment to make something that looks bakery-quality. It’s a recipe that brings joy not just in the eating, but in the making and decorating process too.
Why You’ll Love This Recipe
This cake pops recipe is going to become your new favorite party trick, and here’s why: it takes something that looks incredibly complicated and breaks it down into simple, totally doable steps that anyone can master. I’ve tested this recipe countless times, tweaked it to perfection, and I’m sharing all my secrets with you so your first batch turns out beautifully.
Here’s what makes this recipe absolutely irresistible:
- Foolproof technique – I’ll walk you through exactly how to get the right cake-to-frosting ratio so your pops hold together perfectly without being too dense or crumbly
- Budget-friendly – You can use a boxed cake mix or homemade cake, making this recipe adaptable to whatever you have on hand or whatever your budget allows
- Incredibly customizable – Choose any cake flavor, any frosting, and any coating color to match your party theme or personal preference
- Make-ahead friendly – These can be prepared days in advance, which is a lifesaver when you’re planning for a big event
- Kid-friendly fun – Children absolutely love helping with the rolling, dipping, and decorating, making this a perfect family baking activity
- Portion-controlled treats – Each pop is the perfect two-bite serving, so guests can enjoy a sweet treat without overindulging
- No special skills required – If you can roll a ball and dip it in chocolate, you can make beautiful cake pops
- Pinterest-perfect presentation – These look absolutely stunning in photos and will get you all the likes, saves, and comments on social media
Ingredient Notes
Let’s talk about what goes into these little spheres of happiness. The beauty of cake pops is that the ingredient list is refreshingly simple, and you probably have most of what you need already in your pantry.
Baked Cake: The foundation of your cake pops starts with a fully baked and cooled cake. You can use your favorite homemade recipe—vanilla, chocolate, red velvet, lemon, or anything you love—or you can absolutely use a boxed cake mix. I won’t judge! In fact, boxed mixes work wonderfully because they tend to be extra moist. You’ll need one standard 9×13-inch cake or two 8-inch round cakes. The cake needs to be completely cooled before you start working with it.
Frosting: This is the “glue” that binds your crumbled cake together. Cream cheese frosting works beautifully with most cake flavors, but you can use buttercream, chocolate frosting, or even a simple powdered sugar glaze. The key is using just enough to make the mixture moldable without making it too wet. Start with about ½ cup and add more gradually as needed. Room temperature frosting mixes in much more easily than cold frosting straight from the fridge.
Candy Melts or Chocolate: This is your coating that gives cake pops their smooth, gorgeous exterior. Candy melts (also called candy coating or almond bark) are ideal for beginners because they melt smoothly and set up beautifully without tempering. They come in every color imaginable, making them perfect for themed parties. If you prefer real chocolate, you can use high-quality chocolate chips or bars, but you’ll want to add a tablespoon of coconut oil or vegetable shortening to help thin it out for easier dipping. You’ll need about 2-3 cups of coating depending on how many pops you’re making.
Lollipop Sticks: These are usually 6 inches long and can be found in the baking aisle of craft stores or online. Paper sticks work great and come in fun colors, or you can use traditional white plastic sticks. Make sure they’re food-safe and sturdy enough to support the weight of your cake balls.
Sprinkles and Decorations (Optional): This is where you can really let your creativity shine! Sprinkles, edible glitter, drizzled chocolate, crushed cookies, mini chocolate chips, or edible pearls all make beautiful decorations. Add these while the coating is still wet so they stick properly.
Equipment Needed
Before we dive into making these beauties, let’s make sure you have everything you need. The good news? You don’t need any fancy specialized equipment—just basic kitchen tools that most home bakers already own.
- Large mixing bowl – For crumbling your cake
- Electric mixer or sturdy wooden spoon – To mix the cake crumbs with frosting
- Cookie scoop or tablespoon – For portioning out evenly-sized cake balls (a 1.5-tablespoon scoop is perfect)
- Baking sheets – You’ll need a couple to hold your cake balls while they chill
- Parchment paper or silicone baking mats – To line your baking sheets
- Microwave-safe bowl or double boiler – For melting your chocolate or candy melts
- Styrofoam block or cake pop stand – For holding your pops upright while they dry (you can also use an upside-down colander in a pinch)
- Lollipop sticks – 6-inch sticks work best
- Small spoon or offset spatula – Helpful for smoothing chocolate if needed
- Refrigerator or freezer space – Essential for chilling at various stages
Nice-to-Have (But Not Essential):
- Cake pop mold – Makes perfectly round balls, but hand-rolling works just as well
- Decorating bags – For drizzling contrasting chocolate colors
- Food-safe gloves – Keeps your hands clean during the rolling process
Cake Pops Recipe

These homemade cake pops are a delightful bite-sized dessert perfect for parties, celebrations, or anytime you want a fun, customizable treat. Moist cake combined with creamy frosting, coated in smooth chocolate, and decorated to perfection—they’re easier to make than you think and always a crowd favorite!
- Prep Time: 45 minutes
- Cook Time: 2 hours
- Total Time: 3 hours 30 minutes
- Yield: 48 cake pops 1x
- Category: Dessert
- Method: No Bake
- Cuisine: American
- Diet: Vegetarian
Ingredients
For the Cake Pops:
- 1 fully baked and cooled cake (9×13-inch or equivalent, any flavor)
- ½ to ¾ cup frosting (cream cheese, buttercream, or your preference)
- 2-3 cups candy melts or chocolate coating (any color)
- 48 lollipop sticks (6-inch)
- Sprinkles, edible decorations, or toppings of choice (optional)
Instructions
- Prepare Your Cake Base: If you haven’t already, bake your cake according to your recipe or package directions and allow it to cool completely. This is crucial—working with warm cake will result in a mushy, unworkable mixture.
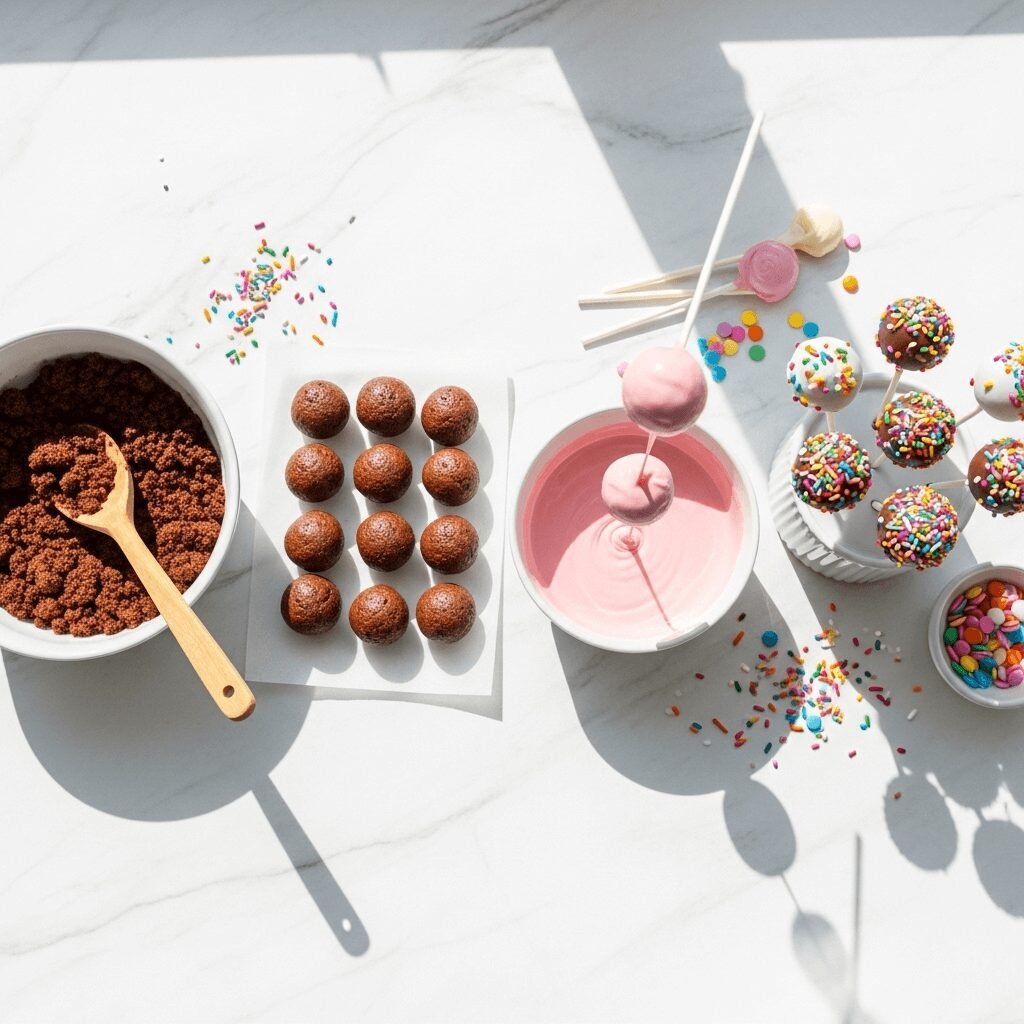
- Crumble the Cake: Break your cooled cake into large chunks and place them in a large mixing bowl. Using your hands or a fork, crumble the cake into fine crumbs. You want a texture similar to wet sand with no large chunks remaining. Take your time with this step—the finer and more uniform your crumbs, the smoother your cake pops will be.
- Add Frosting Gradually: Start with ½ cup of frosting and mix it thoroughly into the cake crumbs using a sturdy spoon or your electric mixer on low speed. The mixture should come together so that when you squeeze a small amount in your hand, it holds its shape without crumbling apart. If it’s too dry, add more frosting one tablespoon at a time. Be careful not to add too much—if the mixture becomes too wet, your pops won’t hold their shape and will slide down the sticks.
- Roll Into Balls: Using a cookie scoop or tablespoon, portion out the mixture and roll it between your palms to form smooth, round balls about 1.5 inches in diameter. Try to make them as uniform as possible so they look professional and bake evenly. Place each ball on a parchment-lined baking sheet.
- First Chill: Once all your balls are rolled, place the baking sheet in the refrigerator for at least 1-2 hours, or in the freezer for 30 minutes. This chilling step is essential—it firms up the cake balls so they won’t fall apart when you dip them in chocolate.
- Prepare Your Coating Station: About 15 minutes before you’re ready to dip, set up your workspace. Prepare your styrofoam block or cake pop stand. Melt your candy melts or chocolate in a microwave-safe bowl in 30-second intervals, stirring between each interval, until completely smooth. If using real chocolate, add a tablespoon of coconut oil or shortening to thin it out. The coating should be smooth and pourable, not thick or clumpy.
- Attach the Sticks: Remove your chilled cake balls from the refrigerator. Dip the tip of a lollipop stick about ½ inch into the melted chocolate, then insert it straight into a cake ball, pushing it about halfway through. The chocolate acts as glue to secure the stick. Repeat with all cake balls, then return them to the refrigerator for another 15 minutes to set the chocolate “glue.”
- Dip and Coat: Working with one cake pop at a time, hold the stick and dip the cake ball into the melted coating, submerging it completely. Pull it out and let the excess coating drip off—you can gently tap the stick against the edge of the bowl to help this along. Don’t swirl the pop in the coating or it might fall off the stick.
- Decorate Immediately: While the coating is still wet, add your sprinkles, edible glitter, or other decorations. Work quickly because the coating sets fast!
- Stand to Dry: Insert the stick into your styrofoam block or cake pop stand so the pop is upright. The coating will set within 10-15 minutes at room temperature, or you can place them in the refrigerator for 5 minutes to speed up the process.
- Optional Drizzle: Once the coating is completely set, you can add decorative drizzles using melted chocolate in a contrasting color. Place the melted chocolate in a small zip-top bag, snip off a tiny corner, and drizzle back and forth over the pops.
- Final Set: Let all decorations set completely before packaging or serving, about 15-20 minutes at room temperature.
Notes
- Cake flavor options: Vanilla, chocolate, red velvet, lemon, strawberry, funfetti, or any cake you love works beautifully
- Coating alternatives: White chocolate, dark chocolate, milk chocolate, or colored candy melts all work perfectly
- Texture fix: If your cake mixture is too crumbly, add more frosting. If it’s too wet, add more cake crumbs or chill longer
- Stick stability: Always use the melted chocolate to “glue” the stick to the cake ball before doing the full dip
- Smooth coating: If your coating is too thick, add a teaspoon of vegetable oil or coconut oil to thin it out
- Avoiding cracks: Make sure cake balls are well-chilled before dipping, and don’t let them sit out too long between the fridge and dipping
Nutrition
- Serving Size: 1 cake pop
- Calories: 95
- Sugar: 12g
- Sodium: 75mg
- Fat: 4g
- Saturated Fat: 2.5g
- Unsaturated Fat: 1.5g
- Trans Fat: 0g
- Carbohydrates: 14g
- Fiber: 0g
- Protein: 1g
- Cholesterol: 8mg
Note: Nutrition information is an estimate based on standard ingredients and may vary depending on specific products used and portion sizes.
Tips & Variations
One of the best things about cake pops is how endlessly customizable they are. Here are some of my favorite ways to switch things up and make this recipe your own:
Flavor Combinations to Try:
- Chocolate Lover’s Dream: Chocolate cake + chocolate frosting + dark chocolate coating + mini chocolate chips
- Red Velvet Classic: Red velvet cake + cream cheese frosting + white chocolate coating
- Lemon Sunshine: Lemon cake + lemon buttercream + yellow candy melts + white chocolate drizzle
- Birthday Cake: Funfetti cake + vanilla frosting + pastel candy melts + rainbow sprinkles
- Cookies and Cream: Vanilla cake with crushed Oreos + vanilla frosting + white chocolate coating + more crushed Oreos on top
- Peanut Butter Cup: Chocolate cake + peanut butter frosting + milk chocolate coating + peanut butter drizzle
- Strawberry Shortcake: Strawberry cake + strawberry frosting + pink coating + freeze-dried strawberry pieces
Seasonal Variations:
- Fall/Halloween: Pumpkin spice cake with cinnamon cream cheese frosting, dipped in orange coating with chocolate drizzle
- Winter/Christmas: Peppermint cake with vanilla frosting, white chocolate coating, and crushed candy canes
- Spring/Easter: Carrot cake with cream cheese frosting, pastel coatings, and Easter-themed sprinkles
- Summer: Coconut cake with coconut frosting, white chocolate coating rolled in toasted coconut
Special Diet Modifications:
- Gluten-Free: Use your favorite gluten-free cake mix or recipe
- Dairy-Free: Use dairy-free cake, dairy-free frosting, and dairy-free chocolate
- Lower Sugar: Reduce frosting amount and use dark chocolate coating
- Vegan: Use vegan cake, vegan frosting, and vegan chocolate coating
Fun Shape Ideas: Instead of traditional round balls, try rolling your mixture into other shapes like footballs, hearts, eggs for Easter, or even character heads (use candy melts to add features).
Pro Chef Tips
After making literally hundreds of cake pops over the years, I’ve learned some insider tricks that make a huge difference in both the process and the final result:
Temperature Control is Everything: This is the most important tip I can give you. Your cake balls must be thoroughly chilled before dipping, but your coating needs to be properly melted and at the right temperature. If the coating is too hot, it’ll cause your cake balls to crack. If it’s too cool, it’ll be too thick to work with. Aim for a smooth, pourable consistency—test it by drizzling some from a spoon. It should flow smoothly without being runny.
The Dipping Technique Matters: Don’t swirl your cake pop in the coating—this creates friction that can cause it to fall off the stick. Instead, dip it straight down, pull it straight up, and then gently tap the stick against the side of the bowl to remove excess. Hold it upright for a few seconds to let any drips settle before adding decorations.
Control Your Frosting Ratio: Too much frosting makes cake pops too soft and they’ll slide down the sticks or fall apart. Too little and they’ll be dry and crumbly. The perfect texture should feel like Play-Doh—firm enough to hold its shape but soft enough to roll smoothly. Start conservatively with frosting and add more only if needed.
Avoid Air Pockets: When rolling your cake balls, really press and compact the mixture firmly. Air pockets will cause cracks in your coating or make the pops expand and crack as they warm up during dipping.
Keep Everything Organized: Set up an assembly line—chilled cake balls on one side, melted coating in the middle, and your drying stand on the other side. This keeps the process moving efficiently and ensures your cake balls don’t warm up too much while waiting to be dipped.
Reheating Coating: As you work, your coating will start to cool down and thicken. Simply pop it back in the microwave for 10-15 seconds and stir to bring it back to the right consistency. Don’t let it get too thick or you’ll end up with a coating that’s too heavy.
The Paper Towel Trick: Keep a damp paper towel nearby to wipe the rim of your coating bowl periodically. This prevents chocolate buildup that can fall onto your beautifully dipped pops.
Common Mistakes to Avoid
Learn from my early cake pop disasters so you don’t have to experience them yourself! Here are the most common pitfalls and how to avoid them:
Mistake #1: Using Warm Cake – I know you’re excited to get started, but if your cake isn’t completely cooled, the heat will make your frosting melt, creating a soupy, unworkable mess. Always bake your cake ahead of time and let it cool completely, or even refrigerate it overnight.
Mistake #2: Over-Mixing with Frosting – It’s tempting to add a lot of frosting because it tastes good, but this is the number one reason cake pops fall off sticks. The mixture becomes too heavy and soft. Start with less frosting than you think you need and add gradually until you reach the right consistency.
Mistake #3: Skipping the Chilling Steps – Every chilling step serves a purpose. The first chill firms up your cake balls. The second chill (after inserting sticks) sets the chocolate “glue.” Skipping these steps almost guarantees your pops will fall apart or slide down the sticks.
Mistake #4: Dipping Warm Cake Balls – If your cake balls aren’t cold enough when you dip them, the temperature difference between the cold ball and warm coating will cause the coating to crack as it sets. Always work with thoroughly chilled cake balls.
Mistake #5: Using Coating That’s Too Hot – Similarly, if your chocolate is too hot, it can also cause cracking or make the cake ball start to break down. Let your coating cool slightly after melting—it should be warm and fluid but not steaming hot.
Mistake #6: Not Tapping Off Excess Coating – A thick coating not only wastes chocolate but also looks less professional and takes forever to set. Gently tap the stick against the bowl rim to remove excess before the coating sets.
Mistake #7: Adding Decorations Too Late – Sprinkles and decorations need to be added while the coating is still wet. Once it sets (which happens quickly!), nothing will stick. Have your decorations ready and work efficiently.
Storage & Meal Prep
One of the best things about cake pops is how well they store, making them perfect for making ahead for parties and events.
Room Temperature Storage: Fully finished and decorated cake pops can be stored at room temperature for up to 2 days. Keep them in an airtight container or individually wrapped in cellophane bags tied with ribbons. Make sure they’re standing upright in a styrofoam block or cake pop stand so the coating doesn’t smudge.
Refrigerator Storage: For longer storage, keep your cake pops in the refrigerator for up to 1 week. Place them in an airtight container with layers separated by parchment paper. Before serving, let them come to room temperature for about 15-20 minutes—cold cake pops can taste a bit dense and the coating may develop condensation.
How to Reheat/Bring to Temperature: You don’t actually reheat cake pops, but you do want to let refrigerated ones come to room temperature before serving. Simply take them out of the fridge 20-30 minutes before your event and let them sit at room temperature. This brings out the full flavor and gives the coating that perfect snap when you bite into it.
Storing Uncoated Cake Balls: If you want to break up the process, you can roll your cake balls and store them uncoated in the refrigerator for up to 3 days or in the freezer for up to 6 weeks. When you’re ready to finish them, thaw frozen cake balls in the refrigerator overnight, then proceed with dipping and decorating.
Best Practices: Never store cake pops in a humid environment as it can make the coating weep or become sticky. If you live in a very humid climate, the refrigerator is your best bet for storage.
Make-Ahead & Freezer Notes
Cake pops are absolutely fantastic for making ahead, which is a huge advantage when you’re planning for a big party or event and need to spread out the work.
Making Cake in Advance: Bake your cake up to 3 days ahead and store it tightly wrapped in plastic wrap at room temperature, or freeze the cooled cake for up to 3 months. Thaw frozen cake in the refrigerator overnight before crumbling.
Making Cake Balls Ahead: You can roll your cake balls and store them in the refrigerator for 3 days or freeze them for up to 6 weeks. Place rolled balls on a parchment-lined baking sheet and freeze until solid (about 2 hours), then transfer to a freezer-safe container or bag. Thaw in the refrigerator overnight before continuing with the recipe.
Freezing Finished Cake Pops: Yes! Fully decorated cake pops freeze beautifully. Flash freeze them on a baking sheet for 1-2 hours until solid, then carefully transfer to a freezer-safe container with layers separated by parchment paper. They’ll keep for up to 2 months. To thaw, transfer to the refrigerator overnight, then bring to room temperature before serving.
Best Make-Ahead Strategy: For a stress-free party prep, here’s my favorite timeline:
- 3 days before: Bake and cool your cake
- 2 days before: Crumble cake, mix with frosting, roll into balls, and refrigerate
- 1 day before: Dip, decorate, and let set completely
- Day of event: Simply set out your beautiful cake pops and accept all the compliments!
Reheating Method: As mentioned, you don’t reheat cake pops, but bringing them to room temperature from refrigerated or frozen storage is important. Allow 20-30 minutes at room temperature for refrigerated pops, or thaw frozen pops in the fridge overnight then let sit at room temperature for 20 minutes before serving.
Serving Suggestions
Cake pops are already pretty perfect on their own, but here’s how to serve them for maximum impact and create a complete dessert experience:
Presentation Ideas:
- Cake Pop Bouquet: Arrange pops at varying heights in a decorative vase filled with floral foam for a stunning centerpiece
- Tiered Display: Use a cupcake stand or tiered server to create different levels for visual interest
- Individual Wrapping: Wrap each pop in a cellophane bag tied with coordinating ribbon for party favors guests can take home
- Themed Displays: Coordinate your display with your party theme using themed containers, fabrics, and decorative elements
Beverage Pairings:
- Coffee or Espresso: The perfect accompaniment for chocolate cake pops, especially at brunch events
- Cold Milk: Classic pairing that kids and adults love, especially with vanilla or funfetti pops
- Hot Chocolate: Create a cozy dessert station with cake pops and gourmet hot chocolate
- Champagne or Prosecco: For adult celebrations, cake pops pair wonderfully with bubbly
- Flavored Lattes: Match your cake pop flavor to specialty coffee drinks for a café-style experience
Complete Dessert Table Ideas: Pair your cake pops with complementary treats for a stunning dessert spread:
- Mini cupcakes in matching flavors
- Chocolate-covered strawberries
- Sugar cookies decorated to match your theme
- Brownies or blondies cut into small squares
- Fresh fruit skewers for guests who want something lighter
- A selection of nuts and candies in decorative bowls
Event-Specific Serving:
- Birthday Parties: Display around a main birthday cake as colorful additions
- Baby Showers: Coordinate colors with the shower theme and attach little tags revealing baby’s gender
- Weddings: Create flavors that match the wedding cake for a cohesive dessert table
- Holiday Parties: Match decorations to the holiday for festive flair
Kid-Friendly Serving: Set up a “cake pop bar” where kids can choose their favorite decorated pops from a fun display, or create a simple activity where they can add their own final sprinkles to pre-dipped pops.
FAQs Section
Q: Why do my cake pops fall off the sticks?
A: This is the most common cake pop problem, and it usually comes down to three issues: 1) Your cake mixture has too much frosting making it too heavy and soft, 2) You didn’t chill the cake balls long enough before dipping, or 3) You didn’t use the “glue” method of dipping the stick in melted chocolate before inserting it. Make sure your cake mixture holds together firmly without being wet, chill thoroughly, and always dip the stick in coating first before inserting into the cake ball.
Q: Can I use store-bought cake and frosting?
A: Absolutely! Using a boxed cake mix and store-bought frosting works perfectly for cake pops. In fact, many people prefer it because boxed cakes tend to be extra moist. There’s zero shame in taking shortcuts—the final result is what matters, and homemade cake pops always taste amazing regardless of whether you baked from scratch or used convenient shortcuts.
Q: Why is my chocolate coating cracking?
A: Cracking usually happens because of temperature differences. If your cake balls are too cold when you dip them (straight from the freezer), or if your coating is too hot, you’ll get cracks as the coating sets. The solution is to let freezer-cold cake balls sit at refrigerator temperature for 15 minutes before dipping, and let your coating cool slightly after melting so it’s warm and fluid but not steaming hot.
Q: How far in advance can I make cake pops?
A: Finished cake pops can be made 2 days in advance and stored at room temperature, or up to 1 week in the refrigerator. You can also freeze them for up to 2 months. For best results, I recommend making them 1-2 days before your event. This gives them time to set properly while still being fresh and delicious.
Q: Can I use a cake pop maker instead of rolling them by hand?
A: While there are electric cake pop makers available, they create a different type of cake pop—more like mini sphere-shaped cakes rather than the dense, truffle-like texture of traditional cake pops. The recipe I’ve shared here is for crumbled-cake-and-frosting style pops. Cake pop makers work great if you have one, but the method and recipe would be different.
Q: What’s the best type of chocolate to use for coating?
A: For beginners, I highly recommend candy melts (also called candy coating or almond bark). They’re specifically formulated for coating and dipping—they melt smoothly, set up beautifully, and come in every color imaginable. If you prefer real chocolate, use high-quality chocolate chips or bars and add 1 tablespoon of coconut oil or vegetable shortening per cup of chocolate to help thin it to the right consistency.
Q: My coating is too thick. How do I fix it?
A: If your coating is too thick to work with, add vegetable oil, coconut oil, or paramount crystals (specifically made for thinning chocolate) one teaspoon at a time, stirring well after each addition until you reach a smooth, pourable consistency. The coating should drip easily from a spoon but not be so thin that it’s runny.
Q: Can I make cake pops without sticks?
A: Yes! These are called cake balls or cake truffles. Simply roll your mixture into balls, chill them, and use a dipping fork or regular fork to dip them in coating. Tap off the excess and slide them onto parchment paper to set. They’re just as delicious, just not as easy to display or eat at parties.
Conclusion
There you have it—everything you need to know to create absolutely stunning, delicious cake pops that’ll have everyone asking for your secret! Whether you’re making them for a special celebration, as homemade gifts, or just because you want to try something fun in the kitchen, this recipe will guide you every step of the way to cake pop perfection.
The beauty of cake pops is that they truly are a creative outlet. Once you master the basic technique, you can let your imagination run wild with flavors, colors, and decorations. I love seeing how different people personalize this recipe to match their style and their event themes. From elegant wedding desserts to whimsical birthday party treats, cake pops fit every occasion beautifully.
Don’t be intimidated if your first batch isn’t perfect—cake pop making is definitely a skill that improves with practice. But even your “practice” pops will taste absolutely amazing, so there’s no downside to giving this recipe a try! Each time you make them, you’ll get faster, develop better technique, and discover little tips and tricks that work for you.
I’d absolutely love to see your cake pop creations! When you make this recipe, share your beautiful results in the comments below and let me know what flavor combination you chose. Did you go classic with vanilla and chocolate, or did you get adventurous with something unexpected? What decorations did you use? Your feedback and creativity inspire me and help other readers feel confident to try new things.
Ready to make the most adorable dessert ever? Save this recipe to your Pinterest boards so you have it ready for your next celebration! And if you loved this recipe, please share it with friends who would enjoy making these fun treats too. Happy baking, and enjoy every bite of your gorgeous homemade cake pops! 🍰✨