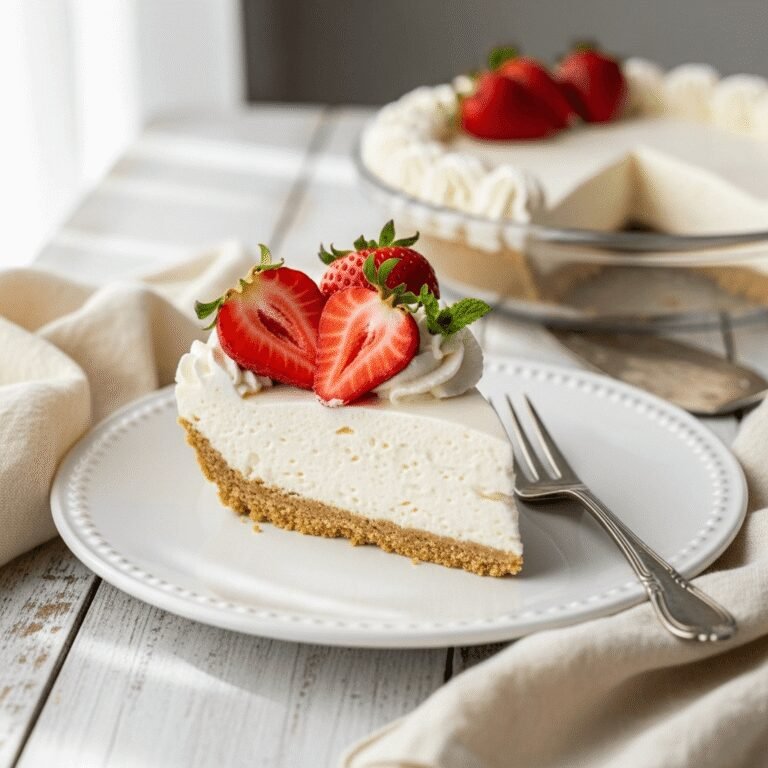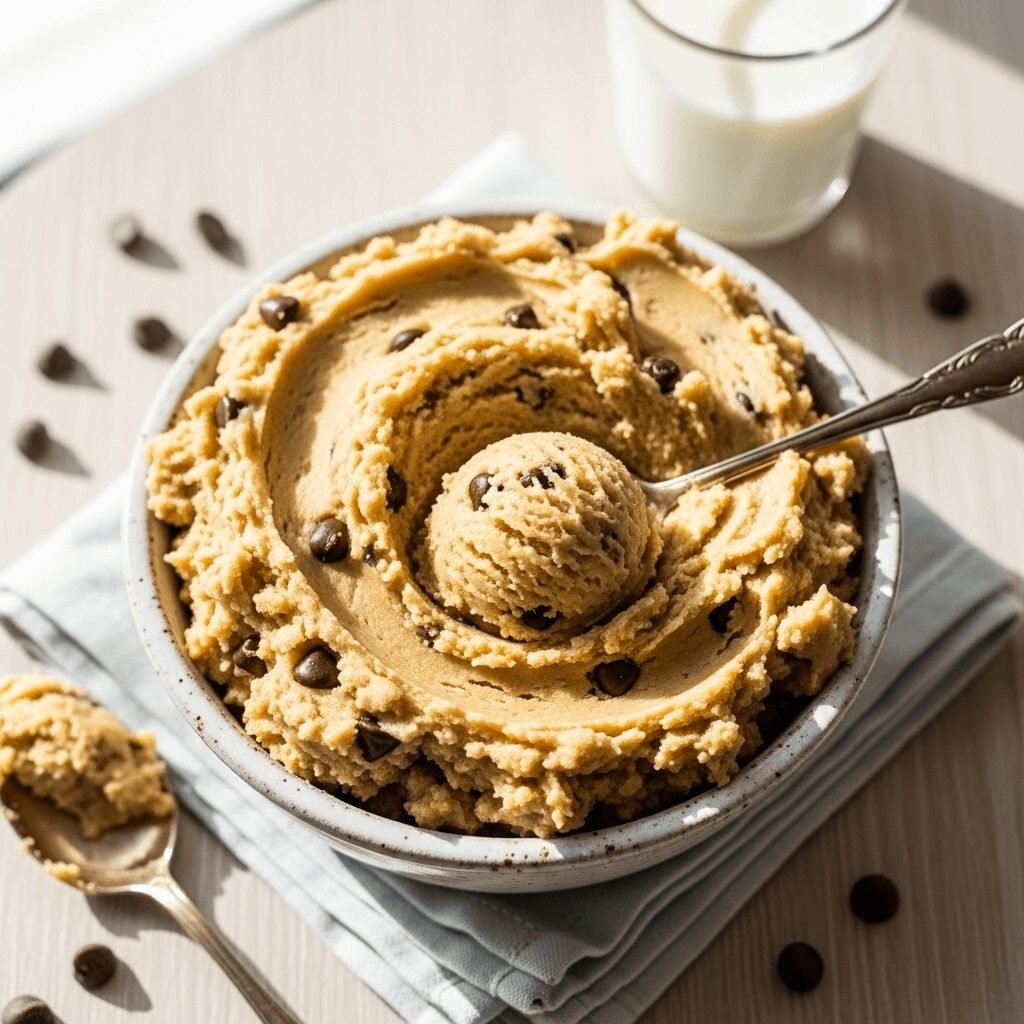
The Ultimate Edible Cookie Dough Recipe – Safe, Easy & Irresistibly Delicious!

There’s something absolutely magical about cookie dough that makes it even more tempting than the baked cookies themselves. That rich, buttery sweetness with chocolate chips scattered throughout—it’s pure comfort in a bowl. This edible cookie dough recipe is specially designed to be safe to eat raw, which means you can indulge in that nostalgic treat without any worries about raw eggs or flour.
Perfect for movie nights, birthday parties, late-night cravings, or whenever you want a quick dessert fix, this no-bake edible cookie dough comes together in just 10 minutes. It’s become incredibly popular on social media and Pinterest because it delivers all the flavor of traditional cookie dough while being completely safe to enjoy straight from the bowl. Serve it as a dip with graham crackers, use it as an ice cream topping, roll it into energy bites, or simply grab a spoon and dig in!
History / Background
The love affair with raw cookie dough is as old as home baking itself. For generations, sneaking tastes of cookie dough while baking was a rite of passage in American kitchens—even though parents warned against it due to the raw eggs and flour. The irresistible combination of butter, sugar, and chocolate chips was simply too good to resist, despite the health warnings.
The concept of “edible” or “safe-to-eat” cookie dough emerged in the early 2010s as food safety awareness grew and creative home bakers sought ways to enjoy this beloved treat without the risks. Food bloggers and recipe developers began experimenting with egg-free versions and heat-treated flour, making cookie dough safe for raw consumption. This innovation sparked a dessert revolution!
By the mid-2010s, edible cookie dough had become a full-blown trend. Dedicated cookie dough cafés started popping up in cities across America, serving scoops of eggless dough in cups and cones like ice cream. The treat became a Pinterest sensation, with thousands of home cooks sharing their variations. Today, edible cookie dough represents the perfect marriage of nostalgia and modern food safety—letting us indulge in childhood memories while being smart about what we eat. It’s become a staple at dessert boards, party spreads, and casual get-togethers, proving that sometimes the “unfinished” version of a recipe is just as satisfying as the final product.
Why You’ll Love This Recipe
This edible cookie dough recipe has everything you could want in a quick, satisfying dessert. It captures that authentic cookie dough flavor we all crave while being completely safe to eat raw—no baking required! The texture is perfectly scoopable yet slightly creamy, and you can customize it with your favorite mix-ins.
Here’s why this recipe will become your new go-to treat:
- Ready in 10 minutes – Seriously one of the fastest desserts you can make from scratch
- No eggs required – Completely safe for raw consumption, perfect for kids and pregnant women
- Customizable – Add any mix-ins you love: chocolate chips, M&Ms, peanut butter chips, sprinkles, or crushed cookies
- Budget-friendly – Uses simple pantry staples that cost less than store-bought edible dough
- No-bake dessert – Perfect for hot summer days when you don’t want to turn on the oven
- Portion control friendly – Make a small batch when you’re craving something sweet without leftovers tempting you all week
- Kid-approved – Children absolutely love helping make this and eating it too
- Versatile serving options – Enjoy it by the spoonful, as a dip, in dessert parfaits, or rolled into energy bites
- Better than store-bought – Fresher taste, no preservatives, and you control the sweetness level
Ingredient Notes
Understanding your ingredients helps you make the perfect edible cookie dough every time. Here’s what you’ll need and why each component matters:
Heat-Treated Flour – This is the most crucial step for food safety. Raw flour can contain harmful bacteria, so we heat-treat it by spreading it on a baking sheet and baking at 350°F for 5 minutes, or microwaving it in 30-second intervals until it reaches 160°F. All-purpose flour works best for authentic cookie dough texture. You can substitute with almond flour for a grain-free version, though the texture will be slightly denser and more crumbly.
Unsalted Butter – Softened to room temperature, butter provides that rich, classic cookie dough flavor and creamy texture. Use unsalted so you can control the salt level. For a dairy-free version, substitute with softened coconut oil or vegan butter (though coconut oil will make it firmer when chilled).
Brown Sugar – Creates a deeper, more complex sweetness with caramel notes that make this taste like authentic chocolate chip cookie dough. Light or dark brown sugar both work; dark brown will give you more molasses flavor. You can use all granulated sugar, but you’ll lose some of that characteristic chewiness and depth.
Granulated Sugar – Balances the brown sugar and adds the right level of sweetness. Together, these two sugars create the perfect flavor profile.
Vanilla Extract – Use pure vanilla extract for the best flavor. This enhances all the other ingredients and adds warmth. Vanilla bean paste works beautifully too if you want those pretty vanilla specks throughout.
Salt – Just a pinch enhances all the flavors and prevents the dough from tasting flat or overly sweet. Don’t skip it!
Milk – Brings the dough together to a scoopable, creamy consistency. Whole milk provides the richest flavor, but 2%, almond milk, oat milk, or any plant-based milk works perfectly. Start with less and add more as needed to reach your desired consistency.
Mini Chocolate Chips – Mini chips distribute more evenly throughout the dough, giving you chocolate in every bite. Regular-sized chips work fine too, or mix both sizes! Semi-sweet is traditional, but feel free to use milk chocolate, dark chocolate, or even white chocolate chips.
Equipment Needed
This recipe requires minimal equipment, which is part of its appeal! Here’s what you’ll need:
- Baking sheet – For heat-treating the flour
- Mixing bowl (medium to large) – For combining all ingredients
- Electric mixer or wooden spoon – A hand mixer makes this easier, but a sturdy wooden spoon and some arm power works perfectly fine
- Measuring cups and spoons – For accurate measurements
- Spatula – For scraping down the bowl and folding in chocolate chips
- Instant-read thermometer (optional) – If you want to verify your flour has reached 160°F during heat treatment
- Airtight container – For storing leftovers (if there are any!)
- Cookie scoop or spoon – For serving
The Ultimate Edible Cookie Dough Recipe – Safe, Easy & Irresistibly Delicious!

This edible cookie dough recipe is safe to eat raw, incredibly easy to make, and tastes just like the real deal! Ready in 15 minutes with simple pantry ingredients, it’s the perfect no-bake treat for cookie dough lovers. Enjoy it by the spoonful, as a dip, or in dessert parfaits.
- Prep Time: 10 minutes (plus 5 minutes for heat-treating flour)
- Cook Time: 0 minutes
- Total Time: 15 minutes
- Yield: 10-12 servings (about 2 cups) 1x
- Category: Dessert
- Method: No Bake
- Cuisine: American
- Diet: Vegetarian
Ingredients
- 1 cup all-purpose flour (heat-treated)
- ½ cup unsalted butter, softened to room temperature
- ⅓ cup light brown sugar, packed
- ¼ cup granulated sugar
- 2 tablespoons milk (plus more as needed)
- 1 teaspoon vanilla extract
- ¼ teaspoon salt
- ¾ cup mini chocolate chips (or regular-sized)
Instructions
- Heat-treat the flour: Spread flour evenly on a baking sheet and bake at 350°F for 5 minutes, stirring halfway through. Alternatively, microwave flour in a microwave-safe bowl in 30-second intervals, stirring between each, until it reaches 160°F on an instant-read thermometer. Let cool completely before using. This step is essential for food safety.
- Cream the butter and sugars: In a large mixing bowl, beat the softened butter, brown sugar, and granulated sugar together using an electric mixer (or wooden spoon) for 2-3 minutes until light and fluffy. The mixture should be well combined and smooth.
- Add vanilla and milk: Pour in the vanilla extract and milk, then mix until fully incorporated. The mixture will look slightly separated at this point—that’s normal!
- Mix in the flour: Add the heat-treated, cooled flour and salt to the bowl. Mix on low speed (or stir vigorously) until the flour is completely incorporated and the mixture comes together as a soft, thick dough. If the dough seems too thick or crumbly, add milk 1 tablespoon at a time until you reach a scoopable consistency.
- Fold in chocolate chips: Using a spatula, gently fold in the chocolate chips until evenly distributed throughout the dough.
- Serve or chill: Enjoy immediately, or refrigerate for 15-20 minutes for a firmer texture. The dough will thicken slightly when chilled.
- Store properly: Transfer to an airtight container and refrigerate for up to 5 days, or freeze for up to 2 months.
Notes
- Food Safety First: Always heat-treat your flour to 160°F to kill potential bacteria. This is non-negotiable for safe raw consumption.
- Butter Temperature: Make sure your butter is truly softened (not melted) for the best texture. It should leave a slight indent when pressed.
- Consistency Adjustments: The dough should be thick but scoopable. Add more milk if it’s too crumbly, or more flour if it’s too wet.
- Mix-In Variations: Feel free to add chopped nuts, M&Ms, peanut butter chips, toffee bits, or any other mix-ins you love.
- Serving Size: Each serving is approximately 2-3 tablespoons. Since this is rich and sweet, a little goes a long way!
Nutrition
- Serving Size: 2 tablespoons (about 1/12 of recipe)
- Calories: 185
- Sugar: 15g
- Sodium: 55mg
- Fat: 10g
- Saturated Fat: 6g
- Unsaturated Fat: 3g
- Trans Fat: 0g
- Carbohydrates: 23g
- Fiber: 1g
- Protein: 2g
- Cholesterol: 20mg
Nutrition information is approximate and will vary based on specific ingredients used and portion sizes.
Tips & Variations
The beauty of edible cookie dough is how easily you can customize it to your preferences! Here are some creative ways to switch things up:
Flavor Variations:
- Peanut Butter Cookie Dough: Replace half the butter with creamy peanut butter and add peanut butter chips instead of chocolate chips
- Double Chocolate: Add 2 tablespoons of cocoa powder to the flour and use a mix of milk and dark chocolate chips
- Birthday Cake: Skip the chocolate chips and fold in ½ cup rainbow sprinkles plus ½ teaspoon almond extract
- Oatmeal Raisin: Add ½ cup finely chopped toasted oats and ½ cup raisins with ½ teaspoon cinnamon
- S’mores Style: Add mini marshmallows, chocolate chips, and crushed graham crackers
- Chocolate Chunk Macadamia: Use chopped dark chocolate and crushed macadamia nuts for a gourmet twist
Dietary Modifications:
- Vegan: Use vegan butter and plant-based milk (coconut milk works especially well)
- Gluten-Free: Substitute with heat-treated gluten-free 1-to-1 baking flour or almond flour
- Lower Sugar: Reduce sugar by ¼ cup and add an extra tablespoon of milk for moisture
- Protein-Packed: Add 2 tablespoons of vanilla protein powder and adjust milk as needed
Texture Adjustments:
- For thicker, stiffer dough (like Toll House cookie dough): Use less milk and chill thoroughly
- For creamier, dip-style dough: Add an extra 1-2 tablespoons of milk
- For extra richness: Add 1 tablespoon of cream cheese along with the butter
Pro Chef Tips
Take your edible cookie dough from good to absolutely amazing with these professional insights:
Toast Your Flour Before Heat-Treating – For an extra dimension of flavor, toast the flour lightly until it smells nutty before heat-treating. This adds subtle depth that mimics the flavor of baked cookies.
Use Room Temperature Ingredients – Cold butter won’t cream properly with the sugar, and cold milk can cause the mixture to seize. Let everything sit out for 30 minutes before starting.
Cream the Butter Longer Than You Think – Spend a full 3 minutes beating the butter and sugars together. This incorporates air, making the final texture lighter and more luxurious instead of dense and greasy.
Add a Touch of Corn Syrup – Professional bakers’ secret: Add 1 tablespoon of light corn syrup with the vanilla for a silkier texture and more authentic bakery taste.
Layer Your Salt – Use fine sea salt in the dough, but finish with a tiny sprinkle of flaky sea salt on top when serving. This creates complexity and makes each bite more interesting.
Bloom Your Vanilla – Mix the vanilla extract with the milk and let it sit for 2 minutes before adding. This intensifies the vanilla flavor throughout the dough.
Don’t Overmix After Adding Flour – Mix just until combined to keep the texture tender. Overmixing develops gluten and makes the dough tougher.
Chill for Optimal Flavor – While you can eat this immediately, chilling for at least 30 minutes allows the flavors to meld and the dough to firm up to the perfect scoopable consistency.
Common Mistakes to Avoid
Even simple recipes can go wrong! Here’s how to sidestep the most common pitfalls:
Using Raw, Untreated Flour – Never skip heat-treating the flour. Raw flour can contain E. coli or salmonella, and heat treatment is the only way to make it safe for raw consumption. Don’t risk food poisoning for a shortcut!
Melted or Too-Cold Butter – Melted butter creates an oily, separated dough instead of a creamy one. Too-cold butter won’t incorporate properly. Your butter should be soft enough to leave an indent when pressed but still hold its shape.
Not Measuring Flour Correctly – Too much flour makes the dough dry and crumbly. Spoon flour into your measuring cup and level it off with a knife rather than scooping directly from the bag, which compacts it.
Adding All the Milk at Once – Different flours absorb liquid differently, so add milk gradually. Start with 2 tablespoons and add more only if needed. It’s easier to add liquid than to fix a dough that’s too wet.
Using Stale or Low-Quality Vanilla – Vanilla is a primary flavor here, so cheap imitation vanilla will make the whole batch taste artificial. Invest in real vanilla extract—it makes a huge difference.
Skipping the Salt – Salt isn’t optional—it balances the sweetness and enhances all the other flavors. Without it, the dough tastes one-dimensional and overly sugary.
Storing at Room Temperature Too Long – Because this contains butter and milk, it should be refrigerated after 2 hours at room temperature. Leaving it out too long can cause it to spoil or become too soft and oily.
Storage & Meal Prep
Proper storage keeps your edible cookie dough fresh, safe, and delicious:
Refrigerator Storage: Transfer the cookie dough to an airtight container and refrigerate for up to 5 days. Press a piece of plastic wrap directly onto the surface of the dough before sealing to prevent it from drying out or absorbing refrigerator odors. The dough will firm up considerably when chilled, which actually makes it easier to scoop and serve.
Bringing Back to Room Temperature: If your chilled dough is too firm to scoop easily, let it sit at room temperature for 10-15 minutes to soften slightly. You can also microwave it for 5-10 seconds (no more!) to make it scoopable again.
Freezer Storage: Edible cookie dough freezes beautifully! You have two options:
- Bulk Freezing: Store the entire batch in a freezer-safe airtight container for up to 2 months. Thaw overnight in the refrigerator before using.
- Individual Portions: Scoop the dough into tablespoon-sized balls, place them on a parchment-lined baking sheet, and freeze until solid (about 1 hour). Transfer the frozen balls to a freezer bag. This way, you can grab individual portions whenever a craving hits! Eat them frozen for a firmer texture, or let them thaw for 5 minutes.
Food Safety Reminder: Even though this is safe to eat raw, it still contains dairy and should be treated like any perishable food. Don’t leave it at room temperature for more than 2 hours, and always use clean utensils when scooping to prevent contamination.
Make-Ahead & Freezer Notes
Edible cookie dough is actually a fantastic make-ahead dessert that often tastes even better after the flavors have time to develop!
Make-Ahead Instructions: This recipe is perfect for meal prep or party planning. Make the dough up to 5 days in advance and store it in the refrigerator. The texture becomes even better after 24 hours as the flour fully hydrates and the flavors meld together. Just give it a quick stir before serving if the butter has separated slightly.
Freezer-Friendly: As mentioned above, freeze in bulk or as individual portions for up to 2 months. Frozen cookie dough balls make an excellent grab-and-go treat—they’re like cookie dough truffles! Many people actually prefer eating them frozen because they have a fudgy, almost ice cream-like consistency.
Best Reheating Method: “Reheating” isn’t quite the right term since this is meant to be eaten cold or at room temperature, but if your dough is frozen solid, the best method to enjoy it is:
- For softer dough: Thaw in the refrigerator overnight, then let sit at room temperature for 10-15 minutes
- For a firmer, truffle-like treat: Eat directly from frozen—it’s absolutely delicious this way!
- Quick method: Microwave frozen dough for 10-15 seconds maximum to soften slightly
Party Planning Tip: If you’re serving this at a party, scoop it into individual portions and refrigerate on a serving platter up to 6 hours ahead. Cover with plastic wrap until ready to serve. This way, everything is ready to go when guests arrive!
Serving Suggestions
Edible cookie dough is incredibly versatile! Here are creative ways to serve and enjoy it:
As a Dessert Dip:
- Serve in a bowl surrounded by graham crackers, vanilla wafers, pretzels, or apple slices
- Pair with fresh strawberries for a chocolate-covered strawberry vibe
- Use as a dip for waffle fries for a sweet-salty combo
In Dessert Parfaits:
- Layer with whipped cream and crushed cookies for an indulgent parfait
- Alternate layers with chocolate pudding and crumbled brownies
- Create a cookie dough cheesecake parfait with cream cheese mousse
As an Ice Cream Topping:
- Scoop small balls on top of vanilla ice cream
- Create a cookie dough sundae with hot fudge, whipped cream, and a cherry
- Mix small pieces into softened ice cream and refreeze for a homemade cookie dough ice cream
In Other Desserts:
- Stuff into chocolate chip cookies before baking for a cookie-in-a-cookie
- Spread between brownie layers
- Roll into balls and coat with melted chocolate for cookie dough truffles
- Use as a filling for crepes or stuffed French toast
Beverage Pairings:
- Ice-cold milk (classic!)
- Hot coffee or cold brew
- Chocolate milk or milkshakes
- Chai tea latte
- Hot chocolate with whipped cream
Fun Serving Presentations:
- Serve in mini mason jars with small spoons for individual portions
- Create a cookie dough board with various mix-ins guests can add themselves
- Scoop into ice cream cones for a fun twist
- Serve in small bowls with edible cookie dough spoons (yes, they exist!)
FAQs Section
Can I use regular flour without heat-treating it?
No, never skip heat-treating flour for any recipe meant to be eaten raw. Raw flour can harbor harmful bacteria like E. coli and salmonella, which can cause serious foodborne illness. Heat treatment (baking at 350°F for 5 minutes or microwaving until it reaches 160°F) kills these bacteria and makes the flour safe for raw consumption. This step is crucial and non-negotiable for food safety.
Why is my cookie dough too dry or crumbly?
This usually happens from too much flour or not enough liquid. Remember that different flours absorb moisture differently, and even humidity levels can affect this. Add milk 1 tablespoon at a time until the dough reaches a scoopable consistency. Also, make sure you’re measuring flour correctly—spoon it into the measuring cup rather than scooping, which compacts it and can result in using too much.
Can I use salted butter instead of unsalted?
Yes, but reduce or omit the added salt in the recipe. Salted butter contains about ⅛ teaspoon of salt per stick, so if you use salted butter, skip the ¼ teaspoon salt called for in the recipe or it may taste too salty. I prefer unsalted butter because it gives you better control over the final flavor.
How long does edible cookie dough last, and does it need to be refrigerated?
Edible cookie dough must be refrigerated because it contains butter and milk, both perishable ingredients. It will last 5 days in an airtight container in the refrigerator, or up to 2 months in the freezer. Never leave it at room temperature for more than 2 hours. While it’s safe to eat raw (thanks to heat-treated flour and no eggs), it’s still a perishable food product.
Can I bake this cookie dough into actual cookies?
While technically you could try to bake it, this recipe isn’t formulated for baking and won’t produce good cookies. It lacks eggs, which provide structure and leavening, and the flour has been heat-treated, which changes its baking properties. You’d end up with flat, crumbly cookies that don’t rise. If you want baked cookies, use a traditional cookie recipe designed for baking.
Is this safe for pregnant women and young children?
Yes! That’s one of the best things about this recipe. Because it contains no raw eggs and uses heat-treated flour, it’s completely safe for pregnant women, young children, elderly individuals, and anyone with compromised immune systems. Traditional cookie dough poses risks for these groups, but this version eliminates those concerns entirely.
Can I make this without a mixer?
Absolutely! While an electric mixer makes things easier and faster, you can definitely make this by hand with a sturdy wooden spoon and a bit of elbow grease. Just make sure your butter is properly softened to room temperature, and beat the butter and sugars together vigorously for 3-4 minutes until fluffy. It’ll take more effort, but the results will be just as delicious.
Conclusion
There you have it—the ultimate edible cookie dough recipe that satisfies every craving safely and deliciously! Whether you’re treating yourself after a long day, surprising your kids with a fun after-school snack, or impressing guests at your next gathering, this no-bake dessert delivers pure happiness in every spoonful.
The best part? You now have a foolproof recipe that takes just 15 minutes and uses simple ingredients you probably already have in your pantry. No more settling for expensive store-bought versions or denying yourself the simple pleasure of cookie dough because of food safety concerns. This recipe gives you permission to indulge guilt-free!
I’d love to hear how your edible cookie dough turns out! Did you try any of the fun variations? Do you prefer eating it with a spoon, as a dip, or frozen like truffles? Drop a comment below and let me know. And if you loved this recipe, please share it with your fellow cookie dough lovers and save it to your Pinterest boards so you can find it whenever that craving hits!
Now grab your mixing bowl and get ready to experience cookie dough the way it was meant to be enjoyed—by the spoonful! Happy indulging! 🍪✨