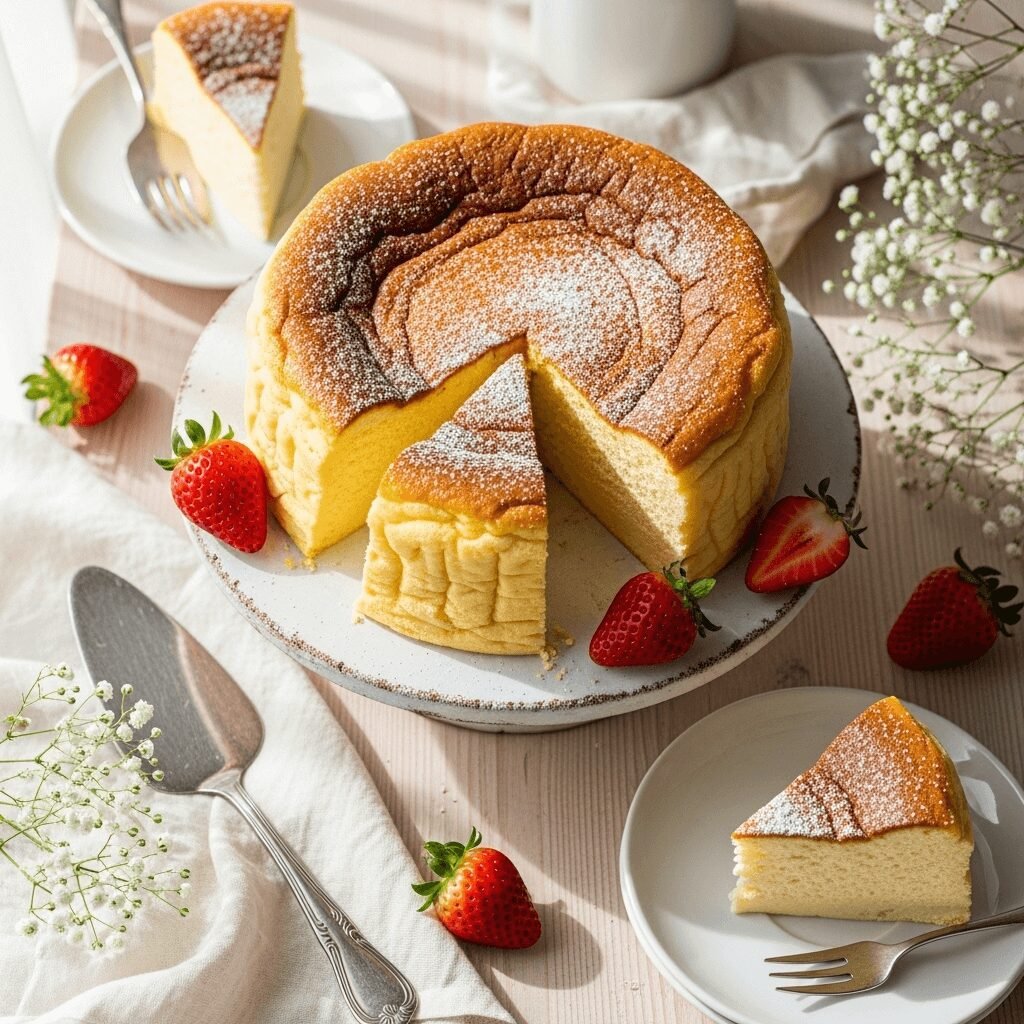
Fluffy Japanese Cheesecake Recipe – Light, Jiggly & Cloud-Like Perfection
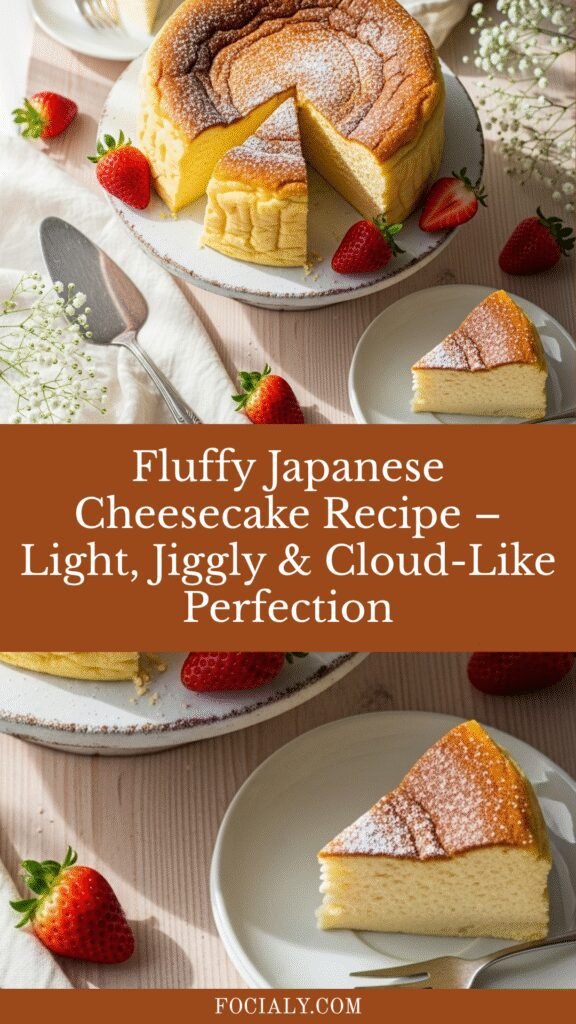
If you’ve ever dreamed of biting into a slice of heaven, Japanese cheesecake is exactly that experience. This isn’t your traditional dense, New York-style cheesecake – oh no, this is something entirely different and magical. Japanese cheesecake is incredibly light, airy, and has this mesmerizing jiggly quality that’s taken the internet by storm. It’s like eating a sweet cloud that melts on your tongue, leaving behind a delicate cream cheese flavor with hints of lemon and vanilla.
This ethereal dessert is perfect for special occasions, afternoon tea parties, birthday celebrations, or simply when you want to impress your family and friends with something truly spectacular. The beauty of Japanese cheesecake lies in its simplicity – despite looking like something from a fancy bakery, it uses everyday ingredients you probably already have in your kitchen. The magic happens in the technique, which I’ll walk you through step-by-step so you can achieve that signature wobble and cottony texture that makes this cake so irresistible.
Whether you’re serving it for a dinner party, bringing it to a potluck, or treating yourself to a weekend baking project, this Japanese cheesecake will become your new favorite dessert obsession.
History / Background
Japanese cheesecake, also known as “soufflé cheesecake” or “cotton cheesecake,” has a fascinating origin story that perfectly represents Japan’s talent for taking Western concepts and elevating them to an art form. This beloved dessert was created in the 1960s by Tomotaro Kuzuno, the owner of a small bakery in Hakata, Japan. During a trip to Berlin, Germany, Kuzuno discovered käsekuchen (German cheesecake) and was inspired to create a lighter, less sweet version that would appeal to Japanese palates, which traditionally prefer delicate, less sugary desserts.
Kuzuno experimented tirelessly in his kitchen, incorporating the French soufflé technique of folding whipped egg whites into the batter to create an impossibly airy texture. The result was revolutionary – a cheesecake that was only one-third as dense as its Western counterparts, with a cottony softness that literally melted in your mouth. His creation became an instant sensation in Japan, and his bakery, Uncle Rikuro’s Cheesecake, remains a pilgrimage site for dessert lovers to this day.
By the 1990s, Japanese cheesecake had spread throughout Asia, with bakeries in Taiwan, Hong Kong, and Singapore developing their own variations. The dessert gained global fame in the 2010s through social media, where videos of the cake’s mesmerizing jiggle went viral on platforms like Instagram and TikTok. Today, Japanese cheesecake represents the perfect marriage of European baking traditions and Japanese culinary philosophy – emphasizing lightness, balance, and the beauty of simplicity. It’s a testament to how food can transcend cultural boundaries and bring joy to people worldwide.
Why You’ll Love This Recipe
This Japanese cheesecake recipe is an absolute showstopper that’s surprisingly achievable for home bakers of all skill levels. While it might look intimidating, I promise that once you understand the technique, you’ll be making this gorgeous dessert on repeat. The process is actually quite meditative and rewarding, and the end result tastes far more impressive than the effort required.
Here’s why this recipe will become your new favorite:
- Cloud-like texture – The combination of cream cheese and whipped egg whites creates an incredibly soft, cottony crumb that’s unlike any other dessert
- Not overly sweet – Perfect for those who find traditional cheesecakes too rich or heavy
- Instagram-worthy presentation – That famous jiggle makes for spectacular photos and videos that your followers will love
- Surprisingly simple ingredients – No exotic or expensive items needed, just pantry staples
- Impressive but achievable – Looks like it came from a professional bakery, but you can make it at home
- Customizable flavor – The subtle base flavor allows for endless variations with different extracts, zests, or toppings
- Crowd-pleaser – Appeals to both cheesecake lovers and those who typically find them too heavy
- Great for special occasions – Elegant enough for formal gatherings but homey enough for family dinners
- Lower in sugar – Contains less sugar than most Western-style cheesecakes
- Therapeutic to make – The process of folding and watching it bake is surprisingly relaxing
Ingredient Notes
Understanding your ingredients is key to Japanese cheesecake success. Each component plays a specific role in creating that signature texture and flavor.
Cream Cheese – Use full-fat, block-style cream cheese (like Philadelphia brand), not spreadable or whipped varieties. The cream cheese must be at room temperature for smooth mixing. This provides the subtle tangy flavor without overwhelming the delicate cake. You need about 8 ounces (225g), which is typically one standard package.
Eggs – You’ll need 5 large eggs, separated into yolks and whites. The yolks add richness and color, while the whites provide all that incredible lift and fluffiness. Make sure there’s absolutely no yolk in your whites, as even a tiny amount of fat will prevent them from whipping properly. Use eggs at room temperature for best results.
Sugar – Granulated white sugar is divided between the yolk mixture and the meringue. Japanese cheesecake uses less sugar than Western versions (about ⅔ cup total), which allows the cream cheese flavor to shine through. Superfine or caster sugar dissolves more easily if you have it.
Butter – Unsalted butter (about 4 tablespoons) is melted and mixed with cream cheese for richness and moisture. You can substitute with coconut oil for a dairy-free version, though the flavor will be slightly different.
Milk – Whole milk (⅓ cup) helps create a smooth, pourable batter. You can use 2% milk in a pinch, but whole milk produces a richer result. For dairy-free, use full-fat oat milk or cashew milk.
Cake Flour – This low-protein flour (about ½ cup) creates the tender, delicate crumb. If you don’t have cake flour, make your own by measuring ½ cup all-purpose flour, removing 1 tablespoon, and replacing it with 1 tablespoon cornstarch.
Cornstarch – Just 2 tablespoons help stabilize the structure and prevent the cake from deflating too much as it cools.
Lemon Juice – Fresh lemon juice (1 tablespoon) adds brightness and helps stabilize the egg whites. Never use bottled lemon juice – fresh is essential here.
Vanilla Extract – Pure vanilla extract (1 teaspoon) enhances all the other flavors. You can also use vanilla bean paste for extra visual appeal.
Cream of Tartar – This optional ingredient (¼ teaspoon) helps stabilize your meringue and makes it easier to achieve stiff peaks. If you don’t have it, substitute with an extra teaspoon of lemon juice.
Equipment Needed
Having the right tools makes this recipe much easier and more successful. Here’s what you’ll need:
- 8-inch or 9-inch round springform pan – Essential for easy removal; the springform mechanism is crucial
- Parchment paper – For lining the pan bottom and sides to prevent sticking
- Large roasting pan – To hold the springform pan for the water bath (bain-marie)
- Stand mixer or hand mixer – Critical for whipping egg whites to stiff peaks; a stand mixer frees up your hands
- Multiple mixing bowls – At least 3 bowls (one large, one medium, one small)
- Fine-mesh sieve or sifter – For sifting flour and cornstarch to prevent lumps
- Rubber spatula – For gentle folding without deflating the batter
- Double boiler or microwave-safe bowl – For melting cream cheese, butter, and milk together
- Whisk – For combining the yolk mixture
- Measuring cups and spoons – Accurate measurements are critical in baking
- Kettle or pot for boiling water – For the water bath
- Cooling rack – For cooling the cake properly
- Offset spatula – Helpful for smoothing the batter in the pan
- Kitchen thermometer – Optional but helpful for monitoring oven temperature
Japanese Cheesecake Recipe
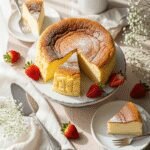
This authentic Japanese cheesecake is incredibly light, fluffy, and jiggly with a delicate cream cheese flavor. The secret is in the meringue technique and gentle baking method that creates a cloud-like texture unlike any other cheesecake you’ve tried.
- Prep Time: 30 minutes
- Cook Time: 70 minutes
- Total Time: 1 hour 40 minutes (plus cooling)
- Yield: 8-10 servings 1x
- Category: Dessert
- Method: Baking (Water
- Cuisine: Japanese
- Diet: Vegetarian
Ingredients
- 8 oz (225g) cream cheese, at room temperature
- 4 tablespoons (60g) unsalted butter
- ⅓ cup (80ml) whole milk
- 5 large eggs, separated, at room temperature
- ⅔ cup (135g) granulated sugar, divided (⅓ cup for yolks, ⅓ cup for whites)
- ½ cup (60g) cake flour
- 2 tablespoons (15g) cornstarch
- 1 tablespoon fresh lemon juice
- 1 teaspoon pure vanilla extract
- ¼ teaspoon cream of tartar (optional but recommended)
- Pinch of salt
- Powdered sugar for dusting (optional)
Instructions
- Prepare the pan and oven: Preheat your oven to 320°F (160°C). Line the bottom of an 8-inch springform pan with parchment paper. Cut a strip of parchment paper tall enough to line the sides (at least 3 inches high) and wrap it around the inside of the pan. Wrap the outside bottom of the springform pan completely with aluminum foil to prevent water from seeping in during the water bath. Set aside.
- Melt the cream cheese mixture: In a double boiler or microwave-safe bowl, combine cream cheese, butter, and milk. Heat gently, stirring frequently, until completely smooth and melted together with no lumps. If using microwave, heat in 20-second intervals, stirring between each. The mixture should be warm but not hot. Set aside to cool slightly.
- Prepare the yolk mixture: In a medium bowl, whisk together the egg yolks and ⅓ cup sugar until pale and slightly thickened, about 2 minutes. Slowly pour the warm cream cheese mixture into the yolks while whisking constantly to prevent scrambling. Add vanilla extract and lemon juice, whisking until smooth.
- Sift in dry ingredients: Sift the cake flour and cornstarch together directly into the yolk mixture. Whisk gently until just combined and smooth with no lumps. The batter should be thin and pourable. Set aside.
- Make the meringue: In a large, spotlessly clean bowl (metal or glass works best), beat the egg whites with an electric mixer on medium speed until foamy. Add cream of tartar and a pinch of salt. Gradually add the remaining ⅓ cup sugar, one tablespoon at a time, while beating. Increase speed to medium-high and continue beating until stiff, glossy peaks form. The meringue should stand straight up when you lift the beaters and look smooth and shiny.
- Fold the batter: Take about one-third of the meringue and fold it gently into the yolk mixture using a rubber spatula. Use a cutting and folding motion, turning the bowl as you go. This lightens the base. Add the remaining meringue in two additions, folding very gently to maintain as much air as possible. The batter should be light, airy, and uniform in color with no white streaks, but don’t overmix or you’ll deflate it.
- Fill the pan: Pour the batter into your prepared springform pan from a low height to minimize air bubbles. Tap the pan gently on the counter 2-3 times to release any large air bubbles. Smooth the top with an offset spatula.
- Prepare water bath: Place the filled springform pan inside a larger roasting pan. Carefully pour hot (not boiling) water into the roasting pan until it reaches halfway up the sides of the springform pan. The water bath ensures gentle, even cooking and prevents cracking.
- Bake: Carefully transfer the roasting pan to the preheated oven. Bake at 320°F (160°C) for 25 minutes. Then reduce the temperature to 285°F (140°C) and continue baking for another 45 minutes. The cake should be set with a slight jiggle in the center and golden brown on top. If the top is browning too quickly, tent loosely with aluminum foil.
- Cool in oven: Turn off the oven and prop the door open slightly with a wooden spoon. Let the cake cool in the oven for 1 hour. This gradual cooling prevents dramatic deflation and cracking. The cake will sink slightly – this is completely normal.
- Finish cooling: Remove from the oven and water bath. Run a thin knife around the edge of the pan to loosen the cake. Let cool to room temperature on a cooling rack, then refrigerate for at least 4 hours or overnight before removing from the pan.
- Serve: Carefully remove the springform pan sides and peel away the parchment paper. Dust with powdered sugar if desired. Slice with a hot, dry knife (wipe clean between cuts) for the cleanest slices.
Notes
- Room temperature ingredients are critical – Cold eggs won’t whip properly and cold cream cheese won’t blend smoothly
- Don’t skip the water bath – This is what creates the gentle, humid heat that gives Japanese cheesecake its signature texture
- Low and slow is the secret – The low temperature and gradual cooling prevent cracking and excessive deflation
- The cake will shrink – It’s supposed to! A 20-30% reduction in height is normal as it cools
- Patience is key – Don’t rush the cooling process or open the oven door during baking
- Best served chilled – The texture is most stable and sliceable when cold
- Store covered – Keeps the cake from absorbing refrigerator odors and drying out
Nutrition
- Serving Size: 1 slice (based on 10 servings)
- Calories: 195
- Sugar: 16g
- Sodium: 110mg
- Fat: 11g
- Saturated Fat: 6g
- Unsaturated Fat: 4g
- Trans Fat: 0g
- Carbohydrates: 19g
- Fiber: 0g
- Protein: 5g
- Cholesterol: 120mg
Note: Nutrition information is approximate and may vary based on specific ingredients used.
Tips & Variations
Flavor Variations:
- Matcha Japanese Cheesecake: Add 1-2 tablespoons matcha powder to the flour mixture for an earthy, Japanese tea flavor
- Chocolate Swirl: Marble in 2 tablespoons melted dark chocolate for a chocolate-vanilla combination
- Citrus Burst: Replace vanilla with orange or yuzu zest and use orange juice instead of lemon juice
- Earl Grey Infusion: Steep 2 Earl Grey tea bags in the warm milk mixture for 5 minutes, then remove before adding to batter
- Berry Ripple: Swirl 3 tablespoons of seedless raspberry or strawberry jam through the batter before baking
Dietary Modifications:
- Reduced Sugar: You can reduce sugar by up to ¼ cup, though the cake will be less sweet and slightly denser
- Gluten-Free: Substitute cake flour with a gluten-free cake flour blend or rice flour
- Dairy-Free: Use vegan cream cheese, plant-based butter, and oat milk (results will differ slightly in texture)
Size Adjustments:
- Mini Cheesecakes: Divide batter among cupcake liners, reduce baking time to 20-25 minutes
- Larger Cake: Use a 10-inch pan, increase baking time by 15-20 minutes
Pro Chef Tips
Temperature control is everything: Use an oven thermometer to verify your oven’s accuracy. Even 10-15 degrees difference can affect the outcome. Japanese cheesecake requires precise, gentle heat.
The meringue makes or breaks this recipe: Your bowl and beaters must be absolutely grease-free. Even a tiny bit of fat or yolk will prevent proper whipping. Wipe everything down with vinegar or lemon juice before starting. Beat to stiff peaks but not dry – the meringue should be glossy and smooth, not grainy or separated.
Fold with confidence but gentleness: The folding technique takes practice. Use broad, sweeping motions with a rubber spatula, cutting down through the center, sweeping across the bottom, and bringing the spatula up along the side. Rotate the bowl as you fold. It should take about 30-40 strokes total – too few leaves streaks, too many deflates the batter.
Water bath wisdom: The water should be hot but not boiling – around 160°F (70°C) is ideal. Boiling water creates too much steam and can cause the cake to rise and fall too dramatically. Add the water after placing the roasting pan in the oven to avoid spills while carrying.
Don’t peek during baking: Opening the oven door causes temperature fluctuations that can make your cake crack or collapse. Trust the timing and only check through the oven window. The cake should jiggle like barely-set jello when done.
The toothpick test doesn’t apply here: Japanese cheesecake should still have a slight wobble in the very center when done. A toothpick will come out with a few moist crumbs – that’s perfect. Overbaking creates a dry, dense cake.
Cooling is part of the cooking process: That hour of gradual cooling in the turned-off oven is crucial. It’s essentially continuing to cook the cake very gently while preventing the shock of cold air that causes cracking and dramatic deflation.
Common Mistakes to Avoid
Overbeating the final batter: Once you add the meringue to the yolk mixture, fold gently. Stirring vigorously or using a whisk will knock out all the air you worked so hard to incorporate, resulting in a dense, flat cake instead of a fluffy one.
Skipping the parchment collar: Many bakers only line the bottom of the pan, but lining the sides is equally important. The parchment creates a non-stick surface and allows the cake to rise without sticking. Without it, the cake can stick to the sides and crack or tear when shrinking.
Removing the cake too early: I know it’s tempting to serve that beautiful cake right away, but Japanese cheesecake absolutely must be completely chilled before removing from the pan. At room temperature, it’s too delicate and will fall apart. Give it at least 4 hours in the refrigerator, preferably overnight.
Using cold ingredients: Starting with room temperature eggs and cream cheese is non-negotiable. Cold cream cheese won’t melt smoothly and will create lumps. Cold eggs won’t emulsify properly and won’t whip to maximum volume. Plan ahead and leave everything on the counter for 1-2 hours before starting.
Baking at too high a temperature: If your oven runs hot or you’re impatient and crank up the heat, you’ll end up with a cracked, browned top and a dense interior. The low temperature is what creates that soft, jiggly texture. It’s worth the extra time, I promise.
Not protecting the pan in the water bath: If water seeps into your springform pan, you’ll have a soggy-bottomed cake. Wrap the entire outside bottom and 2-3 inches up the sides with heavy-duty aluminum foil. Double wrap if you’re not confident in your pan’s seal.
Opening the oven during cooling: When you turn off the oven and prop the door open, resist the urge to peek at or touch the cake. Any jarring movement or sudden temperature change can cause it to deflate dramatically or crack across the top.
Storage & Meal Prep
Refrigerator Storage: Store your Japanese cheesecake in an airtight container or wrapped tightly in plastic wrap in the refrigerator for up to 5 days. The cake actually tastes better on day two after the flavors have had time to develop and the texture sets properly. Always keep it chilled – at room temperature, the delicate structure can become unstable.
Best Serving Temperature: While the cake must be stored cold, let it sit at room temperature for 10-15 minutes before serving. This slightly softened state gives you the best texture and flavor. The cake should still be cool but not refrigerator-cold.
Preventing Absorption of Odors: Japanese cheesecake is very delicate and can absorb strong refrigerator smells. Store it in an airtight container or wrap it very well. Consider placing it on a dedicated shelf away from strongly scented foods like onions or garlic.
Reheating: While Japanese cheesecake is traditionally served chilled, some people enjoy it slightly warm. To gently warm a slice, microwave for 8-10 seconds on 50% power, or place in a 200°F (95°C) oven for 5 minutes. Don’t overheat or the texture will become rubbery.
Keeping the Top Beautiful: If you dust with powdered sugar, do it right before serving as the sugar will dissolve into the moist cake surface over time. For storage, leave the top plain or cover loosely with parchment paper to prevent the top from getting damaged.
Make-Ahead & Freezer Notes
Make-Ahead Timeline: Japanese cheesecake is an excellent make-ahead dessert. In fact, it’s best when made at least one day in advance. Bake and cool completely, then refrigerate for up to 3 days before serving. The texture improves as it chills, becoming more stable and sliceable while the flavors meld together beautifully.
Freezer Instructions: Yes, you can freeze Japanese cheesecake! Wrap the completely cooled cake (still in the springform pan base for stability) tightly in plastic wrap, then wrap again in aluminum foil. Freeze for up to 2 months. The texture holds up remarkably well to freezing.
Freezing Individual Slices: For portion control or easy single servings, slice the cake while cold, then wrap each slice individually in plastic wrap. Place wrapped slices in a freezer-safe container or bag. This way you can thaw only what you need. Frozen slices will keep for 2 months.
Thawing Methods: For best results, thaw the cake in the refrigerator overnight while still wrapped. This slow thawing prevents condensation from forming on the surface and maintains the texture. Remove wrapping once thawed to prevent sogginess. You can also thaw individual slices at room temperature for about 30 minutes.
Post-Thaw Quality: The texture will be very slightly denser after freezing but still delicious and jiggly. Some home bakers actually prefer the slightly more stable texture after freezing as it makes slicing even easier. The flavor remains completely intact.
Not Recommended for Freezing: If you’ve already dusted the cake with powdered sugar, don’t freeze it – the sugar will dissolve during thawing and create a sticky, wet surface. Freeze plain and dust just before serving.
Serving Suggestions
Japanese cheesecake is versatile and pairs beautifully with many accompaniments, though it’s absolutely stunning served simply on its own.
Classic Presentation: Dust with powdered sugar and serve with fresh whipped cream on the side. The cloud-like cake with soft whipped cream is a heavenly combination. Add a sprig of fresh mint for color.
Berry Companions: Fresh strawberries, raspberries, blueberries, or blackberries are perfect partners. Their slight tartness balances the cake’s subtle sweetness. Serve berries on the side or create a simple berry compote by warming berries with a touch of sugar.
Sauce Drizzles: A drizzle of chocolate ganache, caramel sauce, or fruit coulis adds visual appeal and flavor contrast. Berry sauces work particularly well – try raspberry or strawberry purée strained to remove seeds.
Tea Service: Serve Japanese cheesecake the traditional way with hot green tea, matcha latte, or jasmine tea. The subtle sweetness of the cake makes it perfect for afternoon tea service. Earl Grey or English breakfast tea also pair wonderfully.
Coffee Pairings: A strong espresso or cappuccino cuts through the richness beautifully. The slight bitterness of coffee complements the cake’s delicate sweetness.
Ice Cream Addition: A small scoop of vanilla ice cream, matcha ice cream, or green tea ice cream alongside a slice creates a wonderful temperature and texture contrast.
Citrus Accents: Serve with candied citrus peel, lemon curd, or orange marmalade on the side. The bright citrus notes enhance the subtle lemon flavor in the cake.
Elegant Plating: For special occasions, plate with fresh edible flowers like pansies or violets, microgreens, or a artistic swoosh of fruit purée for a restaurant-quality presentation.
FAQs Section
Why did my Japanese cheesecake crack on top? Cracking usually happens due to sudden temperature changes or overbaking. Make sure you’re cooling the cake gradually in the turned-off oven with the door propped open. Also check your oven temperature with a thermometer – if it’s running hot, your cake can overbake. The water bath helps prevent cracking too by maintaining moisture in the oven. Minor cracks are normal and don’t affect taste, and they can be covered with powdered sugar!
Is it normal for Japanese cheesecake to deflate after baking? Absolutely yes! Japanese cheesecake is supposed to shrink and deflate somewhat as it cools – typically 20-30% reduction in height is completely normal. This happens because the air in the meringue contracts as the cake cools. If your cake deflates dramatically (more than 50%), it might be undercooked, or the meringue wasn’t beaten to proper stiff peaks. A gentle deflation with a slightly wrinkled top is the sign of an authentic Japanese cheesecake.
Can I make Japanese cheesecake without a water bath? While technically possible, I really don’t recommend it. The water bath (bain-marie) is crucial for creating the gentle, humid cooking environment that gives Japanese cheesecake its signature jiggly, moist texture. Without it, the cake will likely be drier, denser, more prone to cracking, and won’t have that characteristic wobble. If you absolutely must skip it, bake at an even lower temperature (275°F/135°C) and place a pan of water on the rack below your cake.
How do I know when my Japanese cheesecake is done? The cake should have a golden-brown top and jiggle slightly in the center when you gently shake the pan – think of barely-set jello. If you insert a skewer into the center, it should come out with a few moist crumbs, not wet batter but not completely clean either. The sides should have pulled away slightly from the pan. Remember, the cake continues to cook during the gradual cooling process, so slightly underdone is better than overdone.
Why is my Japanese cheesecake dense instead of fluffy? The most common culprit is deflated meringue. Make sure your egg whites are beaten to proper stiff, glossy peaks and fold them very gently into the yolk mixture. Overmixing the final batter, using cold eggs, or not incorporating enough air during folding can all lead to a dense cake. Also check that you’re using cake flour (not all-purpose) and that your oven temperature is accurate and not too high.
Can I use a regular cake pan instead of a springform pan? You really need a springform pan for Japanese cheesecake. The delicate texture makes it nearly impossible to remove from a regular pan without completely destroying it. If you absolutely don’t have a springform, you could try a regular pan lined with a parchment paper sling (long strips hanging over the edges to lift the cake out), but success isn’t guaranteed. Springform pans are inexpensive and worth the investment.
What’s the difference between Japanese cheesecake and regular cheesecake? Japanese cheesecake uses less cream cheese and sugar than Western-style cheesecakes and incorporates whipped egg whites (meringue) to create an ultra-light, soufflé-like texture. It’s baked in a water bath at low temperature, making it much lighter, fluffier, and less dense than New York cheesecake. The texture is more like a cross between a sponge cake and a traditional cheesecake – soft, jiggly, and cloud-like rather than rich and dense.
Conclusion
There you have it – everything you need to know to create your own beautiful, jiggly Japanese cheesecake at home! While this recipe might seem intimidating at first, I promise that once you understand the techniques, it becomes much easier. The key is patience and gentle handling, especially when folding that precious meringue.
This ethereal dessert is truly worth every minute of effort. The moment you see that gorgeous golden cake emerge from the oven, watch it wobble mesmerizingly when you tap the pan, and take that first bite of cloud-like perfection – you’ll understand why Japanese cheesecake has captured hearts around the world. It’s not just dessert; it’s an experience, a conversation starter, and a testament to your baking skills.
Don’t be discouraged if your first attempt isn’t perfect. Even professional bakers had to practice to master the technique. Each time you make it, you’ll get better at reading the meringue, perfecting your folding technique, and understanding your oven’s personality. Keep notes on what works and what doesn’t, and soon you’ll be the Japanese cheesecake expert among your friends and family.
I’d absolutely love to see your beautiful creations! When you make this recipe, snap a photo and share it on Pinterest – tag me so I can see your gorgeous jiggly cheesecake. Did you try any of the variations? Did you discover any tips or tricks? Drop a comment below and let me know how it turned out. Your feedback helps other bakers and inspires me to create more amazing recipes for you.
Now grab your mixing bowls, preheat that oven, and get ready to create some magic! Happy baking, friends! 🍰✨