Easy Jar Cake Recipe – Single-Serve Dessert in a Jar!

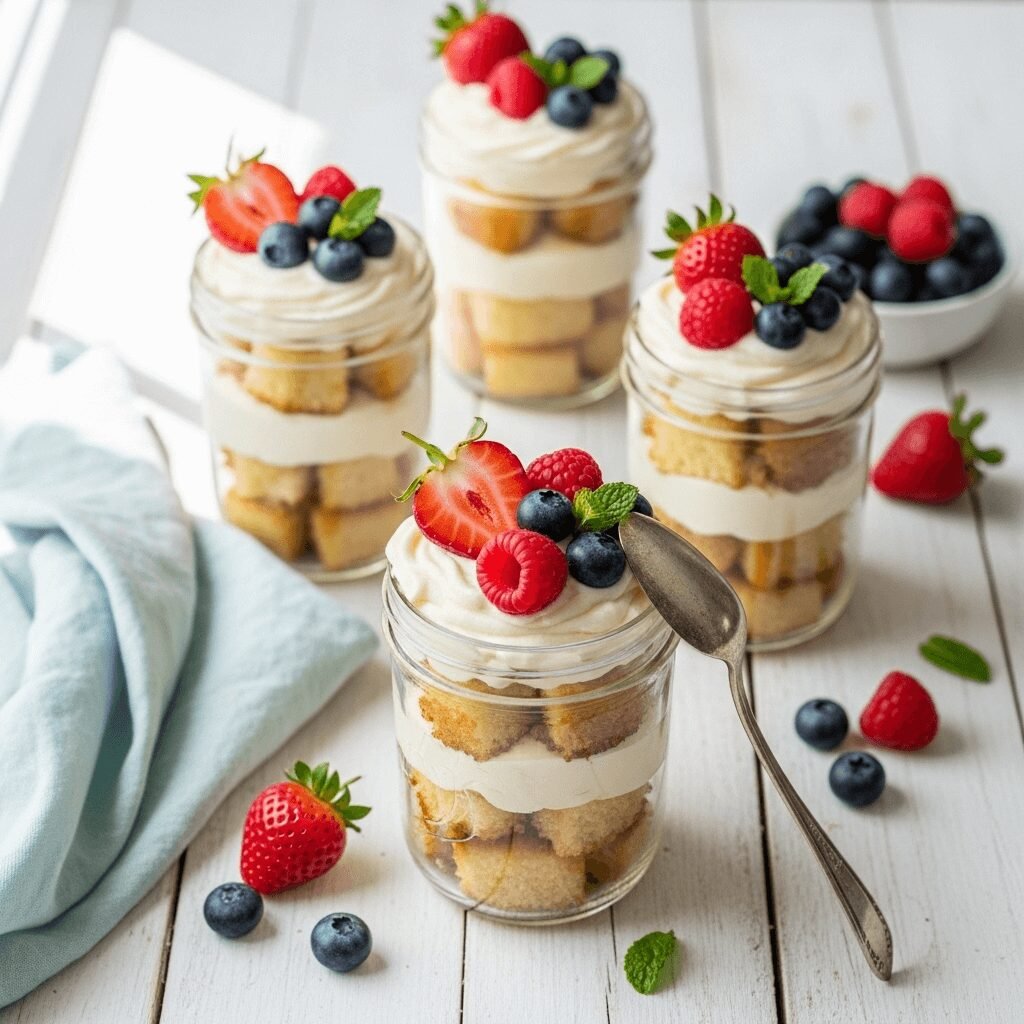
There’s something undeniably charming about dessert served in a jar. Jar cakes are individual-sized cakes layered beautifully in clear glass jars or mason jars, making them perfect for parties, picnics, gift-giving, or simply treating yourself to a personalized dessert. These adorable single-serve treats combine moist cake layers with creamy frosting, fresh fruits, or indulgent toppings, all beautifully visible through the glass.
What makes jar cakes so popular is their versatility and visual appeal. They’re incredibly customizable—you can make them with any cake flavor you love, from classic vanilla and chocolate to red velvet, lemon, or even funfetti. The presentation is Instagram and Pinterest-worthy without requiring professional decorating skills. Plus, they’re portion-controlled, mess-free, and easy to transport, making them ideal for potlucks, birthday parties, bridal showers, or even wedding favors.
Serve these delightful jar cakes at birthday celebrations, holiday gatherings, baby showers, or pack them for picnics and outdoor events. They’re also perfect for meal prep—make a batch on Sunday and enjoy individual desserts throughout the week. Kids absolutely love having their own personal cake, and adults appreciate the nostalgic, homemade feel combined with modern, trendy presentation.
History / Background
The concept of jar cakes emerged from the broader trend of “desserts in jars” that gained massive popularity in the early 2010s, particularly through Pinterest and food blogs. While cakes themselves have existed for centuries, the idea of serving them in individual glass containers is a relatively modern innovation that combines practicality with aesthetic appeal.
The trend has roots in several culinary traditions. Mason jar desserts can be traced back to the American tradition of preserving foods in glass jars, which became iconic during the Great Depression when home canning was essential. Fast forward to the 21st century, and those same jars became fashionable vessels for serving everything from salads to cocktails to desserts.
Jar cakes specifically became a sensation when home bakers and professional pastry chefs alike discovered that layering cake and frosting in clear jars created a beautiful “naked cake” effect—showcasing the layers without requiring perfect frosting skills. The rustic, homemade charm appealed to the farm-to-table movement and DIY culture that dominated food trends in the 2010s.
Today, jar cakes represent the perfect marriage of convenience and creativity. They’ve become staples at farmers markets, boutique bakeries, and home kitchens across America. The format has inspired countless variations, from trifle-style jar cakes to cheesecake jars, pudding parfaits, and everything in between. What started as a Pinterest trend has become a legitimate dessert category that shows no signs of disappearing.
Why You’ll Love This Recipe
Jar cakes are the ultimate crowd-pleaser that make dessert time special without the stress of elaborate baking projects. This recipe delivers bakery-quality results with straightforward techniques that even beginner bakers can master. The individual portions eliminate the need for slicing and serving, making cleanup a breeze while ensuring everyone gets a perfectly portioned treat.
Here’s why this jar cake recipe will become your new favorite:
- Portion-controlled perfection – No guessing about serving sizes; each jar is a complete dessert
- Make-ahead friendly – Prepare them 1-2 days in advance for stress-free entertaining
- Visually stunning – The layered effect creates a beautiful presentation with minimal effort
- Infinitely customizable – Swap flavors, frostings, and toppings to match any occasion or preference
- Travel-friendly – The sealed jars transport easily without messy spills or damaged frosting
- No special decorating skills required – Simply layer and go for impressive results
- Budget-friendly – Uses basic pantry ingredients and stretches further than traditional cakes
- Perfect for gifts – Tie a ribbon around the jar for an adorable homemade present
- Kid-approved – Children love having their own special dessert in a jar
- Versatile for any occasion – Works for casual weeknight treats or elegant celebrations
Ingredient Notes
All-Purpose Flour – The foundation of your cake structure. All-purpose flour provides the perfect protein content for tender, fluffy cake layers. You can substitute with cake flour for an even more delicate crumb, or use a 1:1 gluten-free baking flour if needed.
Granulated Sugar – Sweetens the cake while helping create a tender texture by interfering with gluten development. Don’t reduce the sugar too much, as it also helps retain moisture.
Eggs – Provide structure, moisture, and richness. Room temperature eggs incorporate better into the batter. For egg-free versions, try flax eggs (1 tablespoon ground flaxseed + 3 tablespoons water per egg).
Butter – Adds rich flavor and creates a tender crumb. Use unsalted butter so you can control the salt level. For dairy-free options, substitute with coconut oil or vegan butter sticks.
Buttermilk – Creates exceptional moisture and tenderness while adding a subtle tang. The acidity also reacts with baking soda for better rise. No buttermilk? Mix 1 cup milk with 1 tablespoon lemon juice or vinegar and let sit 5 minutes.
Vanilla Extract – Essential for flavor depth. Use pure vanilla extract, not imitation, for the best taste.
Baking Powder & Baking Soda – Chemical leaveners that make the cake rise and create a light, fluffy texture. Make sure they’re fresh (less than 6 months old) for optimal results.
Salt – Enhances all the other flavors and balances the sweetness.
Cream Cheese & Powdered Sugar – For the frosting layer. Cream cheese frosting is classic, but you can use buttercream, whipped cream, or even pudding. Powdered sugar dissolves smoothly without grittiness.
Heavy Cream – Thins the frosting to a pipeable consistency that’s easy to layer.
Equipment Needed
- 8-12 mason jars or dessert jars (8 oz size works perfectly)
- 9×13-inch baking pan or two 8-inch round cake pans
- Electric mixer (stand mixer or hand mixer)
- Mixing bowls (large and medium)
- Measuring cups and spoons
- Whisk
- Rubber spatula
- Cooling rack
- Piping bag or large ziplock bag (for easy frosting application)
- Offset spatula or butter knife
- Toothpicks (for testing doneness)
- Parchment paper (for lining pans)
- Kitchen scale (optional but helpful for accuracy)
Jar Cake Recipe
These adorable individual jar cakes feature layers of moist vanilla cake and creamy frosting beautifully presented in clear glass jars. Perfect for parties, gifts, or personal treats, they’re easy to make, transport, and customize with your favorite flavors and toppings.
- Prep Time: 25 minutes
- Cook Time: 30 minutes
- Total Time: 55 minutes (plus cooling time)
- Yield: 10 jar cakes (8 oz jars) 1x
- Category: Dessert
- Method: Baking
- Cuisine: American
- Diet: Vegetarian
Ingredients
For the Cake:
- 2 cups all-purpose flour
- 1½ cups granulated sugar
- ½ cup unsalted butter, softened
- 3 large eggs, room temperature
- 1 cup buttermilk, room temperature
- ⅓ cup vegetable oil
- 2 teaspoons vanilla extract
- 2 teaspoons baking powder
- ½ teaspoon baking soda
- ½ teaspoon salt
For the Cream Cheese Frosting:
- 8 oz cream cheese, softened
- ½ cup unsalted butter, softened
- 3½ cups powdered sugar
- 2 teaspoons vanilla extract
- 2-4 tablespoons heavy cream
- Pinch of salt
Optional Toppings:
- Fresh berries (strawberries, blueberries, raspberries)
- Chocolate chips or shavings
- Crushed cookies (Oreos, graham crackers)
- Caramel or chocolate sauce
- Sprinkles
- Whipped cream
- Fresh mint leaves for garnish
Instructions
Step 1: Prepare the Oven and Pans
Preheat your oven to 350°F (175°C). Line a 9×13-inch baking pan with parchment paper, or grease and flour two 8-inch round cake pans. The parchment makes removing the cake much easier for cutting into jar-sized pieces.
Step 2: Mix the Dry Ingredients
In a medium bowl, whisk together the flour, baking powder, baking soda, and salt. Whisk thoroughly for about 30 seconds to ensure even distribution of the leavening agents. This prevents pockets of baking powder or soda that could create an uneven rise.
Step 3: Cream Butter and Sugar
In a large bowl using an electric mixer, beat the softened butter and granulated sugar on medium-high speed for 3-4 minutes until light, fluffy, and pale in color. This creaming process incorporates air for a lighter cake texture. Scrape down the sides of the bowl as needed.
Step 4: Add Eggs and Vanilla
Add the eggs one at a time, beating well after each addition (about 30 seconds per egg). Mix in the vanilla extract. The mixture should look smooth and slightly thickened.
Step 5: Alternate Wet and Dry Ingredients
With the mixer on low speed, add the flour mixture in three additions, alternating with the buttermilk in two additions (begin and end with flour). After each addition, mix just until barely combined—you should still see streaks of flour. Add the vegetable oil and mix on low for 10-15 seconds until just incorporated. Don’t overmix, as this develops gluten and creates a tough cake.
Step 6: Bake the Cake
Pour the batter into your prepared pan(s), smoothing the top with a spatula. Tap the pan gently on the counter a few times to release air bubbles. Bake for 28-32 minutes (9×13 pan) or 25-28 minutes (round pans) until a toothpick inserted in the center comes out clean or with just a few moist crumbs. The cake should spring back when lightly pressed and pull away slightly from the pan edges.
Step 7: Cool Completely
Let the cake cool in the pan for 10 minutes, then turn out onto a cooling rack. Allow it to cool completely before cutting—this takes about 1-1½ hours. Cutting warm cake will result in crumbly pieces that don’t layer well.
Step 8: Make the Cream Cheese Frosting
While the cake cools, beat the softened cream cheese and butter together on medium-high speed until completely smooth and fluffy, about 2-3 minutes. Add the powdered sugar one cup at a time, mixing on low speed after each addition. Add vanilla extract and salt. Finally, add heavy cream one tablespoon at a time until you reach a smooth, pipeable consistency. Beat on high for 1-2 minutes until light and fluffy.
Step 9: Cut the Cake
Once the cake is completely cool, cut it into small cubes or circles that fit nicely in your jars. For 8 oz jars, cut 1-inch cubes or use a 2-inch round cutter. You’ll need enough pieces to create 2-3 layers in each jar.
Step 10: Layer the Jars
Place a layer of cake pieces at the bottom of each jar, pressing down very gently. Pipe or spoon a layer of frosting over the cake (about 2-3 tablespoons). Add another layer of cake, followed by more frosting. Repeat for 2-3 layers, depending on your jar size. The top layer should be frosting, smoothed nicely with an offset spatula.
Step 11: Add Toppings and Serve
Top each jar with your chosen toppings—fresh berries, chocolate chips, cookie crumbs, or a drizzle of sauce. Garnish with a sprig of mint if desired. Seal the jars with lids if making ahead, or serve immediately.
Notes
- Cake Texture Tip: Don’t overmix the batter after adding flour—mix just until you can’t see dry flour streaks for the most tender cake.
- Frosting Consistency: If your frosting is too thick to pipe easily, add cream one teaspoon at a time. If too thin, add more powdered sugar.
- Jar Size: 8 oz jars are ideal—4 oz jars are too small for proper layering, while 16 oz jars require double the recipe.
- Make It Chocolate: Replace ½ cup flour with unsweetened cocoa powder and add an extra 2 tablespoons buttermilk.
- Advance Prep: Assemble jars up to 2 days ahead, but add fresh fruit toppings right before serving to prevent sogginess.
Nutrition
- Serving Size: 1 jar cake (8 oz)
- Calories: 485
- Sugar: 52g
- Sodium: 285mg
- Fat: 24g
- Saturated Fat: 8g
- Unsaturated Fat: 8g
- Trans Fat: 0g
- Carbohydrates: 63g
- Fiber: 1g
- Protein: 6g
- Cholesterol: 110mg
Nutritional values are approximate and calculated per jar cake without additional toppings.
Tips & Variations
Flavor Variations:
- Chocolate Jar Cakes: Replace ½ cup flour with cocoa powder and use chocolate buttercream frosting
- Red Velvet: Add 2 tablespoons cocoa powder, 1 tablespoon red food coloring, and use cream cheese frosting
- Lemon Bliss: Add 2 tablespoons lemon zest and replace vanilla with lemon extract; use lemon buttercream
- Funfetti Party: Fold ½ cup rainbow sprinkles into the batter and top with vanilla frosting and more sprinkles
- Strawberry Dream: Use strawberry cake mix or add freeze-dried strawberry powder, layer with fresh strawberries
- Cookies and Cream: Fold crushed Oreos into vanilla cake and frosting, top with whole cookie pieces
Frosting Alternatives:
- Classic buttercream (for a sweeter, lighter option)
- Whipped cream or stabilized whipped cream (for a lighter dessert)
- Chocolate ganache (for rich chocolate lovers)
- Mascarpone frosting (for Italian-inspired elegance)
- Peanut butter frosting (pair with chocolate cake)
- Swiss meringue buttercream (for silky sophistication)
Dietary Modifications:
- Gluten-Free: Use 1:1 gluten-free baking flour blend
- Dairy-Free: Substitute plant-based butter, coconut cream, and dairy-free cream cheese
- Reduced Sugar: Cut sugar by ¼ cup in cake, use sugar-free frosting
- Vegan: Use flax eggs, plant-based milk with vinegar, and vegan butter/cream cheese
Seasonal Twists:
- Fall: Add cinnamon and nutmeg, top with caramel and pecans
- Winter: Peppermint cake with crushed candy canes
- Spring: Lemon cake with fresh berries and edible flowers
- Summer: Coconut cake with pineapple and toasted coconut
Pro Chef Tips
Temperature Matters: All ingredients should be at room temperature (68-72°F) for optimal mixing. Cold ingredients don’t emulsify properly, resulting in dense cake. Set butter, eggs, and buttermilk out 30-60 minutes before baking.
The Toothpick Test: When testing doneness, insert the toothpick about 1 inch from the center rather than dead center. The very center is the last spot to bake, and waiting for it to be completely dry can result in overbaking the edges.
Frosting Stability: For longer storage or warm weather events, add 2 tablespoons of meringue powder or 1 teaspoon of gelatin to your frosting. This stabilizes it and prevents melting or separation.
Professional Layering: Use a piping bag fitted with a large round tip for even frosting layers. If you don’t have a piping bag, use a ziplock bag with one corner snipped off—works perfectly!
Cake Crumb Control: If your cake is crumbly when cutting, pop it in the freezer for 15-20 minutes before cutting. The slight firming makes clean cuts much easier and reduces crumbs in your frosting layers.
Moisture Lock: Brush each cake layer with simple syrup (equal parts sugar and water, heated until sugar dissolves, then cooled) before adding frosting. This professional technique keeps the cake incredibly moist for days.
Visual Appeal: Create ombré effects by dividing your frosting into portions and tinting each a different shade. Layer from darkest to lightest for a stunning gradient effect visible through the jar.
Common Mistakes to Avoid
Overmixing the Batter – Once you add flour, mix only until you can’t see white streaks. Overmixing develops gluten, resulting in tough, dense cake with tunnels and peaked tops. The batter should look slightly lumpy, and that’s perfectly fine.
Assembling with Warm Cake – Patience is crucial! Frosting melts on warm cake, creating a soupy mess rather than distinct layers. Always cool cake completely to room temperature, or even refrigerate for 30 minutes before assembling.
Frosting That’s Too Soft – If your frosting is too loose, it’ll soak into the cake rather than create distinct layers. The frosting should hold its shape when piped. If too soft, refrigerate for 15-20 minutes or add more powdered sugar ¼ cup at a time.
Not Sealing Jars Properly – If storing assembled jar cakes, make sure lids are tightly sealed to prevent the cake from drying out. The airtight seal is what keeps them fresh and moist for days.
Overfilling the Jars – Leave at least ½ inch of space at the top for lid clearance and to prevent messy smashing of your beautiful layers. Overfilled jars also make it difficult to eat without spilling.
Adding Fruit Too Early – Fresh fruits release moisture and can make your cake layers soggy if added too far in advance. Add fresh fruit toppings within 2-4 hours of serving for best texture and appearance.
Storage & Meal Prep
Refrigerator Storage: Assembled jar cakes will keep beautifully in the refrigerator for 4-5 days when properly sealed with lids. The sealed environment actually helps keep the cake moist. Before serving, let them sit at room temperature for 15-20 minutes to take the chill off—this enhances flavor and makes the frosting creamy rather than firm.
Room Temperature: If your kitchen is cool (below 70°F) and you’re using buttercream frosting, jar cakes can sit at room temperature for up to 6 hours. However, cream cheese frosting MUST be refrigerated due to dairy content. Never leave cream cheese frosting at room temperature for more than 2 hours.
Component Storage: You can store the cake and frosting separately for ultimate flexibility. Wrap unfrosted cake layers tightly in plastic wrap and store at room temperature for 2 days or refrigerate for up to 1 week. Store frosting in an airtight container in the refrigerator for up to 1 week; bring to room temperature and re-whip before using.
Reheating (Optional): While jar cakes are typically served chilled or at room temperature, you can warm the cake component if desired. Remove the lid and any toppings, microwave on 50% power for 10-15 seconds. This works especially well for chocolate lava-style jar cakes.
Transporting Tips: The beauty of jar cakes is their portability! Secure lids tightly and transport in a sturdy box or carrier. For extra security during transport, place jars in muffin tins to prevent rolling. Keep them upright and avoid extreme temperatures during transport.
Make-Ahead & Freezer Notes
Make-Ahead Timeline:
- 3 Days Ahead: Bake the cake layers, cool completely, wrap tightly in plastic wrap, and refrigerate
- 2 Days Ahead: Make frosting, store in airtight container in refrigerator
- 1 Day Ahead: Assemble the jar cakes completely, seal with lids, and refrigerate
- Day Of: Add fresh toppings (fruits, drizzles, garnishes) 1-2 hours before serving
Freezing the Cake: Unfrosted cake freezes beautifully for up to 3 months. Cool completely, wrap tightly in plastic wrap, then aluminum foil. Label with the date. Thaw overnight in the refrigerator before cutting and assembling into jars.
Freezing Assembled Jars: You can freeze fully assembled jar cakes (without fresh fruit toppings) for up to 1 month. Seal tightly with lids, then wrap each jar in plastic wrap for extra protection against freezer burn. Thaw overnight in the refrigerator—the layers maintain their structure remarkably well!
Freezing Frosting: Cream cheese frosting and buttercream both freeze well for up to 3 months in airtight containers. Thaw overnight in the refrigerator, then bring to room temperature and re-whip with a mixer until fluffy before using. You may need to add 1-2 tablespoons of cream to restore the perfect consistency.
Best Reheating Method: For frozen jar cakes, thaw overnight in the refrigerator with lids on. Remove lids and let sit at room temperature for 20-30 minutes before serving. The frosting will soften to the perfect creamy consistency. If you’ve frozen unfrosted cake, thaw completely before assembling to prevent condensation from making the cake soggy.
Batch Baking Strategy: Double or triple the cake recipe and bake multiple batches at once. Freeze unfrosted cake layers individually, and you’ll always have the base ready for quick jar cake assembly whenever you need a last-minute dessert or gift!
Serving Suggestions
Jar cakes are self-contained desserts, but they’re even more delightful when paired with complementary elements that enhance the entire dessert experience.
Beverage Pairings:
- Freshly brewed coffee or espresso (the classic dessert pairing)
- Hot chocolate or mocha for chocolate jar cakes
- Cold milk (especially popular with kids and chocolate variations)
- Sweet iced tea for Southern-style entertaining
- Champagne or prosecco for elegant celebrations
- Dessert wines like Moscato or late-harvest Riesling
- Flavored hot tea (Earl Grey with lemon cakes, chai with spiced cakes)
Party Presentation Ideas: Create a jar cake bar where guests can customize their own! Set out plain cake-filled jars alongside bowls of various toppings: fresh berries, chocolate chips, caramel sauce, chopped nuts, sprinkles, whipped cream, and cookie crumbs. Provide small spoons and let everyone build their perfect dessert.
Complementary Desserts: Serve alongside other finger desserts for variety: chocolate truffles, fruit kabobs, mini cheesecakes, or sugar cookies. This works beautifully for showers, teas, or dessert buffets where you want multiple options without overwhelming prep work.
Fresh Fruit Sides: A simple fruit platter with strawberries, grapes, melon, and pineapple provides a refreshing contrast to the rich sweetness of jar cakes. The fresh fruit cleanses the palate between bites.
Ice Cream Addition: For an ultra-indulgent treat, serve jar cakes with a small scoop of vanilla ice cream on the side or right on top. The cold, creamy ice cream melting into the cake layers creates an irresistible combination.
Elegant Garnishes: Elevate presentation with edible flowers, fresh mint sprigs, lemon zest curls, or a light dusting of powdered sugar right before serving. These simple touches make jar cakes feel restaurant-quality.
Themed Occasions:
- Birthday Parties: Add candles in the top of each jar for individual birthday cakes
- Weddings: Tie jars with ribbon matching wedding colors for elegant favors
- Baby Showers: Use blue or pink tinted frosting with gender-appropriate decorations
- Holiday Gatherings: Add seasonal decorations (holly for Christmas, candy corn for Halloween)
- Picnics: Pack with sealed lids in a cooler with ice packs for outdoor enjoyment
FAQs Section
Can I use cake mix instead of making cake from scratch?
Absolutely! Boxed cake mix works wonderfully for jar cakes. Prepare according to package directions, bake in a 9×13 pan, cool completely, and cut into pieces for layering. The convenience factor makes this a great option for busy bakers. You can elevate boxed mix by adding an extra egg, using milk instead of water, and replacing oil with melted butter for a more homemade taste.
What size jars work best for this recipe?
8-ounce (1 cup) mason jars are ideal—they’re the perfect single-serving size with enough room for 2-3 layers of cake and frosting. You can also use 4-ounce jars for smaller portions (great for kids or appetizer desserts) or 16-ounce jars for generous servings (you’ll need to double the recipe to fill them properly). Wide-mouth jars are easier to fill and eat from than narrow-mouth versions.
How far in advance can I make jar cakes?
You can make jar cakes 2-3 days in advance when stored properly in the refrigerator with lids sealed tightly. The sealed environment keeps them moist and fresh. However, wait until serving day to add fresh fruit toppings or delicate garnishes that might wilt or become soggy. The cake actually improves slightly after a day as the flavors meld together.
Do I need to sterilize the jars like for canning?
No sterilization necessary! Unlike canning, you’re not creating a vacuum seal or storing at room temperature long-term. Simply wash jars in hot, soapy water and dry completely before filling. Make sure jars are completely dry to prevent moisture from making cake layers soggy. Clean jars are sufficient since these desserts will be refrigerated and consumed within days.
Can I make jar cakes without frosting?
Yes! While frosting is traditional, you have several alternatives. Try layering cake with pudding, whipped cream, mousse, lemon curd, fruit compote, or even ice cream (freeze these and serve frozen). You can also create trifle-style jar cakes by adding layers of fruit and whipped cream between cake pieces for a lighter dessert option.
Why did my frosting melt into the cake?
This happens when the cake isn’t fully cooled before assembly or when frosting is too thin. Always ensure cake reaches complete room temperature—touch it with your hand; it should feel neutral, not warm. If your frosting is too soft, refrigerate it for 15-20 minutes or add more powdered sugar until it holds its shape when piped. Properly chilled frosting creates distinct, beautiful layers.
Can I ship jar cakes as gifts?
Yes, with careful packaging! Use jars with secure screw-top lids. Wrap each jar individually in bubble wrap, pack tightly in a sturdy box with packing material to prevent movement, and clearly mark “FRAGILE – THIS SIDE UP.” Ship expedited (2-day maximum) during cool weather months only. Include a cold pack if shipping cream cheese frosting. Consider shipping unfrosted cake cubes with frosting instructions for best results.
Conclusion
These delightful jar cakes prove that impressive desserts don’t require professional pastry skills or hours in the kitchen. With simple ingredients, basic equipment, and a little creativity, you can create personalized, beautiful desserts that wow at parties, make thoughtful gifts, and satisfy your sweet tooth any day of the week.
The best part about jar cakes is how they invite customization—each jar can be a different flavor, topped differently, or personalized for individual preferences. They’re conversation starters at parties, Instagram-worthy for your feed, and absolutely delicious regardless of how you choose to flavor them.
Whether you’re planning a celebration, need a make-ahead dessert for busy weeknights, or want to surprise someone with a homemade gift, these jar cakes deliver every time. The layers of moist cake and creamy frosting visible through clear glass create that special moment of anticipation before the first bite.
Ready to start your jar cake journey? Grab those mason jars from your pantry, preheat that oven, and let’s create some dessert magic! Don’t forget to snap a photo of your beautiful creations and share them on Pinterest—I’d love to see your flavor combinations and creative toppings. Drop a comment below telling me which variation you tried first and how it turned out. Happy baking, friends!