The Ultimate Jello Cake Recipe: A Colorful, Showstopping Dessert Everyone Will Love
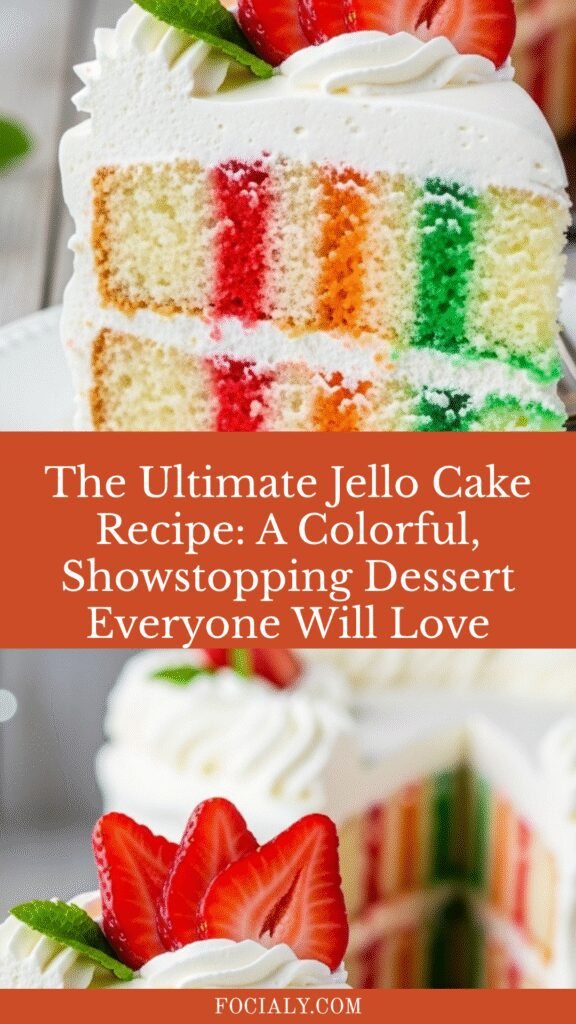
If you’re looking for a dessert that’s equal parts stunning and delicious, this Jello Cake is about to become your new favorite party trick. This vibrant, multi-layered cake combines moist vanilla cake with colorful, fruity Jello that seeps into every bite, creating pockets of flavor and a beautiful rainbow effect when sliced. It’s the kind of dessert that makes people say “wow” before they even take a bite.
What makes Jello Cake so special is its unique texture and presentation. The warm Jello mixture is poured over a freshly baked cake, soaking into the sponge and creating a moist, flavorful dessert that’s topped with fluffy whipped cream. It’s perfect for birthdays, potlucks, summer barbecues, holiday gatherings, or any time you want to serve something that looks like it came from a bakery but requires minimal effort. Kids absolutely adore the fun, jiggly texture and bright colors, while adults appreciate the nostalgic flavor and impressive presentation.
This recipe is incredibly versatile—you can use any Jello flavor combination you love, from classic strawberry to tropical combinations like pineapple and orange. The best part? Most of the work happens while the cake cools, making this a surprisingly hands-off dessert that delivers maximum impact with minimal stress.
History / Background
Jello Cake, also known as “Poke Cake,” first gained popularity in America during the 1970s when Jell-O brand gelatin was experiencing its golden age in American kitchens. The concept was brilliantly simple: poke holes in a cake, pour liquid Jello over it, and let it set for a stunning, flavorful dessert that required no fancy decorating skills.
The recipe was actually created and popularized by the Jell-O company itself as a creative way to encourage consumers to use their product beyond traditional gelatin molds and salads. During this era, convenience foods were celebrated, and homemakers were looking for impressive desserts that didn’t require professional baking skills. The Jello Cake fit perfectly into this cultural moment—it was foolproof, festive, and decidedly modern.
Throughout the 1980s and 1990s, Jello Cake became a staple at church potlucks, birthday parties, and family gatherings across America, particularly in the South and Midwest. Different regions developed their own variations: some used chocolate cake as the base, others created patriotic versions with red and blue Jello for the Fourth of July, and creative bakers experimented with tropical fruit flavors for summer celebrations.
Today, Jello Cake is experiencing a delightful renaissance thanks to social media and Pinterest, where its photogenic rainbow layers and nostalgic appeal have captured the hearts of a new generation. Modern bakers have elevated the classic recipe with gourmet flavor combinations, homemade whipped cream toppings, and fresh fruit garnishes, proving that this retro dessert has serious staying power.
Why You’ll Love This Recipe
This Jello Cake is the definition of a crowd-pleaser that looks impressive but comes together with surprisingly little effort. It’s the kind of recipe you’ll return to again and again because it never fails to impress, and it’s actually fun to make.
Here’s why this recipe deserves a spot in your regular rotation:
- Visually stunning – Those colorful Jello streaks create a gorgeous marbled effect that photographs beautifully and makes every slice a work of art
- Incredibly moist – The Jello soaks into the cake, ensuring it stays moist for days (if it lasts that long!)
- Beginner-friendly – If you can poke holes and pour liquid, you can make this cake successfully
- Budget-conscious – Made with simple, affordable ingredients you probably already have in your pantry
- Make-ahead perfection – Actually tastes better the next day after the flavors have melded together
- Customizable – Use any Jello flavors you love to match your party theme or personal preferences
- Kid-approved – Children love the fun colors and jiggly texture, making it perfect for birthday parties
- No frosting skills required – Topped with simple whipped cream, so no piping bags or decorating expertise needed
- Feeds a crowd – A 9×13 cake easily serves 12-15 people, making it ideal for gatherings
- Nostalgic and trendy – Combines retro charm with modern Pinterest appeal
Ingredient Notes
Let’s break down what you’ll need for this colorful creation and why each ingredient matters:
White Cake Mix or Homemade Vanilla Cake – A white or vanilla cake provides the perfect neutral canvas for the colorful Jello. Box mix works beautifully for convenience, but homemade cake will give you an even more tender crumb. If using a mix, follow the package directions exactly. You can substitute yellow cake mix if that’s what you have, though the colors will be slightly less vibrant.
Jello Gelatin Mix – This is where the magic happens! You’ll need 2-3 boxes of Jello in different flavors and colors. Classic combinations include strawberry and lime, or go rainbow with strawberry, orange, and lime. Sugar-free Jello works equally well if you’re watching sugar intake. The key is choosing flavors that complement each other.
Boiling Water – Essential for dissolving the Jello properly. It must be boiling to ensure the gelatin completely dissolves, which allows it to seep into the cake holes smoothly and set properly later.
Cold Water – After dissolving the Jello in boiling water, you’ll add cold water to bring it to the right consistency for pouring over the cake. This prevents it from setting too quickly.
Heavy Whipping Cream – For the topping, heavy cream whips up light and fluffy, providing a luxurious contrast to the moist cake. You can substitute with Cool Whip or store-bought whipped topping for convenience, but freshly whipped cream tastes infinitely better.
Powdered Sugar – Sweetens the whipped cream without the graininess of granulated sugar. It also helps stabilize the whipped cream.
Vanilla Extract – Adds warmth and depth to both the cake (if making from scratch) and the whipped cream topping.
Fresh Fruit (Optional) – Strawberries, raspberries, or other fresh berries make a beautiful garnish and add fresh flavor that complements the Jello perfectly.
Equipment Needed
Gathering your tools before you start makes the process smooth and stress-free:
- 9×13-inch baking pan – The standard size for this recipe; glass or metal both work well
- Mixing bowls – One large bowl for cake batter, plus separate bowls for each Jello flavor
- Electric mixer – Stand mixer or hand mixer for making the cake and whipping cream
- Wooden spoon handle or chopstick – For poking holes in the cake; needs to be about ½-inch in diameter
- Measuring cups and spoons – For accurate measurements
- Whisk – To dissolve the Jello in hot water
- Rubber spatula – For spreading batter and later spreading whipped cream
- Cooling rack – Allows air to circulate around the cake pan
- Kettle or pot – For boiling water
- Spoons or small pitchers – For carefully pouring Jello into the holes
- Plastic wrap – To cover the cake while it chills
- Offset spatula (optional) – Makes spreading whipped cream easier and more professional-looking
Jello Cake Recipe

This stunning Jello Cake features moist vanilla cake infused with colorful, fruity Jello that creates beautiful marbled layers throughout. Topped with fluffy whipped cream, it’s a showstopping dessert that’s surprisingly simple to make and perfect for any celebration.
- Prep Time: 30 minutes
- Cook Time: 4 hours
- Total Time: 5 hours
- Yield: 12-15 servings 1x
- Category: Dessert
- Method: Baking
- Cuisine: American
- Diet: Vegetarian
Ingredients
For the Cake:
- 1 box white cake mix (plus ingredients called for on box: typically eggs, oil, and water) OR your favorite homemade vanilla cake recipe
- Cooking spray or butter for greasing the pan
For the Jello Layers:
- 1 box (3 oz) strawberry Jello
- 1 box (3 oz) lime Jello
- 1 box (3 oz) orange Jello (optional, for more colors)
- 3 cups boiling water (1 cup per Jello flavor)
- 3 cups cold water (1 cup per Jello flavor)
For the Whipped Cream Topping:
- 2 cups heavy whipping cream, cold
- ⅓ cup powdered sugar
- 1 teaspoon vanilla extract
For Garnish (Optional):
- Fresh strawberries, sliced
- Fresh raspberries or blueberries
- Mint leaves
Instructions
Step 1: Bake the Cake
Preheat your oven according to the cake mix package directions (usually 350°F). Grease a 9×13-inch baking pan with cooking spray or butter. Prepare the cake batter according to package directions, mixing until smooth and well combined. Pour the batter into the prepared pan and spread evenly. Bake according to package timing (typically 28-32 minutes) until a toothpick inserted in the center comes out clean. The top should be golden and spring back when lightly touched.
Step 2: Poke the Holes
As soon as the cake comes out of the oven, let it cool in the pan for about 15 minutes—it should still be quite warm. Using the handle of a wooden spoon, a chopstick, or a similar tool about ½-inch in diameter, poke holes all over the cake, spacing them about 1 inch apart. Make the holes go almost to the bottom of the cake but not quite through. You should have approximately 50-70 holes covering the entire surface. Don’t be shy about this step—the more holes, the more Jello flavor infuses the cake!
Step 3: Prepare the Jello
While the cake is cooling slightly, prepare your Jello mixtures. In separate bowls, empty each box of Jello gelatin. Add 1 cup of boiling water to each bowl and whisk vigorously for 2 minutes until the gelatin is completely dissolved. Then add 1 cup of cold water to each bowl and stir well. Let the Jello mixtures cool for about 5 minutes—you want them liquid but not hot enough to melt the cake.
Step 4: Pour the Jello
Working with one color at a time, slowly pour the Jello mixture over the cake, concentrating on filling the holes. Use a spoon to guide the liquid into the holes if needed. Start with one corner and work your way across in sections with each color, creating a pattern or pouring randomly for a marbled effect. The cake will absorb some Jello, and some will pool on top—this is perfect! The excess Jello will set on the surface, creating a beautiful glossy finish.
Step 5: Refrigerate
Cover the cake pan tightly with plastic wrap and refrigerate for at least 4 hours, or preferably overnight. This allows the Jello to fully set within the cake and develop the best flavor and texture. The longer it chills, the better the flavors meld together.
Step 6: Make the Whipped Cream
About 30 minutes before serving, make your whipped cream topping. In a large, cold mixing bowl, combine the heavy whipping cream, powdered sugar, and vanilla extract. Using an electric mixer, beat on medium-low speed for 30 seconds, then increase to medium-high and beat for 2-3 minutes until stiff peaks form. The cream should be thick, fluffy, and hold its shape. Be careful not to overbeat or it will become grainy.
Step 7: Assemble and Serve
Spread the whipped cream evenly over the top of the chilled cake using an offset spatula or the back of a spoon. You can spread it smooth for a clean look or create decorative swirls for texture. If desired, garnish with fresh berries and mint leaves. Slice into squares and serve immediately. Each slice will reveal beautiful streaks of colorful Jello throughout!
Notes
- The cake must be slightly warm when you poke the holes and pour the Jello for best absorption.
- Don’t skip the cooling time for the Jello mixtures before pouring—hot Jello can make the cake soggy.
- For cleaner slices, dip your knife in hot water and wipe it clean between cuts.
- The whipped cream can be made up to 2 hours in advance and refrigerated until ready to use.
- If you’re short on time, you can use store-bought whipped topping, but fresh whipped cream tastes significantly better.
- For more vibrant colors, use less cold water when mixing the Jello (¾ cup instead of 1 cup per flavor).
Nutrition
- Serving Size: 1 slice (1/12 of cake)
- Calories: 285
- Sugar: 28g
- Sodium: 320mg
- Fat: 14g
- Saturated Fat: 8g
- Unsaturated Fat: 5g
- Trans Fat: 0g
- Carbohydrates: 38g
- Fiber: 0g
- Protein: 3g
- Cholesterol: 65mg
Nutrition information is approximate and based on using standard cake mix and full-fat whipped cream. Values will vary based on specific brands used and serving sizes.
Tips & Variations
Flavor Combinations to Try:
- Patriotic: Red (strawberry) and blue (berry blue) Jello for Fourth of July celebrations
- Tropical Paradise: Pineapple and orange Jello with coconut whipped cream
- Berry Blast: Strawberry, raspberry, and cherry Jello with fresh berry garnish
- Citrus Sunshine: Lemon, lime, and orange Jello for a bright, tangy cake
- Kid’s Birthday: Use their favorite flavors or match party theme colors
- Fall Harvest: Try apple and cranberry Jello with cinnamon whipped cream
Customization Ideas:
- Use chocolate cake as the base for a chocolate-covered-fruit vibe
- Add a layer of cream cheese frosting under the whipped cream for extra richness
- Fold mini chocolate chips or crushed cookies into the whipped cream
- Drizzle chocolate or caramel sauce over individual slices
- Top with toasted coconut flakes for added texture and tropical flair
- Make it boozy for adults by replacing some cold water with vodka or rum (¼ cup per Jello mix)
Dietary Modifications:
- Lower Sugar: Use sugar-free Jello and reduce powdered sugar in whipped cream to 2 tablespoons
- Gluten-Free: Use gluten-free cake mix or gluten-free flour blend in homemade cake
- Dairy-Free: Use coconut whipped cream instead of dairy whipped cream
- Smaller Batch: Halve the recipe and use an 8×8 or 9×9-inch pan
Pro Chef Tips
Temperature Timing is Everything – The sweet spot for poking holes is when the cake has cooled for 15-20 minutes and is still warm to the touch. Too hot and the cake will be too fragile; too cool and the Jello won’t absorb as well. The residual warmth helps the liquid Jello penetrate deeply into the cake.
Strategic Hole Placement – Poke holes in a consistent grid pattern about 1 inch apart for even Jello distribution. Go almost to the bottom of the pan but not quite through—leaving about ¼ inch at the bottom prevents the Jello from pooling underneath the cake and making it soggy.
Control Your Pour – Pour each Jello color slowly and deliberately, using a spoon to guide it into specific holes if you want distinct color sections. For a random marbled effect, pour more freely. Some bakers like to pour in stripes, while others create a checkerboard pattern for maximum visual impact.
Chill Longer for Better Slicing – While 4 hours is the minimum, chilling overnight gives you cleaner slices and better flavor development. The Jello fully sets, the flavors meld beautifully, and the cake is easier to cut into neat squares.
Whip Cream Properly – Use cold cream and a cold bowl for the fluffiest whipped cream. Start slow and gradually increase speed to avoid splattering. Stop beating as soon as stiff peaks form—overbeaten cream will become grainy and eventually turn to butter.
Perfect Presentation – For bakery-worthy slices, run your knife under hot water and wipe it dry between each cut. This creates clean edges without dragging the whipped cream or tearing the cake. Serve slices on white plates to make the colors pop even more.
Common Mistakes to Avoid
Poking Holes in a Cold Cake – If the cake is completely cool, the holes will be smaller and the Jello won’t absorb as well. You’ll end up with most of the Jello sitting on top rather than infusing throughout. Always poke holes while the cake is still slightly warm for maximum absorption.
Using Hot Jello Mixture – Pouring Jello that’s too hot can actually start to dissolve or melt the cake, creating a mushy texture. Let your prepared Jello cool for 5-10 minutes until it’s warm but not steaming hot. It should still be completely liquid, just not scalding.
Not Making Enough Holes – Being too conservative with hole-poking means less Jello penetration and less flavor throughout. Don’t be shy—you should have dozens of holes covering the entire surface. More holes equal more flavor and better visual effect when sliced.
Rushing the Chill Time – Cutting into the cake before it’s properly set will result in runny Jello and messy slices. The Jello needs at least 4 hours to fully set within the cake structure. Patience here rewards you with clean, beautiful slices that hold together perfectly.
Overbeating the Whipped Cream – Once you see stiff peaks forming, stop immediately. Continuing to beat will cause the cream to break down, become grainy, and eventually separate. Properly whipped cream should be thick, fluffy, and spreadable, not chunky or watery.
Storage & Meal Prep
Refrigerator Storage:
Store Jello Cake covered tightly with plastic wrap or in an airtight container in the refrigerator for up to 4 days. The whipped cream topping holds up surprisingly well, though it may release a tiny bit of moisture by day three. For best results, keep the cake in its original pan covered with plastic wrap pressed directly onto the whipped cream surface, then wrapped again around the pan edges.
Individual Slice Storage:
If you’ve already cut the cake, store individual slices in airtight containers with parchment paper between layers to prevent sticking. This makes it easy to grab a quick dessert throughout the week.
Shelf Life:
With the whipped cream topping, this cake is best consumed within 3-4 days. The cake itself remains moist and delicious throughout this time, but whipped cream can begin to break down after a few days. If you’re making it several days in advance, consider adding the whipped cream topping the day of serving.
Reheating:
This dessert is meant to be served chilled, so there’s no reheating needed. Simply remove from the refrigerator about 10 minutes before serving to take the chill off slightly, which allows the flavors to be more pronounced. Some people enjoy it straight from the fridge on hot summer days!
Signs of Spoilage:
Discard the cake if you notice any watery liquid pooling excessively (a little is normal), if the whipped cream develops an off smell or sour taste, or if you see any signs of mold. The dairy in the whipped cream makes this cake more perishable than a frosted cake would be.
Make-Ahead & Freezer Notes
Make-Ahead Instructions:
This is actually an ideal make-ahead dessert! The Jello needs time to set, so making it the day before is not just convenient—it’s recommended. Bake the cake, poke holes, add Jello, and refrigerate overnight (up to 24 hours ahead). Add the whipped cream topping 2-8 hours before serving for best texture and appearance.
Advance Prep Timeline:
- 2 Days Before: Bake cake, add Jello, refrigerate
- Day Before: Make whipped cream, keep refrigerated separately
- Day Of: Spread whipped cream on cake, garnish, and serve
Freezing the Cake:
You can freeze Jello Cake, but with some considerations. The cake itself freezes beautifully, but the whipped cream topping doesn’t freeze well and will become watery and separated when thawed. For best results, freeze the cake WITHOUT the whipped cream topping.
How to Freeze:
Cut the cake into individual portions and wrap each piece tightly in plastic wrap, then place in a freezer-safe container or freezer bag. Remove as much air as possible. Freeze for up to 2 months. When ready to serve, thaw overnight in the refrigerator, then top with freshly made whipped cream.
Freezing Whole Cake:
If freezing the entire cake, leave it in the pan, cover tightly with plastic wrap followed by aluminum foil, and freeze for up to 2 months. Thaw overnight in the refrigerator before adding whipped cream topping.
Best Reheating Method:
Since this is a chilled dessert, there’s no reheating involved. Simply thaw frozen portions in the refrigerator overnight, add fresh whipped cream, and serve cold.
Serving Suggestions
Jello Cake is a standalone showstopper, but here are some delicious ways to serve it:
Classic Accompaniments:
- Fresh Coffee or Tea – A hot beverage balances the cold, sweet cake perfectly for afternoon gatherings
- Cold Milk – Especially popular with kids, creating a nostalgic dessert experience
- Vanilla Ice Cream – Add a scoop alongside for an extra-indulgent treat
- Fresh Fruit Salad – A light, refreshing side that complements the fruity Jello flavors
Beverage Pairings:
- Iced Tea or Lemonade – Perfect for summer barbecues and outdoor parties
- Sparkling Wine or Champagne – For adult celebrations and bridal showers
- Fruit Punch – Match the punch to your Jello flavors for a coordinated party theme
- Vanilla Frappés – For an extra special dessert course
Presentation Ideas:
- Serve on decorative dessert plates with a mint sprig garnish
- Add a drizzle of fruit coulis (strawberry or raspberry sauce) on the plate for restaurant-style plating
- Top each slice with a fresh strawberry fan or a cluster of fresh berries
- Dust with a tiny bit of powdered sugar for an elegant finish
- Serve in clear glass dessert cups to show off the colorful layers
Party and Event Styling:
- Birthday Parties: Use Jello colors to match the party theme
- Baby Showers: Pink and blue Jello for gender reveal presentations
- Summer Cookouts: Pair with grilled burgers and potato salad for the perfect picnic dessert
- Holiday Gatherings: Red and green Jello for Christmas, pastels for Easter
- Potlucks: Transport in the baking pan covered with foil, add whipped cream upon arrival
FAQs Section
Q: Can I use homemade cake instead of a box mix?
A: Absolutely! Any vanilla or white cake recipe will work beautifully. Just make sure it’s baked in a 9×13-inch pan and follow the same hole-poking and Jello-adding process. Homemade cake often produces an even more tender, delicious result, though box mix works perfectly well and is more convenient.
Q: How many holes should I poke in the cake?
A: Aim for 50-70 holes spaced about 1 inch apart across the entire surface of the cake. The more holes you make, the more Jello will infuse throughout, creating better flavor distribution and a more dramatic visual effect when sliced. Don’t worry about overdoing it—you really can’t poke too many holes!
Q: Can I make this cake without dairy?
A: Yes! Use a dairy-free cake mix or recipe, and top the cake with coconut whipped cream instead of traditional whipped cream. Coconut cream (the thick part from a can of full-fat coconut milk that’s been chilled overnight) whips up similarly to dairy cream and tastes delicious. You can also use store-bought dairy-free whipped topping.
Q: Why is my Jello not absorbing into the cake?
A: This usually happens when the cake has cooled too much before you poked the holes. The cake should still be warm (after cooling for just 15-20 minutes) when you poke and pour. If your cake is completely cool, the structure is more set and won’t absorb the liquid as readily. You can try making slightly larger holes, but it’s best to time it correctly from the start.
Q: Can I use fresh fruit in the cake instead of Jello?
A: While fresh fruit can be added as a garnish on top, the Jello is essential for the recipe’s characteristic texture and flavor infusion. However, you could add small diced fruit to the whipped cream topping for extra freshness and flavor.
Q: How do I get clean slices when cutting the cake?
A: The secret is a hot, clean knife! Dip your knife in hot water, wipe it completely dry, then make your cut. Clean and reheat the knife between each slice for the cleanest edges. Also, make sure the cake has chilled for the full 4 hours (or overnight) so the Jello is completely set.
Q: Can I make mini versions or cupcake-style Jello Cakes?
A: Yes! Bake the cake batter in a muffin tin to make Jello Cake cupcakes. Poke 5-6 holes in each cupcake after baking, then use a spoon or small measuring cup to carefully pour Jello into each one. Chill as directed, then top with whipped cream. These are perfect for individual servings at parties and make adorable treats.
Conclusion
This Jello Cake is proof that sometimes the most delightful recipes are the simplest ones. With its vibrant colors, moist texture, and crowd-pleasing flavor, it’s a dessert that brings joy to every occasion—from backyard barbecues to milestone birthday celebrations. The best part? While it looks like you spent hours in the kitchen creating an elaborate dessert, you know it came together with minimal effort and maximum fun.
Whether you’re a experienced baker looking for a nostalgic recipe to share with your family or a beginner seeking a foolproof dessert that’s guaranteed to impress, this Jello Cake delivers on every level. The customizable color combinations mean you can make it again and again, tailoring it to different seasons, holidays, and celebrations without ever getting bored.
I’d love to hear about your Jello Cake adventures! What flavor combinations did you try? Did you create a stunning rainbow version or stick with classic two-toned beauty? Share your photos, results, and creative variations in the comments below. And if you loved this recipe, please save it to your Pinterest boards so you can find it easily when your next celebration rolls around. Don’t forget to tag me in your baking photos on social media—I absolutely love seeing your colorful creations!
Happy baking, and here’s to making desserts that are as fun to create as they are to devour! 🎂✨