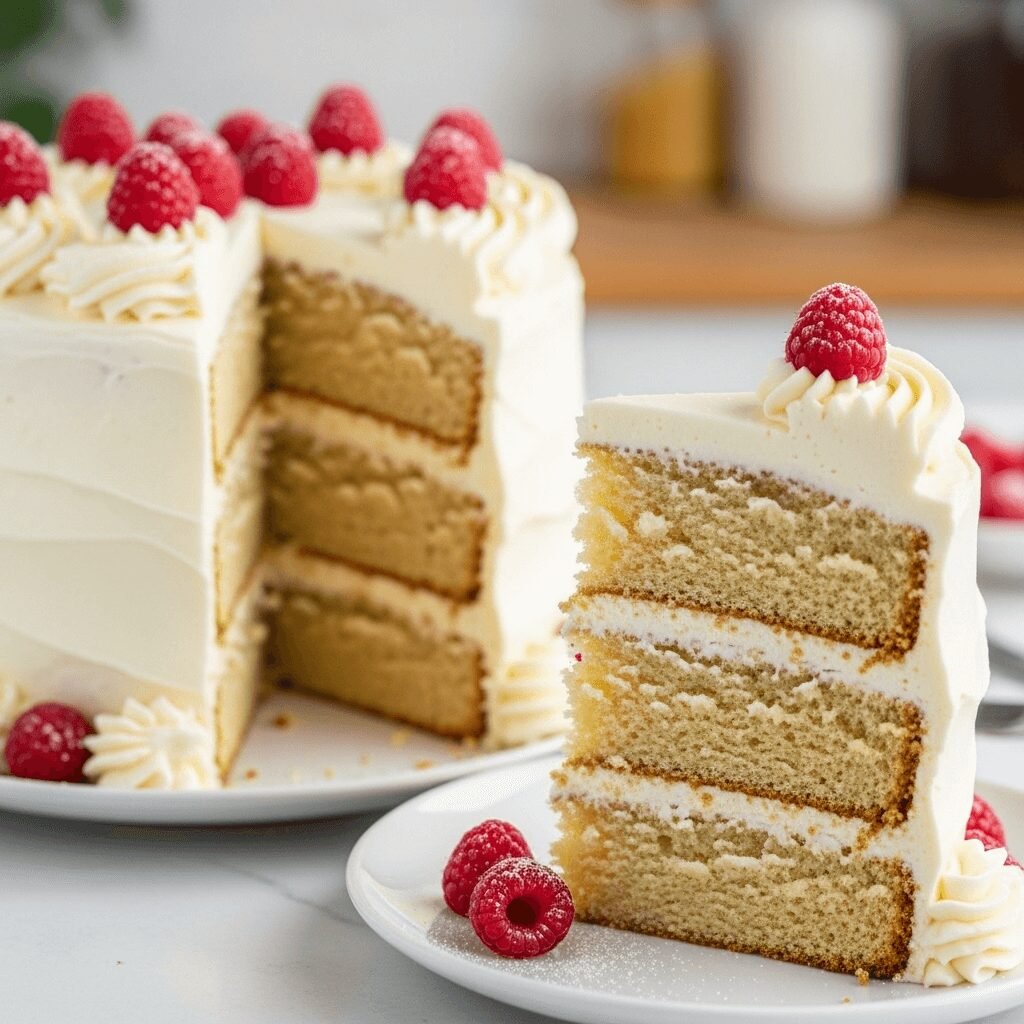
The Ultimate Classic Layer Cake Recipe – Fluffy, Moist & Irresistible!

There’s something absolutely magical about a classic layer cake that brings people together. Whether you’re celebrating a birthday, anniversary, or just want to treat yourself to something special, a homemade layer cake is the ultimate showstopper dessert that never goes out of style. This fluffy, moist layer cake recipe features tender vanilla cake layers with silky buttercream frosting that melts in your mouth with every bite.
What makes this recipe truly special is how it combines simplicity with elegance. You don’t need to be a professional baker to create a stunning layer cake that looks like it came from a fancy bakery. This foolproof recipe uses everyday ingredients you probably already have in your pantry, and the step-by-step instructions make the process so much easier than you’d think. Perfect for birthdays, holidays, bridal showers, baby showers, or any celebration that calls for something sweet and memorable, this classic layer cake will become your go-to recipe for all of life’s special moments.
The beauty of this vanilla layer cake is its versatility. You can dress it up with fancy decorations, keep it simple with smooth frosting, or customize the flavors to suit any occasion. It’s the perfect blank canvas for your creativity, and trust me, once you master this recipe, you’ll be the designated cake baker for every family gathering!
History / Background
Layer cakes have been a beloved part of American baking tradition since the mid-1800s, but their rise to popularity really took off in the early 20th century. Before modern leavening agents like baking powder became widely available in the 1850s, cakes were dense and heavy, often requiring hours of beating eggs to incorporate air. The invention of baking powder revolutionized home baking and made it possible for home cooks to create light, fluffy cakes without professional training.
The classic layer cake as we know it today became a symbol of celebration and prosperity in American culture. In the Victorian era, elaborate multi-layered cakes were a sign of wealth and sophistication because they required expensive ingredients like refined white sugar, pure vanilla extract, and fresh butter – luxuries that weren’t accessible to everyone. Having the time and skill to bake such an impressive dessert was also considered a mark of a accomplished homemaker.
The tradition of birthday cakes specifically dates back to ancient civilizations, but the modern American birthday cake with layers, frosting, and candles became popular in the early 1900s. As commercial baking powder, refined flour, and other baking staples became more affordable and accessible, layer cakes transitioned from special-occasion luxury items to beloved homemade treats that families could enjoy regularly.
Throughout the decades, the layer cake has remained a cornerstone of American dessert culture. From the simple vanilla and chocolate combinations of the 1950s to the elaborate fondant-covered creations of today’s social media era, layer cakes continue to evolve while maintaining their nostalgic charm. This recipe honors that rich tradition while incorporating modern techniques that make it easier than ever to achieve bakery-quality results at home.
Why You’ll Love This Recipe
This classic layer cake recipe is everything you want in a homemade cake and more. It’s the recipe I turn to time and time again because it never disappoints, and it’s received more compliments than any other dessert I’ve ever made. Here’s what makes it absolutely irresistible:
What Makes This Layer Cake Special:
- Incredibly Moist & Fluffy – The secret ingredient combination keeps these cake layers tender and moist for days, never dry or crumbly
- Foolproof Recipe – Clear, detailed instructions mean even beginner bakers can achieve professional-looking results on their first try
- Perfect Vanilla Flavor – Not too sweet, with a delicate vanilla flavor that pairs beautifully with any frosting or filling
- Stays Fresh Longer – This cake actually tastes even better on day two, making it perfect for advance preparation
- Highly Customizable – Use this as a base recipe and easily adapt it to different flavors, colors, and frosting combinations
- Budget-Friendly – Uses simple, affordable ingredients without any expensive specialty items
- Crowd-Pleaser – Appeals to all ages, from picky kids to discerning adults who appreciate a perfectly executed classic
- Makes You Look Like a Pro – The impressive presentation makes people think you spent hours or bought it from a fancy bakery
- No Special Skills Required – You don’t need cake decorating experience to make this look beautiful and taste amazing
- Reliable Every Time – This recipe has been tested countless times and works perfectly every single time without fail
Ingredient Notes
Understanding your ingredients is key to baking success, so let’s talk about what goes into this beautiful layer cake and why each component matters.
All-Purpose Flour – The foundation of your cake structure. I recommend measuring by weight if possible, or using the spoon-and-level method to avoid packing too much flour, which can make your cake dense. Cake flour can be substituted for an even more tender crumb (use 1 cup + 2 tablespoons cake flour for every 1 cup all-purpose).
Granulated Sugar – Provides sweetness and helps create the tender, moist texture. Sugar also helps the cake brown beautifully and keeps it fresh longer. Don’t reduce the amount or your cake will be dry.
Butter (Unsalted) – Use real butter at room temperature for the best flavor and texture. The butter should be soft enough to leave an indent when pressed but not melted or greasy. European-style butter with higher fat content creates an even richer cake.
Eggs (Large) – Provide structure, moisture, and richness. Always use large eggs at room temperature – cold eggs can cause the batter to curdle. Take them out of the fridge 30-60 minutes before baking.
Whole Milk – Adds moisture and creates a tender crumb. Buttermilk can be substituted for a tangier flavor and even more tender texture. You can also use 2% milk in a pinch, though whole milk gives the best results.
Pure Vanilla Extract – Never skimp on vanilla! Use real vanilla extract, not imitation, for the best flavor. The quality really shines through in a vanilla cake.
Baking Powder & Baking Soda – These leavening agents work together to create the perfect rise and fluffy texture. Make sure they’re fresh (less than 6 months old) or your cake won’t rise properly.
Salt – Enhances all the other flavors and balances the sweetness. Don’t skip it!
Sour Cream – This is the secret ingredient that makes this cake incredibly moist and gives it a slight tang that balances the sweetness. Greek yogurt can be substituted in equal amounts.
Equipment Needed
Having the right tools makes baking so much easier and more enjoyable. Here’s everything you’ll need to create your perfect layer cake:
- Three 9-inch round cake pans – For even layers (or two 8-inch pans for taller layers)
- Parchment paper – To line the bottom of pans for easy release
- Stand mixer or hand mixer – For creaming butter and mixing batter efficiently
- Medium mixing bowls (2-3) – For separating wet and dry ingredients
- Measuring cups and spoons – Accurate measurements are crucial in baking
- Rubber spatula – For scraping down bowl sides and folding ingredients
- Wire cooling racks – Essential for cooling cakes properly and evenly
- Offset spatula – Makes frosting the cake so much easier and more professional-looking
- Cake turntable – Optional but incredibly helpful for smooth frosting application
- Toothpicks or cake tester – For checking doneness
- Sifter or fine-mesh strainer – For sifting dry ingredients together
- Pastry brush – For brushing away loose crumbs before frosting
- Cake leveler or serrated knife – For trimming domed cake tops if needed
- Piping bags and tips – Optional, for decorative frosting borders
Layer Cake Recipe
This classic layer cake recipe creates a perfectly moist, fluffy vanilla cake with three tender layers and silky buttercream frosting. It’s the ultimate celebration cake that’s easier to make than you think and tastes absolutely divine!
- Prep Time: 25 minutes
- Cook Time: 25-30 minutes
- Total Time: 1 hour (plus cooling time)
- Yield: 12-16 servings 1x
- Category: Dessert
- Method: Baking
- Cuisine: American
- Diet: Vegetarian
Ingredients
For the Cake:
- 3 cups all-purpose flour
- 2½ cups granulated sugar
- 1 cup (2 sticks) unsalted butter, room temperature
- 4 large eggs, room temperature
- 1 cup whole milk, room temperature
- ½ cup sour cream, room temperature
- 2 tablespoons pure vanilla extract
- 1 tablespoon baking powder
- ½ teaspoon baking soda
- ¾ teaspoon salt
For the Buttercream Frosting:
- 1½ cups (3 sticks) unsalted butter, room temperature
- 6 cups powdered sugar, sifted
- ⅓ cup heavy cream
- 2 tablespoons pure vanilla extract
- ¼ teaspoon salt
- Food coloring (optional)
Instructions
Prepare the Cake Pans:
- Preheat your oven to 350°F (175°C). Grease three 9-inch round cake pans generously with butter or baking spray, then line the bottoms with parchment paper rounds. Grease the parchment paper as well. This double protection ensures your cakes will release perfectly.
Mix the Dry Ingredients: 2. In a medium bowl, whisk together the flour, baking powder, baking soda, and salt. Sift the mixture twice to ensure everything is well combined and there are no lumps. This step is crucial for a tender, evenly textured cake. Set aside.
Cream Butter and Sugar: 3. In the bowl of a stand mixer fitted with the paddle attachment (or using a hand mixer), beat the softened butter on medium speed for about 2 minutes until it’s light and fluffy. Gradually add the sugar while continuing to beat, and cream together for 4-5 minutes until the mixture is pale, fluffy, and increased in volume. Scrape down the sides of the bowl as needed.
Add Eggs: 4. Add the eggs one at a time, beating well after each addition (about 30 seconds each). The mixture should look smooth and well-combined. Don’t worry if it looks slightly curdled – it will come together when you add the flour.
Combine Wet Ingredients: 5. In a separate bowl or large measuring cup, whisk together the milk, sour cream, and vanilla extract until smooth and well combined.
Alternate Additions: 6. With the mixer on low speed, add the flour mixture to the butter mixture in three additions, alternating with the milk mixture in two additions. Begin and end with the flour mixture. Mix each addition just until combined – the pattern should be: flour, milk, flour, milk, flour. After the final addition of flour, mix for no more than 10-15 seconds. Over-mixing develops gluten and creates a tough cake.
Final Mix: 7. Use a rubber spatula to scrape down the sides and bottom of the bowl, then gently fold the batter a few times to ensure everything is evenly incorporated. The batter should be smooth, thick, and creamy.
Divide and Bake: 8. Divide the batter evenly among the three prepared pans (about 2⅔ cups of batter per pan for even layers). Use a kitchen scale for precision if you have one. Smooth the tops with an offset spatula and gently tap the pans on the counter a few times to release any air bubbles.
- Bake for 25-30 minutes, rotating the pans halfway through baking for even browning. The cakes are done when they’re golden brown, spring back when lightly touched, and a toothpick inserted into the center comes out clean or with just a few moist crumbs.
Cool the Cakes: 10. Remove from the oven and let the cakes cool in the pans on wire racks for exactly 15 minutes. Run a thin knife around the edges of each pan, then carefully invert the cakes onto the cooling racks. Peel off the parchment paper and flip the cakes right-side up to cool completely (about 1 hour). The cakes must be completely cool before frosting.
Make the Buttercream: 11. In a large bowl using a hand mixer or in the bowl of a stand mixer, beat the softened butter on medium-high speed for 3-4 minutes until it’s pale, fluffy, and smooth.
- Reduce the speed to low and gradually add the sifted powdered sugar, one cup at a time, beating well after each addition. Add the vanilla extract and salt.
- Once all the sugar is incorporated, increase the speed to medium-high and beat for 3-4 minutes. The frosting should be light, fluffy, and smooth.
- Add the heavy cream one tablespoon at a time while beating, until you reach your desired consistency. For filling between layers, you want slightly thicker frosting. For the outside, you can add an extra tablespoon of cream for easier spreading.
Assemble the Cake: 15. If your cake layers have domed tops, use a serrated knife or cake leveler to trim them flat. Place the first cake layer on a cake stand or serving plate. You can place strips of parchment paper under the edges to keep the plate clean while frosting.
- Spread about 1 cup of buttercream evenly over the first layer, going almost to the edges (it will spread slightly when you add the next layer). Place the second layer on top and repeat with another cup of frosting.
- Place the final layer top-side down (so the flat bottom becomes the top for a perfectly smooth surface). Apply a thin “crumb coat” of frosting all over the entire cake – this seals in crumbs and creates a smooth base. Refrigerate for 20-30 minutes to set the crumb coat.
- Apply the final layer of frosting, using an offset spatula to create smooth sides and top. For the smoothest finish, dip your spatula in hot water, dry it, and then smooth the frosting. Use a cake turntable if you have one for easier frosting.
Decorate and Serve: 19. Decorate as desired with piped borders, sprinkles, fresh flowers, or fresh fruit. Carefully remove the parchment paper strips from under the cake. Slice with a sharp knife, wiping it clean between cuts for neat slices.
Notes
- Room Temperature Ingredients: This is crucial! Room temperature ingredients mix together more easily and create a better texture. Take butter, eggs, milk, and sour cream out of the fridge 30-60 minutes before starting.
- Measuring Flour: Spoon flour into measuring cups and level off with a knife. Don’t scoop directly from the bag or pack it down, as this adds too much flour and makes dry cake.
- Cake Layers: If baking only two pans at a time, refrigerate remaining batter and bake the third layer after the first batch. Keep batter refrigerated for no more than 30 minutes.
- Storing: Unfrosted cake layers can be wrapped tightly and frozen for up to 3 months. Thaw overnight in the refrigerator before frosting.
- Buttercream Consistency: If frosting is too thick, add more cream one teaspoon at a time. If too thin, add more powdered sugar ¼ cup at a time.
- Make-Ahead: Cake layers can be baked 2 days in advance and kept wrapped at room temperature. Frosted cake can be assembled 1 day ahead and refrigerated.
Nutrition
- Serving Size: 1 slice (1/12 of cake)
- Calories: 685
- Sugar: 72g
- Sodium: 285mg
- Fat: 32g
- Saturated Fat: 20g
- Unsaturated Fat: 10g
- Trans Fat: 0g
- Carbohydrates: 94g
- Fiber: 1g
- Protein: 6g
- Cholesterol: 145mg
Nutritional values are approximate and may vary based on specific ingredients used and portion sizes.
Tips & Variations
The beauty of this classic layer cake recipe is how adaptable it is to different flavors and occasions. Here are my favorite ways to customize it:
Flavor Variations:
- Chocolate Layer Cake – Replace ¾ cup of flour with ¾ cup Dutch-process cocoa powder and add an extra ¼ cup milk
- Lemon Layer Cake – Add 2 tablespoons lemon zest to the batter and replace vanilla with lemon extract
- Almond Layer Cake – Replace 1 tablespoon vanilla with 1 tablespoon almond extract
- Funfetti Cake – Gently fold in ¾ cup rainbow sprinkles at the end of mixing (use jimmies, not nonpareils, so they won’t bleed)
- Strawberry Cake – Replace ½ cup milk with ½ cup strawberry puree and add strawberry extract
Frosting Variations:
- Chocolate Buttercream – Add ¾ cup melted and cooled dark chocolate or ½ cup cocoa powder to the buttercream
- Cream Cheese Frosting – Replace half the butter with cream cheese for tangy sweetness
- Lemon Buttercream – Add 2 tablespoons lemon zest and replace vanilla with lemon extract
- Coffee Buttercream – Add 2 tablespoons instant espresso powder dissolved in 1 tablespoon hot water
- Fresh Fruit – Add layers of fresh berries between the cake layers with the frosting
Size Variations:
- Two-Layer 9-inch Cake – Use ⅔ of the recipe and bake in two pans for 28-32 minutes
- Cupcakes – Line muffin tins and fill ⅔ full. Bake at 350°F for 18-22 minutes. Makes about 36 cupcakes
- Sheet Cake – Pour into a greased 9×13-inch pan and bake for 35-40 minutes
- Four-Layer 8-inch Cake – Divide batter among four 8-inch pans and bake for 22-25 minutes for dramatic height
Pro Chef Tips
These professional techniques will take your layer cake from good to absolutely extraordinary:
Temperature Control is Everything – The temperature of your ingredients dramatically affects texture. Room temperature butter creams better with sugar, creating more air pockets for a lighter cake. Cold eggs can cause butter to seize up and create a dense texture. Always plan ahead and take ingredients out 60-90 minutes before baking.
Weigh Your Batter – Professional bakers weigh their batter to ensure perfectly even layers. Each 9-inch pan should contain approximately 22-23 ounces of batter. Use a kitchen scale to divide batter precisely, and your layers will bake evenly and stack beautifully without wobbling.
The Reverse Creaming Method – For an even more tender, velvety crumb, try this professional technique: Add all the dry ingredients to the butter first and mix on low until crumbly, then add the liquid ingredients. This coats the flour in fat before liquid is added, which limits gluten development and creates an incredibly tender cake.
Brush with Simple Syrup – Professional bakers brush each cake layer with simple syrup (equal parts sugar and water, heated until dissolved and cooled) before frosting. This adds moisture, helps the layers stick together, and keeps the cake fresh for days. You can also flavor the syrup with vanilla, citrus, or liqueur.
The Hot Water Trick – For perfectly smooth frosting, dip your offset spatula in hot water, dry it completely, then smooth the frosting. The slight warmth helps create a silky, professional finish. This technique is called the “Viva paper towel method” when used with a paper towel for ultra-smooth sides.
Chill Between Layers – Refrigerate the cake for 15-20 minutes after adding each layer before adding the next. This prevents the layers from sliding and makes assembly much easier. The final assembled cake should also be chilled for at least 30 minutes before the final frosting coat.
Use a Cake Strip – Wrap wet cake strips (or damp towels secured with pins) around your pans before baking. This insulates the edges so the cake bakes evenly without doming in the center or developing dark edges. Your layers will come out flat and level, reducing the need for trimming.
The Toothpick Test Timing – Remove the cake when the toothpick has just a few moist crumbs clinging to it, not when it’s completely clean. The cake continues cooking from residual heat as it cools, and waiting for a completely clean toothpick usually means an over-baked, dry cake.
Common Mistakes to Avoid
Learning from others’ mistakes is the fastest way to baking success. Here are the most common layer cake pitfalls and how to avoid them:
Over-Mixing the Batter – Once you add the flour, mix only until you no longer see dry flour streaks. Over-mixing develops gluten, which creates a tough, dense cake with tunnels and an uneven crumb. The batter should look slightly thick and creamy, not thin or overly smooth. When in doubt, under-mix slightly and finish combining with a rubber spatula by hand.
Opening the Oven Door Too Early – Resist the temptation to check on your cakes before at least 20 minutes of baking time has passed. Opening the door releases heat and can cause the cakes to sink in the middle. If you need to check, do it quickly and gently close the door. Rotate pans only once, halfway through baking, for even browning.
Frosting Warm Cake – This is the number one mistake I see! Frosting will melt, slide off, and mix with crumbs if applied to warm cake, creating a messy disaster. Your cake layers must be completely cool – not just slightly warm, but truly room temperature or even chilled. When in doubt, refrigerate the layers for 30 minutes before frosting.
Not Leveling Cake Layers – Domed tops make stacking difficult and can cause your cake to lean or slide. Always trim the tops flat with a serrated knife or cake leveler. Save those scraps for “baker’s treats” or crumble them as a topping for ice cream!
Skipping the Crumb Coat – Trying to frost a naked cake in one go pushes crumbs into your frosting, creating a messy, unprofessional look. Always apply a thin crumb coat first, chill it until firm (20-30 minutes), then apply the final generous layer of frosting. This extra step makes all the difference in achieving that clean, bakery-quality finish.
Using Cold Butter for Frosting – Cold butter creates lumpy, grainy frosting that’s nearly impossible to spread smoothly. Your butter should be soft enough to easily press your finger into it but not greasy or melted. If you accidentally let it get too soft, refrigerate it for 10 minutes to firm up slightly before beating.
Not Tasting as You Go – Frosting too sweet? Add a pinch more salt. Not vanilla-y enough? Add another ½ teaspoon extract. The beauty of homemade is that you can adjust to your preferences. Always taste your frosting and adjust before committing to frosting the entire cake.
Storage & Meal Prep
Proper storage keeps your beautiful layer cake tasting fresh and delicious for days. Here’s everything you need to know:
Room Temperature Storage – A fully frosted layer cake with buttercream can be stored at room temperature for up to 2 days if your kitchen is cool (below 75°F). Cover it loosely with a cake dome or large bowl – don’t use plastic wrap directly on the frosting as it will stick and ruin your beautiful finish. The cake actually tastes better on day two as the flavors meld and the texture becomes even more moist.
Refrigerator Storage – For longer storage or if your kitchen is warm, refrigerate the cake under a cake dome or in a large covered container for up to 5 days. Buttercream can absorb refrigerator odors, so make sure it’s well-covered. Before serving, let the cake sit at room temperature for 30-60 minutes – cold cake doesn’t have the same tender texture and the frosting can be too firm.
Storing Unfrosted Layers – Wrap each cooled cake layer tightly in two layers of plastic wrap, making sure there are no gaps where air can enter. Store at room temperature for up to 2 days, or refrigerate for up to 5 days. The wrapped layers can also be placed in freezer bags for extra protection.
Storing Leftover Slices – Individual slices can be wrapped in plastic wrap and stored in an airtight container at room temperature for 2 days or refrigerated for up to 5 days. For the best texture, let refrigerated slices come to room temperature for 20 minutes before eating.
Reheating Tips – While cake doesn’t need to be reheated, if you prefer it slightly warm, microwave individual slices for 10-15 seconds on 50% power. This takes the chill off refrigerated cake without making the frosting melt. You can also let it sit at room temperature for 30 minutes for a similar effect.
Buttercream Storage – Leftover buttercream can be stored in an airtight container in the refrigerator for up to 2 weeks or frozen for up to 3 months. Before using, bring it to room temperature and re-whip it in a mixer for 2-3 minutes to restore the fluffy texture.
Make-Ahead & Freezer Notes
This layer cake is perfect for advance preparation, making party planning so much easier and less stressful:
Make-Ahead Strategy – You can break this recipe into manageable steps over several days. Bake the cake layers up to 2 days in advance, wrap them tightly in plastic wrap, and store at room temperature. Make the buttercream up to 5 days ahead and refrigerate it. The day of your event, bring the buttercream to room temperature, re-whip it briefly, and assemble the cake. This approach spreads out the work and actually results in a more flavorful cake.
Freezing Unfrosted Layers – This is my favorite time-saving trick! Wrap each completely cooled cake layer in two layers of plastic wrap, making sure every surface is covered with no gaps. Then wrap in aluminum foil or place in a freezer-safe zip-top bag, pressing out as much air as possible. Label with the date and freeze for up to 3 months. When ready to use, thaw the wrapped layers in the refrigerator overnight or at room temperature for 2-3 hours. Once thawed, they’ll taste just as fresh as the day they were baked.
Freezing Frosted Cake – A fully frosted and decorated cake can be frozen, though the decoration may not look quite as pristine after thawing. Place the frosted cake in the freezer uncovered for 1-2 hours until the frosting is firm, then wrap carefully in plastic wrap and foil. Freeze for up to 2 months. Thaw overnight in the refrigerator, still wrapped, then let it come to room temperature before serving. You may need to touch up the frosting after thawing.
Freezing Buttercream – Transfer buttercream to an airtight container or freezer bag, press plastic wrap directly onto the surface to prevent ice crystals, and freeze for up to 3 months. Thaw overnight in the refrigerator, then bring to room temperature and re-whip for 3-4 minutes until light and fluffy again. You may need to add a tablespoon of cream if it seems too stiff.
Assembly Day Tips – If you’re assembling a frozen cake, there’s no need to thaw it completely. Slightly frozen layers are actually easier to handle and frost because they’re firmer and produce fewer crumbs. You can apply the crumb coat while the layers are partially frozen, then let everything thaw together as you work on the final frosting.
Best Reheating Method – For frozen cake, always thaw it slowly in the refrigerator while still wrapped. This prevents condensation from forming directly on the cake, which can make it soggy. Never microwave a frozen cake to thaw it. Quick temperature changes can ruin the texture and cause the frosting to separate.
Serving Suggestions
A beautiful layer cake deserves an equally special presentation and complementary accompaniments. Here’s how to serve it in style:
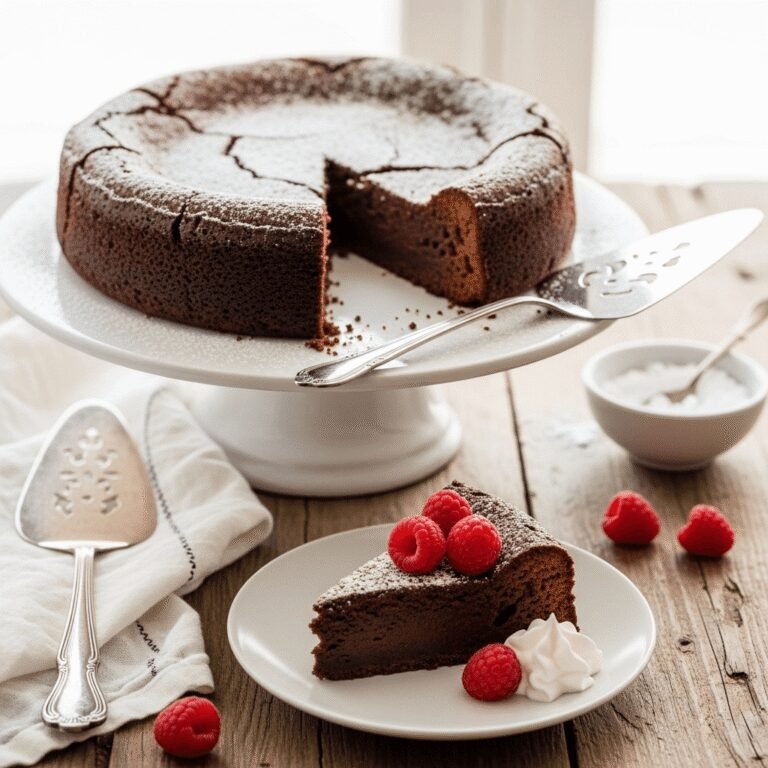
Classic Pairings – Serve each slice with a dollop of freshly whipped cream and fresh berries (strawberries, raspberries, or blueberries) for a traditional, elegant presentation. The slight tartness of the berries perfectly balances the sweet buttercream. A light dusting of powdered sugar over the berries adds a professional finishing touch.
Beverage Pairings – Coffee and layer cake are a match made in heaven – the bitterness of a good coffee or espresso cuts through the sweetness beautifully. For afternoon tea, serve with Earl Grey or English Breakfast tea. For special occasions, pair with champagne, prosecco, or a sweet dessert wine like Moscato or late-harvest Riesling. For kids’ parties, offer cold milk, hot chocolate, or fruit punch.
Ice Cream Combinations – Transform your cake into a true showstopper by serving it a la mode. Vanilla bean ice cream is classic, but try more interesting flavors like salted caramel, strawberry, coffee, or even pistachio. The temperature contrast between cold ice cream and room-temperature cake is irresistible. For an extra-special touch, drizzle with chocolate or caramel sauce.
Holiday Variations – Customize your presentation for different occasions. For Christmas, decorate with red and green frosting, candy canes, or sugared cranberries and rosemary. For Easter, top with pastel-colored frosting, edible flowers, and small chocolate eggs. Fourth of July calls for red, white, and blue berries arranged in a flag pattern. Birthday parties can feature age-specific toppers, sprinkles, or themed decorations.
Elegant Plating – For dinner parties, create restaurant-style presentations. Place each slice on its side to show off the beautiful layers, add a small quenelle (oval scoop) of whipped cream, a few fresh berries, a mint leaf, and a light drizzle of berry coulis or chocolate sauce on the plate. A dusting of cocoa powder or powdered sugar through a small sieve adds sophistication.
Accompaniments – Fresh fruit compote, berry sauce, lemon curd, or chocolate ganache make wonderful toppings that add both visual appeal and complementary flavors. For a Southern twist, serve with fresh sliced peaches or a warm berry compote. Candied nuts, edible flowers, or fresh herbs like mint or basil can also make beautiful, Instagram-worthy garnishes.
Portion Control – This is a rich, indulgent cake, so standard slices are quite generous. For large gatherings, you can cut smaller pieces and serve 16-20 portions from a three-layer 9-inch cake. Use a sharp knife dipped in hot water and wiped clean between each cut for neat, professional-looking slices.
FAQs Section
Can I make this cake without a stand mixer? Absolutely! A hand mixer works perfectly well for this recipe. You’ll just need to beat the butter and sugar for an extra minute or two to get it nice and fluffy. Make sure your butter is at proper room temperature (soft but not melting) to make mixing easier. You can even make this cake entirely by hand with a wooden spoon and some elbow grease, though it will take more effort to properly cream the butter and sugar.
Why did my cake turn out dense instead of fluffy? Dense cake is usually caused by one of three things: over-mixing the batter (which develops gluten), using ingredients that were too cold (which prevents proper creaming), or measuring flour incorrectly by packing it into the measuring cup. Make sure you’re using the spoon-and-level method for measuring flour, bring all ingredients to room temperature, and mix just until combined after adding the flour. Also check that your baking powder and baking soda are fresh – expired leavening agents won’t create the proper rise.
Can I use this recipe to make cupcakes instead? Yes! This batter makes excellent cupcakes. Line standard muffin tins with cupcake liners and fill each about ⅔ full (using a cookie scoop ensures uniform size). Bake at 350°F for 18-22 minutes, until a toothpick inserted in the center comes out clean. This recipe yields approximately 36 standard cupcakes or 16 jumbo cupcakes. The buttercream recipe makes enough to frost all the cupcakes with a generous swirl.
How do I prevent my cake layers from sticking to the pans? The key is thorough preparation: grease the pans well with butter or baking spray, line the bottoms with parchment paper rounds, then grease the parchment too. This double protection ensures easy release every time. Also, let the cakes cool in the pans for exactly 15 minutes before turning out – if you wait too long, the sugar in the cake can caramelize and stick to the pan, but if you turn them out too soon, they may break apart.
Can I reduce the sugar to make this cake less sweet? I don’t recommend reducing the sugar by more than ¼ cup, as sugar doesn’t just provide sweetness – it also contributes to the cake’s texture, moisture, and shelf life. If you find buttercream too sweet, try cream cheese frosting or Swiss meringue buttercream instead, which are less sweet than American buttercream. You can also reduce the frosting and use fresh fruit or whipped cream between layers instead.
How far in advance can I decorate the cake? A fully frosted and decorated cake with buttercream can be assembled up to 24 hours in advance and stored at room temperature (if your kitchen is cool) or refrigerated. If refrigerating, let it sit at room temperature for at least 30-60 minutes before serving so the frosting softens and the flavors fully develop. Avoid adding fresh fruit or delicate decorations more than a few hours before serving, as they can wilt or make the frosting soggy.
Conclusion
There’s truly nothing quite like the joy of slicing into a homemade layer cake – those beautiful, even layers, the fluffy crumb, and that silky buttercream frosting that just melts on your tongue. This classic layer cake recipe has been my go-to for every celebration, and I know it’s going to become your favorite too. Whether you’re celebrating a milestone birthday, hosting a bridal shower, or just treating yourself to something special on a random Tuesday (because you deserve it!), this cake delivers every single time.
What I love most about this recipe is that it takes a dessert that seems intimidating and makes it completely achievable for home bakers of all skill levels. You don’t need fancy equipment, specialty ingredients, or years of baking experience – just quality ingredients, a little patience, and the willingness to follow the steps. The reward is a stunning, bakery-worthy cake that will have everyone asking for your secret recipe.
I’d love to hear how your layer cake turns out! Did you stick with classic vanilla, or did you try one of the flavor variations? What occasion are you baking it for? Drop a comment below and let me know, and don’t forget to rate this recipe if you loved it. Your feedback helps other bakers know what to expect and makes this community so special.
Ready to make this gorgeous cake? Save this recipe to your Pinterest boards so you can find it whenever inspiration strikes, and share it with your baking friends who need an amazing go-to cake recipe in their lives. Happy baking, friend – you’ve got this!