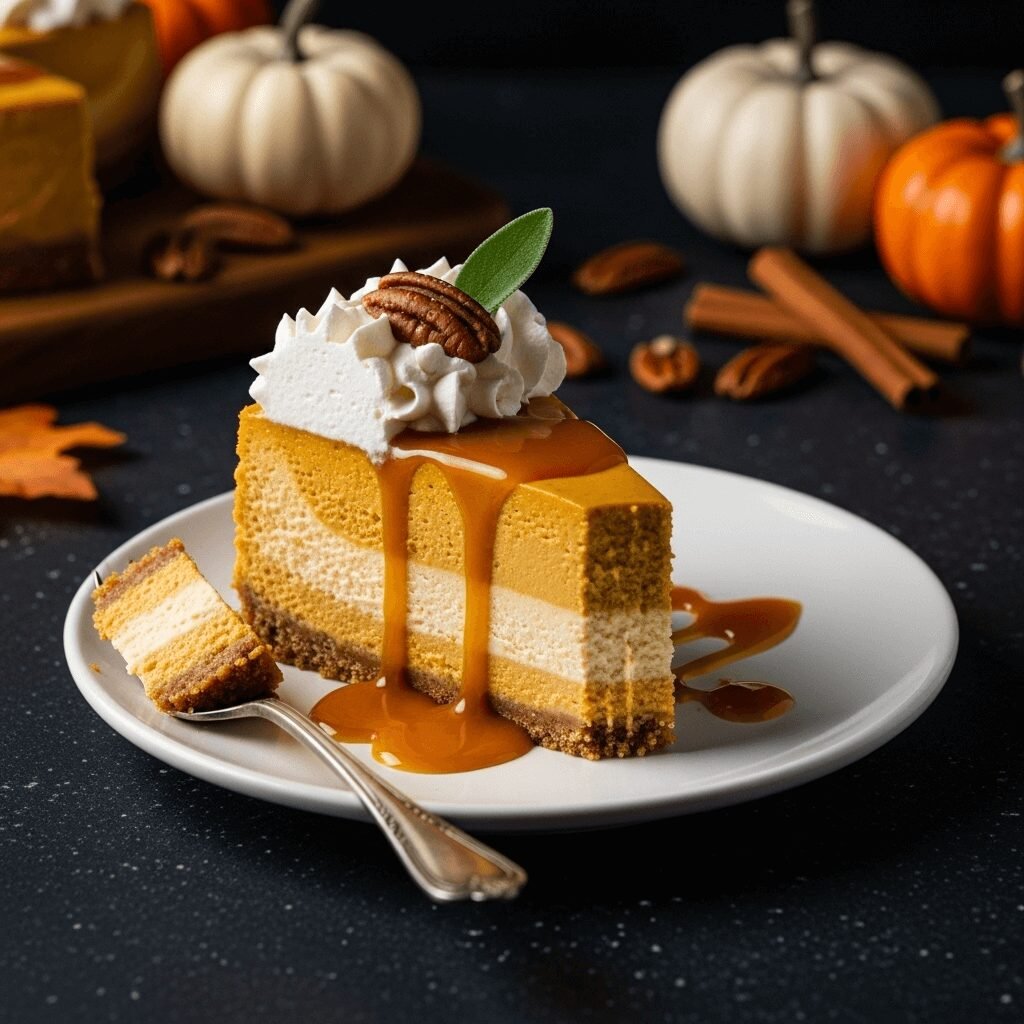
Pumpkin Cheesecake Recipe: Creamy, Spiced & Perfect for Fall

There’s something absolutely magical about pumpkin cheesecake that makes it the crown jewel of fall desserts. This luxurious dessert combines two beloved classics—rich, velvety cheesecake and warmly spiced pumpkin pie—into one show-stopping creation that’ll have everyone at your table asking for seconds. Whether you’re planning your Thanksgiving menu, hosting a cozy fall dinner party, or simply craving something indulgent on a crisp autumn evening, this pumpkin cheesecake delivers pure dessert perfection.
What makes this recipe truly special is how it balances the tangy creaminess of traditional New York-style cheesecake with the earthy sweetness of pumpkin and aromatic spices like cinnamon, nutmeg, and ginger. The result? A dessert that’s neither too heavy nor too sweet, with a gorgeous sunset-orange hue that looks absolutely stunning on any dessert table. Serve it at Thanksgiving, Christmas, or any fall gathering, and watch it disappear before your eyes. Trust me, this is one recipe you’ll be making year after year, and it might just become your new fall tradition.
History / Background
The story of pumpkin cheesecake is a delicious tale of American culinary evolution. Cheesecake itself has ancient roots dating back to ancient Greece, but the modern cream cheese-based version we know and love today is distinctly American, perfected in New York City in the early 1900s. Meanwhile, pumpkin pie has been a cornerstone of American cuisine since colonial times, when settlers learned to use the abundant native squash from Indigenous peoples.
The brilliant marriage of these two classics likely emerged in the 1970s and 1980s when creative home bakers and pastry chefs began experimenting with fusion desserts. As cheesecake grew in popularity beyond New York’s delis and diners, bakers across America started incorporating regional and seasonal flavors into the classic recipe. Pumpkin was a natural choice, especially as pumpkin spice began its meteoric rise in American food culture.
By the 1990s, pumpkin cheesecake had secured its place as a holiday staple, particularly for Thanksgiving when families wanted something a bit more elegant than traditional pumpkin pie but still honoring the season’s signature flavor. Today, it represents the best of American baking innovation—taking beloved traditions and reimagining them into something even more spectacular. The dessert has become so popular that many bakeries now offer it from September through December, and home bakers have developed countless variations to make it their own.
Why You’ll Love This Recipe
This pumpkin cheesecake recipe is designed with home bakers in mind, striking the perfect balance between impressive results and approachable techniques. Even if you’ve never made cheesecake before, you’ll find success with this recipe because I’ve included all the tips and tricks that professional pastry chefs use to achieve that crack-free, silky-smooth top.
Here’s why this recipe will become your go-to fall dessert:
- Foolproof technique – The water bath method ensures even baking and prevents cracks, while detailed instructions guide you through every step
- Make-ahead friendly – Actually tastes better after chilling overnight, making it perfect for stress-free holiday entertaining
- Crowd-pleaser guaranteed – Combines two beloved desserts that appeal to both cheesecake lovers and pumpkin pie fans
- Bakery-quality results – Achieve professional-looking results right in your home kitchen with a stunning presentation
- Perfect spice balance – The warming spices complement rather than overpower the pumpkin, creating a harmonious flavor profile
- Feeds a crowd – One 9-inch cheesecake serves 12-16 people, making it economical for gatherings
- Customizable – Easy to adapt with different crusts, toppings, and spice levels to suit your preferences
- Impressive yet achievable – Looks and tastes like you spent hours in the kitchen, but the actual hands-on time is minimal
Ingredient Notes
Graham Cracker Crumbs – The foundation of your crust, graham crackers provide a slightly sweet, honeyed base that complements the pumpkin beautifully. You’ll need about 9 full graham crackers to yield 1½ cups of crumbs. Can substitute with gingersnap cookies for a spicier crust or vanilla wafers for a milder flavor.
Cream Cheese – The star of any cheesecake! Use full-fat cream cheese (not low-fat or whipped) and make absolutely sure it’s at room temperature before mixing. Cold cream cheese creates lumps that won’t smooth out. Philadelphia brand is the gold standard, but any quality brand works. You’ll need three 8-ounce packages.
Pure Pumpkin Puree – Use 100% pure pumpkin puree (not pumpkin pie filling, which contains added sugars and spices). Libby’s is the most popular brand, but any pure pumpkin works. One 15-ounce can is perfect for this recipe. You can substitute with homemade pumpkin puree if you’ve roasted and pureed your own sugar pumpkins.
Granulated Sugar – Sweetens both the crust and the filling. Regular white sugar dissolves smoothly into the batter, creating that signature creamy texture.
Eggs – These bind the cheesecake and give it structure. Use large eggs at room temperature (place them in warm water for 10 minutes if you forgot to set them out). Room temperature eggs incorporate more smoothly and create a better texture.
Heavy Cream or Sour Cream – Adds extra richness and creates an incredibly smooth, creamy texture. Sour cream also adds a slight tang that balances the sweetness beautifully.
Pumpkin Pie Spice – A convenient blend of cinnamon, ginger, nutmeg, allspice, and cloves. You can make your own by mixing 3 teaspoons cinnamon, 1 teaspoon ginger, ½ teaspoon nutmeg, ¼ teaspoon allspice, and ¼ teaspoon cloves.
Vanilla Extract – Pure vanilla extract (not imitation) adds depth and enhances all the other flavors. It’s a small ingredient that makes a big difference.
Unsalted Butter – Used in the crust, melted butter binds the crumbs together. Unsalted allows you to control the salt level in your recipe.
Equipment Needed
To create your perfect pumpkin cheesecake, gather these essential tools:
- 9-inch springform pan – This is non-negotiable for cheesecakes; the removable sides make serving so much easier
- Aluminum foil – Heavy-duty foil to wrap the outside of your springform pan for the water bath
- Large roasting pan – Needs to be large enough to hold your springform pan with space around it for water
- Electric mixer – Either a stand mixer or hand mixer works; you’ll need this for smooth, lump-free filling
- Food processor or rolling pin – For crushing graham crackers into fine crumbs
- Mixing bowls – Various sizes for preparing different components
- Rubber spatula – Essential for scraping down bowl sides and ensuring everything is well-incorporated
- Measuring cups and spoons – Accurate measurements are crucial for baking success
- Whisk – For combining dry ingredients and checking your filling for lumps
Pumpkin Cheesecake Recipe
This silky-smooth pumpkin cheesecake combines rich cream cheese with warmly spiced pumpkin puree on a buttery graham cracker crust. Baked in a water bath for perfect texture and topped with your choice of whipped cream or caramel, it’s the ultimate fall dessert that rivals any bakery creation.
- Prep Time: 30 minutes
- Cook Time: 1 hour 15 minutes
- Total Time: 9 hours 45 minutes
- Yield: 12-16 servings 1x
- Category: Dessert
- Method: Baking
- Cuisine: American
- Diet: Vegetarian
Ingredients
For the Crust:
- 1½ cups graham cracker crumbs (about 9 full crackers)
- ¼ cup granulated sugar
- 6 tablespoons unsalted butter, melted
- ¼ teaspoon salt
For the Pumpkin Cheesecake Filling:
- 24 ounces cream cheese (three 8-oz packages), softened to room temperature
- 1 cup granulated sugar
- 3 large eggs, room temperature
- 1 cup pure pumpkin puree
- ½ cup sour cream or heavy cream
- 2 teaspoons pumpkin pie spice
- 1 teaspoon vanilla extract
- 2 tablespoons all-purpose flour
- ¼ teaspoon salt
Instructions
Step 1: Prepare Your Oven and Pan
Position an oven rack in the lower third of your oven and preheat to 325°F (163°C). Wrap the outside of a 9-inch springform pan tightly with heavy-duty aluminum foil, covering the bottom and extending up the sides. This prevents water from seeping into your cheesecake during the water bath. Place a large roasting pan in the oven and fill it with about 1 inch of hot water—this is your water bath that will gently steam your cheesecake.
Step 2: Make the Graham Cracker Crust
In a medium bowl, combine graham cracker crumbs, ¼ cup sugar, melted butter, and ¼ teaspoon salt. Mix with a fork until the mixture resembles wet sand and holds together when pressed. Pour into your prepared springform pan and press firmly into the bottom and about 1 inch up the sides using the bottom of a measuring cup or glass. Bake for 10 minutes, then remove and let cool while you prepare the filling.
Step 3: Beat the Cream Cheese
In a large mixing bowl using an electric mixer on medium speed, beat the softened cream cheese for 2-3 minutes until completely smooth and creamy with no lumps. Stop occasionally to scrape down the sides and bottom of the bowl with a rubber spatula. This step is crucial—any lumps now will remain in your finished cheesecake.
Step 4: Add Sugar and Pumpkin
Add 1 cup sugar to the cream cheese and beat on medium speed for another 2 minutes until well combined and fluffy. Add the pumpkin puree, pumpkin pie spice, vanilla extract, flour, and ¼ teaspoon salt. Mix on low speed until just combined, being careful not to overmix.
Step 5: Incorporate Eggs and Cream
Add eggs one at a time, beating on low speed after each addition just until the yellow disappears. Overmixing once the eggs are added can create too much air, leading to cracks. Finally, add the sour cream and mix on low just until combined. Give everything a final gentle fold with your spatula to ensure no pockets of unmixed ingredients remain.
Step 6: Pour and Smooth
Pour the filling over your pre-baked crust, smoothing the top with a spatula. Gently tap the pan on the counter a few times to release any air bubbles that could cause cracks or holes in the finished cheesecake.
Step 7: Bake in Water Bath
Carefully place the foil-wrapped springform pan into the roasting pan with hot water in the oven. The water should come about halfway up the sides of the springform pan. Bake for 1 hour and 15 minutes. The cheesecake is done when the edges are set but the center still has a slight jiggle (about 3 inches in diameter)—it will firm up as it cools.
Step 8: Cool Gradually
Turn off the oven and crack the door open about 4 inches. Leave the cheesecake in the oven for 1 hour. This gradual cooling prevents cracking from temperature shock. After an hour, remove from the oven and water bath, remove foil, and let cool at room temperature for another hour.
Step 9: Refrigerate
Once the cheesecake is at room temperature, cover loosely with plastic wrap (don’t let it touch the surface) and refrigerate for at least 6 hours, preferably overnight. This chilling time allows the flavors to meld and the texture to set perfectly.
Step 10: Serve
Run a knife around the edges before releasing the springform. Slice with a hot, clean knife (dip in hot water and wipe clean between cuts) for picture-perfect slices. Serve with whipped cream, caramel sauce, or candied pecans.
Notes
- Room temperature ingredients are crucial – Cold cream cheese creates lumps, and cold eggs don’t incorporate as smoothly.
- Don’t skip the water bath – This is the secret to a crack-free, evenly baked cheesecake with perfect texture.
- The jiggle test – The center should wobble slightly like Jell-O when gently shaken; it will set completely upon cooling.
- Patience pays off – Rushing the cooling process is the number one cause of cracked cheesecakes.
- Make it ahead – This cheesecake actually tastes better after 24 hours in the fridge as flavors develop.
Nutrition
- Serving Size: 1 slice (1/12 of cheesecake)
- Calories: 385
- Sugar: 28g
- Sodium: 295mg
- Fat: 25g
- Saturated Fat: 14g
- Unsaturated Fat: 9g
- Trans Fat: 0g
- Carbohydrates: 34g
- Fiber: 1g
- Protein: 7g
- Cholesterol: 115mg
Note: Nutrition information is an estimate and will vary based on exact ingredients used and portion sizes.
Tips & Variations
Gingersnap Crust Variation: Swap graham crackers for gingersnap cookies to add an extra layer of spicy warmth that pairs beautifully with pumpkin. You might need to reduce the sugar in the crust slightly as gingersnaps are already quite sweet.
Chocolate Swirl Pumpkin Cheesecake: Reserve 1 cup of the plain cheesecake batter before adding pumpkin. Melt 4 ounces of dark chocolate and mix into the reserved batter. Pour the pumpkin batter into the crust, then dollop the chocolate batter on top and swirl with a knife for a stunning marbled effect.
Maple Pumpkin Cheesecake: Replace ¼ cup of the granulated sugar with pure maple syrup for a deeper, more complex sweetness with subtle maple notes. This also pairs wonderfully with a pecan topping.
Lighter Version: Use reduced-fat cream cheese (not fat-free) and substitute Greek yogurt for the sour cream. The texture will be slightly different but still delicious, and you’ll save about 80 calories per slice.
Mini Pumpkin Cheesecakes: Divide the recipe among 16-18 lined muffin cups. Reduce baking time to 20-25 minutes. These are perfect for parties and portion control!
Spice It Up: Add a pinch of cayenne pepper or black pepper to the filling for a subtle heat that enhances the pumpkin flavor without being spicy—it’s a professional chef trick!
Gluten-Free Option: Use gluten-free graham crackers or crushed gluten-free cookies for the crust. The filling is naturally gluten-free if you omit the flour (the texture will be slightly softer but still delicious).
Pro Chef Tips
The Room Temperature Rule: This cannot be overstated—room temperature ingredients incorporate smoothly and create a silky texture without lumps. Set your cream cheese and eggs out 2-3 hours before baking, or use the quick method: place cream cheese (unwrapped) in the microwave for 10 seconds, and eggs in warm water for 10 minutes.
Prevent Cracking with Steam: The water bath serves two purposes—gentle, even heat and steam that keeps the top of your cheesecake moist. Some chefs also place a pan of water on the rack above the cheesecake for extra insurance against cracks.
The Tap Test: Before baking, hold your filled pan about 2 inches above the counter and drop it firmly but carefully. This releases hidden air bubbles that can create tunnels or holes in your finished cheesecake. You’ll see bubbles rise to the surface—just pop them with a toothpick.
Perfect Slicing Technique: Use unwaxed dental floss for the cleanest cuts. Hold a length of floss taut, press down through the cheesecake, then pull one end through the bottom. This technique is used in professional bakeries for picture-perfect slices every time.
Flavor Development: Like many custard-based desserts, cheesecake tastes significantly better after 24 hours in the refrigerator. The flavors meld together, and the texture becomes even creamier and more cohesive. Plan to make this at least one day before serving.
The Crack Cover-Up: If despite your best efforts you get a crack, don’t worry! A dollop of whipped cream, drizzle of caramel, or layer of sour cream topping completely hides any imperfections while adding another delicious layer.
Common Mistakes to Avoid
Overmixing the Batter: Once you add the eggs, mix on low speed only until combined. Overmixing incorporates too much air, which expands during baking and contracts during cooling, causing cracks and a deflated appearance. Use gentle folding motions for the final mixing.
Skipping the Foil Wrap: Even if your springform pan seems tight, water can seep through during the water bath, creating a soggy crust. Always wrap with heavy-duty foil, and consider a double layer for extra protection. Some bakers even place the wrapped pan inside an oven-safe bag.
Opening the Oven Door: Every time you peek, the temperature drops dramatically, which can cause the cheesecake to fall or crack. Trust the process and resist the urge to check until the minimum baking time has passed. Use your oven light to peek instead.
Not Testing for Doneness Correctly: Don’t wait for the entire surface to be firm—by then it’s overbaked. The center should jiggle like Jell-O when you gently shake the pan. An instant-read thermometer should read 150°F in the center (it will reach 160°F as it cools, which is the safe temperature for eggs).
Rushing the Cooling Process: Temperature shock is the enemy of cheesecake. Never move it directly from the hot oven to the cold refrigerator. The gradual oven cooling, followed by room temperature cooling, followed by refrigeration is essential for a smooth, crack-free top and proper texture throughout.
Storage & Meal Prep
Refrigerator Storage: Cover your pumpkin cheesecake tightly with plastic wrap or store in an airtight container in the refrigerator for up to 5 days. The flavor actually improves over the first 2-3 days, making this an ideal make-ahead dessert. Keep it away from strong-smelling foods as cheesecake can absorb odors.
Leftover Slices: Wrap individual slices in plastic wrap and store in an airtight container for up to 5 days. This is perfect for portion control and grab-and-go desserts throughout the week.
Serving Temperature: For the best flavor and texture, remove the cheesecake from the refrigerator 20-30 minutes before serving. It should be cool but not cold, which allows the flavors to fully bloom and the texture to be at its creamiest.
Protecting the Surface: If storing without removing from the springform pan, lay plastic wrap directly on the surface before covering, or tent foil over the top so it doesn’t touch. This prevents condensation from making the top soggy or sticky.
Make-Ahead & Freezer Notes
Make-Ahead Timeline: This is one of the best make-ahead desserts for holiday entertaining. You can bake the cheesecake up to 3 days before serving—it actually tastes better after sitting in the fridge for 24-48 hours as the flavors develop and meld together beautifully.
Freezing the Whole Cheesecake: Freeze the completely cooled and chilled cheesecake (without toppings) still in the springform pan. Wrap tightly in plastic wrap, then aluminum foil, then place in a freezer-safe bag. Freeze for up to 2 months. Thaw overnight in the refrigerator, then let sit at room temperature for 30 minutes before serving. Add toppings after thawing.
Freezing Individual Slices: This is incredibly convenient for portion control or when you want a special dessert ready anytime. Slice the cheesecake, wrap each slice individually in plastic wrap, then place in a freezer bag. Freeze for up to 2 months. Thaw individual slices in the refrigerator for 4-6 hours or at room temperature for 1-2 hours.
Best Reheating Method: Cheesecake should never be reheated! It’s best served chilled or at cool room temperature. If frozen, always thaw in the refrigerator to maintain the best texture and prevent condensation from making the cheesecake watery.
Freezing the Crust Separately: If you want to get a head start, you can make and bake the crust up to 1 month in advance. Wrap the cooled crust (still in the pan) tightly and freeze. No need to thaw before adding the filling and baking.
Serving Suggestions
Pumpkin cheesecake is stunning on its own, but these accompaniments take it from delicious to absolutely divine:
Classic Whipped Cream: Lightly sweetened whipped cream with a touch of vanilla is the traditional topping. Pipe rosettes around the edge for an elegant presentation, or dollop generous spoonfuls on each slice.
Caramel Drizzle: Warm caramel sauce (homemade or high-quality store-bought) drizzled over each slice adds a buttery sweetness that complements the pumpkin beautifully. Sprinkle with flaky sea salt for a sophisticated sweet-salty contrast.
Candied Pecans: Make quick candied pecans by tossing chopped pecans with butter, brown sugar, and cinnamon, then baking until caramelized. Sprinkle over the cheesecake for added crunch and festive flair.
Coffee Bar: Set up a coffee and dessert bar with this cheesecake as the centerpiece. Freshly brewed coffee, espresso, or spiced chai tea perfectly balance the rich, sweet dessert.
Seasonal Fruit: Fresh apple slices sautéed in butter with cinnamon or poached pears provide a fresh, fruity contrast to the rich cheesecake.
Ice Cream Pairing: A small scoop of vanilla bean or cinnamon ice cream alongside (not on top of!) the cheesecake creates a wonderful temperature and texture contrast.
Holiday Spread: Serve as part of a dessert buffet alongside apple pie, pecan pie, or pumpkin roll for a complete fall dessert spread that offers variety for different preferences.
Wine Pairing: Late harvest Riesling, tawny port, or cream sherry all pair beautifully with pumpkin cheesecake’s spiced flavors and creamy texture.
FAQs Section
Q: Why did my cheesecake crack?
A: Cracks usually result from temperature shock or overbaking. The water bath method, gradual cooling in the turned-off oven, and ensuring the center still jiggles slightly when you remove it are key to preventing cracks. Also, avoid overmixing after adding eggs, as too much air can cause cracking.
Q: Can I use pumpkin pie filling instead of pure pumpkin?
A: No, pumpkin pie filling contains added sugars, spices, and thickeners that will throw off the recipe’s balance and make your cheesecake too sweet and possibly too soft. Always use 100% pure pumpkin puree. Check the ingredient list—it should only say “pumpkin.”
Q: How do I know when the cheesecake is done?
A: The edges should be set and slightly puffed, while the center (about 3 inches in diameter) should still jiggle like Jell-O when you gently shake the pan. An instant-read thermometer inserted in the center should read 150°F. The residual heat will bring it to 160°F as it cools, which is the safe temperature for eggs.
Q: My cheesecake sank in the middle—what happened?
A: This usually means it was overbaked or cooled too quickly. The center sets too much during baking, then contracts dramatically when cooled. Always remove it when the center still jiggles, and follow the gradual cooling method. A slight depression is normal and can be covered with toppings.
Q: Can I make this without a springform pan?
A: While a springform pan is highly recommended for easy removal, you can use a regular 9-inch cake pan lined with parchment paper with long edges that overhang (like handles). The water bath will be trickier, but you can lift the whole cheesecake out using the parchment once chilled. Presentation won’t be quite as neat, but it will taste just as delicious.
Q: Do I have to use a water bath?
A: Technically no, but I strongly recommend it for best results. Without a water bath, your cheesecake is more likely to crack, brown too much on top, and have drier edges with an undercooked center. If you absolutely can’t do a water bath, place a pan of water on the rack below your cheesecake for steam.
Q: How far in advance can I make this?
A: Pumpkin cheesecake actually improves with time! Make it 1-3 days before serving for the best flavor and texture. It can be frozen (without toppings) for up to 2 months. This makes it perfect for holiday meal planning when you want to spread out your cooking tasks.
Conclusion
There you have it—your complete guide to creating the most incredible, bakery-worthy pumpkin cheesecake right in your own kitchen! This dessert truly represents the best of fall baking, combining classic techniques with seasonal flavors to create something that looks as impressive as it tastes. The beauty of this recipe is that while it seems fancy and complicated, it’s actually quite forgiving and achievable for bakers of all skill levels. Just remember the key principles: room temperature ingredients, gentle mixing, the water bath method, and patient cooling.
Whether this is your first cheesecake adventure or you’re a seasoned baker looking for the perfect pumpkin version, I hope you’ll give this recipe a try. It’s become a treasured tradition in my kitchen every fall, and I genuinely believe it could become one of yours too. The joy of slicing into that perfect, smooth cheesecake and seeing everyone’s faces light up at first bite never gets old.
I’d absolutely love to hear how your pumpkin cheesecake turns out! Drop a comment below with your results, share a photo, and let me know if you tried any of the variations. And please, if you loved this recipe, click that Pin button and save it to your Pinterest boards so you can find it easily next time (and help other home bakers discover it too!). Happy baking, friends, and here’s to creating delicious fall memories in your kitchen! 🍂🍰