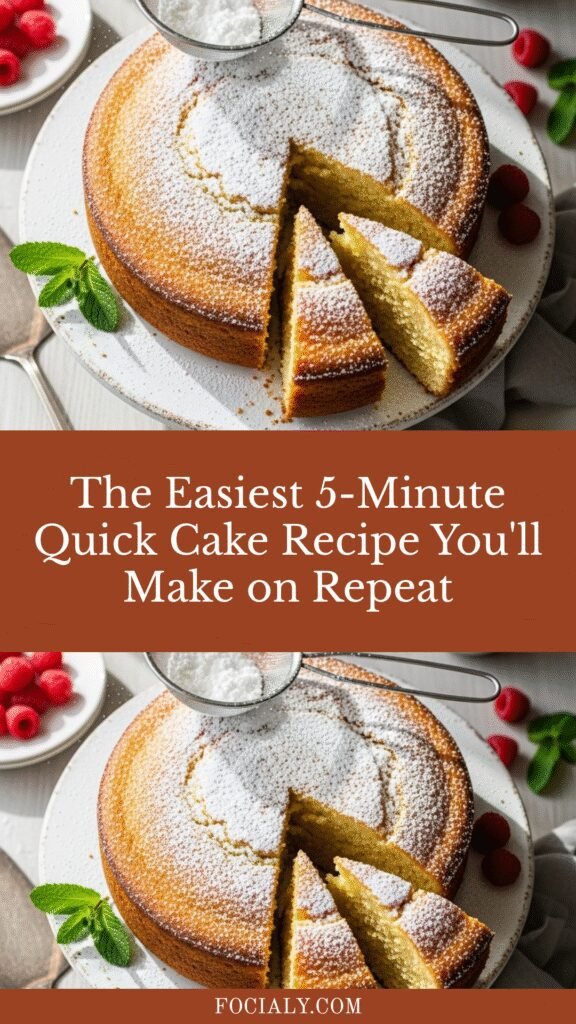
The Easiest 5-Minute Quick Cake Recipe You’ll Make on Repeat
There’s something absolutely magical about pulling a warm, fluffy cake out of the oven when you thought you had no time to bake. This Quick Cake Recipe is that miracle worker in your dessert arsenal—a simple, foolproof cake that comes together faster than you can preheat your oven, yet tastes like you spent hours in the kitchen. Whether you’re craving something sweet after dinner, need a last-minute dessert for unexpected guests, or want to bake with your kids on a lazy Sunday afternoon, this versatile cake delivers every single time.
What makes this recipe truly special is its incredible adaptability. You can dress it up with a dusting of powdered sugar for an elegant afternoon tea, slather it with chocolate frosting for a birthday celebration, or serve it warm with a scoop of vanilla ice cream for the ultimate comfort dessert. American home bakers have been relying on quick cake recipes like this one for generations, and once you make it, you’ll understand why it’s been passed down through countless family recipe boxes.
History & Background of Quick Cake Recipes
The concept of “quick cakes” emerged in American home baking during the early 20th century, coinciding with the widespread availability of baking powder and baking soda as commercial leavening agents. Before these convenient products, cakes required labor-intensive processes like beating eggs for extended periods or using yeast, which needed time to rise. The introduction of chemical leaveners revolutionized home baking, making it possible for busy homemakers to produce tender, fluffy cakes in a fraction of the time.
During the Great Depression and World War II, quick cake recipes became even more popular as families needed to create delicious desserts with limited ingredients and minimal fuss. These “dump cakes” or “wacky cakes”—so named because you could literally dump all ingredients into one bowl—became staples in American households. The recipes were shared through community cookbooks, church gatherings, and passed between neighbors, each family adding their own special twist.
In the 1950s and 60s, as American suburban life flourished and home entertaining became a cultural cornerstone, quick cakes evolved into elegant desserts that didn’t sacrifice quality for convenience. Home economists and food companies published countless variations, proving that speed and deliciousness weren’t mutually exclusive. Today’s quick cake recipes honor that heritage while embracing modern ingredients and techniques that make baking even more accessible to everyone, regardless of skill level.
This particular recipe draws inspiration from classic American butter cakes but streamlines the process dramatically. Instead of the traditional creaming method that requires softened butter and extended mixing, we use melted butter and a simple stirring technique that delivers comparable results in minutes rather than an hour. It’s the perfect example of how traditional baking wisdom can be adapted for our modern, fast-paced lives without compromising on taste or texture.
Why You’ll Love This Quick Cake Recipe
This isn’t just another cake recipe—it’s about to become your most-trusted dessert solution. Imagine having a homemade cake ready in less time than it takes to drive to the bakery. That’s the beauty of this recipe.
The cake itself is incredibly moist with a tender crumb that melts in your mouth. It has a delicate vanilla flavor that serves as the perfect canvas for any topping, frosting, or addition you can dream up. The texture is somewhere between a classic butter cake and a pound cake—substantial enough to hold up to frosting, yet light enough to enjoy on its own.
Here’s why home bakers are obsessed with this recipe:
- Lightning-fast prep: Everything mixes together in one bowl in under 5 minutes—no electric mixer required, though you can certainly use one if you prefer
- Minimal cleanup: One bowl, one pan, and you’re done—perfect for those nights when you want dessert but don’t want to face a mountain of dishes
- Beginner-friendly: No complicated techniques like creaming butter, folding egg whites, or tempering ingredients—if you can stir, you can make this cake
- Budget-conscious: Uses everyday pantry staples you probably already have on hand—no specialty ingredients or expensive additions required
- Incredibly versatile: Serves as a blank canvas for endless flavor variations, from lemon zest to chocolate chips to fresh berries
- Foolproof results: The forgiving nature of this recipe means it’s nearly impossible to mess up, even if you’re new to baking
- Kid-friendly baking project: Safe and simple enough for children to help with, making it perfect for creating kitchen memories together
- Crowd-pleaser: The classic vanilla flavor appeals to picky eaters and dessert connoisseurs alike—everyone finds something to love
Whether you’re a seasoned baker looking for a reliable weeknight dessert or a complete beginner taking your first steps into home baking, this recipe meets you exactly where you are and delivers consistent, delicious results every single time.
Ingredient Notes
Understanding your ingredients makes you a better baker, and this recipe uses simple, high-quality basics that work together beautifully.
All-Purpose Flour: The foundation of our cake’s structure. All-purpose flour has the perfect protein content (around 10-12%) for tender cakes. Don’t substitute with cake flour here—we actually want that slightly sturdier structure that all-purpose provides. If you only have self-rising flour, omit the baking powder and salt from the recipe.
Granulated Sugar: Provides sweetness, of course, but also contributes to the cake’s tender texture and helps create that beautiful golden crust. You can substitute up to half the sugar with brown sugar for a deeper, more caramel-like flavor, but the texture will be slightly denser.
Eggs: These bind everything together and provide structure, moisture, and richness. Use large eggs at room temperature for best results—they incorporate more easily into the batter. If you forgot to take them out of the fridge, place them in a bowl of warm water for 5 minutes.
Butter: Unsalted butter gives you control over the salt level, and using melted butter is the secret to this recipe’s speed. The butter adds incredible flavor and creates that moist, tender crumb we’re after. In a pinch, you can substitute vegetable oil, but you’ll lose some of that rich, buttery flavor.
Milk: Whole milk is ideal for the richest flavor and most tender texture, but 2% works perfectly fine. You can even use buttermilk for a slight tang and even more tender crumb—it’s absolutely delicious. Non-dairy milk alternatives like almond or oat milk work well if you’re avoiding dairy.
Vanilla Extract: Never skip this! Pure vanilla extract adds depth and enhances all the other flavors. Imitation vanilla works in a pinch, but splurge on the real stuff if you can—it makes a noticeable difference.
Baking Powder: Our leavening agent that creates all those lovely air bubbles, giving the cake its light, fluffy texture. Make sure yours is fresh (check the expiration date) for maximum rise.
Salt: Just a pinch enhances all the other flavors and balances the sweetness. Don’t skip it—even desserts need salt!
Equipment Needed
One of the beauties of this recipe is that it doesn’t require any fancy equipment. Here’s what you’ll need to gather before you start:
- 8-inch or 9-inch round cake pan or 8×8-inch square baking pan: Either shape works beautifully. If using a 9-inch pan, your cake will be slightly thinner and may bake a few minutes faster.
- Large mixing bowl: You’ll mix everything right in this bowl, so make sure it’s big enough to stir comfortably without ingredients flying out.
- Whisk or wooden spoon: Either works perfectly. A whisk incorporates ingredients slightly faster, but a wooden spoon gives you a nice arm workout!
- Measuring cups and spoons: Accurate measurements matter in baking, so use proper measuring tools rather than estimating.
- Small microwave-safe bowl: For melting your butter quickly and easily.
- Rubber spatula: Helpful for scraping down the sides of your mixing bowl and ensuring everything is evenly incorporated.
- Toothpick or cake tester: For checking doneness—a must-have for any baker.
- Cooling rack: Allows air to circulate around the cake as it cools, preventing a soggy bottom.
- Parchment paper or cooking spray: For ensuring your cake releases easily from the pan.
Quick Cake Recipe

A foolproof, one-bowl quick cake recipe that delivers tender, moist, and delicious results in under 35 minutes. Perfect for beginners and busy bakers alike, this versatile vanilla cake serves as the ideal base for any topping or frosting you desire.
- Prep Time: 5 minutes
- Cook Time: 25-30 minutes
- Total Time: 30-35 minutes
- Yield: 8-10 servings 1x
- Category: Dessert
- Method: Baking
- Cuisine: American
- Diet: Vegetarian
Ingredients
- 1½ cups (190g) all-purpose flour
- 1 cup (200g) granulated sugar
- 2 large eggs, at room temperature
- ½ cup (115g) unsalted butter, melted and slightly cooled
- ½ cup (120ml) whole milk, at room temperature
- 2 teaspoons pure vanilla extract
- 2 teaspoons baking powder
- ¼ teaspoon salt
Instructions
- Preheat and prepare: Preheat your oven to 350°F (175°C). Grease your cake pan thoroughly with butter or cooking spray, then line the bottom with parchment paper for foolproof release. Grease the parchment paper as well.
- Melt the butter: In a microwave-safe bowl, melt the butter in 20-second intervals, stirring between each, until completely melted. Set aside to cool slightly—you want it warm but not hot, as hot butter can scramble the eggs.
- Combine wet ingredients: In your large mixing bowl, whisk together the eggs and sugar until well combined and slightly pale, about 1 minute. The mixture should look smooth and unified. Add the melted butter, milk, and vanilla extract, whisking until everything is thoroughly combined and smooth.
- Add dry ingredients: Add the flour, baking powder, and salt directly to the wet ingredients. Using your whisk or wooden spoon, gently stir the mixture just until no dry flour streaks remain. Don’t overmix—a few small lumps are perfectly fine and will disappear during baking. Overmixing develops gluten, which can make your cake tough.
- Pour and smooth: Pour the batter into your prepared pan and use a spatula to spread it evenly, smoothing the top. Gently tap the pan on the counter 2-3 times to release any large air bubbles trapped in the batter.
- Bake: Place the pan in the center of your preheated oven and bake for 25-30 minutes. The cake is done when it’s golden brown on top, springs back lightly when touched in the center, and a toothpick inserted into the middle comes out with just a few moist crumbs (not wet batter).
- Cool: Remove from the oven and let the cake cool in the pan on a wire rack for 10 minutes. This brief cooling period allows the cake to set and makes it easier to remove from the pan. After 10 minutes, run a knife around the edges, invert the cake onto the rack, peel off the parchment paper, then flip it right-side up to cool completely.
- Serve: Once completely cool, dust with powdered sugar, frost as desired, or serve plain with fresh berries and whipped cream. Cut into slices and enjoy!
Notes
- For a chocolate version, replace ¼ cup of flour with unsweetened cocoa powder.
- Add lemon or orange zest to the batter for a citrus twist—about 1 tablespoon of zest works beautifully.
- Fold in ½ cup of chocolate chips, fresh berries, or chopped nuts after mixing the batter for added texture and flavor.
- Ensure all ingredients are at room temperature for the smoothest batter and most even baking.
- This cake is best enjoyed within 2 days but stays moist for up to 4 days when stored properly.
Nutrition
- Serving Size: 1 slice (approximately 90g)
- Calories: 245
- Sugar: 22g
- Sodium: 135mg
- Fat: 11g
- Saturated Fat: 6.5g
- Unsaturated Fat: 3.5g
- Trans Fat: 0g
- Carbohydrates: 34g
- Fiber: 0.5g
- Protein: 4g
- Cholesterol: 65mg
Nutrition information is approximate and calculated without frosting or toppings.
Tips & Variations
The beauty of this quick cake recipe lies in its versatility—it’s like a delicious blank canvas waiting for your creative touches.
Flavor Variations: Transform this basic vanilla cake into something spectacular with simple additions. For a Lemon Cake, add 2 tablespoons of fresh lemon zest and replace 2 tablespoons of milk with fresh lemon juice. For a Chocolate Chip Cake, fold in ¾ cup of mini chocolate chips just before pouring the batter into the pan. Create an Almond Cake by replacing 1 teaspoon of vanilla with almond extract—it’s heavenly with fresh raspberries on top.
Healthier Swaps: You can make this recipe slightly lighter without sacrificing too much flavor. Replace up to half the butter with unsweetened applesauce or Greek yogurt for reduced fat content. Substitute whole wheat pastry flour for up to half the all-purpose flour for added fiber—avoid using all whole wheat as it will make the cake too dense. Reduce the sugar to ¾ cup if you prefer a less sweet cake, especially if you’re adding frosting.
Make It Special: Turn this simple cake into an impressive dessert by adding a crumb topping before baking—mix together 3 tablespoons each of flour, sugar, and cold butter until crumbly, then sprinkle over the batter. Create a marble cake by dividing the batter in half, mixing cocoa powder into one half, then dolloping alternating spoonfuls into the pan and swirling with a knife. For a coffee cake style, add a layer of cinnamon-sugar streusel in the middle and on top.
Serving Styles: This cake shines in multiple formats. Bake it in a muffin tin for individual servings—reduce baking time to 15-18 minutes. Use a bundt pan for an elegant presentation—increase baking time to 35-40 minutes and check with a skewer. Make cake layers by doubling the recipe and dividing between two 8-inch pans—perfect for birthday cakes with your favorite frosting in between.
Pro Chef Tips
These professional insights will elevate your cake from good to absolutely spectacular.
Temperature matters more than you think: Room temperature ingredients blend together more smoothly and create a more uniform texture. Cold eggs and milk create tiny butter lumps that can lead to an uneven crumb. If you’re short on time, place eggs in warm water for 5 minutes and microwave milk for just 15-20 seconds.
The folding technique: Once you add your flour, switch to a gentle folding motion rather than vigorous stirring. Use a rubber spatula and cut down through the center of the batter, scrape along the bottom, and bring the spatula up along the side, turning the bowl as you go. This technique minimizes gluten development, keeping your cake tender.
The toothpick test isn’t perfect: A toothpick with a few moist crumbs is actually ideal—it means your cake will stay moist as it cools. If the toothpick comes out completely clean, you’ve likely slightly overbaked, though the cake will still be delicious. Another test: gently press the center of the cake—it should spring back immediately.
Don’t skip the cooling time: It’s tempting to dive right in, but cakes continue cooking slightly as they cool, and the structure needs time to set. Removing it from the pan too soon can cause it to fall apart. That 10-minute rest in the pan is crucial for a cake that slices beautifully.
The secret to extra moisture: For an incredibly moist cake, brush the warm (not hot) cake with a simple syrup made from equal parts sugar and water, heated until the sugar dissolves. This professional bakery trick adds moisture and a subtle sweetness that keeps the cake perfect for days.
Common Mistakes to Avoid
Even simple recipes have pitfalls—here’s how to sidestep them.
Overmixing the batter: This is the number one mistake home bakers make. Once flour is added, gluten starts developing, and overmixing creates a tough, chewy cake instead of a tender one. Mix just until you don’t see dry flour anymore—some small lumps are completely fine.
Opening the oven door too early: Every time you open that oven door, the temperature drops dramatically, which can cause your cake to sink in the middle. Resist the urge to check until you’re at least 20 minutes into baking. The only exception is if you smell burning.
Using hot melted butter: If your butter is too hot when you add it to the eggs, it can partially cook them, creating small cooked egg pieces in your batter and a grainy texture. Let the melted butter cool for 2-3 minutes—it should be warm to the touch but not hot.
Not preparing the pan properly: Few things are more heartbreaking than a cake that sticks to the pan. Always grease thoroughly, even in corners, and use parchment paper on the bottom. For extra insurance, dust the greased pan with a light coating of flour, tapping out the excess.
Cutting the cake while it’s warm: Warm cake is fragile and will crumble when you slice it. It’s also harder to frost a warm cake as the frosting will melt. Be patient and let it cool completely—I know it’s tough, but your presentation will thank you!
Storage & Meal Prep
Proper storage ensures your cake stays fresh and delicious.
Room Temperature Storage: Once completely cooled, store your cake in an airtight container or wrap it tightly in plastic wrap. It will stay moist and delicious at room temperature for up to 3 days. If your kitchen is very warm or humid, err on the side of caution and refrigerate after day 2.
Refrigerator Storage: Unfrosted cake can be refrigerated for up to 5 days. Wrap it tightly in plastic wrap to prevent it from drying out and absorbing refrigerator odors. If frosted (especially with cream cheese or whipped cream frosting), the cake must be refrigerated and will keep for 3-4 days. Bring refrigerated cake to room temperature before serving for the best flavor and texture.
Reheating Tips: While this cake is delicious at room temperature, you can warm individual slices in the microwave for 10-15 seconds for that fresh-from-the-oven experience. For a whole cake, warm it in a 300°F oven for about 10 minutes, covered loosely with foil to prevent drying.
Preventing Staleness: To keep your cake as fresh as possible, store it with a slice of bread in the container. The cake will absorb moisture from the bread, staying moist while the bread gets stale—a worthy sacrifice!
Make-Ahead & Freezer Notes
This cake is wonderfully freezer-friendly, making it perfect for advance preparation.
Freezing Unfrosted Cake: This is the best way to freeze for maximum flexibility. Once completely cooled, wrap the cake tightly in two layers of plastic wrap, followed by a layer of aluminum foil. Label with the date and freeze for up to 3 months. Thaw overnight in the refrigerator, still wrapped, then bring to room temperature before frosting or serving.
Freezing Frosted Cake: If you’ve already frosted your cake, place it in the freezer unwrapped until the frosting is firm (about 1 hour), then wrap it carefully in plastic wrap and foil. This prevents the frosting from getting smooshed. Freeze for up to 2 months. Thaw in the refrigerator overnight.
Freezing Individual Slices: This is incredibly convenient for portioning. Cut the cake into slices, wrap each slice individually in plastic wrap, then place all slices in a freezer bag. You can grab a single slice whenever you want a treat. Slices thaw quickly at room temperature in about 20 minutes.
Best Reheating Method: For frozen cake, I actually prefer thawing it in the refrigerator overnight rather than at room temperature, as it prevents condensation from making the cake soggy. If you’re in a hurry, thaw at room temperature for 2-3 hours.
Make-Ahead Baking: You can mix the batter up to 2 hours before baking and store it covered in the refrigerator. Let it sit at room temperature for 10 minutes before baking, and you may need to add 2-3 minutes to the baking time.
Serving Suggestions
This versatile cake pairs beautifully with so many accompaniments.
Classic Presentations: Dust with powdered sugar and serve with fresh berries and softly whipped cream for an elegant afternoon tea presentation. Top with a simple vanilla or chocolate buttercream for a birthday-worthy treat. Serve warm with a scoop of vanilla ice cream and a drizzle of caramel sauce for an indulgent dessert.
Breakfast or Brunch: Yes, cake for breakfast is allowed—especially when served alongside fresh fruit, Greek yogurt, and a hot cup of coffee. The subtle sweetness makes it perfect for morning entertaining.
Beverage Pairings: This cake is lovely with a cup of hot tea (Earl Grey is particularly nice), fresh coffee, cold milk, or even a glass of dessert wine like Moscato. For a special occasion, serve with champagne for a sophisticated touch.
Side Dishes: Keep it simple with fresh seasonal fruit—strawberries in spring, peaches in summer, apples in fall, and citrus in winter. A small side of lemon curd or berry compote adds a gourmet touch.
Toppings Bar: For a casual gathering, set out this plain cake with a variety of toppings and let everyone customize their slice. Include chocolate sauce, caramel, whipped cream, sprinkles, fresh fruit, nuts, and different frosting options. It’s especially fun for kids’ parties!
Frequently Asked Questions
Can I make this cake without eggs? Yes, you can substitute each egg with a “flax egg” (1 tablespoon ground flaxseed mixed with 3 tablespoons water, left to sit for 5 minutes) or ¼ cup of unsweetened applesauce. The texture will be slightly denser but still delicious. Commercial egg replacers also work well following package directions.
Why did my cake sink in the middle? The most common reasons are opening the oven door too early, underbaking, or using expired baking powder. Make sure your baking powder is fresh (test it by mixing a teaspoon with hot water—it should bubble vigorously), and don’t open the oven until at least 20 minutes into baking. Also ensure your oven temperature is accurate.
Can I double this recipe? Absolutely! Double all ingredients and divide the batter between two 8-inch or 9-inch pans for a layer cake. You can also use a 9×13-inch pan—just increase baking time to 30-35 minutes. Always check for doneness with the toothpick test rather than relying solely on time.
How do I know when the cake is done? Look for three signs: the cake should be golden brown, spring back when lightly touched in the center, and a toothpick inserted in the middle should come out with just a few moist crumbs (not wet batter, but not completely clean either). The edges should also be pulling slightly away from the pan.
Can I use this recipe to make cupcakes? Yes! Line a 12-cup muffin tin with paper liners and fill each about ⅔ full. Bake at 350°F for 15-18 minutes, checking for doneness around 15 minutes. Cupcakes are done when they spring back when touched and a toothpick comes out clean.
Why is my cake dry? Overbaking is usually the culprit. Cakes continue cooking slightly as they cool, so slightly underdone is better than overdone. Also, too much flour (from packing the measuring cup) can create a dry cake. Always spoon flour into your measuring cup and level it off rather than scooping directly from the bag.
Can I make this cake gluten-free? Yes, you can substitute a 1:1 gluten-free baking flour blend for the all-purpose flour. Make sure your blend contains xanthan gum for proper structure. The texture will be slightly different but still delicious. Bob’s Red Mill 1-to-1 Gluten-Free Baking Flour works particularly well.
Conclusion
There you have it—the ultimate quick cake recipe that proves you don’t need hours of preparation or professional training to create something absolutely delicious from your home kitchen. This simple, straightforward cake delivers tender, moist, flavorful results every single time, making it the perfect solution for last-minute dessert cravings, impromptu gatherings, or those moments when you just want to treat yourself to something homemade and wonderful.
What I love most about this recipe is how it empowers you to be creative. Start with this reliable base, then let your imagination run wild with flavor variations, frostings, and toppings. It’s forgiving enough for beginners yet versatile enough to keep experienced bakers interested. Whether you’re baking solo on a quiet evening, creating memories with your children, or preparing dessert for a crowd, this quick cake rises to every occasion.
Now it’s your turn to experience the magic of this incredibly simple cake! I’d absolutely love to hear about your results—did you stick with classic vanilla, or did you venture into flavor variations? What toppings did you choose? Snap a photo of your beautiful creation and share it on Pinterest so other home bakers can be inspired. Don’t forget to save this recipe to your Pinterest boards so it’s always there when you need it (trust me, you’ll make this one again and again).
Happy baking, friends! Here’s to many more delicious moments in your kitchen. 🍰