Easy Homemade Strawberry Tart Recipe with Creamy Custard Filling
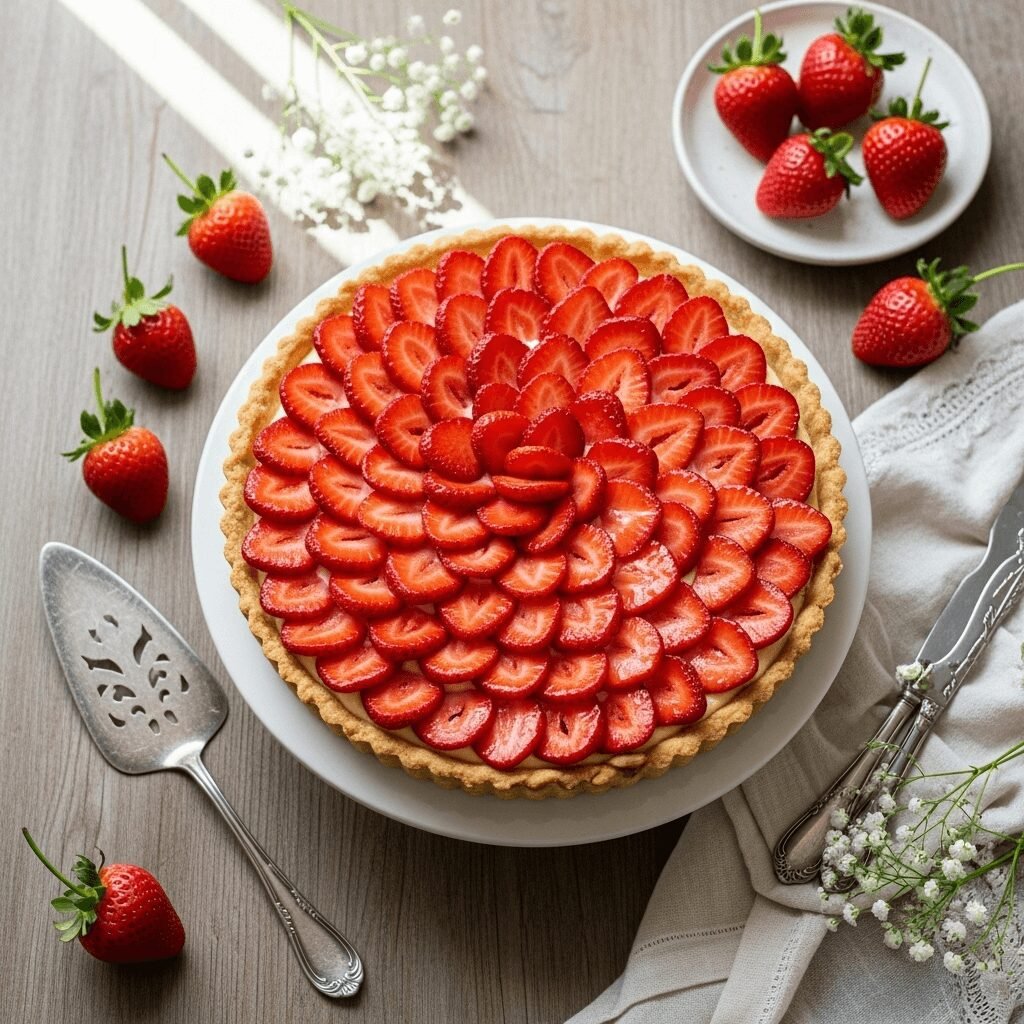
There’s something utterly magical about a classic strawberry tart. Picture this: a buttery, golden pastry shell cradled with silky vanilla custard, topped with glossy, vibrant fresh strawberries arranged like edible jewels. This stunning French-inspired dessert looks like it came straight from a Parisian patisserie, but I’m here to tell you a delicious secret—it’s surprisingly simple to make at home!
This homemade strawberry tart is the perfect dessert for spring and summer gatherings, Mother’s Day brunches, Easter celebrations, birthday parties, or any time you want to impress guests without spending hours in the kitchen. The combination of crisp pastry, luscious cream, and sweet-tart strawberries creates a symphony of textures and flavors that’ll have everyone asking for seconds. Whether you’re hosting a garden party, bringing dessert to a potluck, or simply treating yourself to something special, this elegant strawberry tart delivers bakery-quality results with straightforward home cooking techniques.
The best part? While this dessert looks incredibly sophisticated and fancy, each component is actually quite forgiving for beginner bakers. You don’t need professional pastry skills or expensive equipment—just fresh ingredients, a little patience, and the desire to create something beautiful and delicious.
History / Background
The strawberry tart, or “tarte aux fraises” as it’s known in France, has deep roots in European pastry traditions, particularly French pâtisserie. Tarts have been part of European baking since medieval times, but the modern fruit tart as we know it truly flourished in France during the 19th century when pastry chefs began refining techniques for pastry cream (crème pâtissière) and elegant fruit presentations.
French pâtissiers elevated the humble tart into an art form, transforming simple ingredients into visually stunning desserts that showcased seasonal fruits at their peak. Strawberries, with their brilliant red color and sweet-tart flavor, became a favorite topping, especially during the late spring and early summer months when they’re at their absolute best.
The classic French strawberry tart traditionally features a sweet pastry shell called pâte sucrée, a layer of rich vanilla pastry cream, and fresh strawberries glazed with warmed apricot jam or a clear gel for that signature glossy finish. This technique not only makes the tart look professionally crafted but also seals in the strawberries’ freshness and adds a subtle sweetness.
As French culinary traditions spread throughout Europe and eventually to America, the strawberry tart became a beloved dessert worldwide. American home bakers embraced and adapted the recipe, sometimes simplifying techniques while maintaining that gorgeous presentation. Today, you’ll find variations of strawberry tarts in bakeries across the United States, but nothing compares to making one fresh in your own kitchen with ripe, seasonal strawberries.
The dessert represents the perfect marriage of technique and simplicity—proving that with quality ingredients and a little care, home cooks can create restaurant-worthy desserts that taste even better than store-bought versions.
Why You’ll Love This Recipe
This strawberry tart recipe strikes the perfect balance between impressive presentation and achievable technique. I’ve tested and refined this recipe countless times to ensure it works beautifully for home bakers of all skill levels, and it’s become one of my most-requested desserts among family and friends.
Here’s why this recipe is absolutely worth making:
- Bakery-quality results at home – You’ll save money and get a fresher, more delicious tart than anything from a grocery store bakery
- Make-ahead friendly – The crust and custard can be prepared in advance, making day-of assembly a breeze
- Stunning visual impact – This dessert is Instagram and Pinterest-worthy, guaranteed to wow your guests
- Uses simple, accessible ingredients – No specialty items or hard-to-find components required
- Customizable – Easy to adapt with different fruits, flavor variations, or dietary modifications
- Perfect for any occasion – Elegant enough for special celebrations yet simple enough for casual weekend desserts
- Tastes better than it looks – And it looks amazing! The combination of textures and flavors is absolutely divine
- Great beginner baking project – Each step is straightforward, and the recipe is very forgiving
- Showcases fresh fruit beautifully – The strawberries are the star, and their natural sweetness shines through
- Crowd-pleaser – I’ve never served this to anyone who didn’t love it—kids and adults alike go back for seconds
Ingredient Notes
Let me walk you through the key ingredients that make this strawberry tart absolutely irresistible. Understanding your ingredients helps you make smart substitutions and ensures the best possible results.
For the Pastry Crust:
- All-purpose flour – Forms the structure of your tart shell. You can substitute with a gluten-free baking blend for a gluten-free version.
- Unsalted butter – Use cold butter cut into cubes. This creates a flaky, tender crust. Salted butter works too; just reduce added salt.
- Granulated sugar – Adds sweetness and helps with browning. Don’t skip this even if you want a less sweet tart.
- Egg yolk – Enriches the dough and helps bind it together, creating a sturdy yet tender shell.
- Vanilla extract – Adds subtle flavor depth. Pure vanilla extract is best, but imitation works in a pinch.
- Salt – A small amount enhances all the other flavors.
For the Vanilla Custard Filling:
- Whole milk – Creates a creamy, smooth custard. You can use 2% milk, but whole milk gives the richest flavor.
- Heavy cream – Adds luxurious richness. Half-and-half can substitute if needed.
- Egg yolks – The key to thick, silky custard. Make sure they’re fresh for best results.
- Cornstarch – Thickens the custard to the perfect consistency. Flour can work but cornstarch creates a smoother texture.
- Vanilla extract or vanilla bean – Using a real vanilla bean creates spectacular flavor, but quality vanilla extract is perfectly delicious.
For the Topping:
- Fresh strawberries – The star of the show! Choose bright red, fragrant berries that are ripe but still firm. About 1-2 pounds depending on size.
- Apricot jam or preserves – Warmed and brushed over the berries for that gorgeous glossy finish. Strawberry jam works too.
Equipment Needed
Having the right tools makes this recipe come together smoothly. Here’s what you’ll need:
- 9-inch tart pan with removable bottom – Essential for easy removal and beautiful presentation
- Food processor (optional but helpful) – Makes quick work of the pastry dough
- Rolling pin – For rolling out your tart dough evenly
- Medium saucepan – For cooking the custard filling
- Whisk – A good balloon whisk helps prevent lumps in your custard
- Mixing bowls (various sizes) – For prep work and mixing
- Measuring cups and spoons – Accurate measurements ensure consistent results
- Fine-mesh strainer – For straining the custard to ensure silky smoothness
- Plastic wrap – To cover the custard while it chills
- Pastry brush – For applying the glaze to strawberries
- Sharp knife – For slicing strawberries and trimming the tart
- Pie weights or dried beans – For blind-baking the crust
Strawberry Tart Recipe

An elegant homemade strawberry tart featuring a buttery sweet pastry crust, creamy vanilla custard filling, and fresh strawberries arranged beautifully on top. This French-inspired dessert is perfect for special occasions and surprisingly easy to make at home!
- Prep Time: 30 minutes
- Cook Time: 25 minutes
- Total Time: 2 hours 55 minutes
- Yield: 8-10 servings 1x
- Category: Dessert
- Method: Baking
- Cuisine: French
- Diet: Vegetarian
Ingredients
For the Sweet Tart Crust:
- 1¼ cups (156g) all-purpose flour
- ½ cup (113g) unsalted butter, cold and cubed
- ¼ cup (50g) granulated sugar
- 1 large egg yolk
- 1 teaspoon vanilla extract
- Pinch of salt
- 1-2 tablespoons ice water (if needed)
For the Vanilla Custard Filling:
- 1½ cups (360ml) whole milk
- ½ cup (120ml) heavy cream
- 4 large egg yolks
- ⅓ cup (67g) granulated sugar
- 3 tablespoons (24g) cornstarch
- 2 teaspoons vanilla extract (or 1 vanilla bean, seeds scraped)
- 2 tablespoons (28g) unsalted butter
- Pinch of salt
For the Strawberry Topping:
- 1½ to 2 pounds fresh strawberries, hulled and halved (or quartered if large)
- 3 tablespoons apricot jam or preserves
- 1 tablespoon water
Instructions
Make the Tart Crust:
- Prepare the dough: In a food processor, pulse together flour, sugar, and salt. Add cold butter cubes and pulse until the mixture resembles coarse crumbs with some pea-sized butter pieces remaining. Add egg yolk and vanilla extract, pulse until combined. If the dough seems dry, add ice water 1 tablespoon at a time until dough just comes together when pressed. Don’t overmix.
- Chill the dough: Turn dough out onto a work surface, shape into a disk, wrap tightly in plastic wrap, and refrigerate for at least 30 minutes (or up to 2 days).
- Roll and shape: On a lightly floured surface, roll chilled dough into an 11-inch circle about ⅛-inch thick. Carefully transfer to a 9-inch tart pan with removable bottom, gently pressing dough into the bottom and up the sides. Trim excess dough flush with the top edge. Prick the bottom all over with a fork. Freeze for 15 minutes.
- Blind bake: Preheat oven to 375°F (190°C). Line the tart shell with parchment paper or aluminum foil, fill with pie weights or dried beans. Bake for 15 minutes. Remove weights and parchment, bake for another 8-10 minutes until golden brown. Cool completely on a wire rack.
Make the Vanilla Custard:
- Heat the milk mixture: In a medium saucepan, combine milk and cream. Heat over medium heat until steaming and just beginning to simmer around the edges. Remove from heat.
- Prepare the egg mixture: In a mixing bowl, whisk together egg yolks, sugar, cornstarch, and salt until smooth and pale, about 1-2 minutes.
- Temper the eggs: Slowly pour about ½ cup of the hot milk mixture into the egg mixture while whisking constantly. This tempers the eggs so they don’t scramble. Gradually whisk in the remaining hot milk mixture.
- Cook the custard: Pour the entire mixture back into the saucepan. Cook over medium heat, whisking constantly, until the custard thickens and comes to a boil, about 5-7 minutes. Let it boil for 1 minute while whisking (this ensures the cornstarch is fully cooked).
- Finish the custard: Remove from heat, whisk in vanilla extract and butter until smooth. Strain custard through a fine-mesh strainer into a clean bowl to remove any lumps. Press plastic wrap directly onto the surface of the custard to prevent a skin from forming. Refrigerate until completely chilled, at least 2 hours.
Assemble the Tart:
- Fill the shell: Once custard is cold, give it a good whisk to smooth it out. Spread the custard evenly into the cooled tart shell, smoothing the top with an offset spatula.
- Arrange strawberries: Pat strawberries dry with paper towels. Arrange them cut-side down in concentric circles over the custard, starting from the outer edge and working toward the center. Pack them closely for the best presentation.
- Apply the glaze: In a small bowl, microwave apricot jam with 1 tablespoon water for 20-30 seconds until melted. Strain to remove any fruit chunks. Using a pastry brush, gently brush the warm glaze over the strawberries.
- Chill and serve: Refrigerate the tart for at least 30 minutes before serving to set everything. Remove the outer ring of the tart pan before slicing. Slice with a sharp knife, wiping it clean between cuts.
Notes
- The tart crust and custard can both be made 1-2 days in advance and stored separately in the refrigerator.
- For best results, assemble the tart no more than 4-6 hours before serving to keep the crust crisp.
- If you don’t have a tart pan, a 9-inch pie dish works, though presentation won’t be quite as elegant.
- Don’t skip straining the custard—it ensures a perfectly smooth, lump-free filling.
- Use room temperature strawberries for the best flavor.
Nutrition
- Serving Size: 1 slice (⅛ of tart)
- Calories: 315
- Sugar: 22g
- Sodium: 95mg
- Fat: 17g
- Saturated Fat: 10g
- Unsaturated Fat: 6g
- Trans Fat: 0g
- Carbohydrates: 36g
- Fiber: 2g
- Protein: 5g
- Cholesterol: 155mg
Nutrition information is approximate and will vary based on exact ingredients used and portion sizes.
Tips & Variations
This strawberry tart is wonderfully adaptable! Here are some of my favorite ways to customize it:
Flavor Variations:
- Chocolate strawberry tart – Add 2 tablespoons cocoa powder to the custard or spread a thin layer of melted dark chocolate on the crust before adding custard
- Lemon strawberry tart – Add 1 tablespoon lemon zest to the custard for a bright citrus twist
- Almond tart – Replace ½ teaspoon of vanilla with almond extract in both the crust and custard
- Mixed berry tart – Use a combination of strawberries, blueberries, raspberries, and blackberries
Dietary Modifications:
- Gluten-free – Use a 1:1 gluten-free flour blend for the crust
- Dairy-free – Substitute coconut milk for dairy milk and coconut cream for heavy cream; use vegan butter
- Lower sugar – Reduce sugar in the custard by 2 tablespoons (it will still be delicious)
Different Fruit Options: When strawberries aren’t in season, try these alternatives:
- Sliced peaches or nectarines
- Fresh raspberries
- Kiwi slices
- Mango chunks
- A combination of tropical fruits
Pro Chef Tips
Want to take your strawberry tart from good to absolutely spectacular? Here are professional techniques that make a real difference:
Crust perfection: Keep everything cold! Cold butter in cold dough = flaky crust. If your kitchen is warm, chill your flour in the freezer for 15 minutes before starting. Also, don’t overwork the dough—handle it as little as possible to keep it tender.
Blind baking secret: For an extra-crispy bottom that won’t get soggy, brush the par-baked crust with a thin layer of egg white and bake for 2 additional minutes before cooling. This creates a moisture barrier.
Silky custard technique: When cooking custard, switch from a whisk to a rubber spatula for the last minute of cooking. Scrape the bottom and corners where the mixture tends to thicken first. This prevents any burnt bits from forming.
Strawberry selection and prep: Choose berries that are similar in size for uniform appearance. Hull them carefully to maintain their beautiful shape. For the most stunning presentation, cut larger berries into quarters lengthwise to create petal-like shapes, and arrange them in a rose pattern starting from the center.
Professional glaze: Strain your apricot glaze to remove all fruit chunks—this creates that smooth, glossy professional finish. Apply while the glaze is still warm but not hot, and use a soft-bristled pastry brush with gentle dabbing motions rather than brushing strokes that might move the berries.
Temperature matters: Serve this tart slightly chilled but not ice-cold. Remove it from the refrigerator about 15-20 minutes before serving for the best flavor and texture. The custard should be cool and set but not cold enough to dull the flavors.
Common Mistakes to Avoid
Learn from these common pitfalls so your tart turns out perfect every time:
Soggy crust syndrome – This happens when the custard is added while still warm or when the tart sits assembled for too long. Always cool both the crust and custard completely before assembly, and assemble no more than 6 hours before serving for the crispest crust.
Lumpy custard – Usually caused by not whisking constantly while cooking or cooking over too-high heat. Keep the heat at medium, whisk continuously in figure-eight patterns, and always strain the finished custard. If lumps do form, an immersion blender can save the day.
Cracked or tough crust – This results from overworking the dough or adding too much water. Handle the dough gently, and add liquid sparingly—the dough should just barely come together. If it’s crumbly, that’s better than being tough!
Watery strawberries – Don’t wash strawberries more than an hour before using them, and make sure they’re completely dry before arranging on the tart. Any moisture will make the custard weep and dilute the glaze.
Difficult tart removal – Always use a tart pan with a removable bottom, and make sure to let the tart cool completely before attempting to remove the ring. Place the tart on top of a can or jar, and gently let the ring fall down. If it sticks, run a thin knife around the edge first.
Storage & Meal Prep
Proper storage keeps your strawberry tart fresh and delicious:
Refrigerator storage: Store the assembled tart covered loosely with plastic wrap or in an airtight container in the refrigerator for up to 2 days. However, the crust will gradually soften, so the tart is definitely best enjoyed within the first 24 hours.
Individual components: If you want maximum freshness and a crisp crust, store components separately:
- Baked tart shell: Store covered at room temperature for up to 2 days or refrigerate for up to 5 days
- Vanilla custard: Store in an airtight container with plastic wrap pressed directly on the surface for up to 3 days
- Assemble shortly before serving for the crispest, freshest results
Leftover slices: Cover individual slices with plastic wrap or store in airtight containers. They’ll keep for 2-3 days refrigerated, though the crust won’t be as crisp.
Reheating note: This tart is meant to be served chilled or at cool room temperature—don’t heat it! Simply remove from the refrigerator 15-20 minutes before serving for the best flavor.
Make-Ahead & Freezer Notes
This recipe is fantastic for advance preparation, which makes entertaining so much easier!
Make-ahead timeline:
- 2-3 days ahead: Make and bake the tart shell. Store covered at room temperature or refrigerated.
- 1-2 days ahead: Prepare the vanilla custard. Store covered in the refrigerator with plastic wrap pressed directly on the surface.
- 4-6 hours ahead: Assemble the complete tart (crust + custard + strawberries + glaze). Refrigerate until serving.
- Just before serving: Remove from refrigerator 15-20 minutes early for best flavor.
Freezer instructions:
Tart crust: The baked tart shell freezes beautifully! Wrap the cooled shell tightly in plastic wrap, then aluminum foil. Freeze for up to 3 months. Thaw overnight in the refrigerator or at room temperature for 2-3 hours before filling.
Unbaked dough: The tart dough disk can be frozen for up to 3 months. Thaw overnight in the refrigerator before rolling out.
Custard: I don’t recommend freezing the custard as it can separate and become grainy when thawed.
Assembled tart: The complete tart doesn’t freeze well because the strawberries release moisture when thawed, making everything soggy. Always freeze components separately and assemble fresh.
Best reheating method: Again, this tart isn’t meant to be reheated! It’s a chilled dessert that’s best enjoyed cold or at cool room temperature.
Serving Suggestions
This elegant strawberry tart is a showstopper on its own, but here are some wonderful serving ideas to make your dessert experience even more special:
Classic accompaniments:
- Whipped cream – A dollop of fresh whipped cream (sweetened with a touch of vanilla) is traditional and delicious
- Crème fraîche – Adds a sophisticated tangy richness that complements the sweet berries
- Vanilla ice cream – A small scoop on the side provides a lovely temperature contrast
- Fresh mint garnish – A small sprig adds color and a hint of fresh flavor
Beverage pairings:
- Champagne or Prosecco – The bubbles and acidity cut through the richness beautifully
- Sweet dessert wine – Try a Moscato or late-harvest Riesling
- Coffee or espresso – A classic French pairing
- Herbal tea – Chamomile or mint tea complements the fruit flavors
- Sparkling water with lemon – For a refreshing, palate-cleansing option
Occasion ideas: This tart is perfect for Mother’s Day brunch, Easter dessert, spring baby showers, summer garden parties, birthday celebrations, afternoon tea parties, dinner party finales, and romantic date nights at home.
Presentation tips: Dust the plate with powdered sugar, drizzle with berry coulis, garnish with edible flowers like pansies or violas, serve on a decorative cake stand for extra elegance, or add a sprig of fresh basil or mint for a pop of green.
FAQs Section
Q: Can I make this tart without a tart pan?
A: Yes! You can use a 9-inch pie pan instead. The dessert will look more rustic but taste just as delicious. You won’t get the clean, professional edges that a tart pan provides, but it will still be beautiful. Press the dough into the pie pan and follow the same baking instructions.
Q: Why is my custard runny?
A: The custard needs to boil for a full minute while whisking to activate the cornstarch fully. If it’s runny, it likely didn’t cook long enough. Make sure you see bubbles breaking the surface and cook for the full minute. The custard will thicken further as it cools, but it should be noticeably thick while still hot.
Q: Can I use frozen strawberries?
A: Fresh strawberries are really best for this recipe because frozen berries release too much moisture when thawed, making the tart soggy. If you must use frozen, thaw them completely, drain very well, and pat dry with paper towels. The result won’t be quite as crisp, but it can work in a pinch.
Q: How do I prevent my tart crust from shrinking?
A: Shrinking happens when gluten develops too much. Prevent this by not overworking the dough, making sure the dough is well-chilled before baking, and pressing the dough up slightly higher than the rim of the pan to allow for some shrinkage. The 15-minute freeze before baking also helps significantly.
Q: What can I substitute for apricot jam in the glaze?
A: Strawberry jam, raspberry jam, or even apple jelly work perfectly. You want something that will melt smoothly and create a glossy finish. Red currant jelly is also traditional in French patisseries. Avoid chunky preserves unless you strain them first.
Q: My custard has a skin on top. Did I do something wrong?
A: A skin forms when the surface is exposed to air as it cools. It’s not a mistake, but it’s not desirable either! Always press plastic wrap directly onto the surface of hot custard to prevent this. If a skin does form, just peel it off or whisk it back into the custard (though this may create tiny lumps).
Q: Can I make mini tarts instead of one large tart?
A: Absolutely! Use 4-inch tartlet pans and adjust the baking time to about 12-15 minutes total (8-10 minutes with weights, then 4-5 minutes without). This recipe makes about 6-8 mini tarts. They’re adorable for parties and easier for portion control!
Conclusion
There you have it—a complete guide to creating a stunning, bakery-quality strawberry tart right in your own kitchen! This elegant French-inspired dessert might look intimidating, but as you’ve learned, it’s really just a series of simple steps that come together to create something truly spectacular. The buttery, crisp crust paired with silky vanilla custard and crowned with fresh, juicy strawberries is a combination that never fails to impress.
I absolutely love this recipe because it proves that beautiful, sophisticated desserts don’t have to be complicated or stressful. With a little planning and these detailed instructions, you can create a showstopping dessert that tastes even better than it looks (and it looks amazing!). Whether you’re celebrating a special occasion or just want to treat yourself and your loved ones to something extraordinary, this strawberry tart delivers every single time.
The best part? Once you master this basic technique, you can customize it endlessly with different fruits, flavors, and creative presentations. It’s a recipe that will become part of your dessert repertoire for years to come.
I’d absolutely love to hear how your strawberry tart turns out! Did you try any of the variations? What occasion did you make it for? Please leave a comment below sharing your experience, and don’t forget to rate this recipe. If you loved it (and I know you will!), snap a photo and share it on Pinterest—tag me so I can see your beautiful creation! Your feedback and photos inspire other home bakers and help me create even more delicious recipes for you.
Happy baking, and here’s to creating sweet memories one beautiful tart at a time! 🍓✨