The Ultimate Walnut Cake Recipe: Moist, Nutty, and Irresistibly Delicious

There’s something absolutely magical about a perfectly baked walnut cake – that heavenly aroma that fills your kitchen, the tender crumb that practically melts in your mouth, and those crunchy walnut pieces that add the most delightful texture in every bite. This walnut cake recipe is a timeless classic that transforms simple pantry ingredients into a show-stopping dessert that’s equally at home at a fancy dinner party or a casual Sunday brunch.
What makes this walnut cake so special is its incredible versatility. It’s sophisticated enough to serve at elegant gatherings, yet comforting enough to enjoy with your afternoon coffee. The rich, nutty flavor pairs beautifully with a simple dusting of powdered sugar, a swirl of cream cheese frosting, or even a drizzle of caramel sauce. Whether you’re celebrating a special occasion or simply treating yourself on a Tuesday afternoon, this moist walnut cake delivers pure comfort in every slice.
This recipe is perfect for holiday gatherings, birthday celebrations, potluck dinners, or whenever you’re craving a homemade cake that tastes like it came from a European bakery. The best part? It’s surprisingly easy to make, even if you’re not an experienced baker. With straightforward steps and common ingredients, you’ll have a bakery-quality walnut cake on your table in just about an hour.
History / Background
Walnut cake has a rich history that spans across multiple cultures and continents, making it one of the most beloved nut-based desserts in the world. The tradition of baking with walnuts dates back centuries, with variations appearing in European, Middle Eastern, and American cuisines.
In Eastern Europe, particularly in countries like Hungary, Romania, and the Czech Republic, walnut cake (known as “diós torta” or “ořechový dort”) has been a cherished dessert since the 18th century. These traditional recipes often featured layers of walnut-studded cake with coffee or chocolate buttercream, served during Christmas and Easter celebrations. The abundance of walnut trees in these regions made walnuts an affordable and readily available ingredient, especially during autumn harvest season.
The Mediterranean region also has its own walnut cake traditions. In Greece, “karydopita” is a syrup-soaked walnut cake flavored with cinnamon and cloves, while Italian “torta di noci” showcases the elegant simplicity of walnuts combined with butter and eggs. These cakes were often associated with prosperity and celebration, as nuts were considered precious ingredients.
In America, walnut cake gained popularity during the Colonial period when settlers discovered the native black walnut trees and incorporated them into European baking traditions. By the Victorian era, walnut cake had become a staple in American cookbooks, often featured as a refined dessert for tea parties and social gatherings. The cake represented sophistication and hospitality, making it a favorite for showing off one’s baking skills.
What’s fascinating about walnut cake is how it has evolved while maintaining its essential character. Modern recipes have simplified the process while preserving the deep, earthy flavor that makes this cake so distinctive. Today, walnut cake continues to be a beloved choice for bakers who appreciate the combination of simplicity and elegance – a true testament to its enduring appeal across generations and cultures.
Why You’ll Love This Recipe
This walnut cake recipe is about to become your new favorite go-to dessert, and here’s why: it strikes the perfect balance between impressive and achievable. The cake itself is incredibly moist with a tender crumb that stays fresh for days, while the generous amount of toasted walnuts adds both wonderful texture and a sophisticated, earthy flavor that’s absolutely irresistible.
Here’s what makes this recipe a winner:
- Simple ingredients you already have – No exotic ingredients or specialty items required; everything you need is probably in your pantry right now
- Foolproof method – Even beginner bakers can nail this recipe on the first try with clear, step-by-step instructions
- Make-ahead friendly – Bakes beautifully in advance and actually tastes better the next day as the flavors develop
- Naturally impressive – Looks and tastes like you spent hours in the kitchen, but it’s actually quite quick to prepare
- Budget-friendly – Uses affordable ingredients without sacrificing flavor or quality
- Crowd-pleaser – Appeals to both kids and adults, making it perfect for family gatherings
- Customizable – Easily adapted with different frostings, glazes, or flavor variations to suit your preferences
- Stays moist – The walnuts and oil keep this cake incredibly tender, so it won’t dry out like some cakes do
- Perfect texture – Not too heavy, not too light – just the right balance with delightful nutty crunch throughout
- Works for any occasion – Casual enough for everyday dessert, elegant enough for celebrations
Ingredient Notes
Understanding your ingredients is the key to baking success, so let’s break down what makes this walnut cake so special and what role each component plays.
Walnuts: The star of the show! Use fresh, high-quality walnuts for the best flavor. Toasting them before adding to the batter intensifies their nutty flavor and adds extra crunch. You can substitute with pecans if needed, though the flavor will be slightly sweeter and less earthy. Make sure your walnuts aren’t rancid – give them a taste before using, as old nuts can ruin your cake.
All-purpose flour: Provides structure to the cake. You can use a 1:1 gluten-free flour blend if needed, though the texture will be slightly different. Cake flour can also work for an even more tender crumb, but all-purpose gives the best structure to support the heavy walnuts.
Granulated sugar: Sweetens the cake and helps create moisture. You can reduce the sugar by up to ¼ cup if you prefer a less sweet cake, but don’t eliminate it entirely as it affects texture.
Eggs: Provide structure, moisture, and richness. Use room temperature eggs for better incorporation. They should be large eggs for this recipe.
Vegetable oil or melted butter: Oil creates an incredibly moist cake that stays soft for days, while butter adds more flavor. You can use either or a combination of both. Coconut oil works well too for a subtle tropical note.
Buttermilk or sour cream: Adds tanginess and moisture while tenderizing the crumb. If you don’t have buttermilk, make your own by adding 1 tablespoon of lemon juice or vinegar to regular milk and letting it sit for 5 minutes.
Vanilla extract: Enhances all the other flavors. Use pure vanilla extract for the best results – it really makes a difference.
Baking powder and baking soda: The leavening agents that make your cake rise and create that light, tender texture. Make sure they’re fresh (less than 6 months old) for optimal rising power.
Salt: Balances the sweetness and enhances the walnut flavor. Don’t skip it!
Cinnamon (optional): Adds warmth and depth that complements the walnuts beautifully. Nutmeg also works wonderfully.
Equipment Needed
Having the right tools makes baking so much easier and more enjoyable. Here’s everything you’ll need to create this beautiful walnut cake:
- 9-inch round cake pans (2) or one 9×13-inch baking pan – for layer cake or sheet cake respectively
- Parchment paper – to prevent sticking and ensure easy cake removal
- Large mixing bowls (2) – one for dry ingredients, one for wet ingredients
- Electric mixer (hand mixer or stand mixer) – for creaming and beating to the perfect consistency
- Whisk – for combining dry ingredients
- Rubber spatula – for folding and scraping down bowl sides
- Measuring cups and spoons – for accurate measurements (baking is a science!)
- Fine-mesh sieve – for sifting dry ingredients and achieving a smooth batter
- Cooling rack – essential for proper cooling to prevent soggy bottoms
- Toothpick or cake tester – to check for doneness
- Offset spatula – helpful for frosting if you’re adding a topping
- Food processor or sharp knife – for chopping walnuts to your desired size
Walnut Cake Recipe
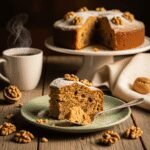
This classic walnut cake is beautifully moist, tender, and packed with crunchy toasted walnuts in every bite. With its rich, nutty flavor and simple elegance, it’s perfect for any occasion from casual coffee breaks to special celebrations.
- Prep Time: 20 minutes
- Cook Time: 35 minutes
- Total Time: 55 minutes
- Yield: 12 servings 1x
- Category: Dessert
- Method: Baking
- Cuisine: American/European
- Diet: Vegetarian
Ingredients
- 2 cups all-purpose flour
- 1½ cups granulated sugar
- 1½ cups walnuts, toasted and chopped (divided: 1¼ cups for batter, ¼ cup for topping)
- 3 large eggs, room temperature
- ¾ cup vegetable oil (or melted butter)
- ¾ cup buttermilk, room temperature
- 2 teaspoons vanilla extract
- 2 teaspoons baking powder
- ½ teaspoon baking soda
- ½ teaspoon salt
- 1 teaspoon ground cinnamon (optional)
- Powdered sugar for dusting (optional)
For Cream Cheese Frosting (optional):
- 8 oz cream cheese, softened
- ¼ cup unsalted butter, softened
- 2 cups powdered sugar
- 1 teaspoon vanilla extract
- 2 tablespoons heavy cream
Instructions
- Prepare your oven and pans: Preheat your oven to 350°F (175°C). Grease two 9-inch round cake pans (or one 9×13-inch pan) with butter or cooking spray, then line the bottoms with parchment paper. Lightly flour the sides and tap out excess. This ensures easy removal after baking.
- Toast the walnuts: Spread walnuts on a baking sheet and toast in the preheated oven for 8-10 minutes until fragrant and lightly golden. Watch carefully to prevent burning. Remove and let cool, then chop roughly. Reserve ¼ cup for topping and set aside.
- Mix dry ingredients: In a large bowl, whisk together flour, sugar, baking powder, baking soda, salt, and cinnamon (if using). Add 1¼ cups of the chopped toasted walnuts to this mixture and toss to coat them with flour. This prevents them from sinking to the bottom of the cake.
- Combine wet ingredients: In a separate large bowl, whisk together eggs, oil, buttermilk, and vanilla extract until well combined and slightly frothy. The mixture should be smooth and uniform in color.
- Create the batter: Make a well in the center of the dry ingredients. Pour the wet ingredients into the well. Using a rubber spatula or wooden spoon, gently fold the ingredients together using a folding motion rather than stirring. Mix just until no flour streaks remain – don’t overmix or your cake will be tough. The batter will be thick but pourable.
- Fill the pans: Divide the batter evenly between your prepared pans. Use a spatula to spread it evenly to the edges. Tap the pans gently on the counter a few times to release any air bubbles. Sprinkle the reserved ¼ cup walnuts on top.
- Bake: Place pans in the center of your preheated oven. Bake for 30-35 minutes (9-inch rounds) or 35-40 minutes (9×13-inch pan), until a toothpick inserted in the center comes out clean or with just a few moist crumbs. The cake should spring back when lightly pressed and pull away slightly from the pan edges.
- Cool properly: Remove from oven and let cakes cool in the pans on a wire rack for 15 minutes. This cooling period is crucial – if you try to remove them too soon, they might break. After 15 minutes, run a knife around the edges, invert onto the cooling rack, peel off parchment paper, and let cool completely before frosting or serving.
- Frost and serve (optional): If using cream cheese frosting, beat softened cream cheese and butter until fluffy (about 2 minutes). Add powdered sugar gradually, then vanilla and cream, beating until smooth and spreadable. Frost the cooled cake, or simply dust with powdered sugar for a more rustic presentation.
Notes
- Toasting walnuts is essential – it brings out their natural oils and intensifies the flavor dramatically
- Room temperature ingredients mix more evenly and create a better texture
- Don’t overmix the batter once you add wet to dry – this develops gluten and makes the cake tough
- The cake is done when a toothpick comes out clean or with a few moist crumbs, not wet batter
- This cake actually tastes better the next day as the flavors meld together
- Store any leftover cake covered at room temperature for 2 days or refrigerated for up to 5 days
Nutrition
- Serving Size: 1 slice (1/12 of cake)
- Calories: 385
- Sugar: 28g
- Sodium: 245mg
- Fat: 24g
- Saturated Fat: 3.5g
- Unsaturated Fat: 19g
- Trans Fat: 0g
- Carbohydrates: 38g
- Fiber: 2g
- Protein: 7g
- Cholesterol: 47mg
Note: Nutrition information is approximate and calculated without frosting. Values may vary based on specific ingredients used.
Tips & Variations
One of the best things about this walnut cake recipe is how versatile it is! Here are some creative ways to customize it to your taste preferences:
Chocolate Walnut Cake: Add ¼ cup cocoa powder to the dry ingredients and reduce flour by ¼ cup. You can also fold in ½ cup chocolate chips for extra decadence. This creates a rich, brownie-like cake that chocolate lovers will adore.
Spiced Walnut Cake: Increase the cinnamon to 2 teaspoons and add ½ teaspoon each of ground nutmeg and ginger. This makes it perfect for fall and winter holidays with warm, cozy spices throughout.
Coffee Walnut Cake: Replace half the buttermilk with strong brewed coffee (cooled). The coffee enhances the walnut flavor without making it taste like coffee cake – it just deepens all the flavors beautifully.
Maple Walnut Cake: Substitute ½ cup of the sugar with pure maple syrup and reduce buttermilk to ½ cup. Top with maple cream cheese frosting for an absolutely divine combination.
Lighter Version: Use half all-purpose flour and half whole wheat pastry flour, replace oil with unsweetened applesauce (though cake will be slightly less moist), and reduce sugar by ⅓ cup. Use Greek yogurt instead of buttermilk for added protein.
Cupcake Version: Divide batter among lined muffin tins, filling each about ⅔ full. Bake for 18-22 minutes. Perfect for parties and portion control! Makes about 18-20 cupcakes.
Gluten-Free Option: Use a high-quality 1:1 gluten-free baking flour blend with xanthan gum. Add an extra egg for structure and increase baking powder to 2½ teaspoons.
Boozy Version: Add 2 tablespoons of bourbon, rum, or brandy to the wet ingredients for an adult version that’s incredible for dinner parties.
Different Nuts: While this is a walnut cake, you can substitute with pecans, hazelnuts, or a combination. Each nut brings its own unique flavor profile to explore.
Pro Chef Tips
Want to take your walnut cake from good to absolutely extraordinary? Here are professional baking secrets that make all the difference:
Toast your walnuts properly: This is non-negotiable! Toasting walnuts at 350°F for 8-10 minutes transforms their flavor from flat to phenomenally nutty. Spread them in a single layer and watch carefully in the last few minutes. They should smell amazing and look slightly darker. Let them cool completely before chopping to prevent the oils from making your batter greasy.
Room temperature ingredients are crucial: Cold eggs and buttermilk won’t emulsify properly with the oil, leading to a dense, heavy cake. Take them out of the fridge 30-60 minutes before baking. If you forget, place eggs in warm water for 5 minutes and microwave buttermilk for 15-20 seconds (don’t make it hot, just take the chill off).
Properly measure your flour: Too much flour is the number one cause of dry, dense cakes. Use the spoon-and-level method: spoon flour into your measuring cup and level off with a knife. Don’t scoop directly from the bag or tap the cup, which packs in extra flour. Even better, use a kitchen scale (1 cup = 120g).
Don’t overmix the batter: Once you combine wet and dry ingredients, mix only until you can’t see flour streaks anymore. Overmixing develops gluten, which makes your cake tough and chewy instead of tender and delicate. A few small lumps are perfectly fine – they’ll bake out.
Coat nuts with flour: Tossing the chopped walnuts in a bit of the flour mixture before adding the wet ingredients prevents them from sinking to the bottom. This ensures even distribution throughout the cake.
Test for doneness correctly: Insert a toothpick in the center of the cake, not near the edges (which cook faster). It should come out clean or with a few moist crumbs clinging to it. If it comes out wet with batter, bake for 3-5 more minutes and test again. Overbaked cake is dry cake, so check early!
Cool properly for the best texture: Letting the cake cool in the pan for 15 minutes allows it to set up and firm up enough to handle. Cooling completely on a wire rack (not in the pan) prevents soggy bottoms caused by steam getting trapped. Patience here pays off!
Grind some walnuts finely: For an even more intense walnut flavor and incredibly moist texture, pulse ½ cup of the walnuts into a fine meal in your food processor and add them to the flour mixture. The rest should be chopped for texture contrast.
Common Mistakes to Avoid
Even experienced bakers can run into issues. Here are the most common pitfalls and how to avoid them:
Using old or rancid walnuts: Walnuts contain oils that can go rancid quickly, especially if stored improperly. Always taste your walnuts before using them – if they taste bitter or “off,” they’ll ruin your entire cake. Store walnuts in an airtight container in the refrigerator or freezer to keep them fresh for months.
Opening the oven door too early: Resist the temptation to check on your cake in the first 25 minutes of baking. Every time you open the oven door, the temperature drops dramatically, which can cause your cake to sink in the middle or bake unevenly. Only check after the minimum baking time.
Skipping the parchment paper: Even if you grease and flour your pans well, parchment paper is insurance against sticking. It takes 30 seconds to line your pans and saves you from the heartbreak of your beautiful cake breaking apart when you try to remove it.
Inverting the cake while still hot: If you try to turn out your cake layers immediately after removing them from the oven, they’ll fall apart or stick to the pan. That 15-minute cooling period allows the structure to set up properly. Similarly, trying to frost a warm cake will result in melted, sliding frosting and a crumbly mess.
Not properly preparing your pans: Missed spots when greasing means stuck cake. Use butter and flour (or cooking spray with flour) generously, making sure to get into all the corners and edges. The parchment circle on the bottom is your insurance policy.
Substituting ingredients without understanding the chemistry: Baking is science! Swapping buttermilk for regular milk without adding acid, using cold ingredients, or making multiple substitutions at once can lead to disappointing results. Make one change at a time so you can understand what works.
Storing the cake incorrectly: Leaving cake uncovered dries it out quickly, while sealing it in plastic wrap while still warm creates condensation that makes it soggy. Always cool completely, then store in an airtight container or wrapped well. Don’t refrigerate unless it has perishable frosting, as refrigeration dries out cake.
Storage & Meal Prep
Proper storage keeps your walnut cake fresh, moist, and delicious for days. Here’s everything you need to know:
Room Temperature Storage: If your cake has no perishable frosting (like a simple dusting of powdered sugar or no topping), store it covered at room temperature for up to 3 days. Place it in an airtight cake keeper, cover it with a cake dome, or wrap individual slices tightly in plastic wrap. The cake actually improves after a day as the flavors meld together and the crumb softens slightly.
Refrigerator Storage: Cakes with cream cheese frosting, whipped cream, or other perishable toppings must be refrigerated. Store in an airtight container for up to 5 days. Before serving, let it sit at room temperature for 30 minutes to take the chill off – this improves both flavor and texture significantly.
Freezer Storage: This walnut cake freezes beautifully! Wrap unfrosted cake layers tightly in plastic wrap, then aluminum foil, then place in a freezer bag with all air pressed out. Freeze for up to 3 months. You can also freeze frosted cake – freeze it uncovered until solid (about 2 hours), then wrap well. This prevents the frosting from getting smooshed.
Reheating: While this cake is delicious at room temperature, you can warm individual slices in the microwave for 10-15 seconds for a just-baked experience. This brings out the walnut oils and makes it even more aromatic. For oven warming, wrap slices in foil and heat at 300°F for 8-10 minutes.
Keeping It Moist: If your cake is starting to dry out slightly, brush the cut edges with a simple syrup (equal parts sugar and water, boiled and cooled). This adds moisture back and helps extend the cake’s life another day or two.
Make-Ahead & Freezer Notes
This walnut cake is a fantastic make-ahead dessert, making it perfect for stress-free entertaining and meal prep:
Bake in Advance: You can bake the cake layers up to 2 days before you need them. Once completely cooled, wrap each layer tightly in plastic wrap and store at room temperature. They’ll actually be easier to frost when slightly firm, and the flavor deepens beautifully overnight.
Freeze Unfrosted Layers: This is my favorite make-ahead trick! Bake the cakes, let them cool completely, wrap each layer tightly in plastic wrap, then aluminum foil, and freeze for up to 3 months. When ready to serve, thaw them in the refrigerator overnight or at room temperature for 2-3 hours, still wrapped. Frost while they’re still slightly cool – the frosting will set up perfectly.
Freeze Frosted Cake: If you want to prepare the entire cake ahead, frost it completely, then freeze uncovered until solid (about 2 hours). Once frozen solid, wrap carefully in plastic wrap and foil. Thaw in the refrigerator overnight, still wrapped, then bring to room temperature before serving. The texture will be virtually identical to fresh.
Freeze Individual Slices: For grab-and-go treats, slice the cake and wrap individual pieces in plastic wrap, then place in a freezer bag. Pull out one slice at a time as needed. They’ll thaw in about 30 minutes at room temperature, perfect for last-minute dessert cravings.
Best Reheating Method: For frozen cake, always thaw in the refrigerator while wrapped to prevent condensation from making it soggy. Then let it come to room temperature (still wrapped) for the best texture. For a warm slice, microwave for 15-20 seconds or wrap in foil and heat in a 300°F oven for 10 minutes.
Make Frosting Ahead: Cream cheese frosting can be made up to 3 days in advance and stored in an airtight container in the refrigerator. Before using, let it come to room temperature and give it a quick stir to restore the creamy consistency.
Serving Suggestions
This versatile walnut cake pairs beautifully with so many accompaniments. Here are my favorite ways to serve it:
Coffee and Tea: This cake is absolutely perfect with your morning coffee or afternoon tea. The nutty richness complements espresso, cappuccino, strong black tea, or even chai beautifully. It’s become my go-to cake for brunches and coffee dates.
Ice Cream Pairings: Serve warm slices with a scoop of vanilla bean ice cream, salted caramel ice cream, or maple walnut ice cream for an incredible dessert experience. The warm-cold contrast is simply divine. Coffee ice cream is also phenomenal with this cake.
Whipped Cream: A simple dollop of lightly sweetened whipped cream (add a splash of vanilla extract or a tablespoon of maple syrup) is elegant and lets the cake flavor shine through. For something extra special, fold in a bit of cinnamon or make maple whipped cream.
Fresh Fruit: Balance the richness with fresh berries – raspberries, strawberries, or blackberries all work wonderfully. Sliced ripe pears or caramelized apples are also fantastic, especially in fall and winter. The fruit adds brightness and freshness.
Caramel or Chocolate Sauce: Drizzle warm caramel sauce or rich chocolate ganache over each slice for an ultra-decadent dessert. You can also add a sprinkle of flaky sea salt for a sophisticated sweet-salty contrast that’s absolutely addictive.
Breakfast Treat: This cake is substantial enough to serve as a coffee cake for brunch. Serve it alongside fresh fruit salad, yogurt parfaits, and scrambled eggs for a complete breakfast spread that will impress your guests.
Holiday Dessert Table: This cake fits perfectly on any holiday dessert table. Serve it alongside pumpkin pie at Thanksgiving, sugar cookies at Christmas, or fruit tart at Easter. Its elegant simplicity and nutty flavor complement other desserts without competing.
Wine Pairings: For adult gatherings, this cake pairs beautifully with dessert wines like Port, late-harvest Riesling, or sweet Marsala. The nutty, slightly spiced flavors also work wonderfully with a good bourbon or whiskey.
FAQs Section
Can I make this cake without buttermilk?
Absolutely! You can make your own buttermilk substitute by adding 1 tablespoon of white vinegar or lemon juice to ¾ cup of regular milk. Let it sit for 5 minutes until it curdles slightly. Alternatively, use plain yogurt or sour cream thinned with a bit of milk to reach a pourable consistency.
Why did my cake sink in the middle?
A sunken center usually means the cake wasn’t fully baked, the oven temperature was too low, or you opened the oven door too early. Make sure your oven is properly preheated (use an oven thermometer to verify), don’t open the door in the first 25 minutes, and test for doneness properly before removing from oven. Old leavening agents can also cause sinking.
Can I reduce the sugar in this recipe?
You can reduce the sugar by up to ¼ cup without dramatically affecting the texture, though the cake will be less sweet and slightly denser. Sugar doesn’t just add sweetness – it also contributes to moisture, tenderness, and browning. If you reduce it significantly, the cake’s texture will change noticeably.
How do I know when the cake is done baking?
Insert a toothpick or cake tester into the center of the cake. It should come out clean or with just a few moist crumbs (not wet batter). The cake should also spring back when gently pressed with your finger and pull away slightly from the sides of the pan. The internal temperature should be around 200-210°F if you use a thermometer.
Can I use a different type of nut?
Yes! Pecans are the closest substitute with a similar texture but slightly sweeter flavor. Hazelnuts work wonderfully if you remove the skins first. Almonds will give you a different but equally delicious cake – consider adding a bit of almond extract. You can also use a combination of nuts for more complex flavor.
My cake turned out dry – what happened?
Dry cake usually results from overbaking, too much flour (measure correctly!), or overmixing the batter which develops too much gluten. It could also be caused by using old baking powder or baking at too high a temperature. Make sure you’re checking for doneness a few minutes before the minimum time and removing the cake as soon as the toothpick comes out clean with just moist crumbs.
Can I make this into cupcakes or a different pan size?
Definitely! For cupcakes, fill liners ⅔ full and bake for 18-22 minutes. For a 9×13-inch pan, bake for 35-40 minutes. A bundt pan works beautifully too – bake for 45-55 minutes and make sure to grease it extremely well. For mini loaf pans, fill ⅔ full and bake for 25-30 minutes. Always use the toothpick test to determine doneness as baking times can vary.
Conclusion
There you have it – the ultimate walnut cake recipe that’s destined to become a staple in your baking repertoire! This cake has everything you could want: incredible flavor, perfect texture, foolproof instructions, and endless versatility. Whether you’re baking for a special occasion or simply treating yourself to something homemade and delicious, this walnut cake delivers every single time.
What I love most about this recipe is how it brings people together. There’s something about the aroma of a freshly baked walnut cake that draws everyone into the kitchen, eager to grab the first slice. It’s the kind of dessert that creates memories – Sunday afternoon baking with your kids, bringing a homemade treat to a friend’s house, or simply enjoying a quiet moment with a slice of cake and a cup of coffee.
I’d absolutely love to hear how your walnut cake turns out! Did you make any creative variations? Serve it with something unexpected? Have any questions or tips to share? Drop a comment below and let me know! And if you loved this recipe, please give it a five-star rating and save it to your Pinterest boards so you can find it again easily. Don’t forget to share photos of your beautiful creation on social media – tag me so I can see your baking success!
Happy baking, friends! Now go preheat that oven and create some deliciousness! 🎂✨