Homemade Almond Joy Bars Recipe (Just 5 Ingredients!)
If you’ve ever craved the perfect combination of coconut, chocolate, and almonds, these Homemade Almond Joy Bars are about to become your new obsession! These no-bake treats taste exactly like the classic candy bar we all love, but they’re made right in your own kitchen with simple, wholesome ingredients you can actually pronounce.
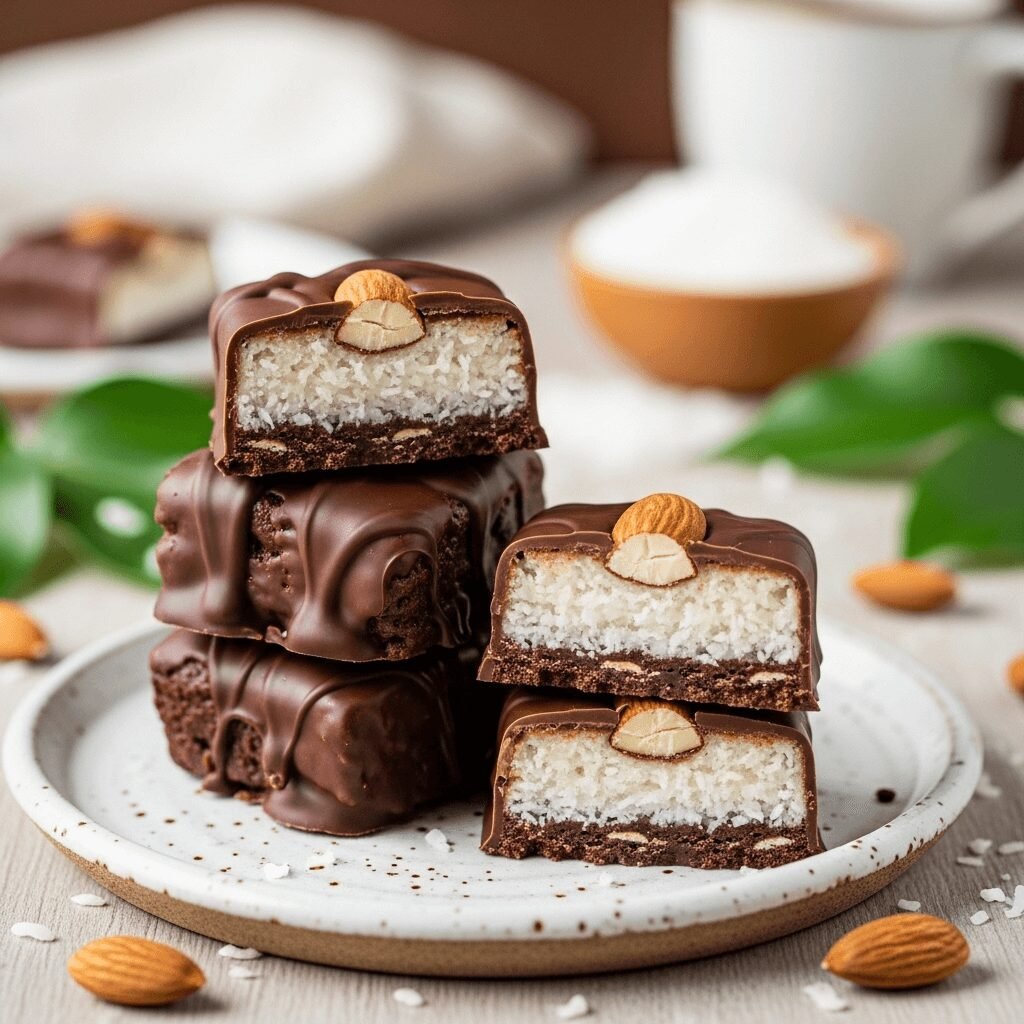
These copycat Almond Joy Bars feature a sweet coconut filling nestled on a chocolate base, topped with crunchy whole almonds and coated in rich, velvety chocolate. They’re perfect for satisfying your sweet tooth, bringing to parties, gifting during the holidays, or simply enjoying as an afternoon pick-me-up with your coffee. The best part? You don’t need any fancy equipment or baking skills to make these delicious bars—just a little time in the fridge and you’re golden!
Whether you’re making these for a special occasion, a bake sale, or just because it’s Tuesday and you deserve something sweet, these homemade candy bars deliver that perfect balance of textures and flavors that make Almond Joy candy bars so irresistible.
History / Background
The Almond Joy candy bar has been an American favorite since 1946, when the Peter Paul Candy Manufacturing Company introduced it as a companion to their wildly popular Mounds bar (which is the same coconut-chocolate combination, just without the almonds). The company wanted to create a candy bar that appealed to those who preferred nuts in their chocolate, and thus, the Almond Joy was born with its iconic tagline, “Sometimes you feel like a nut, sometimes you don’t!”
The original candy bar was designed to showcase the tropical flavors of coconut combined with the richness of milk chocolate and the satisfying crunch of almonds—a flavor profile that was somewhat exotic for American palates at the time. During World War II, coconut had become more accessible and popular in the United States, making it the perfect time to introduce a coconut-forward candy.
Today, Almond Joy is manufactured by The Hershey Company, which acquired the brand in 1988. The candy bar has become so culturally significant that it’s inspired countless homemade versions, allowing home cooks to recreate this nostalgic treat with better-quality ingredients and without the preservatives found in commercial versions.
Making homemade Almond Joy Bars has become a beloved tradition for many families, especially during the holidays when candy-making is at its peak. These bars represent the perfect marriage of convenience and homemade goodness—they’re easy enough for beginners but impressive enough to gift to your pickiest foodie friends.
Why You’ll Love This Recipe
These Homemade Almond Joy Bars take everything you love about the store-bought version and make it even better! With just five simple ingredients and no baking required, you’ll have a batch of candy bars that taste fresher, richer, and more satisfying than anything you can buy at the store.
Here’s why this recipe is a winner:
- No-Bake Simplicity – No oven required! Everything comes together with simple melting and mixing, then sets beautifully in the refrigerator
- Budget-Friendly – Make a whole batch for less than buying individual candy bars, perfect for feeding a crowd or gift-giving
- Customizable Sweetness – Control the sugar content and chocolate type to suit your taste preferences
- Impressive Results – These look professionally made but require zero special skills or candy-making experience
- Make-Ahead Friendly – Prepare these days or even weeks in advance; they keep beautifully in the fridge or freezer
- Kid-Approved Activity – Get the whole family involved in a fun kitchen project that yields delicious rewards
- Allergen-Aware Options – Easy to adapt for various dietary needs by swapping chocolate types or using alternative sweeteners
- Gift-Worthy Presentation – Wrap these individually for the perfect homemade gift that everyone will actually want to receive
Whether you’re a coconut lover, a chocolate fanatic, or someone who just appreciates a good homemade treat, these bars deliver on every level. They’re rich without being overly sweet, satisfying without being too heavy, and they have that perfect candy bar texture that makes them utterly addictive!
Ingredient Notes
Let’s talk about what makes these bars so irresistible and how each ingredient plays its crucial role:
Sweetened Shredded Coconut – This is the star of the show! Use sweetened coconut flakes or shredded coconut for the best texture and flavor. The sweetened variety gives you that authentic Almond Joy taste. Look for the kind in the baking aisle, not the large coconut flakes or unsweetened coconut, which will alter both texture and sweetness. If you can only find unsweetened coconut, you can use it but add 2-3 tablespoons of powdered sugar to compensate.
Sweetened Condensed Milk – This magical ingredient acts as both the binder and sweetener for your coconut filling. It creates that perfectly chewy, cohesive texture that holds everything together. Don’t confuse this with evaporated milk—they’re completely different! There’s no real substitute that works quite as well, but in a pinch, you could try coconut condensed milk for a dairy-free version.
Semi-Sweet or Dark Chocolate Chips – The chocolate coating is what brings everything together. Semi-sweet chocolate chips offer a nice balance of sweetness, while dark chocolate chips create a more sophisticated, less-sweet bar. You can also use chocolate bars chopped into pieces if you prefer. For the smoothest melting, add a tablespoon of coconut oil to your chocolate.
Whole Almonds – Raw or roasted whole almonds work beautifully here. Roasted almonds add a deeper, nuttier flavor, while raw almonds provide a cleaner taste. You’ll want whole almonds for that authentic look and satisfying crunch. If someone has a nut allergy, you can make “Mounds Bars” instead by simply omitting the almonds!
Coconut Oil (Optional) – Adding a small amount of coconut oil to your melted chocolate helps create a smoother, shinier coating that’s easier to work with. It also helps the chocolate set with a nice snap. If you don’t have coconut oil, you can use a tiny bit of vegetable oil or shortening, though coconut oil adds a subtle flavor that complements the filling perfectly.
Equipment Needed
You don’t need a fancy kitchen to make these candy bars! Here’s everything you’ll need:
- 8×8-inch or 9×9-inch baking pan – For shaping your bars
- Parchment paper or aluminum foil – Essential for easy removal and cleanup
- Medium mixing bowl – For combining your coconut filling
- Microwave-safe bowl or double boiler – For melting chocolate smoothly
- Rubber spatula – For mixing and spreading
- Sharp knife – For cutting clean bar shapes
- Measuring cups and spoons – For accurate ingredient measurements
- Cutting board – For slicing your finished bars
- Airtight container – For storage
Almond Joy Bars Recipe

These Homemade Almond Joy Bars taste just like the classic candy bar but better! With a sweet coconut filling, crunchy almonds, and rich chocolate coating, they’re an easy no-bake treat perfect for any occasion.
- Prep Time: 20 minutes
- Chill Time: 2 hours
- Total Time: 2 hours 20 minutes
- Yield: 16-20 bars 1x
- Category: Dessert
- Method: No Bake
- Cuisine: American
- Diet: Vegetarian
Ingredients
For the Coconut Layer:
- 3 cups sweetened shredded coconut
- ¾ cup sweetened condensed milk
- 2 tablespoons coconut oil, melted (optional, for smoother texture)
For the Chocolate Coating:
- 2½ cups semi-sweet or dark chocolate chips
- 2 tablespoons coconut oil (for smooth coating)
For Topping:
- 16-20 whole almonds (one per bar)
Instructions
Step 1: Prepare Your Pan
Line an 8×8-inch baking pan with parchment paper, leaving overhang on the sides for easy removal later. This is crucial for getting clean-cut bars without them sticking to the pan.
Step 2: Make the Coconut Filling
In a medium bowl, combine the shredded coconut and sweetened condensed milk. Mix thoroughly until all the coconut is evenly coated and the mixture holds together when pressed. If using, add the 2 tablespoons of melted coconut oil and stir until well combined. The mixture should be sticky and moldable.
Step 3: Create the Bottom Chocolate Layer
Melt ½ cup of the chocolate chips with ½ tablespoon coconut oil in the microwave in 30-second intervals, stirring between each interval until smooth and fully melted. Pour this into your prepared pan and spread it into an even layer using a spatula. Place in the refrigerator for 10-15 minutes until firm.
Step 4: Add the Coconut Layer
Remove the pan from the refrigerator. Press the coconut mixture evenly over the chocolate layer, creating a smooth, compact surface. Press down firmly with your hands or the back of a spatula to ensure the layer is solid and even. Return to the refrigerator for 30 minutes to firm up.
Step 5: Cut Into Bars
Using the parchment paper overhang, lift the coconut slab out of the pan and place it on a cutting board. Using a sharp knife (wiped clean between cuts), slice into 16-20 bars depending on your preferred size. Rectangular bars about 1 inch wide and 3 inches long work perfectly.
Step 6: Add Almonds
Gently press one whole almond into the top center of each bar, pushing it slightly into the coconut layer so it stays secure but still sits on top visibly.
Step 7: Melt the Coating Chocolate
In a microwave-safe bowl, combine the remaining 2 cups of chocolate chips and 1½ tablespoons coconut oil. Microwave in 30-second intervals, stirring thoroughly between each interval, until the chocolate is completely smooth and melted. Let it cool for 2-3 minutes—you want it warm but not hot, or it will be too thin.
Step 8: Coat the Bars
Working with one bar at a time, use a fork or dipping tool to dip each coconut bar into the melted chocolate, turning to coat all sides completely. Let excess chocolate drip off, then place the coated bar on a parchment-lined baking sheet. The almond should remain visible on top. Repeat with all bars.
Step 9: Set the Chocolate
Once all bars are coated, place the baking sheet in the refrigerator for at least 1 hour, or until the chocolate is completely set and firm to the touch.
Step 10: Serve and Enjoy
Remove from the refrigerator about 5-10 minutes before serving for the best texture. Store any leftovers in an airtight container in the refrigerator.
Notes
- For a thicker chocolate coating, double-dip your bars after the first coating has set
- If your coconut mixture seems too dry, add a tablespoon more condensed milk
- Use a fork with thin tines for dipping to get cleaner-looking bars
- Let chocolate coating cool slightly before dipping so it’s not too runny
- These bars taste even better after sitting for 24 hours as the flavors meld together
- For ultra-smooth chocolate, you can temper it, but it’s not necessary for this recipe
Nutrition
- Serving Size: 1 bar (based on 18 bars)
- Calories: 245
- Sugar: 22g
- Sodium: 45mg
- Fat: 16g
- Saturated Fat: 12g
- Unsaturated Fat: 3g
- Trans Fat: 0g
- Carbohydrates: 26g
- Fiber: 2g
- Protein: 3g
- Cholesterol: 5mg
Note: Nutrition information is approximate and will vary based on specific ingredients used and bar size.
Tips & Variations
Make Them Dark Chocolate Lovers’ Bars – Use all dark chocolate (70% cacao or higher) for a more sophisticated, less-sweet version that really lets the coconut shine through.
Create Mounds Bars Instead – Simply omit the almonds for a classic Mounds bar experience! Some people prefer this nut-free version.
Try Different Nuts – While almonds are traditional, you can experiment with cashews, pecans, or macadamia nuts for a fun twist. Toasted nuts add even more flavor depth.
Add Extra Flavor – Mix a teaspoon of vanilla extract or almond extract into your coconut filling for added dimension. A tiny pinch of sea salt in the coconut layer also enhances all the flavors beautifully.
Make Them Dairy-Free – Use dairy-free chocolate chips and look for coconut condensed milk (available at many health food stores) to make these completely vegan-friendly.
Create Mini Bites – Cut the bars into smaller, bite-sized pieces for a perfect party treat or portion-controlled snack.
Add Crunch to the Base – Mix crushed graham crackers or cookies into your bottom chocolate layer for an extra textural element.
Drizzle Decoration – After coating, drizzle white chocolate over the top in a zigzag pattern for a beautiful, bakery-style presentation.
Make Them Keto-Friendly – Use sugar-free chocolate chips, unsweetened coconut, and replace the condensed milk with a mixture of coconut cream and a low-carb sweetener like erythritol.
Pro Chef Tips
Toast Your Coconut First – For an even deeper flavor, spread your shredded coconut on a baking sheet and toast it at 325°F for 5-7 minutes, stirring occasionally, until lightly golden. Let it cool before mixing with condensed milk. This adds a wonderful nuttiness that elevates the entire bar.
Temper Your Chocolate for Professional Results – If you want that perfect snap and shiny finish that professional chocolatiers achieve, take the time to properly temper your chocolate. Melt two-thirds of your chocolate, then remove from heat and stir in the remaining one-third until melted. This creates stable chocolate crystals for the best texture and appearance.
Work in a Cool Environment – Chocolate work is always easier in a cool kitchen. If your kitchen is warm, turn up the air conditioning or work in the coolest part of your home. Warm temperatures make the chocolate coating too thin and can cause it to take forever to set.
Freeze Between Layers – For the cleanest cuts and easiest dipping, place your coconut layer in the freezer for 15 minutes before cutting and again before dipping. Slightly frozen bars hold together much better during the chocolate coating process.
Use a Dipping Fork – Professional candy makers use a special dipping fork (available online for just a few dollars). It has thin tines that leave minimal marks and allows excess chocolate to drip off cleanly. If you don’t have one, a regular fork works, but try to use one with thinner, more widely-spaced tines.
The Two-Spoon Method – If hand-dipping seems intimidating, place each bar on a spoon, pour chocolate over it with another spoon, and use the spoons to rotate and coat the bar completely. This gives you more control.
Let Chocolate Set at Room Temperature First – After coating, let the bars sit at room temperature for 10-15 minutes before refrigerating. This prevents condensation from forming on the chocolate, which can create a dull finish or white spots.
Common Mistakes to Avoid
Using Unsweetened Coconut Without Adjusting – Unsweetened coconut will make your bars taste bland and not at all like Almond Joy. If you must use unsweetened coconut, add at least ¼ cup of powdered sugar to the mixture to compensate.
Overheating the Chocolate – Chocolate can seize or become grainy if overheated. Always use short microwave intervals and stir thoroughly between each one. If your chocolate gets too hot, it can also be too thin for coating and may slide off your bars.
Cutting the Bars While Warm – If you try to cut your coconut layer before it’s fully chilled and firm, you’ll end up with messy, crumbly bars that fall apart. Patience is key here—give it the full chilling time.
Skipping the Parchment Paper – Don’t try to use just a greased pan! The coconut mixture is incredibly sticky, and you’ll never get clean bars out without parchment or foil. The overhang is also essential for lifting the slab out easily.
Dipping in Too-Hot Chocolate – If your melted chocolate is steaming or very hot, it’s too thin and will run right off your bars, leaving them with a thin, uneven coating. Let it cool for 2-3 minutes after melting for the perfect dipping consistency.
Not Pressing the Coconut Layer Firmly – A loosely packed coconut layer will fall apart when you cut and dip it. Really press down firmly to compact those coconut shreds into a solid, cohesive layer that will hold together beautifully.
Using Old Coconut – Coconut can go rancid, especially if it’s been sitting in your pantry for a year. Use fresh coconut for the best flavor. If your coconut smells off or tastes bitter, toss it and buy new.
Storage & Meal Prep
These Almond Joy Bars are fantastic make-ahead treats that actually improve with a little age as the flavors meld together!
Refrigerator Storage: Store your finished bars in an airtight container in the refrigerator for up to 2 weeks. Layer them between sheets of parchment or wax paper to prevent them from sticking together. The chocolate coating keeps the coconut layer fresh and prevents it from drying out.
Room Temperature Storage: If your kitchen is cool (below 70°F), you can keep these bars in an airtight container at room temperature for 3-4 days. However, they hold their shape better and the chocolate stays firmer when refrigerated, especially in warmer months.
Individual Wrapping: For grab-and-go convenience or gift-giving, wrap each bar individually in wax paper or plastic wrap once they’re fully set. This makes them perfect for lunch boxes, travel snacks, or party favors.
Reheating Tips: These bars are actually best enjoyed straight from the fridge or at cool room temperature. There’s no need to reheat them—in fact, warming them up will melt the chocolate coating. If they’re too firm from the fridge, let them sit at room temperature for 5-10 minutes before eating for the ideal texture.
Make-Ahead & Freezer Notes
Make-Ahead Instructions: These bars are ideal for making ahead of holidays, parties, or gift-giving occasions. You can prepare them completely up to 2 weeks in advance and keep them refrigerated. In fact, they often taste better after sitting for 24-48 hours as all the flavors have time to meld together beautifully.
Freezer-Friendly: These bars freeze exceptionally well! Once completely set, arrange them in a single layer in a freezer-safe container or bag, separating layers with parchment paper. They’ll keep in the freezer for up to 3 months without any loss in quality or taste.
Freezing Individual Components: You can also freeze just the coconut filling layer (before coating in chocolate) for up to 3 months. When you’re ready, thaw slightly, cut into bars, add almonds, and proceed with the chocolate coating. This is perfect if you want fresh-coated bars without starting from scratch.
Thawing Instructions: To thaw frozen bars, transfer them from the freezer to the refrigerator and let them thaw overnight. Don’t thaw them at room temperature, as this can cause condensation to form on the chocolate, creating an unappealing appearance. Frozen bars can also be eaten directly from the freezer for a firmer, almost ice-cream-bar-like texture—some people actually prefer them this way!
Flash Freezing Tip: If you’re freezing multiple bars, flash freeze them first by placing them on a baking sheet in the freezer for 1 hour until solid, then transfer them to a container or bag. This prevents them from sticking together and allows you to grab individual bars whenever you want one.
Serving Suggestions
These Almond Joy Bars are delicious on their own, but here are some creative ways to serve them that will elevate your dessert game:
With Coffee or Espresso – The rich chocolate and coconut flavors pair beautifully with a strong cup of coffee or espresso. This combination makes for a perfect afternoon pick-me-up or after-dinner treat.
As Part of a Candy Buffet – Include these bars alongside other homemade candies like peanut butter cups, truffles, and fudge for an impressive dessert spread at parties, weddings, or holiday gatherings.
Ice Cream Topping – Chop these bars into chunks and use them as a topping for vanilla or chocolate ice cream. The combination of cold ice cream and candy bar chunks is absolutely heavenly!
Gift Boxes and Baskets – Arrange these bars in decorative boxes or baskets for teacher gifts, hostess presents, or holiday gift-giving. Wrap each bar in colorful cellophane tied with ribbon for a beautiful presentation.
Dessert Platter Centerpiece – Cut the bars into smaller bite-sized pieces and arrange them on a platter with fresh strawberries, raspberries, and other chocolate treats for an elegant dessert board.
With Fresh Fruit – Serve alongside fresh pineapple chunks, sliced mango, or orange segments to complement the tropical coconut flavor.
Alongside Herbal Tea – Try pairing these with coconut tea, mint tea, or chamomile for a lighter beverage option that won’t compete with the rich chocolate flavor.
Hot Chocolate Garnish – Place a small bar on top of a mug of hot chocolate and let it slowly melt into the drink for an indulgent coconut-chocolate beverage experience.
FAQs Section
Can I use unsweetened coconut instead of sweetened?
While you can technically use unsweetened coconut, you’ll need to add additional sweetener to compensate. Mix in ¼ to ⅓ cup of powdered sugar with the condensed milk to achieve a similar sweetness level to the original recipe. Without this adjustment, your bars will taste bland and won’t have that authentic Almond Joy flavor.
Why is my coconut mixture too dry or crumbly?
If your coconut mixture isn’t holding together well, you may need a bit more condensed milk. Different brands of shredded coconut have varying moisture levels, so add condensed milk one tablespoon at a time until the mixture holds together when pressed but isn’t overly wet. It should feel like wet sand that clumps together easily.
Can I make these without coconut oil?
Yes! The coconut oil in the chocolate coating is optional and simply helps create a smoother, shinier finish with a nice snap when you bite into it. You can omit it entirely or substitute with a tiny bit of vegetable oil or shortening. The coconut oil in the filling helps with texture but can also be omitted if needed.
How do I prevent the chocolate coating from cracking?
Chocolate can crack if the bars are too cold when you coat them or if you refrigerate them too quickly after coating. Let your bars sit at room temperature for about 10 minutes before dipping, and after coating, allow them to set at room temperature for 15-20 minutes before transferring to the refrigerator. Adding coconut oil to your melted chocolate also helps create a more flexible coating.
Can I use chocolate bars instead of chocolate chips?
Absolutely! High-quality chocolate bars often melt more smoothly than chocolate chips because chips contain stabilizers to help them hold their shape during baking. If using chocolate bars, chop them into small, uniform pieces for even melting. You’ll need about 16 ounces total of chocolate bars to replace the 2½ cups of chips.
Why won’t my chocolate coating harden?
If your chocolate isn’t setting, it could be due to a few reasons: your kitchen might be too warm (chocolate sets best in temperatures below 70°F), you may have added too much coconut oil (stick to the recipe amount), or there might be water or moisture in your chocolate (even a tiny drop can prevent proper setting). Place the bars in the refrigerator to help the chocolate firm up.
Can I make these nut-free?
Yes! Simply omit the almonds to create homemade Mounds bars instead. The recipe works perfectly without nuts, and many people actually prefer the nut-free version. You can also sprinkle the tops with extra coconut flakes before the chocolate sets if you want more visual interest without the nuts.
Conclusion
There’s something truly magical about making your own candy bars at home, and these Homemade Almond Joy Bars are proof that you don’t need to be a professional chocolatier to create something absolutely delicious! With just five simple ingredients and a little patience while they chill, you can make a batch of these incredible treats that rival anything you’d buy at the store—and they’re made with real ingredients you can feel good about.
Whether you’re preparing these for a special occasion, holiday gift-giving, or simply because you’re craving that perfect coconut-chocolate-almond combination, this recipe delivers every single time. The best part is watching the faces of your friends and family when they bite into these bars and realize they taste just like (or better than!) the store-bought version they grew up loving.
So what are you waiting for? Head to your kitchen and whip up a batch of these irresistible bars! They’re easy enough for a weeknight treat but impressive enough to gift to anyone on your list. Don’t forget to snap a photo of your beautiful homemade candy bars and share your success—I’d love to see how yours turn out!
Ready to make these delicious bars? Pin this recipe to your favorite Pinterest board so you can find it whenever a craving strikes! And if you try this recipe, please come back and leave a comment below—I love hearing about your baking adventures and any creative variations you come up with!