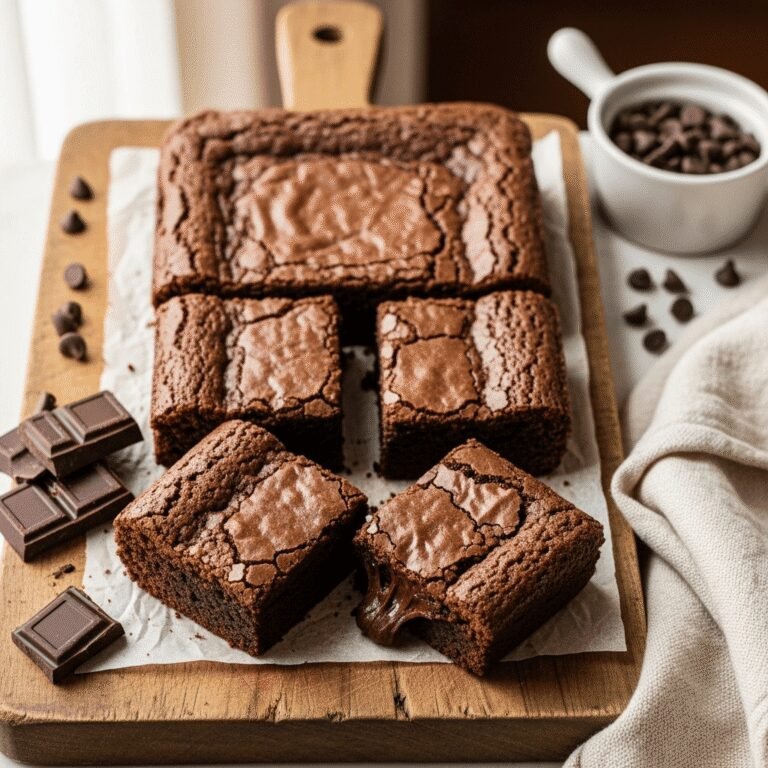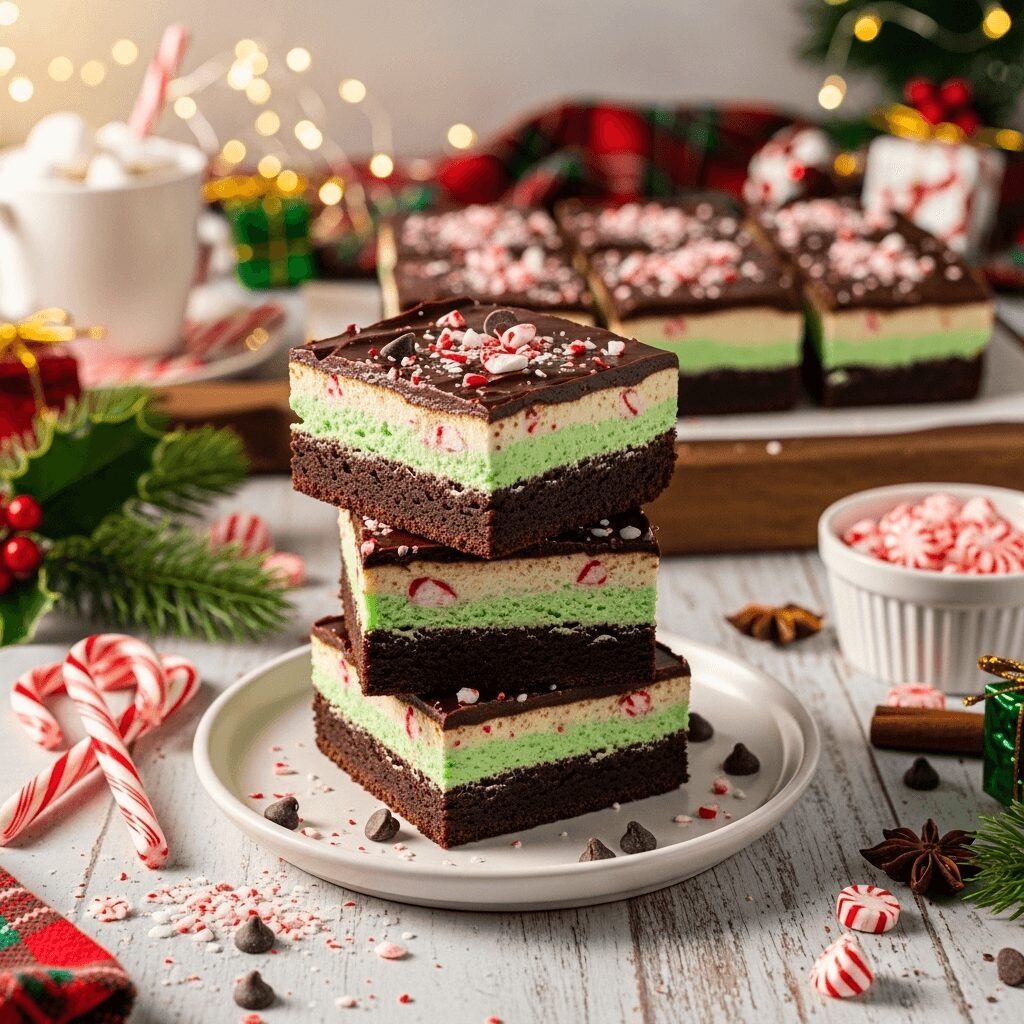
Festive Peppermint Brownies Recipe (Perfect Holiday Chocolate Treat!)
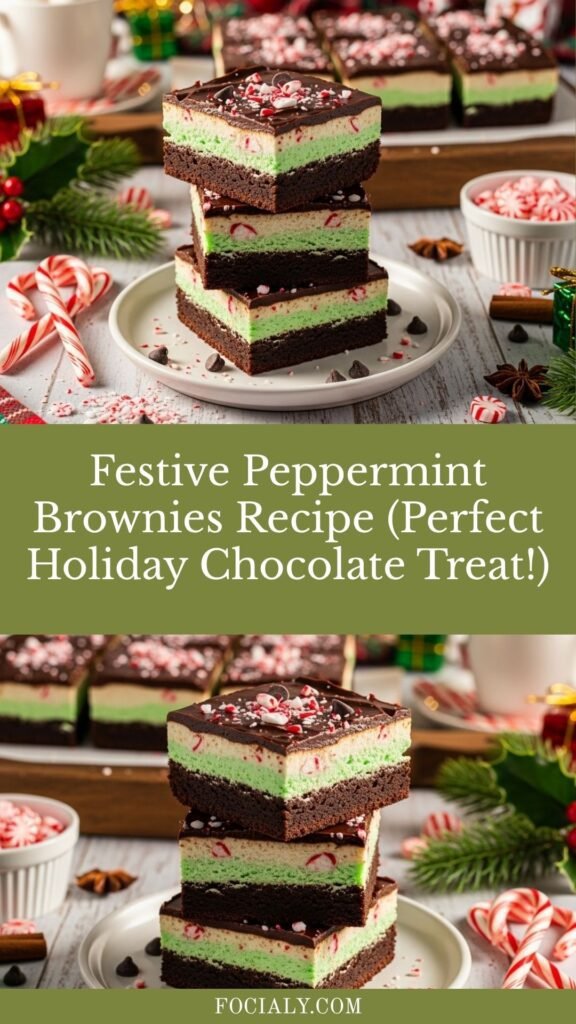
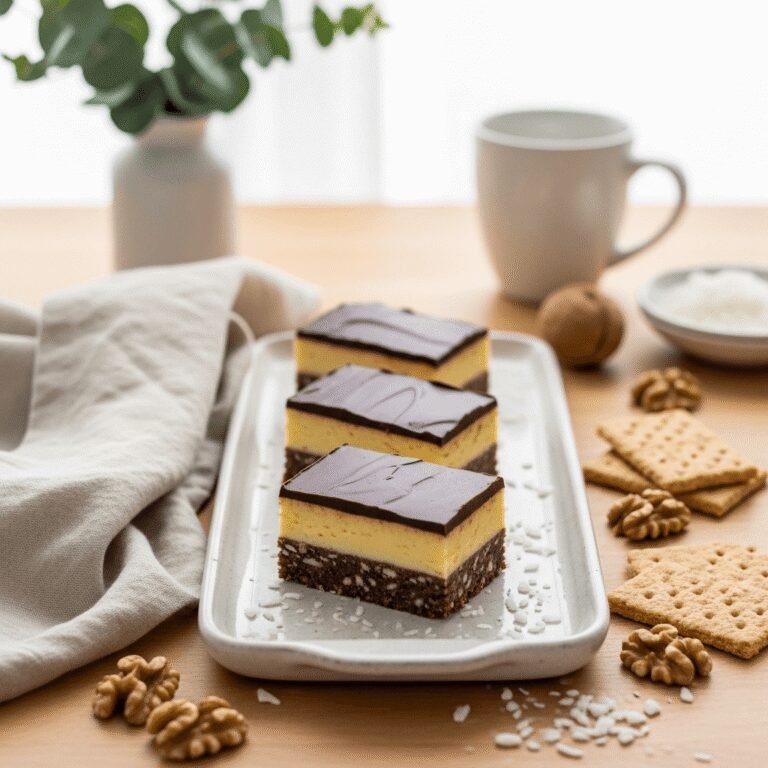
Get ready to fall in love with the most incredible peppermint brownies recipe that combines rich, fudgy chocolate with refreshing peppermint in every delicious bite! These stunning brownies feature a dense chocolate base topped with a creamy peppermint layer and finished with a glossy chocolate ganache, creating the ultimate holiday dessert. Whether you’re baking for Christmas parties, cookie exchanges, or simply want to embrace the festive season, these chocolate peppermint brownies deliver show-stopping results that taste as amazing as they look.
What makes these holiday peppermint brownies so special? The three-layer presentation creates a beautiful contrast of colors and textures – dark chocolate brownie on the bottom, creamy white peppermint layer in the middle, and rich chocolate topping that ties it all together. The cool, refreshing mint flavor perfectly balances the rich chocolate, creating a sophisticated treat that appeals to both kids and adults. These brownies are perfect for holiday gatherings, gift-giving, New Year’s celebrations, or anytime you want to create something truly special that captures the magic of the season!
History / Background
The combination of chocolate and peppermint has become so synonymous with the holiday season that it’s hard to imagine winter celebrations without this iconic flavor pairing. The story of how these two ingredients became festive favorites is a fascinating journey through confectionery history and American holiday traditions.
Peppermint itself has been cultivated for thousands of years, with ancient Egyptians, Greeks, and Romans using it medicinally and in cooking. However, peppermint candy as we know it didn’t emerge until the late 1800s when advances in candy-making technology made mass production possible. The red-and-white striped candy cane, now an iconic Christmas symbol, was invented around 1900 and helped cement peppermint’s association with the holidays.
Chocolate and mint have been paired in confections since the 18th century in European cuisine, particularly in Britain and France. After-dinner mints became popular in the Victorian era, with the cooling sensation of mint believed to aid digestion after rich meals. The Brits, in particular, have a long tradition of mint-chocolate combinations, from mint-filled chocolates to peppermint creams.
The chocolate-peppermint combination became particularly prominent in American culture during the mid-20th century. York Peppermint Patties (introduced in 1940), Junior Mints (1949), and Andes Mints (1950s) all helped popularize this flavor combination. By the 1960s and 1970s, chocolate-mint had become firmly established as a holiday flavor, appearing in seasonal treats from candy canes to hot cocoa mix.
Peppermint brownies as a specific dessert gained popularity in the 1980s and 1990s, as home bakers began creating more elaborate holiday treats. The layered brownie format – with its distinctive chocolate base, mint middle, and chocolate top – became a holiday baking staple, shared through community cookbooks, church bake sales, and eventually food blogs.
The three-layer peppermint brownie design is sometimes called “mint brownies” or “grasshopper brownies” (named after the classic grasshopper cocktail made with crème de menthe). These brownies represent the American tradition of elevating simple treats into something spectacular for holiday celebrations.
Today, Christmas peppermint brownies are a beloved part of holiday baking traditions, appearing at cookie exchanges, on Christmas cookie trays, and as homemade gifts. They capture everything wonderful about holiday baking: festive colors, indulgent flavors, impressive presentation, and that special touch of homemade love.
Why You’ll Love This Recipe
These easy peppermint brownies are absolutely phenomenal, and once you make them, they’ll become your holiday tradition!
Here’s why this recipe will win your heart:
- Stunning presentation – Three beautiful layers that look bakery-professional
- Perfect flavor balance – Rich chocolate with refreshing peppermint
- Fudgy brownie base – Dense, moist chocolate perfection
- Creamy peppermint layer – Smooth, minty, and delicious
- Glossy chocolate topping – Beautiful finish that’s easy to achieve
- Make-ahead friendly – Perfect for holiday prep and gifting
- Crowd-pleasing favorite – Appeals to all ages
- Festive without food coloring – Natural mint flavor, optional green coloring
- Freezer-friendly – Make weeks ahead for stress-free entertaining
- Great for gifting – Package beautifully for neighbors and teachers
- Simple ingredients – No exotic or hard-to-find items needed
- Impressive but achievable – Looks complex but actually straightforward
Whether you’re an experienced baker or trying your first layered dessert, this recipe delivers consistent, spectacular results that make the holidays feel extra special!
Ingredient Notes
Let’s break down the ingredients for these festive chocolate mint brownies:
For the Brownie Layer:
Unsalted Butter – Creates rich flavor and fudgy texture. Use room temperature for melting. Substitution: Coconut oil works for dairy-free (slight coconut flavor).
Semi-Sweet Chocolate – Foundation of chocolate flavor. Use quality chocolate chips or chopped bars. Substitution: Dark chocolate creates more intense flavor; milk chocolate makes sweeter brownies.
Granulated Sugar – Sweetens and creates that crackly top. Substitution: Can use part brown sugar for deeper flavor.
Eggs – Provide structure and richness. Use large eggs at room temperature. Substitution: Flax eggs work for vegan version (texture differs).
Vanilla Extract – Enhances chocolate and mint flavors. Substitution: Vanilla bean paste adds specks.
All-Purpose Flour – Creates structure without making brownies cakey. Substitution: Gluten-free 1:1 flour blend works well.
Cocoa Powder – Intensifies chocolate flavor. Use unsweetened. Substitution: Dutch-process creates darker color.
For the Peppermint Layer:
Butter (Softened) – Creates creamy base for mint layer. Substitution: Vegan butter for dairy-free.
Powdered Sugar – Sweetens and creates smooth texture. Must be sifted! Substitution: Cannot substitute with granulated sugar.
Peppermint Extract – The star! Use pure extract for best flavor. Start with less, add more to taste. Substitution: Crème de menthe (alcohol-based) works but use less.
Milk or Cream – Thins mixture to spreadable consistency. Substitution: Plant-based milk for dairy-free.
Green Food Coloring (Optional) – Creates classic mint appearance. Substitution: Can omit for natural white layer.
For the Chocolate Topping:
Chocolate Chips – Creates glossy ganache topping. Substitution: Chopped chocolate bars work beautifully.
Heavy Cream or Butter – Creates smooth, pourable ganache. Substitution: Coconut cream for dairy-free.
Equipment Needed
You’ll need these tools for perfect peppermint brownies:
Essential:
- 9×9-inch square baking pan (or 8×8 for thicker brownies)
- Medium saucepan (for melting chocolate and butter)
- Large mixing bowl (for brownie batter)
- Medium mixing bowl (for peppermint layer)
- Electric mixer or whisk (for peppermint layer)
- Rubber spatula (for spreading layers)
- Measuring cups and spoons (for accuracy)
- Parchment paper (for easy removal)
- Wire cooling rack (for cooling)
- Small saucepan or microwave-safe bowl (for ganache)
Optional but helpful:
- Offset spatula (for smooth, even layers)
- Toothpick (for testing doneness)
- Kitchen scale (for precise measuring)
Peppermint Brownies Recipe

Decadent three-layer peppermint brownies with fudgy chocolate base, creamy peppermint middle, and glossy chocolate ganache topping. Perfect for Christmas celebrations, holiday parties, and gift-giving!
- Prep Time: 20 minutes
- Cook Time: 25-30 minutes
- Total Time: 2 hours (including cooling and setting time)
- Yield: 16 brownies 1x
- Category: Dessert
- Method: Baking
- Cuisine: American
- Diet: Vegetarian
Ingredients
For the Brownie Layer:
- ½ cup (115g) unsalted butter
- 1 cup (175g) semi-sweet chocolate chips
- 1 cup (200g) granulated sugar
- 2 large eggs, room temperature
- 1 teaspoon vanilla extract
- ⅔ cup (80g) all-purpose flour
- ¼ cup (25g) unsweetened cocoa powder
- ¼ teaspoon salt
For the Peppermint Layer:
- ¼ cup (60g) unsalted butter, softened
- 2 cups (240g) powdered sugar, sifted
- 2 tablespoons milk or heavy cream
- ¾ teaspoon peppermint extract (adjust to taste)
- 3-4 drops green food coloring (optional)
For the Chocolate Topping:
- ¾ cup (130g) semi-sweet chocolate chips
- 3 tablespoons heavy cream or butter
Optional Garnish:
- Crushed candy canes or peppermint candies
- Mini chocolate chips
Instructions
Step 1: Preheat and Prepare Pan
Preheat oven to 350°F (175°C). Line a 9×9-inch square baking pan with parchment paper, leaving overhang on two sides for easy removal. Lightly grease the parchment. Set aside.
Step 2: Make Brownie Layer
In a medium saucepan over low heat, melt butter and 1 cup chocolate chips together, stirring constantly until smooth. Remove from heat and let cool for 5 minutes. Whisk in sugar until combined. Add eggs one at a time, whisking well after each. Add vanilla and whisk until mixture is glossy and thick. In a small bowl, whisk together flour, cocoa powder, and salt. Add to chocolate mixture and fold gently just until combined. Don’t overmix!
Step 3: Bake Brownies
Pour batter into prepared pan, spreading evenly. Bake for 25-30 minutes, until edges are set and center has just a slight jiggle. A toothpick inserted should have moist crumbs, not wet batter. Don’t overbake! Cool completely in pan on wire rack, about 45-60 minutes.
Step 4: Make Peppermint Layer
In a medium bowl using electric mixer, beat softened butter until creamy, about 1 minute. Gradually add sifted powdered sugar, beating on low speed until combined. Add milk, peppermint extract, and food coloring (if using). Beat on medium-high speed for 2-3 minutes until light, fluffy, and smooth. Taste and adjust peppermint extract if desired (add more for stronger mint flavor).
Step 5: Spread Peppermint Layer
Once brownies are completely cool, spread peppermint mixture evenly over the top using offset spatula or back of spoon. Work gently to avoid disturbing the brownie layer. Refrigerate for 20-30 minutes until peppermint layer is firm to touch.
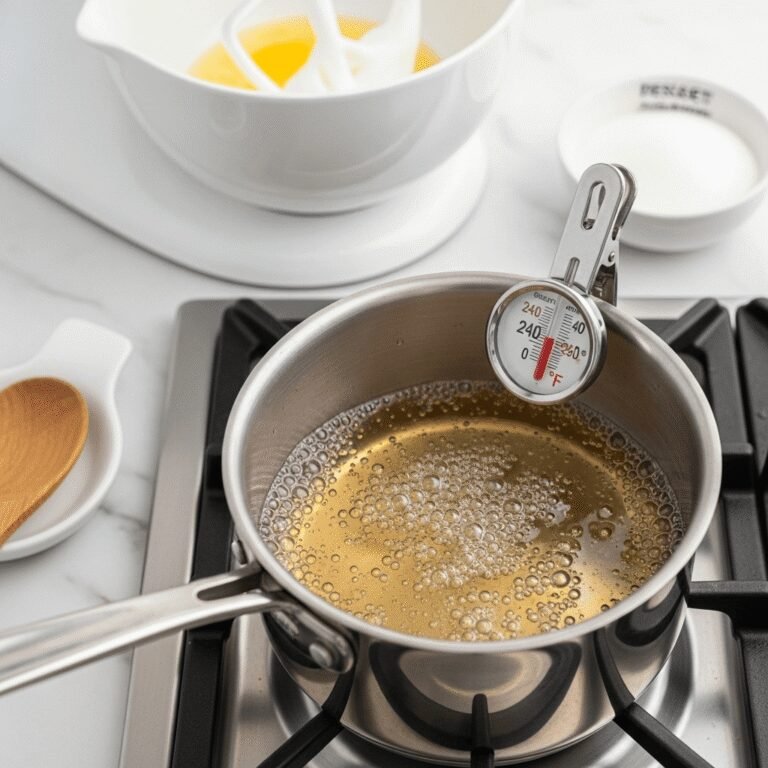
Step 6: Make Chocolate Ganache
In a small saucepan or microwave-safe bowl, heat heavy cream until just beginning to simmer (don’t boil). Pour hot cream over ¾ cup chocolate chips. Let sit undisturbed for 2 minutes, then stir until smooth and glossy. Let cool for 5-10 minutes until slightly thickened but still pourable.
Step 7: Add Chocolate Topping
Pour ganache over chilled peppermint layer. Use offset spatula to spread evenly, covering entire surface. If desired, immediately sprinkle with crushed candy canes or mini chocolate chips before ganache sets.
Step 8: Chill and Cut
Refrigerate brownies for at least 1 hour until chocolate topping is completely set. Use parchment overhang to lift brownies out of pan. Place on cutting board and cut into 16 squares with sharp knife, wiping blade clean between cuts for neat edges.
Step 9: Serve
Serve chilled or at room temperature. Store leftovers covered in refrigerator.
Notes
- Cool completely: Brownie layer must be completely cool before adding peppermint layer.
- Peppermint strength: Start with ¾ teaspoon extract, taste, add more if desired. Strength varies by brand.
- Food coloring optional: Green coloring is traditional but not necessary. White layer is equally pretty!
- Ganache consistency: If ganache is too thin, let it cool longer. If too thick, warm slightly.
- Clean cuts: Wipe knife between cuts, or use plastic knife for cleanest slices.
- Make ahead: These improve after refrigeration as flavors meld.
Nutrition
- Serving Size: 1 brownie (1/16 of recipe)
- Calories: 245
- Sugar: 28g
- Sodium: 60mg
- Fat: 12g
- Saturated Fat: 7g
- Unsaturated Fat: 4g
- Trans Fat: 0g
- Carbohydrates: 34g
- Fiber: 1g
- Protein: 2g
- Cholesterol: 40mg
Tips & Variations
The beauty of peppermint brownies is how wonderfully customizable they are!
Dark Chocolate Peppermint Brownies: Use dark chocolate (70% cacao) for intense chocolate flavor. Reduce sugar by 2 tablespoons.
White Chocolate Peppermint: Replace brownie layer with white chocolate blondies for elegant twist.
Candy Cane Brownies: Mix crushed candy canes into brownie batter and sprinkle on top of ganache.
Grasshopper Brownies: Add 2 tablespoons crème de menthe to peppermint layer for adult version.
Double Mint: Add mini chocolate chips and crushed Andes mints to brownie batter.
Gluten-Free: Use 1:1 gluten-free flour blend. Texture remains perfect!
Vegan Peppermint Brownies: Use flax eggs, vegan butter, dairy-free chocolate chips, and plant milk.
Red Velvet Peppermint: Add red food coloring to brownie layer for festive red-white-brown layers.
Peppermint Mocha: Add 1 teaspoon instant espresso powder to brownie batter.
No-Bake Peppermint Layer: Make peppermint layer with cream cheese instead of butter for cheesecake-like texture.
Thin Mint Style: Add crushed Girl Scout Thin Mints to brownie batter.
Pro Chef Tips
Want bakery-quality results? Here are professional secrets:
Bring all ingredients to room temperature before starting. Room temperature eggs, butter (for peppermint layer), and dairy blend more smoothly and create better texture throughout all three layers.
Use high-quality chocolate and pure peppermint extract. Since these are the star flavors, quality makes enormous difference. Cheap chocolate tastes waxy, and imitation peppermint extract tastes artificial.
Sift powdered sugar for the peppermint layer. Lumpy powdered sugar creates grainy texture. Always sift it before mixing for smooth, professional results.
Cool brownie layer completely before adding peppermint. Warm brownies will melt the peppermint layer, creating a mess. Be patient – full cooling takes 45-60 minutes.
Beat peppermint layer until very fluffy. Don’t rush this step! Beating for 2-3 minutes incorporates air, creating light, creamy texture instead of dense, paste-like consistency.
Add peppermint extract gradually. Peppermint strength varies wildly by brand. Start with less, taste, then add more. Too much creates medicinal flavor.
Let ganache cool before pouring. If ganache is too hot, it will melt the peppermint layer and create muddy appearance. Cool until barely warm and slightly thickened.
Work quickly spreading ganache. Once you start spreading, work efficiently before it sets. Use offset spatula for smoothest finish.
Refrigerate fully before cutting. Cold brownies cut cleanly with defined layers. Room temperature brownies create smeared, messy cuts.
Use plastic knife for cleanest cuts. Professional trick! Plastic knives cut through chocolate without dragging or cracking the ganache layer.
Common Mistakes to Avoid
Even beautiful layered brownies can go wrong. Here are pitfalls to watch for:
Adding peppermint layer to warm brownies: This is disaster! Warm brownies melt the butter in the peppermint layer, creating a runny mess that soaks into the brownie instead of staying as a distinct layer. Always wait until brownies are completely cool to the touch.
Using too much peppermint extract: Peppermint is powerful! Too much creates medicinal, toothpaste-like flavor instead of refreshing mint. Start with ¾ teaspoon, taste the peppermint mixture, and add more only if needed. You can always add more but can’t remove it!
Not sifting powdered sugar: Lumpy powdered sugar creates grainy, unpleasant texture in the peppermint layer. The lumps won’t dissolve, leaving white chunks throughout. Always sift powdered sugar before adding to ensure smooth, creamy results.
Pouring hot ganache over peppermint layer: Hot ganache melts the peppermint layer underneath, creating muddy, mixed layers instead of distinct beautiful stripes. Let ganache cool until just barely warm and slightly thickened before pouring.
Cutting brownies too soon: Cutting before chocolate topping is completely set creates dragged, messy appearance. Refrigerate at least 1 hour (or overnight is even better) before cutting. Cold brownies = clean cuts with perfect layers.
Overbaking brownies: Even though these get topped with two more layers, the brownie base still needs to be fudgy, not cakey. Pull them when center still has slight jiggle and toothpick has moist crumbs.
Storage & Meal Prep
Peppermint brownies store beautifully!
Refrigerator Storage: Store brownies in airtight container in refrigerator for up to 1 week. The peppermint layer and ganache topping require refrigeration. Layer parchment paper between stacks to prevent sticking.
Room Temperature Storage: Not recommended due to butter-based peppermint layer. It will soften and potentially melt at room temperature, especially in warm kitchens.
Individual Wrapping: Wrap individual brownies in plastic wrap, then store in container or freezer bag. Perfect for gift-giving or grab-and-go treats!
Serving Temperature: These brownies are delicious served cold, but many prefer them at cool room temperature. Remove from fridge 15-20 minutes before serving for best flavor and texture.
Best Storage Container: Use container with tight-fitting lid to prevent brownies from absorbing other refrigerator odors and to protect the ganache layer.
Make-Ahead & Freezer Notes
Perfect for holiday prep!
Make-Ahead Timeline:
- 3 days ahead: Bake and assemble completely, refrigerate covered.
- 1 day ahead: Ideal timing! Flavors meld beautifully overnight.
- Day of: Cut and serve. These actually improve with time!
Freezing Complete Brownies: Cool completely, cut into squares, place on baking sheet and freeze until solid (2 hours). Wrap each brownie individually in plastic wrap, place in freezer bag or container. Freeze up to 3 months. Thaw in refrigerator overnight.
Freezing Uncut Pan: Wrap cooled, uncut pan tightly in plastic wrap, then aluminum foil. Freeze up to 3 months. Thaw overnight in refrigerator, then cut.
Freezing Just Brownie Layer: Bake brownie layer, cool completely, wrap tightly, freeze up to 3 months. Thaw, then add fresh peppermint layer and ganache for best results.
Thawing: Always thaw frozen brownies in refrigerator (6-8 hours or overnight) rather than at room temperature. This prevents condensation and maintains texture.
Not Recommended: Freezing ganache can sometimes cause it to “bloom” (white streaks) when thawed, though it’s still safe to eat. For best appearance, freeze before adding ganache and add fresh topping after thawing.
Serving Suggestions
Peppermint brownies are festive and versatile!
Holiday Cookie Tray: Arrange on platter with other Christmas cookies like sugar cookies, gingerbread, and shortbread for stunning variety.
Gift Giving: Package in clear cellophane bags tied with red ribbon, or in decorative tins lined with parchment paper. Perfect for neighbors, teachers, and coworkers!
Dessert Plating: Serve on white plates dusted with cocoa powder, garnished with fresh mint sprig and candy cane piece.
Ice Cream Pairing: Serve with vanilla or peppermint ice cream for ultimate indulgence.
Hot Cocoa Bar: Offer as part of hot chocolate station at holiday parties.
Perfect Accompaniments:
- Vanilla ice cream
- Peppermint ice cream
- Hot chocolate
- Fresh whipped cream
- Coffee
- Eggnog
- Fresh mint garnish
- Crushed candy canes
- Chocolate sauce drizzle
Beverage Pairings:
- Hot chocolate
- Peppermint mocha
- Coffee or espresso
- Milk
- Hot tea
- Irish cream liqueur (adults)
Occasion Ideas:
- Christmas parties
- Cookie exchanges
- Holiday office parties
- New Year’s celebrations
- Winter birthdays
- Teacher gifts
- Neighborhood treats
- Bake sales
FAQs Section
Can I make these without peppermint extract?
Yes, but they wouldn’t be peppermint brownies! You could replace with vanilla or almond extract for different flavor. For mint without peppermint, try crème de menthe (use less, as it’s stronger).
How strong should the peppermint flavor be?
This is personal preference! Start with ¾ teaspoon extract and taste the peppermint mixture before spreading. Add more if you want stronger mint flavor. Some brands are more potent than others.
Can I use candy canes instead of extract?
Not really. Candy canes don’t dissolve well and create grainy texture. However, you can crush them for garnish on top of the ganache, which adds nice peppermint punch and festive appearance!
Why is my peppermint layer too soft?
Usually from not enough powdered sugar or too much liquid. Make sure you’re using 2 full cups of sifted powdered sugar. Also, refrigerate the layer to firm it up before adding ganache.
Can I make these without the ganache topping?
Yes! The brownies are still delicious with just the peppermint layer. You could dust with powdered sugar or drizzle with melted chocolate instead of ganache.
How do I get clean, professional-looking cuts?
Refrigerate brownies until very cold. Use a sharp knife warmed under hot water and wiped dry. Wipe knife clean between each cut. For absolutely perfect cuts, use a plastic knife – it won’t drag through the chocolate like metal does!
Do I have to use green food coloring?
Absolutely not! The white peppermint layer is equally pretty and looks elegant. Green is traditional but purely for visual appeal. The taste is identical either way.
Conclusion
And there you have it – everything you need to create the most spectacular peppermint brownies that capture all the magic of the holiday season! These three-layer beauties aren’t just dessert – they’re an edible celebration, a showstopper, and a delicious way to spread holiday cheer to everyone lucky enough to get one.
Whether you’re building your holiday baking tradition, preparing treats for cookie exchanges, or making homemade gifts that show you care, these festive peppermint brownies deliver professional bakery results that’ll have everyone asking for your recipe. The combination of fudgy chocolate, creamy mint, and glossy ganache creates pure perfection in every bite!
I’d love to hear about your peppermint brownie adventures! Did you add candy cane topping? How did your holiday guests react? Did they become your new December tradition? Drop a comment below and share your experience – I read every one and love seeing how you make these special! If these brownies brought extra joy to your holidays, please save this recipe to your Pinterest boards and share it with friends who love festive baking. Let’s spread the peppermint-chocolate holiday cheer!
Now grab that peppermint extract and preheat your oven – the most beautiful, delicious holiday brownies are waiting to be created! Happy holiday baking!