The Ultimate Ice Cream Sandwich Cake Recipe – Easy No-Bake Dessert
If you’re looking for a show-stopping dessert that requires absolutely zero baking skills, this Ice Cream Sandwich Cake is about to become your new best friend! This dreamy frozen treat layers store-bought ice cream sandwiches with whipped topping, hot fudge, caramel, and your favorite mix-ins to create a jaw-dropping cake that looks like you spent hours in the kitchen. The best part? It comes together in just 15 minutes of active prep time, then the freezer does all the work for you.
This ice cream sandwich cake is perfect for summer BBQs, birthday parties, Fourth of July celebrations, or any time you need a crowd-pleasing dessert without the stress. It’s endlessly customizable, feeds a crowd, and tastes like a fancy ice cream cake from a specialty shop – but costs a fraction of the price and requires zero special equipment. Whether you’re hosting a backyard party or need a make-ahead dessert for a potluck, this no-bake ice cream sandwich cake delivers big flavor with minimal effort.
History / Background
The ice cream sandwich itself has been an American favorite since the early 1900s, with the first patent for an ice cream sandwich machine filed in 1899. These frozen treats became a staple of ice cream trucks and convenience stores throughout the 20th century, beloved for their portable, hand-held format and the perfect ratio of creamy ice cream to soft chocolate wafers.
The genius concept of transforming individual ice cream sandwiches into a layered cake likely emerged in the 1980s and 1990s when home cooks discovered that these pre-portioned treats could be arranged to create impressive-looking desserts without any actual baking. This coincided with the rise of no-bake desserts and semi-homemade cooking, popularized by cooking shows and magazines that emphasized convenience without sacrificing taste.
The ice cream sandwich cake represents the perfect evolution of American dessert culture – taking a nostalgic childhood favorite and elevating it into something suitable for adult entertaining. It embodies the creativity of home cooks who work smarter, not harder, and the democratization of impressive desserts. You don’t need pastry chef skills or expensive ingredients to create something that looks and tastes absolutely spectacular. This recipe has been shared at countless family reunions, pinned thousands of times on Pinterest, and has become a staple of summer entertaining across the United States.
Why You’ll Love This Recipe
This ice cream sandwich cake is the definition of a crowd-pleaser that makes your life easier. It’s one of those magical recipes that looks incredibly impressive but is secretly one of the easiest desserts you’ll ever make. The combination of textures – soft cake-like ice cream sandwiches, fluffy whipped topping, gooey sauces, and crunchy mix-ins – creates a dessert experience that keeps everyone coming back for seconds.
Here’s why this recipe will become your go-to party dessert:
- No baking required – Perfect for hot summer days when you don’t want to turn on the oven
- Make-ahead friendly – Prepare it days in advance and let it sit in the freezer until party time
- Budget-friendly – Uses affordable store-bought ingredients that cost less than a bakery cake
- Endlessly customizable – Switch up flavors, toppings, and mix-ins to match any theme or preference
- Feeds a crowd – One pan easily serves 12-15 people, making it ideal for gatherings
- Kid-approved – Children absolutely love helping assemble this and choosing their favorite toppings
- No special equipment – Just needs a 9×13 pan and a few simple tools you already own
- Impressive presentation – Looks like a gourmet ice cream cake that took hours to create
- Foolproof recipe – Nearly impossible to mess up, making it perfect for beginner cooks
- Stress-free entertaining – Dessert is completely done before guests arrive
Ingredient Notes
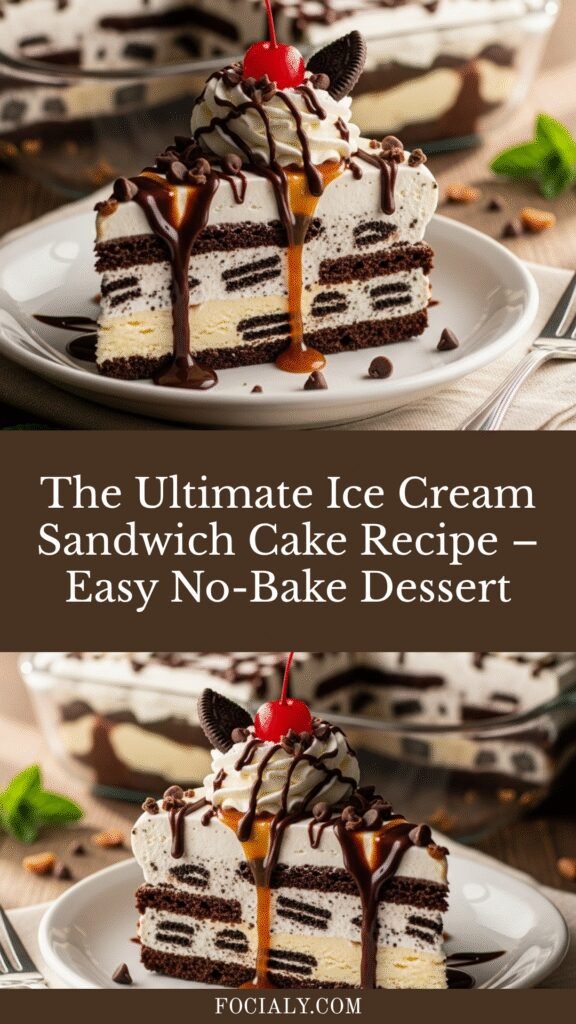
Ice Cream Sandwiches: The foundation of this recipe! Standard rectangular ice cream sandwiches (like Klondike or store brands) work perfectly. You’ll need about 24 sandwiches for a 9×13 pan. Choose vanilla ice cream sandwiches for the most versatile base, or experiment with chocolate, Neapolitan, or specialty flavors. Make sure they’re the same size for even layering. You can substitute with ice cream cookie sandwiches for a different texture.
Whipped Topping: Cool Whip or similar frozen whipped topping spreads easily and holds up well in the freezer. You’ll need about 16 ounces total. For a homemade alternative, use stabilized whipped cream (add 2 tablespoons of powdered sugar and 1 teaspoon of vanilla to heavy cream before whipping). Regular whipped cream works but may become icy in the freezer.
Hot Fudge Sauce: Adds rich chocolate flavor and gorgeous drizzle appeal. Use jarred hot fudge sauce (slightly warmed for easier spreading) or homemade chocolate ganache. Microwave for 15-20 seconds if it’s too thick to drizzle. Substitute with chocolate syrup, Nutella, or peanut butter sauce.
Caramel Sauce: Provides sweet, buttery contrast to the chocolate. Jarred caramel sauce or dulce de leche both work beautifully. Warm it slightly for better drizzling. Can be substituted with butterscotch sauce, salted caramel, or even honey.
Mix-Ins and Toppings: This is where you can get creative! Popular options include crushed Oreos, chocolate chips, toffee bits, crushed candy bars (Snickers, Reese’s, Butterfinger), mini M&Ms, chopped nuts, sprinkles, crushed graham crackers, or cookie dough pieces. Choose 2-3 different textures for best results.
Optional: Chocolate sandwich cookies (Oreos) for a cookie crumb layer, peanut butter cups for extra richness, or mini marshmallows for fun texture.
Equipment Needed
- 9×13-inch baking pan or dish – Glass, ceramic, or metal all work; glass is nice for showing off the layers
- Aluminum foil or plastic wrap – For covering the cake while it freezes
- Offset spatula or butter knife – For spreading whipped topping evenly
- Microwave-safe bowls – For warming sauces
- Measuring cups – For portioning toppings
- Sharp knife – For slicing the finished cake
- Spoon or piping bag – For drizzling sauces
- Cutting board – Optional, for chopping candy bars or cookies
Ice Cream Sandwich Cake Recipe

A stunning no-bake ice cream sandwich cake layered with whipped topping, hot fudge, caramel sauce, and your favorite candy toppings. This easy frozen dessert looks impressive but comes together in just 15 minutes of prep time – perfect for summer parties and celebrations!
- Prep Time: 15 minutes
- Cook Time: 4 hours
- Total Time: 4 hours 15 minutes
- Yield: 12-15 servings 1x
- Category: Dessert
- Method: No-Bake
- Cuisine: American
- Diet: Vegetarian
Ingredients
For the Cake:
- 24 ice cream sandwiches (standard rectangular size)
- 16 ounces (about 2 tubs) frozen whipped topping, thawed
- 1 cup hot fudge sauce, slightly warmed
- ¾ cup caramel sauce, slightly warmed
- 1½ cups crushed Oreos (about 15 cookies)
- 1 cup mini chocolate chips
- 1 cup toffee bits or Heath bar pieces
- ½ cup chopped peanuts (optional)
For Topping:
- Additional whipped topping for garnish
- Extra drizzles of chocolate and caramel sauce
- Maraschino cherries (optional)
- Chocolate shavings or curls (optional)
Instructions
Step 1: Prepare Your Pan
Line a 9×13-inch pan with aluminum foil or parchment paper, leaving some overhang on the sides for easy removal later. This step is optional but makes serving much easier and cleaner.
Step 2: Create the First Layer
Arrange 12 ice cream sandwiches in a single layer on the bottom of the pan. You may need to slightly trim or squeeze them to fit snugly. Work quickly so they don’t start melting. It’s okay if there are small gaps – the toppings will fill them in.
Step 3: Add Whipped Topping
Spread half of the thawed whipped topping (about 8 ounces) evenly over the ice cream sandwiches using an offset spatula or the back of a spoon. Make sure to spread it all the way to the edges for even coverage.
Step 4: Drizzle Sauces
Drizzle half of the warmed hot fudge sauce and half of the caramel sauce over the whipped topping layer. You can do this in stripes, swirls, or a random pattern – there’s no wrong way! Use a spoon or squeeze bottle for better control.
Step 5: Add Mix-Ins
Sprinkle half of the crushed Oreos, half of the chocolate chips, and half of the toffee bits over the sauce layer. Gently press them into the whipped topping so they adhere.
Step 6: Repeat Layers
Place the remaining 12 ice cream sandwiches on top, creating a second layer. Spread the remaining whipped topping over this layer, then repeat with the remaining sauces and toppings.
Step 7: Freeze
Cover the pan tightly with plastic wrap or aluminum foil. Freeze for at least 4 hours or overnight until completely firm. For best results, freeze overnight to allow all the layers to set properly and the ice cream sandwiches to soften into a cake-like texture.
Step 8: Serve
Remove from freezer 5-10 minutes before serving to make slicing easier. Use the foil overhang to lift the cake out of the pan if desired, or slice directly in the pan. Cut into squares using a sharp knife dipped in hot water and wiped clean between cuts. Garnish individual slices with extra whipped topping, sauce drizzles, and cherries if desired.
Notes
- Customization is key: Feel free to swap out any of the toppings for your favorites. This recipe is incredibly flexible!
- Work quickly: Ice cream sandwiches soften fast, so have all your ingredients ready before you start assembling.
- Make it themed: Use colored sprinkles, candy, or themed toppings for holidays and special occasions.
- Slice clean: For the cleanest slices, dip your knife in very hot water, wipe it dry, and then cut. Repeat between each slice.
- Storage: Keep covered in the freezer for up to 2 weeks. After that, ice crystals may start to form.
Nutrition
- Serving Size: 1 slice (1/12 of cake)
- Calories: 425
- Sugar: 48g
- Sodium: 180mg
- Fat: 18g
- Saturated Fat: 11g
- Unsaturated Fat: 5g
- Trans Fat: 0g
- Carbohydrates: 62g
- Fiber: 2g
- Protein: 5g
- Cholesterol: 25mg
Nutrition information is approximate and will vary based on specific brands and toppings used.
Tips & Variations
Flavor Variations:
- Mint Chocolate: Use mint chocolate chip ice cream sandwiches, Andes mints, and green food coloring in the whipped topping
- Peanut Butter Heaven: Add peanut butter sauce, Reese’s pieces, and chopped peanut butter cups
- Birthday Cake Style: Use birthday cake flavored ice cream sandwiches and cover with rainbow sprinkles and crushed sugar cookies
- S’mores Version: Add marshmallow fluff, crushed graham crackers, and mini marshmallows
- Coffee Lovers: Use coffee ice cream sandwiches, espresso sauce, and crushed biscotti
- Cookies and Cream: Double up on Oreos and use white chocolate chips instead of regular
- Strawberry Shortcake: Use strawberry ice cream sandwiches, fresh strawberry sauce, and crushed vanilla wafers
Dietary Modifications:
- Gluten-Free: Use gluten-free ice cream sandwiches and certified gluten-free toppings
- Dairy-Free: Choose dairy-free ice cream sandwiches and coconut whipped cream
- Lower Sugar: Opt for no-sugar-added ice cream sandwiches and sugar-free sauces
Presentation Ideas:
- Pipe whipped topping rosettes on top for an elegant look
- Create a drip effect with warm ganache around the edges
- Spell out messages with chocolate sauce for celebrations
- Add fresh berries for a pop of color and freshness
Pro Chef Tips
Temperature Control: The key to a perfect ice cream sandwich cake is working with properly softened ingredients. Take your whipped topping out of the freezer 10-15 minutes before assembly so it spreads easily but isn’t too runny. Conversely, keep your ice cream sandwiches as cold as possible until the moment you need them.
Sauce Consistency: Warm your chocolate and caramel sauces just until they’re pourable but not hot. If they’re too warm, they’ll melt the ice cream sandwiches. If they’re too cold, they won’t drizzle nicely. Aim for honey-like consistency – thick enough to stay in place but fluid enough to create beautiful swirls.
Even Layers: Use a small offset spatula to spread your whipped topping evenly. Start in the center and work your way out to the edges. This ensures every bite has the perfect ratio of cream to ice cream to toppings. Don’t worry about making it perfectly smooth – a rustic look is beautiful too!
Flavor Balance: Professional pastry chefs know that great desserts balance sweet, salty, rich, and textural elements. Include at least one salty component (like salted caramel or pretzels) to cut through the sweetness, and one crunchy element (like toffee or nuts) for textural contrast.
Freezer Positioning: Place your assembled cake on a flat freezer shelf, not in the door. The door experiences temperature fluctuations every time it opens, which can cause ice crystals to form. A stable, consistently cold environment keeps your cake smooth and creamy.
Common Mistakes to Avoid
Mistake #1: Using Rock-Hard Sauces – If your fudge or caramel sauce is too thick and cold, it won’t spread properly and can tear your whipped topping layer. Always warm them slightly before drizzling. Solution: Microwave in 10-second intervals, stirring between each, until pourable.
Mistake #2: Letting Ice Cream Sandwiches Soften Too Much – If your ice cream sandwiches get too soft during assembly, your cake will be sloppy and the layers won’t be distinct. Solution: Work in batches if needed. Place half the sandwiches while keeping the rest in the freezer, then swap.
Mistake #3: Skipping the Freezing Time – Trying to serve this cake before it’s fully frozen results in a melty mess that won’t slice cleanly. Solution: Plan ahead and freeze overnight. If you’re short on time, 4-5 hours is the absolute minimum, and even then, work quickly when serving.
Mistake #4: Using Too Much Sauce – While it’s tempting to pour on loads of chocolate and caramel, too much sauce can make the cake soggy and overpower the other flavors. Solution: Use a light hand and remember you can always drizzle more on individual slices when serving.
Mistake #5: Cutting with a Cold Knife – A cold knife will drag and tear through the frozen layers, creating messy slices. Solution: Dip your knife in hot water, wipe it completely dry, and then make each cut. Repeat this process for every slice to ensure clean, professional-looking portions.
Storage & Meal Prep
Refrigerator Storage: This cake must be stored in the freezer, not the refrigerator. In the fridge, it will melt into a soupy mess within 30 minutes. Always keep it frozen until ready to serve.
Freezer Storage: Once assembled and fully frozen, wrap the cake tightly in plastic wrap, then cover with aluminum foil to prevent freezer burn. Properly stored, your ice cream sandwich cake will maintain great quality for up to 2 weeks. After that point, ice crystals may begin to form, and the texture won’t be quite as creamy, though it will still be safe to eat for up to 1 month.
Individual Slice Storage: If you have leftovers, you can wrap individual slices tightly in plastic wrap and store them in a freezer-safe container or zip-top bag. This makes it easy to grab a single serving whenever a craving hits. Individual slices are best consumed within 1 week for optimal texture.
Preventing Freezer Burn: The enemy of frozen desserts is air exposure. Make sure your cake is sealed airtight. If you notice any exposed areas, add an extra layer of plastic wrap over those spots. Some people even place the entire wrapped cake in a large freezer-safe bag for extra protection.
Serving from Frozen: Remove the cake from the freezer 5-10 minutes before you plan to slice it. This brief tempering period makes cutting much easier and results in slices that aren’t rock-hard. However, don’t let it sit out longer than 15 minutes or it will start to melt.
Make-Ahead & Freezer Notes
Advance Preparation: This is one of the best make-ahead desserts you can prepare! You can assemble this ice cream sandwich cake up to 1 week before your event. In fact, making it a day or two ahead actually improves the texture, as the ice cream sandwiches soften slightly and meld with the other layers, creating a more cohesive cake-like consistency.
Component Prep: If you want to break up the work even further, you can prepare your mix-ins and toppings ahead of time. Crush your Oreos, chop your candy bars, and portion your sauces into containers up to a week in advance. Store them at room temperature (for cookies and candies) or in the fridge (for sauces) until assembly day.
Freezing Instructions: After assembling your cake, allow it to freeze uncovered for 1 hour to set the top layer. This prevents the plastic wrap from sticking to the whipped topping. Then cover tightly with plastic wrap followed by aluminum foil. Label with the date so you know when you made it.
Transporting: If you need to bring this cake to a party or potluck, keep it frozen until the last possible moment. Transport in a cooler with ice packs surrounding (but not touching) the cake. The cake can stay frozen in a well-iced cooler for 2-3 hours. When you arrive, transfer immediately to the host’s freezer until dessert time.
No Thawing Needed: Unlike many frozen desserts, this cake is served directly from the freezer. There’s no waiting for it to thaw, which makes timing your dessert service incredibly easy. Just remember that brief 5-10 minute tempering period for easier slicing, and you’re ready to go.
Batch Cooking: Hosting multiple events? You can make 2-3 of these cakes at once and keep them in your freezer for whenever you need them. Just make sure you have the freezer space and proper wrapping to keep each one fresh.
Serving Suggestions
Perfect Pairings: This ice cream sandwich cake is a complete dessert on its own, but here are some wonderful accompaniments to elevate your dessert presentation:
- Fresh berries – Raspberries, strawberries, or blueberries add a pop of color and fresh flavor that cuts through the richness
- Hot coffee or espresso – The bitter notes complement the sweet cake beautifully, making it perfect for after-dinner service
- Dessert wine – A glass of moscato, ice wine, or port pairs wonderfully with this frozen treat
- Wafer cookies or pirouettes – Serve on the side for extra crunch and an elegant presentation
- Chocolate shavings – Fresh chocolate curls made with a vegetable peeler add a gourmet touch
- Toasted nuts – Candied pecans or almonds provide textural contrast
- Fresh mint sprigs – A simple garnish that adds color and a hint of freshness
Occasion Ideas:
- Summer BBQs – Keep it in a cooler and serve as the grand finale to grilled meals
- Birthday parties – Add birthday candles and personalize with the guest of honor’s favorite toppings
- Fourth of July – Use red, white, and blue sprinkles and serve with sparklers
- Pool parties – Pre-slice into bars for easy poolside snacking
- Graduation celebrations – Decorate the top with school colors
- Baby showers – Use pastel toppings and add cute decorative elements
- Movie nights – Slice into smaller pieces for easy couch snacking
Plating Suggestions: Serve each slice on a chilled dessert plate with a drizzle of extra sauce, a dollop of whipped cream, and a cherry on top for a classic ice cream parlor presentation. For a more modern look, serve on dark plates to make the colors pop, and add a dusting of cocoa powder around the edge.
FAQs Section
Can I make this with homemade ice cream sandwiches?
Absolutely! Homemade ice cream sandwiches work beautifully. Just make sure they’re completely frozen solid before assembling the cake, and try to make them uniform in size for even layering. The advantage of store-bought is consistency and convenience, but homemade adds a special personal touch.
How long before serving should I take the cake out of the freezer?
Remove the cake from the freezer just 5-10 minutes before you plan to slice it. This brief period allows the exterior to soften just enough for easier cutting without the cake melting. If you’re serving outdoors in hot weather, keep it in the freezer until the last possible moment and work quickly.
Can I use sugar-free or low-fat ingredients?
Yes! Sugar-free ice cream sandwiches, sugar-free sauces, and light whipped topping all work in this recipe. Keep in mind that the texture may be slightly different – sugar-free ice cream can be icier, and low-fat whipped topping may not be quite as fluffy – but the cake will still be delicious and much lower in sugar and calories.
What if my ice cream sandwiches don’t fit perfectly in the pan?
Don’t worry about perfect fit! You can trim ice cream sandwiches with a sharp knife if they’re too large, or squeeze them gently to fit. Small gaps between sandwiches are completely fine – the whipped topping and toppings will fill in any spaces. Some people even break sandwiches into pieces to fill odd spaces.
Can I make individual servings instead of one large cake?
Definitely! Use a muffin tin or small individual serving cups. Layer one ice cream sandwich (cut to fit), a layer of whipped topping and toppings, then repeat. Cover each cup with plastic wrap and freeze. This is perfect for portion control or for serving at events where guests might eat at different times.
Why did my cake turn out icy or grainy?
Ice crystals usually form when the cake experiences temperature fluctuations. This happens if the freezer door is opened frequently, if the cake isn’t wrapped airtight, or if it’s stored in the freezer door instead of on a stable shelf. Make sure your cake is tightly wrapped and stored in the coldest, most stable part of your freezer.
Can I add alcohol to this recipe?
Yes! Adult versions are delicious. You can brush the ice cream sandwiches with a tablespoon of liqueur (Kahlua, Bailey’s, or amaretto work well) before adding the whipped topping, or fold a tablespoon or two into the whipped topping itself. Don’t add too much liquid or it will make the cake icy. Keep in mind that alcohol doesn’t freeze completely, so it may make the texture slightly softer.
Conclusion
There you have it – the ultimate ice cream sandwich cake that’s guaranteed to steal the show at your next gathering! This no-bake frozen dessert proves that impressive doesn’t have to mean complicated. With just a handful of store-bought ingredients and about 15 minutes of assembly time, you can create a stunning layered cake that tastes like it came from a gourmet ice cream shop.
The beauty of this recipe is its versatility. Make it exactly as written, or let your creativity run wild with different flavors, toppings, and theme-inspired decorations. Whether you’re serving it at a casual backyard BBQ or a milestone birthday celebration, this ice cream sandwich cake delivers every single time. It’s become my go-to dessert when I want to look like a kitchen superstar without breaking a sweat!
I’d love to see your creations! When you make this ice cream sandwich cake, snap a photo and share it on Pinterest or Instagram. What flavor combinations will you try? Do you have a secret ingredient that would take this cake to the next level? Drop a comment below and let me know – I read every single one and love hearing about your kitchen adventures!
Don’t forget to save this recipe to your Pinterest dessert board so you have it ready the next time you need an easy crowd-pleasing treat. And if you loved this recipe, check out my other no-bake summer desserts for more stress-free sweet treats. Happy freezing! 🍦