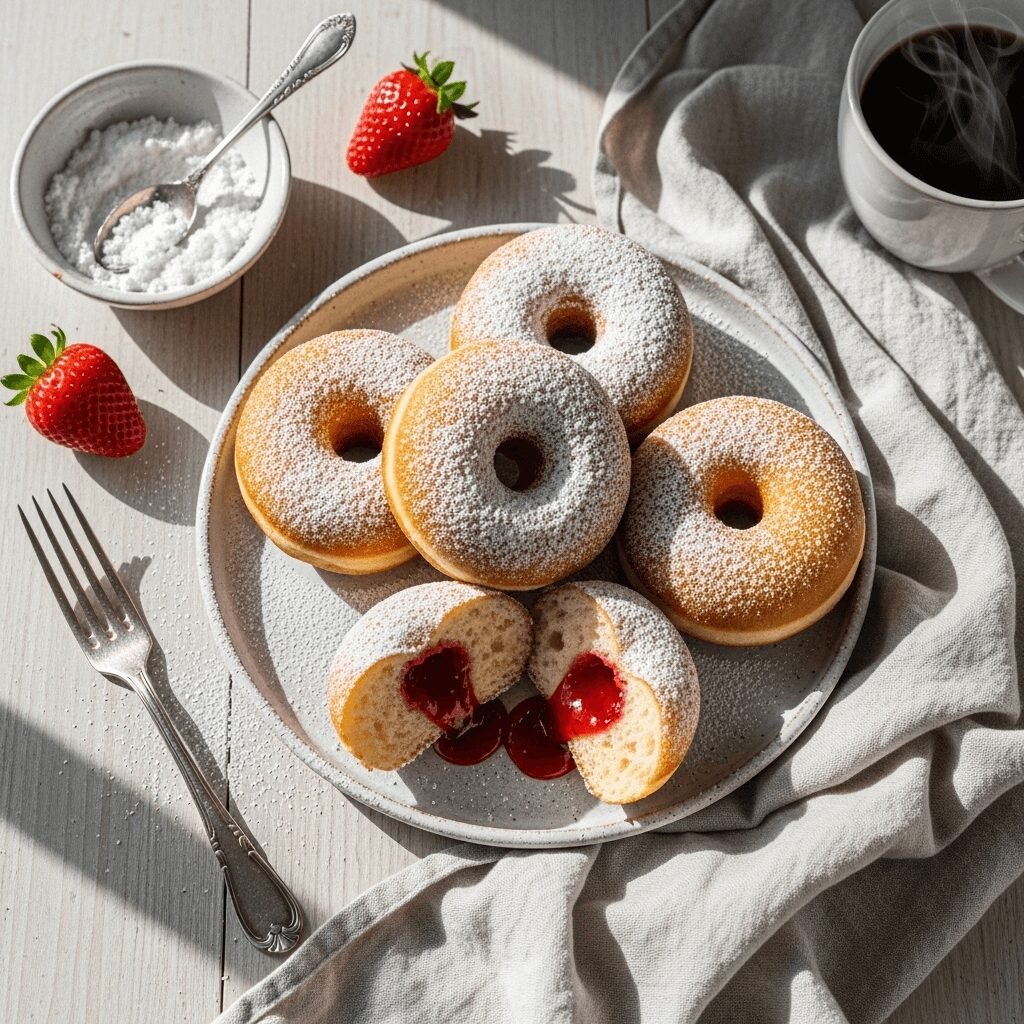
Homemade Jelly Donuts Recipe – Fluffy, Sweet & Irresistible!

There’s something absolutely magical about biting into a warm, pillowy jelly donut with powdered sugar dusting your lips and sweet fruit filling oozing out with every bite. These homemade jelly donuts are the ultimate comfort food that brings back childhood memories of bakery visits and special weekend treats. Unlike store-bought versions that can taste artificial or stale, making jelly donuts from scratch gives you complete control over the quality of ingredients and freshness.
This classic recipe creates beautifully golden, light-as-air donuts filled with your favorite jam or jelly and coated in a snowy blanket of powdered sugar. They’re perfect for weekend brunch, holiday mornings, birthday celebrations, or any time you want to impress your family with something truly special. While they do require some patience for the dough to rise, the active hands-on time is surprisingly manageable, and the results are absolutely worth every minute. Whether you call them jelly donuts, filled donuts, or Berliners, this recipe will become your go-to whenever you’re craving bakery-quality treats at home.
History / Background
Jelly donuts have a rich and fascinating history that spans continents and centuries. The concept of fried dough dates back thousands of years, but the jelly-filled donut as we know it today has more specific origins. In Germany, a pastry called “Berliner Pfannkuchen” or simply “Berliner” has been enjoyed since at least the 16th century. Legend has it that a patriotic baker from Berlin wanted to serve as a cannoneer under Frederick the Great, but was deemed unfit for military service. Instead, he became a field baker and created these round pastries shaped like cannonballs, frying them in fat over an open fire since he had no oven available.
The tradition of eating jelly donuts spread throughout Europe, with each culture adding its own twist. In Poland, “pączki” (pronounced poonch-key) are traditionally eaten on Fat Thursday before Lent, while in Israel, “sufganiyot” are a beloved Hanukkah tradition symbolizing the miracle of oil. Jewish immigrants brought their versions of jelly donuts to America in the late 19th and early 20th centuries, where they became a staple in Jewish-American bakeries.
In the United States, jelly donuts gained mainstream popularity in the mid-20th century as donut shops proliferated across the country. President John F. Kennedy famously (and mistakenly) declared “Ich bin ein Berliner” in his 1963 speech in West Berlin, which technically translates to “I am a jelly donut” in the local dialect, though Berliners understood his intended meaning. This moment in history inadvertently gave the humble jelly donut even more cultural cachet.
Today, jelly donuts remain one of the most beloved filled donut varieties worldwide. They represent comfort, nostalgia, and the simple joy of biting into something sweet and satisfying. Making them at home connects us to this rich baking tradition while creating new memories with loved ones.
Why You’ll Love This Recipe
This homemade jelly donut recipe strikes the perfect balance between achievable and impressive. You don’t need to be a professional baker to create bakery-quality results that will have everyone asking for seconds.
Here’s why this recipe will become your favorite:
- Incredibly fluffy texture – The dough is enriched with eggs, butter, and milk, creating donuts that are tender and light, never dense or greasy
- Customizable fillings – Use any jam, jelly, or fruit preserve you love, from classic strawberry and raspberry to more adventurous flavors like lemon curd or Nutella
- Fresher than store-bought – Nothing compares to warm, just-made donuts with real ingredients and no preservatives
- Family-friendly activity – Kids love helping with the cutting, filling, and sugar coating, making this a wonderful weekend baking project
- Impressive presentation – These look like they came from a fancy bakery but cost a fraction of the price
- Freezer-friendly – Make a double batch and freeze extras for quick treats later
- Adaptable sweetness – Control the sugar level in both the dough and coating to suit your taste
- Perfect for special occasions – Ideal for holidays, birthday breakfasts, brunch gatherings, or whenever you want to create something memorable
Ingredient Notes
Understanding your ingredients helps you make better donuts and troubleshoot if something doesn’t go as planned.
All-Purpose Flour – The foundation of your donut dough. Bread flour can be substituted for a slightly chewier texture, but all-purpose creates the most tender results. Make sure to measure correctly by spooning flour into your measuring cup and leveling it off.
Active Dry Yeast – This is what makes your donuts rise and become fluffy. Make sure your yeast is fresh (check the expiration date) and proof it in warm milk to ensure it’s active. Instant yeast can be substituted in equal amounts and mixed directly into dry ingredients.
Whole Milk – The fat content in whole milk creates richer, more tender donuts. You can use 2% milk in a pinch, but avoid skim milk as it won’t produce the same luxurious texture.
Granulated Sugar – Sweetens the dough and feeds the yeast. The amount in the dough is moderate since you’ll be coating the finished donuts in powdered sugar.
Eggs – Provide structure, richness, and help create that beautiful golden color. Use large eggs at room temperature for best incorporation.
Butter – Adds flavor and tenderness. Use unsalted butter so you can control the salt level. Make sure it’s softened to room temperature for easy mixing.
Salt – Enhances all the flavors and strengthens the gluten structure. Don’t skip it even though these are sweet.
Vanilla Extract – Pure vanilla extract adds depth of flavor. Imitation vanilla works but won’t taste as complex.
Vegetable Oil – For frying. Choose a neutral oil with a high smoke point like canola, vegetable, or peanut oil. Avoid olive oil as the flavor is too strong.
Jelly or Jam – Your filling of choice! Seedless jam works best for smooth piping. Warm it slightly before filling for easier piping. Popular choices include strawberry, raspberry, grape, apricot, or mixed berry.
Powdered Sugar – For coating the finished donuts. Also called confectioners’ sugar or icing sugar. The superfine texture adheres beautifully to the warm donuts.
Equipment Needed
Having the right tools makes the donut-making process much smoother and more enjoyable.
- Large mixing bowl – For combining and kneading the dough
- Stand mixer with dough hook (optional) – Makes kneading easier, though you can absolutely knead by hand
- Kitchen thermometer – Essential for checking milk temperature (should be 110°F) and oil temperature (365°F)
- Rolling pin – For rolling out the dough to even thickness
- Round cookie cutter or biscuit cutter (3-inch diameter) – Creates perfectly shaped donuts
- Clean kitchen towels – For covering dough while it rises
- Large heavy-bottomed pot or Dutch oven – For deep frying; needs to hold at least 3 inches of oil
- Slotted spoon or spider strainer – For safely removing donuts from hot oil
- Wire cooling rack – Allows donuts to drain and prevents sogginess
- Paper towels – For lining under the cooling rack
- Piping bag with small round tip – For filling the donuts with jelly
- Large shallow bowl – For the powdered sugar coating
- Pastry brush (optional) – For brushing off excess flour before frying
Jelly Donut Recipe

Light, fluffy homemade jelly donuts filled with sweet fruit preserves and dusted with powdered sugar. These bakery-style donuts are made from scratch with a tender, enriched dough that fries up golden and perfect every time. Better than any donut shop and surprisingly easy to make at home!
- Prep Time: 2 hours 30 minutes (including rise time)
- Cook Time: 15 minutes
- Total Time: 2 hours 45 minutes
- Yield: 12-14 donuts 1x
- Category: Dessert, Breakfast, Brunch
- Method: Frying
- Cuisine: American
- Diet: Vegetarian
Ingredients
For the Donut Dough:
- 4 cups all-purpose flour, plus more for dusting
- 2¼ teaspoons (1 packet) active dry yeast
- 1 cup whole milk, warmed to 110°F
- ⅓ cup granulated sugar
- 2 large eggs, room temperature
- ¼ cup unsalted butter, softened
- 1 teaspoon salt
- 1½ teaspoons vanilla extract
- Vegetable oil for frying (about 8 cups)
For Filling and Coating:
- 1½ cups seedless jam or jelly (strawberry, raspberry, or your favorite)
- 1½ cups powdered sugar for coating
Instructions
Step 1: Proof the Yeast
Warm the milk to 110°F (use a thermometer to ensure accuracy). Pour into a small bowl, add 1 tablespoon of the sugar, and sprinkle the yeast over top. Stir gently and let sit for 5-10 minutes until foamy and bubbly. If the mixture doesn’t foam, your yeast is dead or the milk was too hot; start over with fresh yeast.
Step 2: Make the Dough
In a large mixing bowl or the bowl of a stand mixer, combine the flour, remaining sugar, and salt. Add the proofed yeast mixture, eggs, softened butter, and vanilla extract. Mix on low speed with the dough hook (or stir with a wooden spoon) until a shaggy dough forms. Increase speed to medium-low and knead for 8-10 minutes until the dough is smooth, elastic, and slightly tacky but not sticky. If kneading by hand, turn out onto a lightly floured surface and knead for 10-12 minutes.
Step 3: First Rise
Shape the dough into a ball and place in a greased bowl, turning once to coat all sides. Cover with a clean kitchen towel or plastic wrap. Let rise in a warm, draft-free spot for 1-1½ hours until doubled in size. The dough should feel puffy and when you gently press it with your finger, the indentation should slowly spring back.
Step 4: Roll and Cut
Punch down the dough to release air bubbles. Turn out onto a lightly floured surface and roll to ½-inch thickness (about as thick as your pointer finger). Using a 3-inch round cutter, cut out circles, placing them on a parchment-lined baking sheet as you go. Gather scraps, gently re-roll once, and cut more circles. Avoid over-handling the dough as this makes it tough.
Step 5: Second Rise
Cover the cut donuts with a kitchen towel and let rise for 30-45 minutes until puffy and nearly doubled. They should feel light and airy to the touch.
Step 6: Heat the Oil
Pour oil into a large, heavy-bottomed pot to a depth of 3 inches. Heat over medium heat to 365°F, using a thermometer to monitor. Maintaining the correct temperature is crucial—too hot and the outsides burn before the insides cook; too cool and they absorb too much oil and become greasy.
Step 7: Fry the Donuts
Carefully slide 2-3 donuts at a time into the hot oil using a slotted spoon or spider strainer. Fry for 1-2 minutes per side until deep golden brown. Don’t overcrowd the pot or the temperature will drop. Use the spider strainer to flip and remove donuts. Transfer to a wire rack set over paper towels to drain. Let the oil return to 365°F between batches.
Step 8: Fill with Jelly
Once the donuts are cool enough to handle but still slightly warm, prepare your filling. If your jam is very thick, warm it for 15-20 seconds in the microwave and stir until smooth. Transfer to a piping bag fitted with a small round tip. Insert the tip into the side of each donut and gently squeeze, filling until you feel slight resistance (about 1-2 tablespoons per donut). You’ll see the donut expand slightly when it’s full.
Step 9: Coat in Sugar
Place powdered sugar in a large shallow bowl. Roll each filled donut in the sugar, coating all sides generously. Shake off any excess. Serve immediately for best taste and texture.
Notes
- Temperature Control: Maintaining oil at 365°F is the secret to non-greasy donuts. Use a reliable thermometer.
- Don’t Skip the Second Rise: This step creates the signature light, airy texture.
- Filling Variations: Try lemon curd, Nutella, pastry cream, or any thick jam you love.
- Make-Ahead Dough: You can prepare the dough through the first rise, then refrigerate overnight. Bring to room temperature before rolling and cutting.
- Cinnamon Sugar Option: Mix ½ cup granulated sugar with 2 teaspoons cinnamon for an alternative coating.
Nutrition
- Serving Size: 1 donut
- Calories: 285
- Sugar: 18g
- Sodium: 195mg
- Fat: 12g
- Saturated Fat: 3g
- Unsaturated Fat: 8g
- Trans Fat: 0g
- Carbohydrates: 41g
- Fiber: 1g
- Protein: 5g
- Cholesterol: 42mg
Carbohydrates: 41g
Fiber: 1g
Protein: 5g
Cholesterol: 42mg
Nutrition information is approximate and based on using strawberry jam filling and standard powdered sugar coating.
Tips & Variations
Flavor Variations:
- Boston Cream Donuts: Fill with vanilla pastry cream instead of jelly and top with chocolate ganache
- Lemon Burst: Use lemon curd filling and mix lemon zest into the powdered sugar coating
- Chocolate Lovers: Add 3 tablespoons cocoa powder to the dough and fill with Nutella
- Mixed Berry: Combine strawberry, raspberry, and blueberry preserves for a complex flavor
- Tropical Twist: Fill with pineapple or passion fruit jam
Dietary Adaptations:
- Baked Version: Place risen donuts on parchment-lined baking sheets and bake at 375°F for 10-12 minutes. They won’t have the same fried texture but are lighter in calories
- Dairy-Free: Use plant-based milk and vegan butter substitutes
- Reduced Sugar: Cut the sugar in the dough by half and use a light dusting of powdered sugar
Coating Alternatives:
- Cinnamon sugar (½ cup sugar + 2 teaspoons cinnamon)
- Vanilla glaze (1 cup powdered sugar + 2 tablespoons milk + ½ teaspoon vanilla)
- Chocolate coating (melted chocolate ganache)
- Maple glaze (powdered sugar mixed with maple syrup)
Pro Chef Tips
Temperature is Everything: The single most important factor in perfect donuts is oil temperature. Invest in a good thermometer and maintain 365°F throughout frying. When donuts hit the oil, the temperature will drop—adjust your heat accordingly and wait for it to recover before adding the next batch.
The Windowpane Test: To check if your dough is properly kneaded, pinch off a small piece and gently stretch it between your fingers. If you can stretch it thin enough to see light through it without tearing (like a windowpane), the gluten is well-developed and your donuts will be perfectly textured.
Room Temperature Ingredients: Eggs and butter should be at room temperature before mixing. Cold ingredients don’t incorporate smoothly and can result in dense, uneven donuts. Set them out 30-60 minutes before starting.
Create a Warm Rising Environment: If your kitchen is cold, create a warm spot for rising by turning your oven to the lowest setting for 1 minute, then turning it off. Place the covered bowl of dough inside—it’s the perfect warm, draft-free environment.
The Float Test: Before frying all your donuts, test one. A properly risen donut will float immediately when added to the oil. If it sinks, the dough needs more rising time.
Don’t Overwork Scraps: When re-rolling dough scraps, handle them as little as possible. Overworked dough develops too much gluten and becomes tough. If you have very small scraps left after the second roll, fry them as donut holes rather than re-rolling again.
Fill While Warm: Fill donuts while they’re still slightly warm (but cool enough to handle comfortably). The gentle warmth helps the jam spread inside more evenly and creates pockets that hold more filling.
Common Mistakes to Avoid
Mistake #1: Using Expired or Improperly Stored Yeast
Old yeast won’t activate properly, resulting in donuts that don’t rise. Always check expiration dates and store yeast in the refrigerator or freezer. Always proof your yeast first so you know it’s active before committing all your ingredients.
Mistake #2: Incorrect Oil Temperature
Oil that’s too hot will burn the exterior before cooking the interior, leaving you with raw centers and dark exteriors. Oil that’s too cool will cause donuts to absorb excess grease, making them heavy and oily. Use a thermometer and be patient—consistent 365°F is the goal.
Mistake #3: Skipping the Second Rise
Cutting and handling the dough deflates it, so the second rise is essential for light, airy donuts. Skipping this step results in dense, bready donuts instead of fluffy ones.
Mistake #4: Overcrowding the Pot
Adding too many donuts at once dramatically drops the oil temperature and leads to greasy results. Fry only 2-3 at a time, allowing space for them to expand and for you to flip them easily.
Mistake #5: Rolling Dough Too Thin or Too Thick
Dough rolled thinner than ½ inch will create flat, crispy donuts that don’t have room for filling. Dough thicker than ¾ inch won’t cook through properly and may have doughy centers. The ½-inch sweet spot is perfect.
Storage & Meal Prep
Room Temperature Storage:
Jelly donuts are absolutely best enjoyed fresh on the day they’re made, preferably within 2-3 hours of frying while they’re still at their peak. However, they can be stored at room temperature in an airtight container for up to 2 days. Place parchment paper between layers to prevent sticking. Note that the powdered sugar coating will absorb moisture and may dissolve somewhat, and the donuts will lose their initial crispy exterior.
Refrigeration:
Refrigerating jelly donuts is not recommended as it causes them to dry out and become stale faster due to retrogradation (the process where starch molecules crystallize). If you must refrigerate due to hot weather, store in an airtight container for up to 3 days, but be aware the texture will suffer.
Reheating:
To refresh day-old donuts, microwave individual donuts for 8-10 seconds (no more!) to warm slightly. This softens them and makes the filling warm and gooey again. Don’t overheat or they’ll become rubbery. You can also warm them in a 300°F oven for 5 minutes. Re-dust with fresh powdered sugar after warming.
Shelf Life Indicators:
Discard donuts that develop any mold, have an off smell, or show signs of the jelly fermenting. The jam filling can spoil before the bread, so always check carefully before eating stored donuts.
Make-Ahead & Freezer Notes
Make-Ahead Dough:
You can prepare the dough through the first rise, then punch it down, wrap it tightly in plastic wrap, and refrigerate for up to 24 hours. This slow, cold rise actually develops more complex flavor. When ready to continue, remove from refrigerator, let sit at room temperature for 30 minutes, then proceed with rolling, cutting, and the second rise. The cold dough may take slightly longer for the second rise.
Freezing Unfilled Donuts:
This is the best freezing method! Fry the donuts completely and let them cool to room temperature. Place on a baking sheet and freeze until solid (about 2 hours), then transfer to a freezer-safe bag or container, separating layers with parchment paper. Freeze for up to 2 months. To serve, thaw at room temperature for 30 minutes, warm in a 300°F oven for 5-7 minutes, then fill with fresh jelly and coat in powdered sugar. This gives you the best texture and fresh-filled taste.
Freezing Filled Donuts:
You can freeze already-filled and sugar-coated donuts, though the texture won’t be quite as perfect. Freeze the same way as unfilled donuts. Thaw at room temperature for 45-60 minutes before serving. The sugar coating will be wet from condensation, so you may want to re-dust with fresh powdered sugar.
Freezing Uncooked Dough:
After the second rise, you can freeze cut donuts on a parchment-lined baking sheet until solid, then transfer to freezer bags for up to 1 month. To use, let thaw and rise at room temperature for 1-2 hours until puffy, then fry as directed. This method is convenient but may result in slightly less fluffy donuts.
Best Reheating from Frozen:
For frozen unfilled donuts, let thaw completely, warm in a 300°F oven for 7-10 minutes, then fill and sugar. For frozen filled donuts, thaw at room temperature (don’t microwave directly from frozen or the filling will become scorching hot while the donut stays cold).
Serving Suggestions
Jelly donuts are delicious on their own, but pairing them thoughtfully makes for an even more memorable experience.
Beverage Pairings:
- Hot Coffee or Espresso – The classic combination; the bitter coffee perfectly balances the sweet donuts
- Cold Milk – Creamy whole milk or chocolate milk is perfect for dunking and takes you straight back to childhood
- Hot Chocolate – For an extra-indulgent treat, especially wonderful in winter
- Fresh-Squeezed Orange Juice – The acidity cuts through the richness beautifully
- Chai Latte or Spiced Tea – The warm spices complement the sweet filling nicely
Brunch Spread Ideas: Serve jelly donuts as the showstopper of a weekend brunch alongside scrambled eggs, crispy bacon, fresh fruit salad, Greek yogurt parfaits, and mimosas or bellinis.
Dessert Presentation: Arrange jelly donuts on a tiered cake stand dusted with extra powdered sugar and garnished with fresh berries. Add small bowls of different jams on the side so guests can add more filling if desired.
Special Occasion Ideas:
- Birthday breakfast with candles stuck in a donut
- Bridal or baby shower brunch centerpiece
- Holiday morning tradition (Christmas, Easter, Hanukkah)
- Kids’ sleepover breakfast treat
- Valentine’s Day breakfast in bed
Complementary Sides:
- Fresh berry compote for dipping
- Whipped cream or mascarpone
- Sliced fresh fruit like strawberries, raspberries, or peaches
- Vanilla ice cream for a “donut sundae”
FAQs Section
Q: Can I make these donuts without a stand mixer?
A: Absolutely! While a stand mixer makes kneading easier, you can easily make this dough by hand. Mix ingredients with a wooden spoon until combined, then turn out onto a floured surface and knead by hand for 10-12 minutes. You’ll know it’s ready when the dough is smooth, elastic, and springs back when poked.
Q: Why are my donuts greasy?
A: Greasy donuts are almost always the result of oil that’s too cool. When the temperature drops below 350°F, donuts absorb excess oil instead of frying quickly. Make sure you’re using a thermometer, maintaining 365°F, and not overcrowding the pot. Also ensure your donuts have risen properly—underproofed donuts are denser and absorb more oil.
Q: Can I bake these instead of frying?
A: Yes, though they won’t have the same traditional texture. Place risen donuts on parchment-lined baking sheets and bake at 375°F for 10-12 minutes until golden. Brush with melted butter immediately after baking, then roll in cinnamon sugar or powdered sugar. Baked donuts will be more cake-like and less fluffy than fried versions, but they’re still delicious and lower in fat.
Q: My donuts have raw centers—what went wrong?
A: This happens when the oil is too hot, causing the outside to brown too quickly while the inside remains undercooked. Make sure your oil is at 365°F (not higher), and fry donuts for the full 1-2 minutes per side. Also check that you rolled the dough to ½-inch thickness—thicker dough won’t cook through properly.
Q: How do I know when the dough has risen enough?
A: Properly risen dough should double in size and feel puffy and light. The “poke test” is your friend: gently press your finger about ½-inch into the dough. If the indentation slowly springs back halfway, it’s ready. If it springs back immediately, it needs more time. If it doesn’t spring back at all, you’ve over-proofed and should proceed immediately to the next step.
Q: What’s the best jam to use for filling?
A: Seedless jams work best because they pipe smoothly through the piping tip without clogging. Strawberry and raspberry are traditional favorites, but grape, apricot, cherry, and mixed berry are all excellent. The jam should be thick enough to hold its shape—avoid very runny jellies. Warming the jam slightly (10-15 seconds in the microwave) makes it easier to pipe.
Q: Can I use instant yeast instead of active dry yeast?
A: Yes! Use the same amount (2¼ teaspoons) but mix it directly into the dry ingredients—no need to proof it first. Instant yeast activates more quickly, so your rise times may be slightly shorter. Watch the dough rather than the clock and proceed when it’s doubled in size.
Conclusion
Making homemade jelly donuts is one of those kitchen adventures that fills your home with amazing aromas and creates lasting memories. Yes, these donuts require a bit more time and effort than buying a box from the store, but the incredible flavor, fluffy texture, and satisfaction of creating something so special from scratch make every minute worthwhile.
There’s something deeply rewarding about pulling golden donuts from hot oil, filling them with sweet jam, and watching your family’s faces light up as they take that first bite. The powdered sugar on their noses, the happy sighs, the requests for “just one more”—these are the moments that make home cooking so meaningful.
Whether you’re making these for a holiday breakfast, a special occasion, or just because it’s a lazy weekend and you want to try something new, this jelly donut recipe won’t disappoint. The process is easier than you might think, and the results rival anything you’d find in a fancy bakery.
So grab your apron, warm up that milk, and get ready to become the hero of breakfast time. Your kitchen is about to smell absolutely incredible, and you’re about to discover why nothing beats a warm, homemade jelly donut fresh from your own hands.
Ready to make your own bakery-quality jelly donuts? Save this recipe to your Pinterest boards so you can find it whenever that donut craving hits! Drop a comment below and let me know what filling flavor you’re most excited to try. Happy frying! 🍩✨