Easy No Sugar Cookies Recipe – Naturally Sweet & Delicious!

If you’ve been searching for a guilt-free cookie that doesn’t compromise on flavor, you’ve just found your new favorite recipe! These No Sugar Cookies are perfectly sweet, wonderfully chewy, and made without any refined sugar whatsoever. Instead, we’re harnessing the natural sweetness of ripe bananas and a touch of pure maple syrup to create cookies that taste indulgent while being genuinely wholesome.
These cookies are perfect for anyone looking to reduce their sugar intake, parents wanting healthier treats for their kids, or anyone following a refined sugar-free lifestyle. They’re ideal for afternoon snacks, lunchbox treats, post-workout fuel, or anytime you’re craving something sweet but want to make a better choice. The best part? They come together in just one bowl with simple ingredients you probably already have in your pantry. Whether you’re serving them to health-conscious friends, picky toddlers, or just treating yourself, these no sugar cookies prove that eating better doesn’t mean sacrificing the joy of a warm, fresh-baked cookie.
History / Background
The concept of sugar-free baking has evolved dramatically over the past few decades. While our grandparents relied heavily on refined white sugar in their cookie recipes, the health and wellness movement of the 1970s began questioning our dependence on processed sweeteners. However, early sugar-free recipes often relied on artificial sweeteners that left an unpleasant aftertaste and didn’t provide the same textural results as traditional sugar.
The real breakthrough came in the 2010s with the clean eating and paleo movements, which championed the use of natural sweeteners like dates, bananas, maple syrup, and honey. Food bloggers and home bakers began experimenting with fruit-based sweeteners, discovering that overripe bananas could provide not just sweetness, but also moisture, binding properties, and a lovely texture to baked goods.
This particular style of no sugar cookie draws inspiration from both the wholesome baking traditions of early American settlers—who often used molasses, honey, and dried fruits to sweeten their treats—and modern nutritional science, which recognizes the benefits of reducing refined sugar consumption. Today’s no sugar cookies represent a perfect marriage of old-fashioned baking wisdom and contemporary health consciousness, proving that we can honor our love of homemade cookies while making choices that support our wellbeing.
The rise of these cookies also coincides with increased awareness of blood sugar management, diabetes prevention, and the negative effects of sugar crashes, making them particularly popular among parents, fitness enthusiasts, and anyone mindful of their dietary choices.
Why You’ll Love This Recipe
These no sugar cookies are about to become your go-to recipe for satisfying your sweet tooth the smart way. They deliver all the comfort and nostalgia of traditional cookies while aligning with your health goals. The texture is absolutely spot-on—slightly crispy on the edges with a tender, chewy center that makes every bite satisfying.
Here’s why this recipe is a total winner:
- Naturally sweetened – No refined sugar, no artificial sweeteners, just wholesome ingredients your body recognizes
- Kid-approved – Even the pickiest eaters love these cookies, making them perfect for lunchboxes and after-school snacks
- Simple ingredients – You probably have everything you need already, with no specialty items or expensive add-ins required
- One-bowl wonder – Minimal cleanup means you can whip up a batch anytime the craving hits
- Customizable – Easily adapt with your favorite mix-ins like chocolate chips, nuts, dried fruit, or seeds
- Perfect texture – Chewy, satisfying, and absolutely delicious straight from the oven or at room temperature
- Budget-friendly – Uses affordable pantry staples that won’t break the bank
- Meal prep friendly – Bakes and stores beautifully, so you can make a batch for the entire week
- Energy-boosting – Thanks to wholesome ingredients like oats and bananas, these provide sustained energy without the sugar crash
- Allergy-friendly adaptable – Can easily be made gluten-free, dairy-free, or nut-free depending on your needs
Ingredient Notes
Understanding your ingredients is the key to baking success, especially when we’re working without refined sugar. Here’s what you need to know about each component:
Ripe Bananas – This is your primary sweetener and moisture source. Use bananas with plenty of brown spots; the riper they are, the sweeter your cookies will be. Bananas also act as a binding agent, helping hold everything together naturally. If your bananas aren’t quite ripe enough, you can speed up the process by placing them in a paper bag or baking them in their skins at 300°F for 15-20 minutes.
Old-Fashioned Rolled Oats – These provide structure, fiber, and a wonderfully hearty texture. I recommend old-fashioned oats rather than quick oats for better texture, though quick oats will work in a pinch. For gluten-free cookies, make sure to use certified gluten-free oats. You can also pulse half the oats in a food processor to create a flour-like consistency for a smoother texture.
Maple Syrup – A small amount of pure maple syrup adds extra sweetness and helps achieve that classic cookie texture. Always use pure maple syrup, not pancake syrup, which contains added sugars and artificial flavors. Honey can be substituted in equal amounts, though it will create a slightly different flavor profile.
Almond Butter or Peanut Butter – Nut butter adds richness, healthy fats, and protein while helping bind the ingredients. Use natural, unsweetened nut butter without added oils or sugars. If you have a nut allergy, sunflower seed butter works beautifully as a substitute.
Vanilla Extract – Pure vanilla extract elevates the overall flavor and adds warmth. Don’t skip this—it makes a noticeable difference!
Cinnamon – A warm spice that complements the banana beautifully and adds depth. You can also experiment with nutmeg, cardamom, or pumpkin pie spice.
Baking Powder – Helps the cookies rise slightly and creates a better texture. Make sure yours is fresh (test it by adding a teaspoon to hot water—it should fizz vigorously).
Salt – Just a pinch enhances all the flavors and balances the sweetness.
Optional Mix-ins – Dark chocolate chips (look for sugar-free or low-sugar varieties), chopped nuts, unsweetened coconut flakes, dried fruit, or seeds can all be added for variety and extra nutrition.
Equipment Needed
One of the best things about this recipe is that it requires minimal equipment. Here’s what you’ll need:
- Large mixing bowl – For combining all your ingredients
- Fork or potato masher – To mash those ripe bananas smoothly
- Measuring cups and spoons – For accurate ingredient measurements
- Whisk or wooden spoon – For mixing everything together
- Baking sheets – Two standard-size sheets work best for even baking
- Parchment paper or silicone baking mats – Prevents sticking and makes cleanup a breeze
- Cookie scoop or spoon – For portioning uniform cookies (a 2-tablespoon scoop is ideal)
- Wire cooling rack – Allows air circulation for proper cooling
- Spatula – For transferring cookies from baking sheet to cooling rack
- Optional: Food processor – If you want to pulse some oats into flour for a smoother texture
No Sugar Cookies Recipe
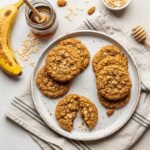
Wholesome, naturally sweetened cookies made with ripe bananas, oats, and nut butter—no refined sugar needed! These chewy, delicious treats are perfect for guilt-free snacking and are loved by kids and adults alike.
- Prep Time: 10 minutes
- Cook Time: 12 minutes
- Total Time: 22 minutes
- Yield: 18-20 cookies 1x
- Category: Dessert
- Method: Baking
- Cuisine: American
- Diet: Diabetic
Ingredients
- 2 large ripe bananas (about 1 cup mashed)
- 1/3 cup natural almond butter or peanut butter (unsweetened)
- 1/4 cup pure maple syrup
- 1 teaspoon pure vanilla extract
- 2 cups old-fashioned rolled oats (certified gluten-free if needed)
- 1/2 teaspoon ground cinnamon
- 1/2 teaspoon baking powder
- 1/4 teaspoon salt
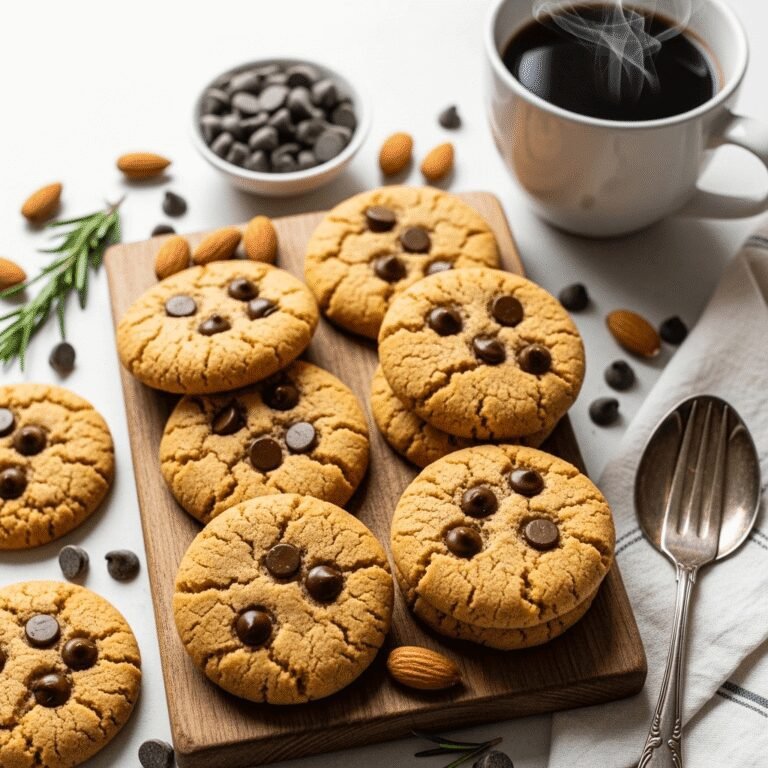
- 1/2 cup optional mix-ins (dark chocolate chips, chopped nuts, dried fruit, or unsweetened coconut)
Instructions
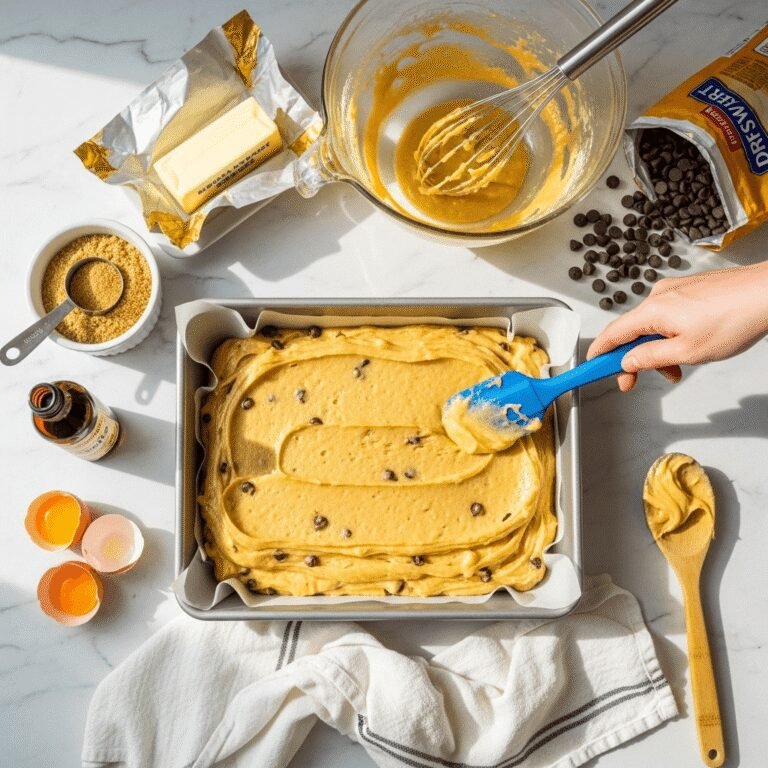
- Preheat your oven to 350°F (175°C). Line two baking sheets with parchment paper or silicone baking mats and set aside.
- Mash the bananas in a large mixing bowl using a fork or potato masher until smooth with just a few small lumps remaining. The riper your bananas, the sweeter your cookies will be.
- Add wet ingredients to the mashed bananas: stir in the almond butter, maple syrup, and vanilla extract. Mix until everything is well combined and smooth. The mixture should be creamy and pourable.
- Add dry ingredients to the bowl: add the rolled oats, cinnamon, baking powder, and salt. Stir everything together until fully incorporated. The batter will be thick and slightly sticky—this is exactly what you want.
- Fold in mix-ins if using. Chocolate chips, nuts, or dried fruit should be distributed evenly throughout the dough.
- Let the batter rest for 5 minutes. This allows the oats to absorb some moisture, which helps with texture and makes the cookies easier to shape.
- Scoop and shape the cookie dough using a cookie scoop or spoon (about 2 tablespoons per cookie). Place them on the prepared baking sheets, spacing them about 2 inches apart. Gently flatten each cookie with the back of a spoon or your fingers, as these cookies don’t spread much during baking.
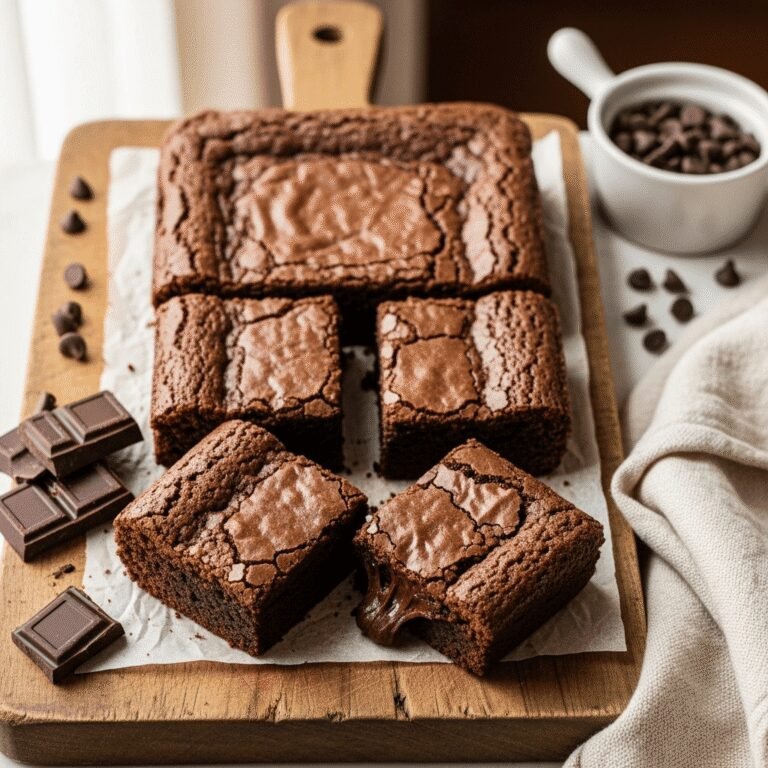
- Bake for 12-15 minutes, or until the edges are lightly golden brown. The centers may look slightly soft, but they’ll firm up as they cool.
- Cool the cookies on the baking sheet for 5 minutes, then carefully transfer them to a wire cooling rack to cool completely. They’ll continue to firm up as they cool.
- Enjoy your wholesome, naturally sweetened cookies! Store any leftovers in an airtight container.
Notes
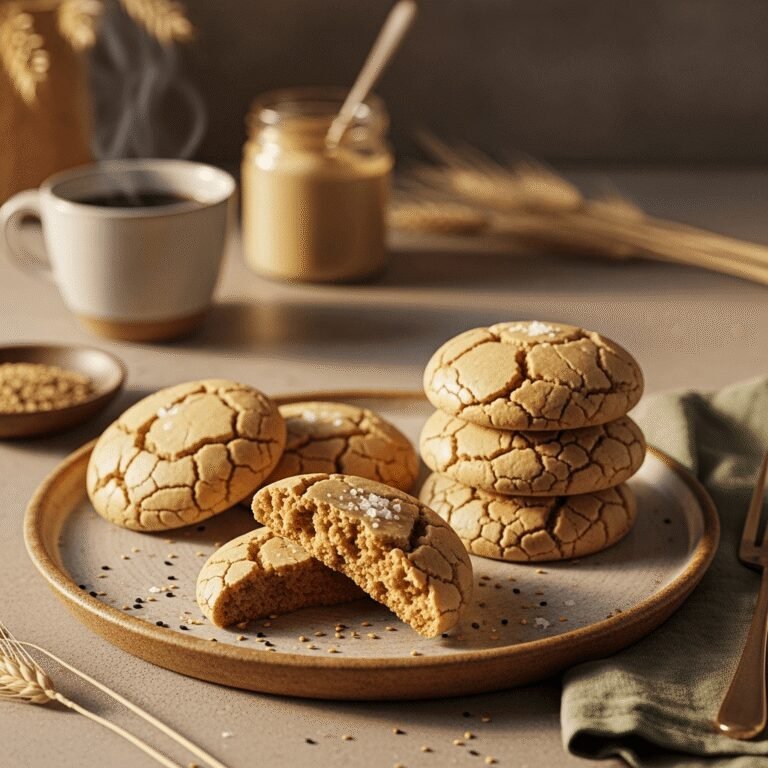
- Banana ripeness matters: The riper your bananas (more brown spots), the sweeter and more flavorful your cookies will be.
- Nut butter consistency: If your nut butter is very thick or separated, stir it well before measuring, or slightly warm it for easier mixing.
- Cookie texture: These cookies are meant to be chewy rather than crispy. If you prefer crispier cookies, bake them for an additional 2-3 minutes.
- Measurement tip: When measuring maple syrup, lightly oil your measuring cup first—the syrup will slide right out.
- Gluten-free option: Use certified gluten-free oats to make these completely gluten-free.
Nutrition
- Serving Size: 1 cookie
- Calories: 95
- Sugar: 5g (naturally occurring)
- Sodium: 35mg
- Fat: 3.5g
- Saturated Fat: 0.5g
- Unsaturated Fat: 2.8g
- Trans Fat: 0g
- Carbohydrates: 14g
- Fiber: 2g
- Protein: 2.5g
- Cholesterol: 0mg
Nutrition information is calculated based on standard ingredient measurements and may vary based on specific brands and mix-ins used.
Tips & Variations
The beauty of this recipe is its versatility. Here are some creative ways to customize these cookies to suit your taste preferences and dietary needs:
Chocolate Lover’s Version – Fold in 1/2 cup of sugar-free dark chocolate chips or cacao nibs. You can also add 2 tablespoons of unsweetened cocoa powder to the batter for double chocolate cookies.
Tropical Twist – Add 1/3 cup unsweetened shredded coconut and 1/4 cup chopped dried pineapple or mango (look for unsweetened varieties).
Peanut Butter Banana – Use peanut butter instead of almond butter and add an extra tablespoon for more peanut butter flavor. Top each cookie with a few extra peanuts before baking.
Breakfast Cookie – Add 2 tablespoons of ground flaxseed or chia seeds, 1/4 cup of chopped walnuts, and a handful of unsweetened dried cranberries for a nutritious morning treat.
Spice It Up – Increase the cinnamon to 1 teaspoon and add 1/4 teaspoon each of nutmeg and ginger for a spiced cookie reminiscent of gingerbread.
Berry Blast – Fold in 1/2 cup of freeze-dried strawberries or blueberries (crushed slightly) for a fruity flavor boost without added moisture.
Protein Boost – Add 2 tablespoons of your favorite vanilla protein powder and an extra tablespoon of nut butter to compensate for the dryness.
Seed-Based (Nut-Free) – Replace almond butter with sunflower seed butter and add 2 tablespoons of hemp seeds or pumpkin seeds for extra nutrition.
Pro Chef Tips
Taking your no sugar cookies from good to absolutely amazing is all about the details. Here are some professional techniques that will elevate your baking:
Temperature matters – Make sure your oven temperature is accurate by using an oven thermometer. Many home ovens run hot or cold, which can significantly affect baking times and results. Bake at true 350°F for the perfect texture.
Uniform sizing – Use a cookie scoop to ensure all your cookies are the same size. This guarantees even baking, so you won’t end up with some burnt and some underdone cookies on the same sheet.
The flatten technique – Because these cookies don’t contain traditional sugar, which helps cookies spread, you need to flatten them before baking. Use the bottom of a glass or your palm to gently press each cookie to about 1/2-inch thickness.
Rotate for even baking – Halfway through baking (around the 6-7 minute mark), rotate your baking sheets front to back and top to bottom if using two racks. This ensures even browning and prevents hot spots.
Don’t overbake – These cookies will look slightly underdone in the center when you remove them from the oven. That’s exactly what you want! They’ll continue cooking on the hot baking sheet and firm up as they cool. Overbaking will result in dry, hard cookies.
Quality ingredients – Since this recipe has so few ingredients, quality really shines through. Use pure vanilla extract (not imitation), real maple syrup (not pancake syrup), and natural nut butter without added oils or sugars.
Rest the dough – Letting the batter rest for 5 minutes before scooping allows the oats to absorb moisture, which improves texture and makes the dough easier to work with.
Common Mistakes to Avoid
Even simple recipes can go wrong if you’re not careful. Here are the most common pitfalls and how to avoid them:
Using under-ripe bananas – Green or yellow bananas without brown spots won’t provide enough sweetness or the right flavor. Wait until your bananas are very ripe with plenty of brown spots. The extra sweetness makes all the difference in a sugar-free recipe.
Not flattening the cookies – Unlike traditional cookies that spread during baking, these need to be shaped before going into the oven. If you don’t flatten them, you’ll end up with thick, cake-like cookies that don’t bake evenly.
Overmixing the batter – Once you add the oats, mix just until combined. Overmixing can make the cookies tough and dense rather than tender and chewy.
Skipping the resting time – That 5-minute rest isn’t optional. It allows the oats to absorb moisture, which dramatically improves the final texture of your cookies.
Crowding the baking sheet – Leave at least 2 inches between cookies. While they don’t spread much, they do need space for even heat circulation and proper baking.
Using instant oats – Quick or instant oats will create a mushy texture. Stick with old-fashioned rolled oats for the best results, or pulse half of them in a food processor if you want a smoother texture.
Not cooling properly – These cookies are fragile when hot. Let them cool on the baking sheet for 5 minutes before transferring to a wire rack, or they may break apart.
Storage & Meal Prep
Proper storage ensures your cookies stay fresh and delicious for as long as possible:
Room Temperature Storage – Store completely cooled cookies in an airtight container at room temperature for up to 5 days. Place parchment paper between layers to prevent sticking. They’ll stay soft and chewy if the container is properly sealed.
Refrigerator Storage – For longer freshness, store cookies in an airtight container in the refrigerator for up to 10 days. The cool temperature helps prevent the bananas from over-ripening. Let them come to room temperature before eating, or enjoy them chilled for a firmer texture.
Cookie Dough Prep – You can prepare the dough ahead and refrigerate it in a covered bowl for up to 24 hours. This actually improves the flavor as the oats continue to soften. When ready to bake, scoop and flatten as directed, adding an extra minute or two to the baking time since the dough will be cold.
Portion and Chill – For ultimate convenience, scoop and flatten all your cookies on parchment-lined baking sheets, then refrigerate for up to 2 days. When you’re ready for fresh-baked cookies, simply transfer the cold dough rounds to a baking sheet and bake as directed.
Lunchbox Friendly – These cookies are perfect for packed lunches. Individually wrap them in parchment paper or small reusable bags. They hold up well without refrigeration for several hours, making them ideal for school lunches or road trips.
Make-Ahead & Freezer Notes
These cookies are incredibly freezer-friendly, making them perfect for meal prep and having healthy treats on hand:
Freezing Baked Cookies – Let cookies cool completely, then arrange them in a single layer on a baking sheet and freeze for 1-2 hours until solid. Transfer the frozen cookies to a freezer-safe bag or container, separating layers with parchment paper. They’ll keep for up to 3 months. Thaw at room temperature for 20-30 minutes or microwave individual cookies for 15-20 seconds.
Freezing Cookie Dough – This is my favorite method for always having fresh cookies ready! Scoop and flatten the cookies on a parchment-lined baking sheet, then freeze until solid (about 2 hours). Transfer the frozen dough rounds to a freezer bag, removing as much air as possible. Label with the date and baking instructions. Frozen cookie dough will keep for up to 3 months.
Baking from Frozen – You can bake frozen cookie dough directly from the freezer without thawing. Simply add 2-3 minutes to the baking time. This means you can have fresh, warm cookies anytime the craving strikes without any advance planning.
Flash Freeze Method – For the freshest texture, use the flash freeze method: freeze cookies individually on a baking sheet first, then transfer to a container. This prevents them from sticking together and allows you to grab just one or two at a time.
Thawing Tips – For the best texture, thaw frozen cookies at room temperature rather than in the microwave. If you prefer warm cookies, heat thawed cookies in a 300°F oven for 3-5 minutes to restore that fresh-baked quality.
Serving Suggestions
These versatile cookies pair beautifully with many accompaniments and fit perfectly into various meals and occasions:
Breakfast or Brunch – Serve alongside Greek yogurt and fresh berries for a balanced breakfast. Add a drizzle of almond butter and a sprinkle of chia seeds for extra nutrition.
Afternoon Snack – Pair with a glass of unsweetened almond milk, oat milk, or your favorite dairy-free milk alternative. A hot cup of herbal tea or coffee also complements these cookies perfectly.
Lunchbox Addition – Pack 1-2 cookies with sliced apples, cheese, and raw veggies for a well-rounded lunch that kids will actually eat.
Post-Workout Fuel – These cookies provide a good balance of carbohydrates and protein, making them ideal for post-workout recovery. Pair with a protein shake for optimal muscle recovery.
Dessert Spread – Create a dessert platter with these cookies, fresh fruit, a small bowl of almond butter for dipping, and some dark chocolate squares.
Coffee or Tea Time – Perfect with your morning coffee, afternoon tea, or evening herbal infusion. The subtle sweetness won’t overpower your beverage.
Ice Cream Sandwich – For an occasional treat, sandwich a scoop of sugar-free vanilla or banana ice cream between two cookies.
Party Platter – Arrange on a rustic wooden board with fresh fruit, nuts, and a small bowl of honey for drizzling (optional) when entertaining health-conscious friends.
FAQs Section
Can I make these cookies without oats?
While oats are a key ingredient, you can substitute with equal parts almond flour or a combination of almond flour and coconut flour (use 1 1/2 cups almond flour + 1/2 cup coconut flour). The texture will be slightly different—more crumbly and less chewy—but still delicious. You can also pulse oats in a food processor to create oat flour if you prefer a smoother texture.
Can I use frozen bananas?
Absolutely! Frozen bananas work perfectly. Thaw them completely first and drain any excess liquid. The bananas may be slightly more watery than fresh, so you might want to reduce the maple syrup by 1 tablespoon if the batter seems too thin.
Are these cookies suitable for babies and toddlers?
Yes, with some modifications. These cookies are great for toddlers over 12 months old. For babies just starting solids (6-12 months), you can omit the maple syrup entirely and rely solely on banana sweetness. Also ensure any mix-ins are age-appropriate and chopped small to prevent choking hazards.
Why are my cookies falling apart?
This usually happens if the bananas weren’t mashed enough, the ingredients weren’t mixed thoroughly, or the cookies were moved while still hot. Make sure to mash bananas until very smooth, mix the batter well, and let cookies cool on the baking sheet for a full 5 minutes before transferring them.
Can I make these cookies vegan?
Good news—this recipe is already vegan as written! Just make sure any chocolate chips or mix-ins you add are also vegan-friendly. Many dark chocolate chips are naturally vegan, but always check the label.
How can I make these cookies crunchier?
For crunchier cookies, bake them a few minutes longer (15-17 minutes total) and flatten them thinner before baking. You can also use quick oats instead of old-fashioned, which will create a less chewy texture. Let them cool completely on a wire rack, as they’ll continue to crisp up as they cool.
Can I substitute the maple syrup with something else?
Yes! Honey works as a 1:1 substitute, though it will add a distinct honey flavor. Date paste (blend pitted dates with a little water) is another excellent refined sugar-free option. For a completely sugar-free version, you can try adding extra banana and omitting the maple syrup entirely, though the cookies will be less sweet.
Conclusion
There you have it—a foolproof recipe for the most delicious, wholesome no sugar cookies you’ll ever make! These little beauties prove that you don’t need refined sugar to create something truly special in your kitchen. With their naturally sweet flavor, chewy texture, and incredibly simple ingredient list, they’re destined to become a staple in your home.
Whether you’re baking for health-conscious family members, looking for better snack options for your kids, or simply want to treat yourself without the sugar crash, these cookies deliver on every level. The best part? They’re so easy to make that you can whip up a fresh batch anytime the craving strikes, and they’re versatile enough to customize for any taste preference.
I’d absolutely love to hear how these cookies turn out for you! Did you try any fun mix-ins? How did your family react? Leave a comment below sharing your experience, and don’t forget to rate the recipe. If you snap a photo of your beautiful cookies, tag me on Instagram—I feature reader creations in my stories!
Save this recipe to your Pinterest board so you’ll have it whenever you need a healthy, delicious treat! Click the Pinterest button to save it to your favorite baking or healthy snacks board. Trust me, you’ll want to make these again and again. Happy baking, friends! 🍪