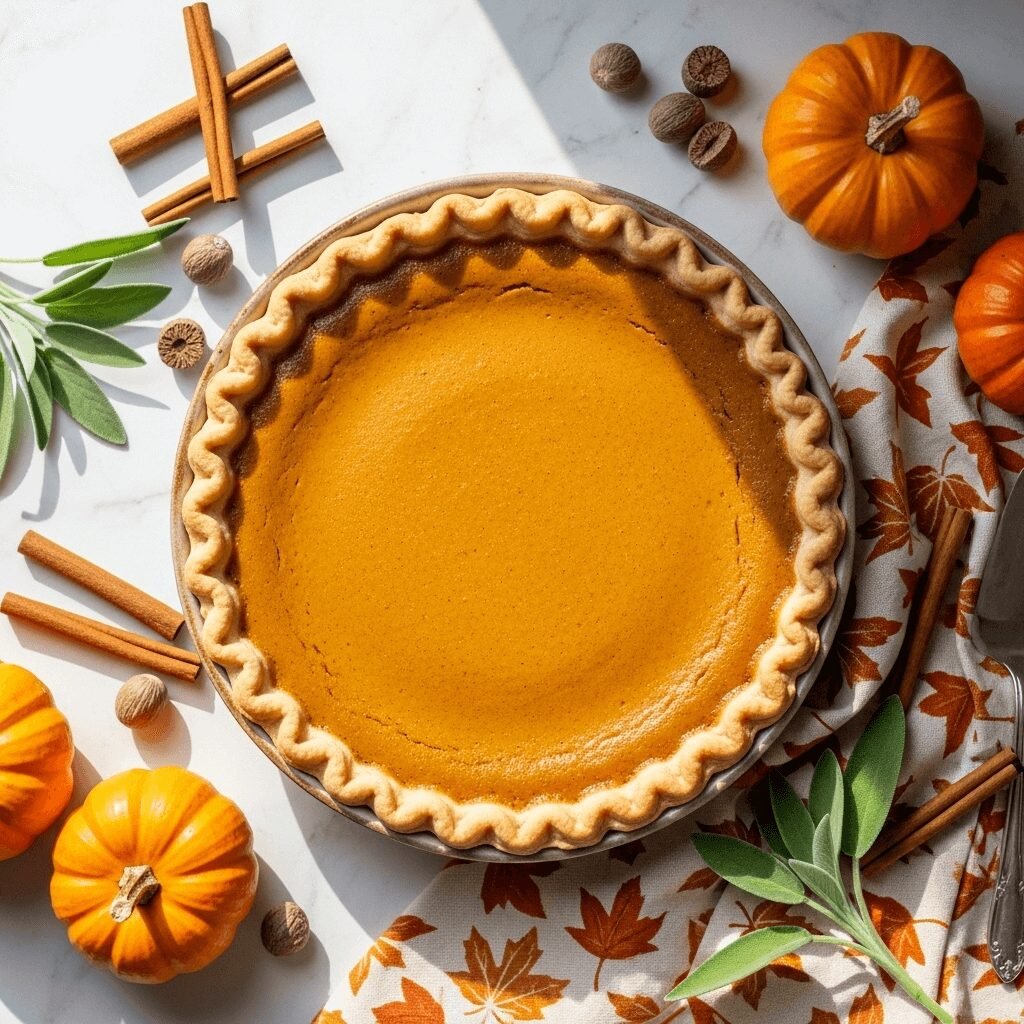
The Ultimate Homemade Pumpkin Pie Recipe – Perfectly Spiced & Creamy Every Time
There’s nothing quite like the aroma of a freshly baked pumpkin pie wafting through your kitchen on a crisp autumn day. This classic homemade pumpkin pie recipe is the quintessential dessert that defines the fall season and graces virtually every Thanksgiving table across America. With its silky-smooth custard filling, warm spices, and buttery flaky crust, this traditional pumpkin pie is everything a holiday dessert should be – comforting, delicious, and absolutely unforgettable.
Whether you’re a seasoned baker or attempting your first pumpkin pie, this recipe will guide you through creating a dessert that looks and tastes like it came straight from a professional bakery. Serve it at Thanksgiving dinner, holiday gatherings, fall potlucks, or anytime you’re craving that perfect combination of sweet pumpkin and warming spices. Trust me, once you make pumpkin pie from scratch, you’ll never go back to store-bought versions!
History / Background
Pumpkin pie has a fascinating history that’s deeply woven into the fabric of American culinary tradition. While pumpkins are native to North America and were cultivated by Indigenous peoples for thousands of years, the pumpkin pie we know today evolved over centuries of cultural exchange and culinary innovation.
Native Americans introduced early European settlers to pumpkins and various ways to cook them, including roasting and stewing. The colonists quickly recognized the versatility of this nutritious squash and began incorporating it into their own recipes. However, the earliest versions of “pumpkin pie” were quite different from what we enjoy today – colonists would hollow out a pumpkin, fill it with milk, honey, and spices, then bake it whole in hot ashes.
The modern pumpkin pie, with its spiced custard filling baked in a pastry crust, didn’t emerge until the 17th and 18th centuries when European pie-making techniques merged with New World ingredients. By the early 19th century, pumpkin pie recipes began appearing in American cookbooks, cementing its place as a beloved dessert.
The connection between pumpkin pie and Thanksgiving became stronger in the mid-1800s, particularly after Sarah Josepha Hale, the author of “Mary Had a Little Lamb,” campaigned for Thanksgiving to become a national holiday. She frequently mentioned pumpkin pie in her writings about the ideal Thanksgiving feast. When President Abraham Lincoln officially declared Thanksgiving a national holiday in 1863, pumpkin pie was already considered an essential part of the celebration.
The introduction of canned pumpkin puree in the early 20th century made pumpkin pie more accessible to home bakers year-round, though it remains most popular during the fall and winter holiday season. Today, approximately 50 million pumpkin pies are consumed every Thanksgiving in the United States, making it one of the most iconic American desserts.
Why You’ll Love This Recipe
This classic pumpkin pie recipe strikes the perfect balance between traditional flavor and foolproof technique, making it accessible for bakers of all skill levels. The filling is incredibly smooth and creamy, with just the right amount of sweetness and a beautifully balanced blend of warm spices that complement rather than overpower the natural pumpkin flavor.
Here’s what makes this recipe special:
- Perfectly Balanced Spices – The combination of cinnamon, ginger, nutmeg, and cloves creates that signature pumpkin pie flavor without being overwhelming
- Foolproof Texture – Achieve a silky-smooth custard filling that sets perfectly without cracks every single time
- Make-Ahead Friendly – Prepare components in advance to reduce holiday stress and streamline your baking schedule
- Budget-Friendly – Uses simple, affordable ingredients that you probably already have in your pantry
- Crowd-Pleaser – A universally loved dessert that appeals to both kids and adults alike
- Classic Presentation – Looks beautiful on any dessert table and photographs wonderfully for sharing
- No Special Skills Required – Clear, step-by-step instructions make this achievable even for first-time pie bakers
- Customizable – Easy to adapt with different spice levels, crust variations, or sweetness adjustments
Ingredient Notes
Let’s talk about what goes into making the perfect pumpkin pie. Each ingredient plays a crucial role in creating that signature flavor and texture we all love.
Pumpkin Puree – Use plain canned pumpkin puree (not pumpkin pie filling, which already contains spices and sugar). Look for 100% pure pumpkin. You can also use fresh roasted pumpkin, but canned provides consistent results and saves time. Make sure to use sugar pumpkins or pie pumpkins if going fresh, not carving pumpkins.
Eggs – These are essential for binding the custard and creating that smooth, sliceable texture. Large eggs work best. Bring them to room temperature for easier mixing and smoother incorporation.
Sweetened Condensed Milk – This is the secret to an ultra-creamy, rich filling. It adds sweetness while contributing to that luxurious mouthfeel. You can substitute with a combination of heavy cream and sugar, but condensed milk provides superior texture.
Brown Sugar – Adds depth of flavor with its molasses notes that complement the pumpkin beautifully. You can use light or dark brown sugar, though dark will give a slightly richer flavor. White sugar can substitute if needed.
Warm Spices – The classic quartet of ground cinnamon, ginger, nutmeg, and cloves creates that iconic pumpkin pie flavor. Freshly ground spices will give the best flavor, but pre-ground works perfectly fine. Pumpkin pie spice can substitute for the individual spices (use 2 teaspoons).
Salt – Just a pinch enhances all the other flavors and prevents the pie from tasting flat or one-dimensional.
Vanilla Extract – Pure vanilla extract adds warmth and rounds out the flavor profile. Avoid imitation vanilla if possible.
Pie Crust – You can use homemade, store-bought refrigerated dough, or a frozen pre-made crust. A buttery, flaky crust complements the creamy filling best. Blind-baking helps prevent a soggy bottom.
Equipment Needed
Having the right tools makes baking so much easier and more enjoyable. Here’s what you’ll need to make this beautiful pumpkin pie:
- 9-inch pie pan (glass or metal works great)
- Large mixing bowl for combining the filling
- Medium mixing bowl for egg mixture
- Whisk for smooth blending
- Measuring cups and spoons for accurate measurements
- Rubber spatula for scraping bowls and smoothing filling
- Fork for crimping the crust edges
- Aluminum foil or pie crust shield to prevent over-browning
- Cooling rack for proper cooling
- Rolling pin (if making homemade crust)
- Can opener for canned pumpkin
- Oven thermometer (optional but helpful for accuracy)
PrintThe Ultimate Homemade Pumpkin Pie Recipe – Perfectly Spiced & Creamy Every Time

This classic homemade pumpkin pie features a smooth, creamy custard filling perfectly spiced with cinnamon, ginger, and nutmeg, all nestled in a flaky, buttery crust. It’s the ultimate Thanksgiving dessert that’s surprisingly easy to make and guaranteed to impress your family and guests.
- Prep Time: 20 minutes
- Cook Time: 55 minutes
- Total Time: 1 hour 15 minutes (plus cooling time)
- Yield: 8 servings 1x
- Category: Dessert
- Method: Baking
- Cuisine: American
- Diet: Vegetarian
Ingredients
ScaleFor the Filling:
- 1 (15-ounce) can pure pumpkin puree
- 1 (14-ounce) can sweetened condensed milk
- 2 large eggs
- 1/4 cup packed light brown sugar
- 1 1/2 teaspoons ground cinnamon
- 1 teaspoon ground ginger
- 1/2 teaspoon ground nutmeg
- 1/4 teaspoon ground cloves
- 1/2 teaspoon salt
- 1 teaspoon pure vanilla extract
For the Crust:
- 1 unbaked 9-inch pie crust (homemade or store-bought)
Instructions
- Preheat and Prepare: Preheat your oven to 425°F (220°C). Place your unbaked pie crust in a 9-inch pie pan, crimp the edges decoratively with a fork or your fingers, and set aside.
- Mix the Filling Base: In a large mixing bowl, whisk together the pumpkin puree, sweetened condensed milk, and brown sugar until completely smooth and well combined. Make sure there are no lumps of brown sugar remaining.
- Add Eggs: In a separate medium bowl, lightly beat the eggs. Add the beaten eggs to the pumpkin mixture and whisk until fully incorporated and smooth.
- Incorporate Spices: Add the cinnamon, ginger, nutmeg, cloves, salt, and vanilla extract to the pumpkin mixture. Whisk thoroughly until all spices are evenly distributed and the filling is silky smooth. The mixture should be pourable and have a beautiful orange color.
- Fill the Crust: Pour the pumpkin filling into the prepared pie crust, using a rubber spatula to get every last bit from the bowl. Gently tap the pie pan on the counter a few times to release any air bubbles. Smooth the top with the spatula if needed.
- Bake at High Heat: Place the pie on the center rack of your preheated oven and bake at 425°F for 15 minutes. This initial high heat helps set the crust and start the custard cooking.
- Reduce Temperature: After 15 minutes, reduce the oven temperature to 350°F (175°C) without opening the oven door. Continue baking for 40-45 minutes more, or until the filling is set around the edges but still has a slight jiggle in the center (about 2-3 inches in diameter). The center will continue cooking as it cools.
- Check for Doneness: Insert a knife about 1 inch from the center – it should come out mostly clean. If the crust edges are browning too quickly, tent them with aluminum foil or use a pie crust shield.
- Cool Completely: Remove the pie from the oven and place it on a cooling rack. Let it cool at room temperature for at least 2 hours, then refrigerate for at least 2 more hours before serving. The pie needs this time to fully set and develop the best flavor and texture.
- Serve and Enjoy: Slice with a sharp knife, wiping the blade clean between cuts for neat slices. Serve chilled or at room temperature with freshly whipped cream, a dollop of vanilla ice cream, or a sprinkle of cinnamon.
Notes
- Preventing Cracks: Don’t overbake! The center should still jiggle slightly when you remove it from the oven. Overbaking causes cracks and a grainy texture.
- Crust Shield: If you don’t have a pie crust shield, make one by cutting the center out of a square of aluminum foil, leaving a 2-3 inch ring to cover the edges.
- Room Temperature Ingredients: Let eggs and condensed milk come to room temperature before mixing for the smoothest filling.
- Storage: Cover and refrigerate for up to 4 days. The pie tastes even better on day two as the flavors meld.
- Spice Substitution: Replace individual spices with 2 teaspoons pumpkin pie spice if preferred.
Nutrition
- Serving Size: 1 slice (1/8 of pie)
- Calories: 312
- Sugar: 28g
- Sodium: 285mg
- Fat: 12g
- Saturated Fat: 6g
- Unsaturated Fat: 5g
- Trans Fat: 0g
- Carbohydrates: 45g
- Fiber: 2g
- Protein: 7g
- Cholesterol: 68g

Nutrition information is approximate and based on standard ingredients. Values may vary depending on specific brands and modifications.
Tips & Variations
Spice It Up:
- Add 1/4 teaspoon cardamom for a unique, sophisticated flavor
- Increase ginger to 1 1/2 teaspoons for extra warmth and zing
- Add a pinch of cayenne pepper for subtle heat that enhances the other flavors
Make It Lighter:
- Use evaporated milk instead of sweetened condensed milk and increase sugar by 1/4 cup
- Substitute one egg with two egg whites to reduce cholesterol
- Use a reduced-fat graham cracker crust instead of traditional pastry
Flavor Variations:
- Maple Pumpkin Pie: Replace brown sugar with 1/3 cup pure maple syrup
- Bourbon Pumpkin Pie: Add 2 tablespoons bourbon for a grown-up twist
- Chocolate Bottom: Spread 1/2 cup melted chocolate in the bottom of the crust before adding filling
- Pecan Streusel Top: Add a buttery pecan streusel topping during the last 20 minutes of baking
Crust Options:
- Use a gingersnap cookie crust for extra spice
- Try a graham cracker crust for easier preparation
- Make a decorative lattice top crust for visual appeal
- Add crushed pecans to your pie dough for texture
Pro Chef Tips
Temperature Control is Everything: Use an oven thermometer to ensure accuracy. Many home ovens run hot or cold, and even 25 degrees can make a difference between perfectly set custard and overcooked, cracked filling.
The Jiggle Test: The pie is done when the outer 2-3 inches are set but the center still jiggles like gelatin when you gently shake the pan. It will continue cooking from residual heat and firm up completely as it cools. This is the secret to avoiding cracks.
Blind Bake for Best Results: For an even crisper bottom crust, blind bake it for 10 minutes at 375°F with pie weights or dried beans before adding the filling. This creates a barrier that prevents sogginess.
Strain Your Filling: For an ultra-silky texture that rivals professional bakeries, pour your filling through a fine-mesh strainer before adding it to the crust. This removes any lumps and creates the smoothest possible custard.
Water Bath Method: Place your pie pan inside a larger baking pan and add about 1 inch of hot water to the outer pan. This gentle, moist heat prevents cracks and ensures even cooking. Just be very careful when removing from the oven.
Fresh Pumpkin Preparation: If using fresh pumpkin, roast it cut-side down at 350°F until tender, scoop out the flesh, and puree it smooth. Then, drain it in a cheesecloth-lined strainer for several hours to remove excess moisture, or your pie will be watery.
Flavor Development: Make your filling a day ahead and refrigerate it overnight. The spices will bloom and meld together, creating a more complex, developed flavor profile.
Common Mistakes to Avoid
Overbaking the Filling: This is the number one cause of cracked, grainy pumpkin pie. Remember, the center should still have a slight wobble when you remove it from the oven. It will set completely as it cools. An overbaked pie will have a dry, curdled texture instead of creamy smoothness.
Using Pumpkin Pie Mix Instead of Pure Pumpkin: Pumpkin pie filling already contains sugar and spices, which will throw off the recipe’s balance and result in an overly sweet, oddly flavored pie. Always check the label and use 100% pure pumpkin puree.
Not Letting It Cool Completely: I know it’s tempting to cut into that beautiful pie right away, but patience is crucial! Cutting into a warm pie results in a runny, messy slice. The filling needs at least 2 hours at room temperature plus 2 hours refrigerated to fully set and develop its best texture.
Skipping the Crust Shield: If your crust edges burn while the filling is still cooking, your pie won’t look as beautiful and will taste bitter around the edges. Always protect those crust edges with foil or a shield once they’re golden brown.
Not Preheating the Oven Properly: Starting with a properly preheated oven at the right temperature ensures the crust begins cooking immediately and the filling sets at the correct rate. Give your oven a full 20 minutes to reach temperature before baking.
Storage & Meal Prep
Refrigerator Storage: Once completely cooled, cover your pumpkin pie loosely with plastic wrap or aluminum foil and refrigerate. It will keep beautifully for up to 4 days. In fact, many people prefer the taste on day two when the flavors have had time to meld together. The texture remains perfectly creamy and sliceable throughout this time.
Room Temperature Serving: While pumpkin pie should be stored in the refrigerator, you can let it sit at room temperature for 30-60 minutes before serving if you prefer. This takes the chill off and allows the flavors to bloom. However, don’t leave it out for more than 2 hours due to the egg and dairy content.
Covering Tips: If using plastic wrap, make sure it doesn’t touch the pie’s surface, or it will stick and mar the beautiful top. You can insert toothpicks around the edges to hold the wrap up, or use a large container that accommodates the pie without touching it.
Leftover Slices: Wrap individual slices in plastic wrap or place in airtight containers for easy grab-and-go desserts. They’re perfect for next-day breakfast (don’t judge – pie for breakfast is a holiday tradition!).
Shelf Life: Thanks to the high sugar content and eggs, properly refrigerated pumpkin pie stays fresh longer than many other custard pies. You’ll notice the crust may soften slightly after a day or two, but the filling remains perfectly delicious.
Make-Ahead & Freezer Notes
Prepare in Advance: Pumpkin pie is an excellent make-ahead dessert, which is a lifesaver during busy holiday cooking! You can bake it up to 2 days before serving. Simply cool it completely, cover well, and refrigerate. This actually improves the flavor as the spices continue to develop.
Freezing the Baked Pie: Yes, you can freeze a fully baked and cooled pumpkin pie! Wrap it tightly in plastic wrap, then again in aluminum foil or place it in a freezer-safe container. It will keep for up to 1 month. To serve, thaw it overnight in the refrigerator, then let it sit at room temperature for 30 minutes before serving.
Freezing Unbaked: You can also freeze the unbaked pie for up to 3 months. Assemble it completely in a disposable aluminum pie pan, wrap well, and freeze. Bake directly from frozen, adding 15-20 minutes to the baking time. Cover the edges with foil early to prevent over-browning.
Make-Ahead Filling: Prepare the filling up to 24 hours in advance and store it covered in the refrigerator. Give it a good whisk before pouring it into the crust. This is perfect for reducing stress on the big day.
Make-Ahead Crust: Roll out and fit your pie crust into the pan up to 3 days ahead. Cover it with plastic wrap and refrigerate until ready to fill and bake. You can also freeze unbaked pie crusts for up to 3 months.
Best Reheating Method: If you prefer warm pie, reheat individual slices in a 300°F oven for 10-15 minutes or microwave for 20-30 seconds. The whole pie can be gently warmed at 300°F for 20-25 minutes, but it’s traditionally served chilled or at room temperature.
Serving Suggestions
Pumpkin pie is delicious on its own, but the right accompaniments can elevate it to something truly special. Here are some tried-and-true serving suggestions:
Classic Pairings:
- Freshly whipped cream with a hint of vanilla and cinnamon
- Vanilla bean ice cream for that warm-and-cold contrast
- Cinnamon whipped cream for double the spice
- Maple whipped cream for a fall flavor explosion
Beverage Pairings:
- Hot spiced apple cider
- Fresh brewed coffee or espresso
- Chai tea latte
- Warm maple bourbon cocktail (for adults)
- Hot chocolate with cinnamon
Enhance Your Dessert Table:
- Serve alongside apple pie and pecan pie for variety
- Offer candied pecans or walnuts as a crunchy garnish
- Provide caramel sauce for drizzling
- Add a dollop of mascarpone cream for Italian-inspired richness
- Sprinkle toasted pumpkin seeds on top for texture and visual appeal
Complete Your Thanksgiving Menu:
- Serve after a traditional turkey dinner with all the trimmings
- Pair with roasted root vegetables and mashed potatoes
- Complement with cranberry sauce and green bean casserole
- Follow up herb-roasted turkey breast for a complete feast
Presentation Ideas:
- Dust with powdered sugar and cinnamon before serving
- Garnish with candied ginger pieces
- Top with toasted coconut flakes
- Add fresh mint leaves for a pop of color
- Serve on vintage dessert plates for rustic charm
FAQs Section
Can I use fresh pumpkin instead of canned?
Absolutely! Use 2 cups of fresh pumpkin puree from roasted sugar pumpkins or pie pumpkins. Cut the pumpkin in half, remove seeds, and roast cut-side down at 350°F until tender (about 45 minutes). Scoop out the flesh, puree it smooth, and drain in a cheesecloth-lined strainer for several hours to remove excess moisture. Fresh pumpkin has a lighter, more delicate flavor than canned, which is more concentrated.
Why did my pumpkin pie crack on top?
Cracks usually occur from overbaking or baking at too high a temperature. The edges set and pull away from the still-liquid center, creating those unsightly cracks. Remove your pie when the center still jiggles slightly – it will continue cooking as it cools. Also, avoid opening the oven door repeatedly, as temperature fluctuations can cause cracking. If it does crack, don’t worry! Cover it with whipped cream and no one will know.
How do I know when my pumpkin pie is done?
The pie is perfectly baked when the edges are set and slightly puffed, but the center (about 2-3 inches in diameter) still jiggles like gelatin when you gently shake the pan. An instant-read thermometer inserted into the center should read 175°F. Remember, the residual heat will continue cooking the pie as it cools, firming up that jiggly center into the perfect sliceable texture.
Can I make pumpkin pie without eggs?
While eggs provide essential structure and richness, you can make an egg-free version using substitutes. Try 1/4 cup cornstarch mixed with 1/4 cup water, or use a commercial egg replacer. The texture will be slightly different – more pudding-like and less custard-like – but still delicious. Silken tofu can also work as a binder in vegan versions.
Do I need to prebake (blind bake) my pie crust?
It’s not absolutely necessary for pumpkin pie, but it does help prevent a soggy bottom. If you do blind bake, do it for only 10 minutes at 375°F with pie weights or dried beans. This creates a moisture barrier without fully cooking the crust. The high initial baking temperature (425°F) in this recipe helps set the bottom crust quickly, minimizing sogginess even without blind baking.
Why is my pumpkin pie watery or runny?
This usually happens when the pie hasn’t been allowed to cool and set properly. The filling needs at least 4 hours total (2 hours at room temperature, then 2+ hours refrigerated) to fully set. Cutting into it too early releases liquid that hasn’t had time to gel. Another cause is using fresh pumpkin that wasn’t properly drained of excess moisture, or opening the oven door too frequently during baking, which disrupts the setting process.
Can I make mini pumpkin pies instead of one large pie?
Definitely! This recipe works beautifully for individual servings. Divide the filling among 12 standard muffin cups lined with pastry (you can use a biscuit cutter to cut rounds), or use mini pie pans or ramekins. Reduce baking time to 15 minutes at 425°F, then 20-25 minutes at 350°F. Mini pies are perfect for portion control and make beautiful presentations at gatherings.
Conclusion
There you have it – everything you need to create the most amazing homemade pumpkin pie that will have everyone asking for seconds (and the recipe!). This classic dessert is more than just a holiday tradition; it’s a celebration of fall flavors, family gatherings, and the joy of baking from scratch. The combination of creamy pumpkin custard and warm spices in a buttery, flaky crust is simply unbeatable.
What I love most about this recipe is how it brings people together. Whether you’re baking it for your first Thanksgiving as a host, continuing a treasured family tradition, or simply treating yourself to a slice of autumn comfort, this pumpkin pie never disappoints. The best part? It’s so much easier than you might think, and the homemade version tastes infinitely better than anything store-bought.
I hope you’ll give this recipe a try and experience the satisfaction of pulling a beautiful, perfectly baked pumpkin pie from your oven. Don’t forget to let it cool completely before slicing – I know it’s hard to wait, but patience really does pay off with this dessert!
Now it’s your turn! I’d love to hear how your pumpkin pie turns out. Did you try any of the variations? What did you serve it with? Drop a comment below and let me know! And if you loved this recipe as much as I do, please share it with your friends and save it to your Pinterest boards so you can find it easily next time pie cravings strike. Happy baking, and here’s to making delicious memories in the kitchen! 🥧🍂