Classic Boston Cream Pie Recipe – Layers of Cake, Cream & Chocolate
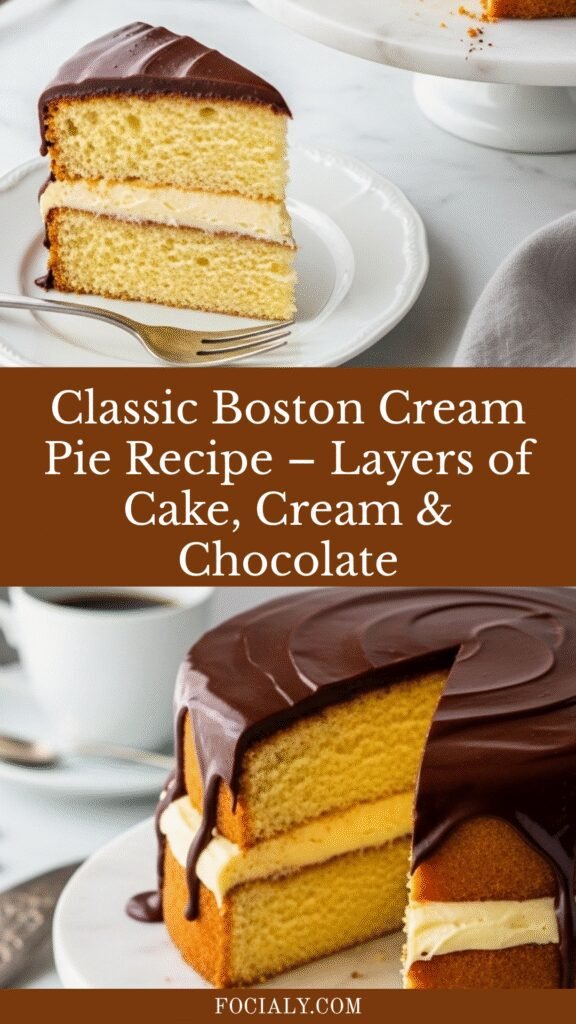
Boston Cream Pie is an iconic American dessert that’s not actually a pie at all – it’s a spectacular layer cake! This beloved classic features tender vanilla sponge cake split into two layers, filled with silky vanilla custard or pastry cream, and topped with a glossy chocolate ganache. Every bite offers the perfect combination of textures and flavors: light, airy cake; rich, creamy filling; and smooth, decadent chocolate. Despite its impressive appearance, this Boston cream pie recipe is surprisingly achievable for home bakers. It’s the perfect showstopper dessert for birthdays, dinner parties, holidays, or any special occasion when you want to create something truly memorable. The official state dessert of Massachusetts since 1996, Boston Cream Pie has been delighting dessert lovers for over 150 years!
History / Background
Boston Cream Pie has a fascinating history that begins in 1856 at the Parker House Hotel in Boston (now the Omni Parker House). Armenian-French chef M. Sanzian created this dessert, originally calling it “Parker House Chocolate Cream Pie.” The name reflected the era when cakes and pies were often baked in the same pans and the terms were used somewhat interchangeably.
The Parker House Hotel was already famous for its culinary innovations – it’s also the birthplace of Parker House Rolls and is credited with inventing Boston Cream Donuts as a variation of this cake. The hotel’s restaurant attracted Boston’s elite society and visiting dignitaries, helping spread the dessert’s fame far beyond Massachusetts.
The original recipe consisted of two layers of French butter sponge cake filled with a rum-flavored custard and topped with chocolate fondant. Over time, the recipe evolved, with the rum often being omitted and the chocolate fondant replaced with a simpler chocolate ganache, making it more accessible to home bakers.
Despite being called a “pie,” this dessert has always been a cake. The naming confusion stems from 19th-century baking practices when cake batter was commonly baked in pie tins because they were more readily available than cake pans in many households. The name stuck even as the dessert evolved into its modern layer cake form.
Boston Cream Pie’s popularity grew steadily throughout the late 1800s and 1900s. It became so beloved in Massachusetts that in 1996, a group of students successfully lobbied to make it the official state dessert. The designation was partly chosen because of the dessert’s historical significance and its creation in Boston, but also because it beat out other contenders including chocolate chip cookies (which were invented in Massachusetts) and Indian pudding.
The dessert’s influence extends beyond the original cake. Boston Cream Donuts, invented at the same hotel, feature the same flavor combination in donut form. Boston Cream Pie cupcakes, popsicles, and even coffee flavors have all been inspired by this classic dessert.
Today, Boston Cream Pie remains a testament to American culinary heritage – a sophisticated yet approachable dessert that has stood the test of time. While you can find it in bakeries across the country, nothing beats the satisfaction and flavor of making this iconic dessert from scratch in your own kitchen.
Why You’ll Love This Recipe
This homemade Boston Cream Pie delivers all the elegance and deliciousness of the famous dessert with clear, manageable steps that home bakers can master. It’s one of those recipes that looks incredibly impressive but breaks down into simple components.
- Truly impressive presentation – looks like you ordered it from a fancy bakery
- Three simple components – cake, custard, and ganache made separately then assembled
- Lighter than regular layer cakes – the sponge cake is wonderfully airy and not overly sweet
- Perfect balance of flavors – vanilla, cream, and chocolate work in harmony
- Make-ahead friendly – components can be prepared in advance
- Serves a crowd – one cake feeds 10-12 people beautifully
- Classic American dessert – connects you to culinary history
- Customizable – easy to adapt with flavor variations
- Special occasion worthy – perfect for birthdays, anniversaries, and holidays
- Surprisingly achievable – step-by-step instructions make it approachable
- Better than store-bought – homemade custard and fresh cake are incomparable
Ingredient Notes
For the Cake:
All-Purpose Flour: Creates the structure for the tender sponge cake. Measure carefully by spooning into your measuring cup and leveling off. Cake flour can be substituted for an even more delicate crumb.
Eggs: The foundation of sponge cake! Eggs provide structure, richness, and help the cake rise. Room temperature eggs whip up to greater volume, so take them out of the fridge 30 minutes before baking.
Granulated Sugar: Sweetens the cake and helps create volume when beaten with eggs. The sugar also contributes to the tender, fine crumb texture.
Butter: Adds richness and flavor to the cake. Using melted butter keeps the sponge light while still providing that buttery taste. Unsalted butter is preferred so you can control the salt level.
Vanilla Extract: Essential for that classic vanilla cake flavor. Always use pure vanilla extract, not imitation, for the best taste.
Baking Powder: Provides additional lift to create a light, airy sponge cake. Make sure it’s fresh (less than 6 months old) for best results.
For the Pastry Cream:
Whole Milk: The base of the custard. Whole milk creates the richest, creamiest texture. You can use 2% milk in a pinch, but the custard will be slightly less rich.
Egg Yolks: Thicken the custard and give it that luxurious, silky texture and golden color. Save the whites for another recipe like meringues or macarons!
Cornstarch: The thickening agent that transforms milk into pudding-like custard. It creates a smooth, stable filling that won’t make the cake soggy.
Heavy Cream: Whipped and folded into the cooled custard for an even lighter, fluffier filling. This step is optional but highly recommended for the most luxurious texture.
For the Chocolate Ganache:
Semi-Sweet Chocolate: Use good quality chocolate for the best flavor. Chocolate chips work, but chopped bar chocolate melts more smoothly. Semi-sweet provides perfect sweetness balance, but dark chocolate (60-70% cacao) works beautifully too.
Heavy Cream: Creates the glossy, pourable ganache that tops the cake. The cream-to-chocolate ratio determines consistency – more cream makes it thinner and shinier.
Equipment Needed
- 9-inch round cake pans (2 pans, or split one cake layer)
- Parchment paper (for lining pans)
- Large mixing bowls (3-4 total)
- Electric mixer (hand or stand mixer)
- Medium saucepan (for pastry cream)
- Whisk
- Rubber spatula
- Fine-mesh strainer (for straining custard)
- Plastic wrap (for covering custard)
- Serrated knife (for splitting cake layers if needed)
- Cake stand or serving plate
- Offset spatula (for spreading filling)
- Measuring cups and spoons
- Cooling racks
Classic Boston Cream Pie Recipe – Layers of Cake, Cream & Chocolate
This classic Boston Cream Pie features two layers of tender vanilla sponge cake filled with silky vanilla pastry cream and topped with glossy chocolate ganache. It’s an iconic American dessert that’s surprisingly easy to make at home and absolutely stunning to serve. Perfect for special occasions or any time you want an impressive, delicious dessert!
- Prep Time: 45 minutes
- Cook Time: 25 minutes
- Total Time: 1 hour 10 minutes (plus cooling and chilling time)
- Yield: 10-12 servings 1x
- Category: Dessert
- Method: Baking
- Cuisine: American
- Diet: Vegetarian
Ingredients
For the Vanilla Sponge Cake:
- 1½ cups all-purpose flour
- 1½ teaspoons baking powder
- ½ teaspoon salt
- 4 large eggs, room temperature
- 1 cup granulated sugar
- ½ cup whole milk
- 6 tablespoons unsalted butter, melted and slightly cooled
- 2 teaspoons pure vanilla extract
For the Vanilla Pastry Cream:
- 2 cups whole milk
- ½ cup granulated sugar, divided
- 4 large egg yolks
- 3 tablespoons cornstarch
- 2 tablespoons unsalted butter
- 1½ teaspoons pure vanilla extract
- ½ cup heavy cream (optional, for lightening the filling)
For the Chocolate Ganache:
- 6 ounces semi-sweet chocolate, finely chopped
- ½ cup heavy cream
- 1 tablespoon light corn syrup (optional, for extra shine)
Instructions
Make the Cake:
- Preheat your oven to 350°F (175°C). Grease two 9-inch round cake pans, line the bottoms with parchment paper, then grease the parchment. Dust lightly with flour and tap out excess.
- In a medium bowl, whisk together flour, baking powder, and salt. Set aside.
- In a large bowl using an electric mixer, beat the eggs and sugar on high speed for 5-7 minutes until the mixture is thick, pale yellow, and tripled in volume. When you lift the beaters, the mixture should fall in ribbons that hold their shape briefly on the surface.
- In a small saucepan or microwave, warm the milk and melted butter together until just warm (not hot). Stir in vanilla extract.
- Gently fold the flour mixture into the egg mixture in three additions using a rubber spatula. Use a folding motion (cut down the center, sweep along the bottom, and bring up the sides) to preserve the air you’ve beaten into the eggs. Mix just until no flour streaks remain.
- Take about 1 cup of the batter and fold it into the warm milk-butter mixture to temper it, then gently fold this mixture back into the main batter. Work quickly but gently.
- Divide the batter evenly between the prepared pans. Bake for 22-25 minutes until the cakes are golden, spring back when lightly pressed, and a toothpick inserted in the center comes out clean.
- Cool in pans for 10 minutes, then turn out onto wire racks, peel off parchment, and cool completely.
Make the Pastry Cream:
- In a medium saucepan, heat the milk and ¼ cup of sugar over medium heat until steaming and sugar dissolves. Don’t let it boil.
- Meanwhile, in a bowl, whisk together egg yolks, remaining ¼ cup sugar, and cornstarch until smooth and pale.
- Slowly pour about half of the hot milk into the egg mixture while whisking constantly (this tempers the eggs and prevents scrambling). Then pour the egg mixture back into the saucepan with the remaining milk.
- Cook over medium heat, whisking constantly, until the mixture thickens and comes to a boil. Let it boil for 1 minute while whisking (this cooks out the starchy taste).
- Remove from heat and whisk in butter and vanilla until smooth. Pour through a fine-mesh strainer into a clean bowl to remove any lumps.
- Press plastic wrap directly onto the surface of the custard (this prevents a skin from forming) and refrigerate until completely cold, at least 2 hours or overnight.
- Optional: When ready to assemble, whip the heavy cream to soft peaks and fold it into the cold pastry cream for a lighter, fluffier filling.
Make the Chocolate Ganache:
- Place chopped chocolate in a heat-proof bowl. Heat the cream in a small saucepan until it just begins to simmer (don’t boil).
- Pour hot cream over the chocolate and let sit for 1 minute undisturbed. Then whisk until completely smooth and glossy. Stir in corn syrup if using. Let cool for 10-15 minutes until slightly thickened but still pourable.
Assemble the Boston Cream Pie:
- If your cake layers have domed tops, use a serrated knife to level them. Place one cake layer on your serving plate or cake stand, cut side up.
- Spread the chilled pastry cream evenly over the bottom cake layer, leaving a ½-inch border around the edges (the weight of the top layer will push it out slightly).
- Place the second cake layer on top, cut side down, pressing gently to adhere.
- Pour the ganache over the top of the cake, starting in the center and using an offset spatula to spread it to the edges, letting it drip naturally down the sides if desired.
- Refrigerate for at least 30 minutes to set the ganache before slicing. Serve chilled or at room temperature.
Notes
- Eggs at room temperature: They whip to greater volume, creating a lighter cake.
- Don’t rush the egg-sugar beating: The 5-7 minutes of beating is crucial for a light, airy sponge.
- Fold gently: Preserve the air bubbles you’ve created by folding rather than stirring.
- Chill the pastry cream thoroughly: It needs to be completely cold before assembly or it will make the cake soggy.
- Use quality chocolate: The ganache flavor depends on your chocolate quality.
- Chill before serving: The cake slices more cleanly and the flavors are better when chilled.
Nutrition
- Serving Size: 1 slice (1/12 of cake)
- Calories: 385
- Sugar: 32g
- Sodium: 195mg
- Fat: 18g
- Saturated Fat: 11g
- Unsaturated Fat: 6g
- Trans Fat: 0g
- Carbohydrates: 48g
- Fiber: 1g
- Protein: 7g
- Cholesterol: 155mg
Tips & Variations
Chocolate Boston Cream Pie: Replace ¼ cup of flour with ¼ cup cocoa powder in the cake for chocolate sponge layers. The combination of chocolate cake with vanilla cream and chocolate ganache is incredible!
Coffee Boston Cream Pie: Add 1 tablespoon instant espresso powder to the hot milk when making the cake. The coffee enhances the chocolate flavor beautifully without tasting like coffee.
Coconut Cream Filling: Replace half the milk in the pastry cream with coconut milk and add ½ cup toasted coconut. Top with chocolate ganache as usual for a Boston Cream “Almond Joy” experience.
Mini Boston Cream Pies: Make this as cupcakes! Bake cupcakes, hollow out the centers, fill with pastry cream, and top with ganache. Perfect for parties!
Raspberry Boston Cream Pie: Add a layer of seedless raspberry jam between the cake and pastry cream for a fruity twist.
White Chocolate Version: Use white chocolate instead of semi-sweet for the ganache. Add a drop of vanilla extract to enhance the white chocolate flavor.
Rum-Flavored Traditional: Add 2 tablespoons of dark rum to the pastry cream for the traditional Parker House version.
Lighter Filling: Fold whipped cream into the cooled pastry cream (as mentioned in the optional step) for a lighter, airier filling that’s less rich.
Pro Chef Tips
Beat eggs properly for maximum volume: The eggs and sugar must be beaten until they form ribbons – when you lift the beaters, the mixture should fall back on itself and hold its shape for several seconds before disappearing. This usually takes 5-7 minutes with an electric mixer. Underbeating results in a dense cake.
Fold, don’t stir: When incorporating the flour and the milk-butter mixture, use a folding motion with a rubber spatula, not a stirring motion. Cut down through the center, sweep along the bottom, and bring the spatula up the side. Rotate the bowl and repeat. This preserves the air bubbles you’ve created.
Temper the milk-butter mixture: Adding the warm milk-butter mixture directly to the batter would deflate it. Instead, fold about 1 cup of batter into the liquid first to lighten it, then gently fold this mixture back into the main batter. This maintains the batter’s airy texture.
Cook pastry cream properly: The custard must come to a full boil and cook for 1 minute while whisking constantly. This is necessary to activate the cornstarch’s thickening power and cook out the raw starchy taste. Don’t skip this step or your filling will be thin and taste floury.
Strain the pastry cream: Always pour hot pastry cream through a fine-mesh strainer. This removes any lumps and creates silky-smooth custard. Even if you think you whisked perfectly, strain it anyway!
Press plastic wrap directly on custard: Place plastic wrap directly on the surface of the hot custard before chilling. This prevents a skin from forming on top, which would create lumps in your finished filling.
Let ganache cool before pouring: If the ganache is too hot when you pour it on the cake, it will soak in and make the cake messy. Let it cool for 10-15 minutes until it’s slightly thickened but still pourable. It should coat the back of a spoon.
Level your cakes: For the most professional look, use a serrated knife or cake leveler to trim any dome from your cake layers. This creates perfectly flat layers that stack beautifully.
Chill before slicing: Boston Cream Pie slices most cleanly when it’s been chilled for at least 1 hour. Use a sharp knife dipped in hot water and wiped clean between each slice for the neatest cuts.
Common Mistakes to Avoid
Underbeating the eggs and sugar: This is the most common mistake with sponge cakes. If you don’t beat the mixture long enough (5-7 minutes), the cake will be dense instead of light and airy. The mixture should triple in volume and fall in thick ribbons. Be patient – this step is crucial!
Overmixing after adding flour: Once flour is added, gluten can develop quickly with mixing. Fold gently and stop as soon as the flour is incorporated. Overmixing deflates the batter and creates a tough, dense cake. Use a folding motion, not stirring.
Not tempering the milk mixture properly: Adding the warm milk-butter mixture directly to the delicate beaten eggs will deflate them. Always fold some batter into the liquid first to lighten it, then gently incorporate this back into the main batter. This maintains the airiness.
Assembling with warm components: If the cake is still warm or the pastry cream isn’t completely chilled, you’ll end up with a soggy mess. Everything must be completely cool before assembly. The pastry cream should be refrigerator-cold and quite thick. Patience is key!
Using low-quality chocolate for ganache: Since the ganache is the first thing people taste, using cheap chocolate really shows. Invest in good-quality chocolate bars (not chips, which contain stabilizers). The flavor difference is dramatic.
Not chilling the assembled cake: The ganache needs time to set and the flavors need time to meld. Chill the assembled cake for at least 30 minutes, preferably 1-2 hours, before serving. This also makes it much easier to slice cleanly.
Storage & Meal Prep
Refrigerator Storage: Store Boston Cream Pie covered in the refrigerator for up to 3 days. Cover loosely with plastic wrap or a cake dome to prevent the ganache from picking up refrigerator odors. The cake actually tastes better the next day as flavors meld!
Bringing to Room Temperature: For best flavor, remove the cake from the refrigerator 20-30 minutes before serving. The cake and cream taste best slightly cool, not ice-cold. The ganache will also be glossier at room temperature.
Storing Components Separately: If making components ahead, store the baked cake layers wrapped in plastic wrap at room temperature for up to 2 days. Store pastry cream in an airtight container in the refrigerator for up to 3 days. Make ganache fresh when assembling.
Preventing Soggy Cake: The pastry cream must be completely cold and thick before assembly. If it’s at all warm or thin, it will soak into the cake and make it soggy. If you’re concerned, you can brush the cake layers with a thin layer of melted white chocolate before adding the cream – this creates a barrier.
Slicing Tips: Use a sharp knife dipped in hot water and wiped clean between each slice for the cleanest cuts. The heat helps the knife glide through the chocolate ganache and custard without pulling.
Make-Ahead & Freezer Notes
Bake Cake Ahead: Bake the cake layers up to 2 days in advance. Once completely cool, wrap each layer tightly in plastic wrap and store at room temperature. This actually makes assembly easier as day-old cake is sturdier and easier to handle.
Make Pastry Cream Ahead: Prepare the pastry cream up to 3 days ahead and refrigerate in an airtight container with plastic wrap pressed directly on the surface. If adding whipped cream, do this just before assembly, not in advance.
Freeze Cake Layers: Wrap cooled, unfilled cake layers individually in plastic wrap, then foil. Freeze for up to 2 months. Thaw at room temperature for 2-3 hours before assembling. Don’t freeze assembled cake as the custard doesn’t freeze well.
Day-Before Assembly: You can fully assemble the cake the day before serving. In fact, it often tastes even better! The flavors meld beautifully overnight. Keep refrigerated and covered.
Cannot Freeze Assembled Cake: Do not freeze Boston Cream Pie once assembled. The custard filling doesn’t freeze well and becomes watery when thawed. The texture of the ganache also suffers. Always freeze only the unfilled cake layers.
Best Make-Ahead Strategy: Bake cake layers and make pastry cream 1-2 days ahead. Store separately. On the day of serving (or the night before), assemble the cake with fresh ganache. This gives you all the make-ahead convenience while ensuring the best texture and flavor.
Ganache Timing: Make ganache fresh when you’re ready to assemble. It only takes 5 minutes and tastes best when freshly made. If needed, you can make it a few hours ahead and gently rewarm it over a double boiler to restore pouring consistency.
Serving Suggestions
Boston Cream Pie is a spectacular dessert that stands beautifully on its own, but here are ways to enhance the experience:
Perfect Occasions:
- Birthday celebrations
- Anniversary dinners
- Holiday gatherings (especially Thanksgiving or Easter)
- Graduation parties
- Bridal or baby showers
- Dinner party finale
- Massachusetts-themed events or Boston celebrations
Beverage Pairings:
- Freshly brewed coffee or espresso (the classic pairing!)
- Irish coffee for special occasions
- Cold milk (especially for kids)
- Hot tea (Earl Grey or chai work beautifully)
- Dessert wine like Port or late-harvest Riesling
- Coffee liqueur like Kahlúa for adults
Plating Enhancements:
- Dust individual plates with cocoa powder before placing slice
- Drizzle extra chocolate ganache on the plate
- Add a dollop of whipped cream beside the slice
- Garnish with fresh berries (raspberries or strawberries)
- Sprinkle with chocolate shavings or curls
- Add a sprig of fresh mint for color
- Dust with powdered sugar for elegance
Complete Dessert Experience: Serve with vanilla ice cream or vanilla bean whipped cream on the side for extra indulgence. The cold cream contrasts beautifully with the cake.
Afternoon Tea Service: Cut into smaller, more delicate slices (16 servings instead of 12) and serve as part of an elegant afternoon tea spread.
Make It Special: Present the whole cake on a beautiful cake stand before slicing. The dramatic appearance of the glossy chocolate ganache top is stunning and worth showing off!
FAQs Section
Q: Why is it called a “pie” when it’s actually a cake?
A: In the mid-1800s when Boston Cream Pie was created, cakes and pies were often baked in the same pans, and the terms were used more interchangeably. Pie tins were more common in homes than cake pans, so cakes were frequently baked in pie tins. The name stuck even as the dessert evolved into a layer cake. It’s part of the dessert’s historical charm!
Q: Can I make this without a mixer?
A: While technically possible, it’s extremely difficult and not recommended. The eggs and sugar need to be beaten for 5-7 minutes to triple in volume, which creates the light, airy sponge cake. Doing this by hand with a whisk would be exhausting and likely wouldn’t achieve the same results. A hand mixer or stand mixer is essential for this recipe.
Q: Why did my pastry cream turn out lumpy?
A: Lumps happen when the custard isn’t whisked constantly while cooking, or when it overheats and the eggs scramble slightly. The solution: always strain the hot custard through a fine-mesh strainer into a clean bowl. This removes any lumps and creates silky-smooth cream. If your custard is very lumpy, you can also blend it briefly with an immersion blender before straining.
Q: Can I use pudding mix instead of making pastry cream from scratch?
A: While you can use instant vanilla pudding prepared according to package directions, the flavor and texture won’t be as good as homemade pastry cream. Homemade cream is richer, smoother, and has better vanilla flavor. If you do use pudding mix, prepare it with whole milk and fold in some whipped cream to lighten the texture.
Q: My ganache is too thick/thin – how do I fix it?
A: If ganache is too thick: Gently reheat it and whisk in a tablespoon or two of warm cream until you reach desired consistency. If ganache is too thin: Let it sit at room temperature for 10-15 minutes to cool and thicken, stirring occasionally. You can also refrigerate it briefly, but watch carefully and stir frequently so it doesn’t seize.
Q: Do I have to use a 9-inch pan? Can I use 8-inch pans?
A: You can use 8-inch pans, but the cake layers will be thicker and taller. Increase baking time by 3-5 minutes and check with a toothpick. The assembled cake will be more dramatically tall, which looks impressive! Just make sure you have enough pastry cream filling – you may want to make 1.5x the filling recipe.
Q: How do I prevent the filling from squishing out when I cut the cake?
A: Ensure the pastry cream is completely cold and thick before assembly – it should be quite firm, almost like pudding consistency. Don’t overfill – use a generous but not excessive amount of cream. Most importantly, chill the assembled cake for at least 1 hour before slicing so everything sets properly. Use a sharp knife and clean it between slices.
Q: Can this be made gluten-free?
A: Yes, but the texture will be different. Use a 1:1 gluten-free baking flour blend designed for cakes. Sponge cakes rely on gluten structure, so gluten-free versions are typically slightly denser and more delicate. The result is still delicious but won’t be quite as light and airy as the traditional version.
Conclusion
Making Boston Cream Pie from scratch is one of those baking projects that feels like a real accomplishment – and tastes like it too! Yes, there are multiple components, but each one is straightforward when broken down into steps. The magic happens when you bring them all together: that tender vanilla sponge, the silky custard filling, and the glossy chocolate topping create something truly special.
The beauty of this classic Boston Cream Pie recipe is that it’s not just about the incredible flavors and textures – it’s about creating a piece of culinary history in your own kitchen. When you serve this iconic Massachusetts dessert, you’re continuing a tradition that’s been delighting people since 1856. And honestly? The look on people’s faces when they take that first bite, experiencing that perfect harmony of cake, cream, and chocolate, is absolutely priceless.
Ready to make your own Boston Cream Pie? I’d love to hear about your baking adventure! Did you try any of the variations? How did your family react to this showstopper dessert? Leave a comment below and share your experience. And if you loved this recipe, please pin it to your Pinterest dessert board so you can find it again and share this classic with other home bakers who appreciate a truly special dessert!
Now let’s get baking – your own piece of American dessert history awaits! 🍰