Ultimate Coconut Cake Recipe (Moist, Fluffy & Absolutely Divine!)
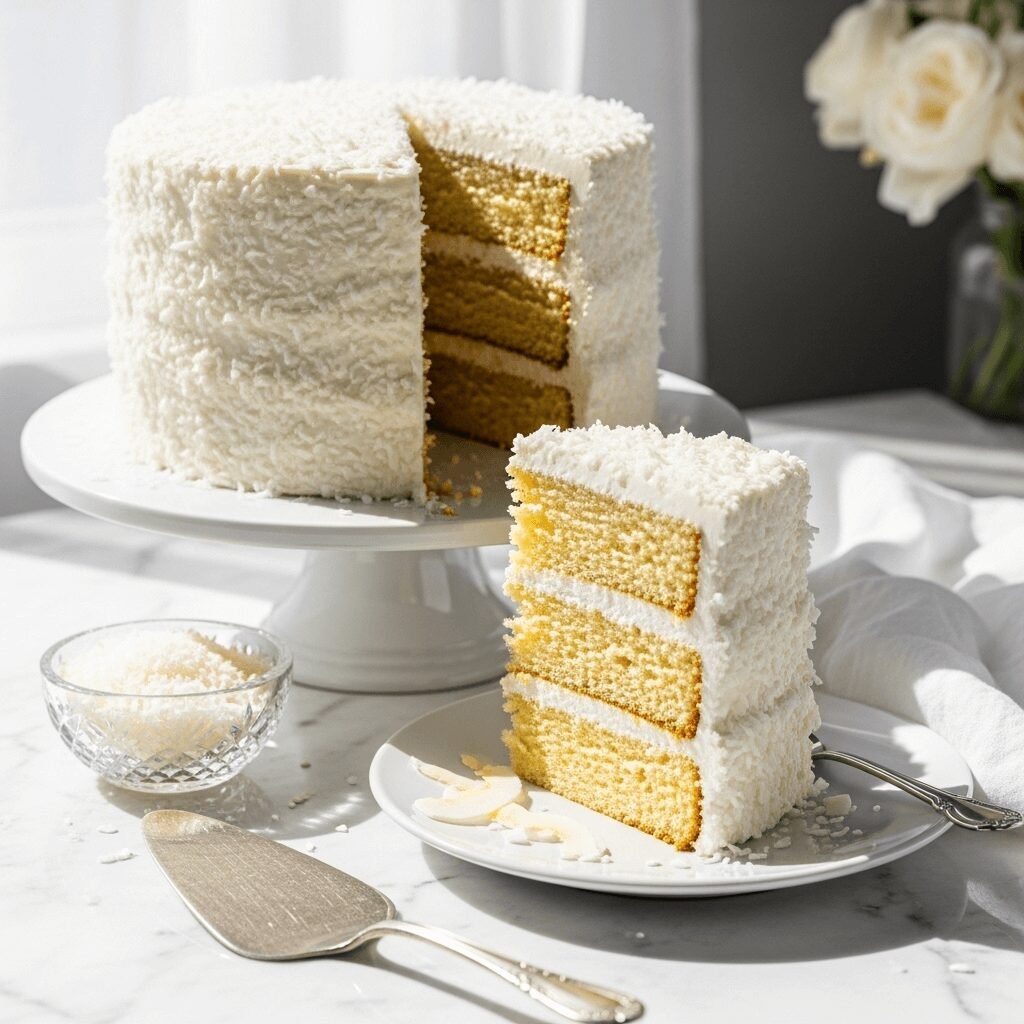
Prepare yourself for pure heaven in cake form! This classic coconut cake features tender, moist layers infused with coconut flavor, covered in fluffy coconut frosting, and generously coated with sweet, snowy coconut flakes. It’s the kind of show-stopping dessert that makes people’s eyes light up when you bring it to the table.
This isn’t just any coconut cake—it’s a coconut lover’s dream come true with coconut in every single layer. The cake itself is incredibly soft and buttery with a delicate crumb that practically melts on your tongue. The frosting is silky-smooth and not too sweet, providing the perfect complement to the sweet coconut coating. And that gorgeous coating of shredded coconut? It creates a beautiful snowy appearance that looks like it came straight from a fancy bakery.
Coconut cake is the ultimate celebration dessert, perfect for birthdays, holidays, Easter Sunday, Mother’s Day brunch, wedding showers, and any time you want to serve something truly spectacular. It’s also a beloved Southern tradition, often appearing at church potlucks and family reunions where it’s always the first dessert to disappear. The combination of flavors and textures—tender cake, creamy frosting, and that slightly chewy coconut exterior—creates an unforgettable eating experience that keeps people coming back for seconds (and thirds!).
History / Background
Coconut cake holds a cherished place in American baking history, particularly in the Southern United States where it’s considered one of the most iconic and beloved desserts. The story of coconut cake is intertwined with advances in transportation, technology, and the evolution of American home baking.
Before the late 1800s, coconut was an exotic luxury in America. Fresh coconuts had to be imported from tropical regions, making them expensive and difficult to obtain, especially for inland communities. The breakthrough came in the 1890s when Franklin Baker, a Philadelphia flour miller, received a shipload of coconuts as payment for a debt. Rather than letting them go to waste, Baker developed a process for shredding, drying, and packaging coconut, creating the first commercially available shredded coconut in America. This innovation made coconut accessible and affordable to home bakers across the country.
The timing couldn’t have been better. The late Victorian era was obsessed with elaborate, impressive layer cakes, and coconut cake quickly became a status symbol. Early recipes were labor-intensive, requiring bakers to crack open fresh coconuts, grate the meat by hand, and create elaborate frosting designs. The all-white appearance was particularly prized in the Victorian era, symbolizing purity and celebration.
In the American South, coconut cake took on special cultural significance. It became the traditional cake for Easter celebrations, Christmas gatherings, and weddings. Southern bakers developed their own distinctive style, often using multiple thin layers (sometimes up to seven!) with filling between each layer and a thick coating of fluffy frosting covered entirely in sweetened coconut flakes. The cake became so associated with special occasions that many Southern families have treasured coconut cake recipes passed down through generations.
One famous variation is the “Lane Cake,” created by Emma Rylander Lane in Clayton, Alabama in the 1890s. Her prize-winning coconut cake included a bourbon-spiked filling with pecans, raisins, and coconut. The cake became so legendary that it was even mentioned in Harper Lee’s “To Kill a Mockingbird.”
Throughout the 20th century, coconut cake remained a beloved classic, adapting to changing times. The introduction of cream of coconut and coconut extract made it easier to achieve intense coconut flavor. Boxed cake mixes offered shortcuts, though traditionalists insisted on from-scratch recipes. Today, coconut cake continues to be a special-occasion dessert that represents celebration, hospitality, and the joy of sharing something truly delicious.
Why You’ll Love This Recipe
This coconut cake recipe has been perfected through countless batches to create the absolute best version you’ll ever taste. It strikes that perfect balance between impressive and achievable—it looks like you spent all day on it, but the method is straightforward and approachable.
The cake layers are incredibly tender and moist with a fine, delicate crumb that holds up beautifully when sliced. The coconut flavor shines through without being overwhelming, complemented by the sweet vanilla notes. The frosting is silky and spreadable, not too sweet, and holds its shape perfectly. And that gorgeous coconut coating? It’s not just for looks—it adds wonderful texture and extra coconut goodness in every bite.
Here’s why this recipe will become your go-to celebration cake:
- Absolutely stunning presentation – This cake looks bakery-professional and always impresses guests
- Triple coconut flavor – Coconut in the cake, frosting, and coating for maximum coconut deliciousness
- Incredibly moist texture – Stays fresh and tender for days without drying out
- Perfect for celebrations – Makes a beautiful centerpiece for birthdays, holidays, and special occasions
- Surprisingly straightforward – Despite the impressive results, the method is beginner-friendly
- Crowd-pleaser – Even people who think they don’t like coconut fall in love with this cake
- Versatile recipe – Can be made as a layer cake, sheet cake, or cupcakes
- Make-ahead friendly – Components can be prepared in advance for easier party planning
- Customizable sweetness – You can adjust the sugar levels to suit your taste
- Freezes beautifully – Make it weeks ahead and have an emergency celebration cake ready to go
- Feeds a crowd – Makes generous servings perfect for gatherings and potlucks
Ingredient Notes
Let’s explore the key ingredients that make this coconut cake so exceptionally delicious. Each component plays an important role in creating that perfect texture and flavor.
All-Purpose Flour – Provides structure while keeping the cake tender. Cake flour would make it too delicate, while bread flour would make it tough. All-purpose is the perfect middle ground.
Granulated Sugar – Sweetens the cake and helps create that tender, moist crumb. Sugar also helps the cake brown beautifully and adds to the overall texture.
Baking Powder – The primary leavening agent that makes the cake rise and creates that light, fluffy texture. Make sure yours is fresh (not expired) for the best rise.
Salt – Enhances all the other flavors and balances the sweetness. Never skip the salt in baking!
Unsalted Butter – Adds rich flavor and creates tender texture. Must be at room temperature for proper creaming. Using unsalted allows you to control the exact salt level.
Eggs – Provide structure, moisture, and richness. Room temperature eggs incorporate better into the batter. They also help emulsify the ingredients and create a stable cake structure.
Coconut Milk – This is a game-changer! Using coconut milk instead of regular milk infuses coconut flavor throughout the entire cake. Use full-fat coconut milk (the kind in cans) for best results. Shake the can well before opening to combine the cream and liquid.
Vanilla Extract – Enhances the coconut flavor and adds depth. Always use pure vanilla extract, not imitation.
Coconut Extract – Intensifies the coconut flavor dramatically. A little goes a long way! You can find this in the baking aisle near vanilla extract. Don’t skip this—it’s what makes the cake taste incredibly coconutty.
Sour Cream – Adds moisture, tenderness, and a subtle tang that balances the sweetness. Creates an exceptionally tender crumb texture. You can substitute with Greek yogurt if needed.
For the Frosting:
Unsalted Butter – The base of the frosting. Must be very soft (almost room temperature) for smooth, fluffy frosting.
Cream Cheese – Adds tanginess and helps stabilize the frosting so it holds its shape perfectly. Also keeps the frosting from being too sweet. Use full-fat cream cheese, and make sure it’s softened.
Powdered Sugar – Sweetens and thickens the frosting. Sift it if it’s lumpy for the smoothest texture.
Coconut Extract – Carries the coconut theme into the frosting. Just ½ teaspoon adds incredible flavor without overwhelming.
Vanilla Extract – Rounds out the flavors and adds warmth.
Heavy Cream – Adjusts the frosting consistency. Add more for softer, more spreadable frosting, or less for stiffer frosting.
Sweetened Shredded Coconut – The crowning glory! This coats the entire cake for that classic coconut cake appearance and adds wonderful texture. You’ll need about 2-3 cups depending on how thick you like your coating. Look for the finely shredded variety for the prettiest look.
Equipment Needed
You’ll need some basic baking equipment to create this stunning coconut cake:
- Three 9-inch round cake pans – For classic three-layer cake (or use two pans and halve layers for four thinner layers)
- Parchment paper – Essential for lining pan bottoms so cakes release perfectly
- Stand mixer or hand mixer – Makes mixing much easier, though you can do it by hand if needed
- Large mixing bowls – At least two for keeping ingredients organized
- Medium mixing bowl – For the dry ingredients
- Measuring cups and spoons – For accurate measurements (crucial in baking!)
- Rubber spatula – For folding ingredients and scraping down bowls
- Whisk – For combining dry ingredients
- Cooling racks – Essential for cooling cakes completely before frosting
- Offset spatula – Makes frosting the cake much easier and helps create smooth sides
- Cake turntable (optional but helpful) – Makes frosting dramatically easier
- Toothpicks – For testing cake doneness
- Cake stand or serving plate – For presenting your beautiful creation
- Bench scraper or straight spatula – Helps create smooth frosting and straight edges
Ultimate Coconut Cake Recipe (Moist, Fluffy & Absolutely Divine!)

This classic coconut cake features three moist, tender layers infused with coconut flavor, covered in cream cheese coconut frosting, and coated with sweet shredded coconut. It’s the ultimate celebration cake that’s easier to make than it looks!
- Prep Time: 30 minutes
- Cook Time: 30 minutes
- Total Time: 2 hours (including cooling and frosting)
- Yield: 12-14 servings 1x
- Category: Dessert
- Method: Baking
- Cuisine: American
- Diet: Vegetarian
Ingredients
For the Coconut Cake:
- 3 cups all-purpose flour
- 1 tablespoon baking powder
- ½ teaspoon salt
- 1 cup unsalted butter, softened to room temperature
- 2 cups granulated sugar
- 4 large eggs, at room temperature
- 1 cup full-fat coconut milk (shake can well before using)
- ½ cup sour cream, at room temperature
- 2 teaspoons vanilla extract
- 1 teaspoon coconut extract
For the Cream Cheese Coconut Frosting:
- 1 cup unsalted butter, very soft
- 8 oz cream cheese, softened to room temperature
- 6 cups powdered sugar, sifted
- ½ teaspoon coconut extract
- 1 teaspoon vanilla extract
- 2-4 tablespoons heavy cream (as needed for consistency)
- Pinch of salt
For Assembly:
- 2½-3 cups sweetened shredded coconut (for coating the cake)
Instructions
Prepare the Cake Layers:
- Preheat and Prep: Preheat your oven to 350°F (175°C). Grease three 9-inch round cake pans with butter or cooking spray, line the bottoms with parchment paper rounds, then grease the parchment. Lightly dust with flour and tap out excess. This ensures easy cake release.
- Mix Dry Ingredients: In a medium bowl, whisk together the flour, baking powder, and salt until well combined. Set aside.
- Cream Butter and Sugar: In a large bowl using an electric mixer (or stand mixer with paddle attachment), beat the softened butter and sugar together on medium-high speed for 3-4 minutes until very light, fluffy, and pale in color. This incorporates air and creates tender cake texture. Scrape down the sides of the bowl as needed.
- Add Eggs: Add the eggs one at a time, beating well after each addition. Make sure each egg is fully incorporated before adding the next. The mixture should look smooth and creamy.
- Combine Wet Ingredients: In a measuring cup or small bowl, whisk together the coconut milk, sour cream, vanilla extract, and coconut extract until smooth.
- Alternate Adding Ingredients: With the mixer on low speed, add the flour mixture in three additions, alternating with the coconut milk mixture in two additions. Begin and end with the flour mixture. Mix each addition just until incorporated—don’t overmix. The batter should be smooth and thick but pourable.
- Fill Pans: Divide the batter evenly among the three prepared pans (about 2⅓ cups of batter per pan for even layers). Smooth the tops with a spatula. Tap the pans gently on the counter a few times to release air bubbles.
- Bake: Bake for 28-32 minutes, or until a toothpick inserted in the center comes out clean or with just a few moist crumbs, and the cakes spring back when lightly touched. The tops should be golden and pulling slightly away from the pan edges. Start checking at 28 minutes to avoid overbaking.
- Cool: Let the cakes cool in the pans on cooling racks for 15 minutes. This allows them to set up. Run a knife around the edges, then carefully invert onto the cooling racks, peel off the parchment paper, and let cool completely before frosting (at least 1 hour). You can speed this up by placing them in the refrigerator.
Make the Frosting:
- Beat Butter and Cream Cheese: In a large bowl with an electric mixer, beat the very soft butter and cream cheese together on medium speed for 2-3 minutes until completely smooth, creamy, and well combined with no lumps.
- Add Sugar: Add the sifted powdered sugar one cup at a time, beating on low speed until incorporated, then increase to medium-high and beat for 1-2 minutes until fluffy. The frosting should be thick and smooth.
- Add Flavorings: Beat in the coconut extract, vanilla extract, and salt. Mix until well combined.
- Adjust Consistency: Add heavy cream 1 tablespoon at a time until you reach your desired consistency. For spreading between layers and the crumb coat, you want slightly thicker frosting. For the final coat, slightly thinner frosting is easier to spread smoothly.
Assemble the Cake:
- Level Cakes (Optional): If your cakes domed significantly during baking, use a serrated knife or cake leveler to trim the tops flat for more stable stacking.
- First Layer: Place one cake layer on your serving plate or cake stand. If desired, place strips of parchment paper under the edges to keep the plate clean during frosting (remove before serving).
- Add Filling: Spread about ¾ cup of frosting evenly over the first layer, going almost to the edges.
- Second Layer: Place the second cake layer on top, pressing down gently. Add another ¾ cup of frosting and spread evenly.
- Top Layer: Place the final cake layer on top, pressing down gently to secure. Make sure everything is level and stable.
- Crumb Coat: Spread a thin layer of frosting all over the entire cake—top and sides. This is called a crumb coat and seals in any loose crumbs. It doesn’t need to look perfect. Refrigerate for 30 minutes to set the crumb coat.
- Final Frosting: Once the crumb coat is firm, spread the remaining frosting generously over the entire cake, creating a smooth, even layer on the top and sides. Use an offset spatula or bench scraper for the smoothest finish.
- Coat with Coconut: While the frosting is still soft and sticky, gently press handfuls of shredded coconut all over the cake, covering the entire surface—top and sides. Pat gently to help it adhere. Use as much coconut as you like for your desired look!
- Chill and Serve: Refrigerate the finished cake for at least 30 minutes to set the frosting before slicing. This makes cutting much neater. Let the cake sit at room temperature for 15-20 minutes before serving for best flavor and texture.
Notes
- Room temperature ingredients are crucial – Cold ingredients don’t mix properly and can create dense cake
- Don’t overbake – Check cakes at 28 minutes; overbaking creates dry cake
- Cool completely before frosting – Warm cake will melt the frosting
- Make extra frosting if you love thick layers – This recipe provides enough for moderate frosting; double the frosting recipe for very thick layers
- Toast the coconut for deeper flavor – Spread coconut on a baking sheet and toast at 325°F for 5-8 minutes until golden (watch carefully!)
- Level your layers – This creates a more stable, professional-looking cake
Nutrition
- Serving Size: 1 slice (1/12 of cake)
- Calories: 685
- Sugar: 68g
- Sodium: 245mg
- Fat: 34g
- Saturated Fat: 22g
- Unsaturated Fat: 10g
- Trans Fat: 0g
- Carbohydrates: 89g
- Fiber: 2g
- Protein: 6g
- Cholesterol: 135mg
Note: Nutrition information is approximate and will vary based on specific ingredients and portion sizes.
Tips & Variations
The beauty of this coconut cake is how easily you can customize it to create unique variations!
Italian Cream Cake Style: Add 1 cup of chopped pecans and ½ cup of shredded coconut directly to the cake batter for a nutty, textured variation that’s incredibly popular in the South.
Pineapple Coconut Cake: Add ½ cup of well-drained crushed pineapple to the cake batter and spread pineapple jam between the layers along with the frosting for a tropical twist.
Toasted Coconut Cake: Toast all the shredded coconut before coating the cake. Spread it on baking sheets and bake at 325°F for 5-8 minutes, stirring frequently, until golden. This adds incredible nutty flavor and beautiful golden color.
Lime Coconut Cake: Add 2 tablespoons of lime zest to the cake batter and 1 tablespoon to the frosting. Brush layers with lime simple syrup before frosting for a bright, tangy version.
Chocolate Coconut Cake: Use chocolate cake layers instead and top with coconut frosting. Think of it as a homemade Mounds cake!
Lemon Coconut Cake: Add lemon zest to the batter and use lemon curd between layers along with the coconut frosting for a bright, refreshing combination.
Coconut Cream Filling: Make a coconut pastry cream to fill between layers instead of just frosting—adds amazing richness and coconut flavor.
Mini Coconut Cakes: Divide batter among cupcake tins and bake for 18-22 minutes. Frost and coat with coconut for adorable individual servings.
Reduced Sugar Version: Cut the sugar in the cake by ⅓ cup and use less powdered sugar in the frosting (start with 4 cups and add more to taste).
Rum Coconut Cake: Brush cake layers with rum simple syrup (equal parts sugar, water, and dark rum) before frosting for an adult version perfect for celebrations.
Pro Chef Tips
After making countless coconut cakes, I’ve learned professional tricks that make a dramatic difference in the final result:
Bring all ingredients to room temperature before starting. This is the single most important tip! Room temperature ingredients mix more evenly and create better texture. Cold eggs and butter can cause the batter to curdle or mix unevenly. Set everything out 1-2 hours before baking.
Cream the butter and sugar thoroughly. Don’t rush this step! Beat for a full 3-4 minutes until the mixture is very pale, fluffy, and increased in volume. This incorporates air that helps create a light, tender cake. If you don’t cream long enough, your cake will be dense.
Don’t overmix once you add the flour. Mix only until the flour disappears—overmixing develops gluten and creates tough, dense cake. Use the lowest speed on your mixer and stop as soon as ingredients are combined.
Measure flour correctly. Spoon flour into measuring cups and level off with a knife—never scoop directly from the bag or pack it down. Too much flour creates dry, crumbly cake. Better yet, weigh your flour if you have a kitchen scale (1 cup = 120 grams).
Use cake strips for perfectly flat layers. Soak fabric cake strips in water, wring out, and wrap around your pans before baking. This helps cakes bake more evenly and prevents doming. You can also make DIY versions with aluminum foil and wet paper towels.
Check for doneness early. Start checking cakes at 28 minutes. Every oven is different, and overbaking even by a few minutes creates dry cake. The toothpick should come out with just a few moist crumbs, not completely clean.
Cool cakes completely before frosting. This takes patience, but warm cake will absolutely melt your frosting and create a disaster. Refrigerate the layers if you’re in a hurry—they’ll cool faster.
Make frosting the right consistency. Your frosting should be thick enough to hold its shape but soft enough to spread smoothly. Adjust with heavy cream (to thin) or more powdered sugar (to thicken) as needed.
Do a proper crumb coat. This thin first layer of frosting seals in crumbs so your final coat is smooth and beautiful. Don’t skip this step! Refrigerate after the crumb coat so it sets firm.
Use an offset spatula and turntable. These tools make frosting dramatically easier. If you don’t have a turntable, place your cake stand on an upside-down bowl so you can rotate it easily.
Press coconut gently but firmly. Take handfuls of coconut and gently press onto the frosting, patting to help it stick. Work quickly before the frosting sets. Don’t be shy—really pack it on for that classic look!
Common Mistakes to Avoid
Even experienced bakers can stumble with layer cakes. Here’s how to avoid common pitfalls:
Using cold ingredients – This is the number one mistake! Cold butter doesn’t cream properly, cold eggs can cause curdling, and cold dairy doesn’t mix smoothly. Everything should be at room temperature (around 65-70°F). Plan ahead and set ingredients out 1-2 hours before baking.
Overbaking the cakes – Dry cake is disappointing! Check early and remove cakes when a toothpick comes out with just a few moist crumbs. Remember that cakes continue cooking slightly as they cool in the pan. When in doubt, slightly underbake rather than overbake.
Overmixing the batter – Once you add flour, mix only until it disappears. Overmixing develops gluten, creating tough, dense, rubbery cake with tunnels. Use the lowest mixer speed and stop as soon as you don’t see dry flour streaks.
Frosting warm cakes – I cannot stress this enough: your cakes MUST be completely cool! Even slightly warm cakes will melt the frosting, causing it to slide off and creating a messy disaster. If you’re impatient, refrigerate the layers to speed cooling.
Skipping the crumb coat – The crumb coat seals in crumbs so your final frosting layer is smooth and beautiful. Without it, you’ll have crumbs throughout your frosting. It only takes an extra 5 minutes and is absolutely worth it.
Not leveling the layers – If your cakes domed during baking and you don’t trim them flat, your finished cake will be lopsided and unstable. Use a serrated knife or cake leveler to create flat, even layers that stack beautifully.
Wrong frosting consistency – Frosting that’s too stiff is impossible to spread smoothly and can tear your cake. Frosting that’s too soft won’t hold its shape. Adjust consistency with heavy cream or powdered sugar until it spreads smoothly but holds its shape.
Storage & Meal Prep
Proper storage keeps your coconut cake fresh and delicious for days!
Room Temperature Storage: If you’ll eat the cake within 2 days, you can store it at room temperature in a cake keeper or under an inverted large bowl. However, because this cake contains cream cheese frosting, I recommend refrigeration for food safety, especially in warm weather.
Refrigerator Storage: Store the cake in an airtight container or cake keeper in the refrigerator for up to 5 days. The coconut coating helps protect the cake from drying out. Before serving, let it sit at room temperature for 15-20 minutes—the texture and flavor are much better when not cold.
Covering Without Messing Up Coconut: To cover without disturbing the coconut coating, insert toothpicks around the top edge and sides of the cake, then drape plastic wrap over the toothpicks. Or use a large cake keeper or dome that doesn’t touch the sides.
Individual Slices: Cut the cake into slices and wrap each individually in plastic wrap. Store in the refrigerator for easy grab-and-go servings. This also helps the cake stay moist longer.
Preventing Dry Cake: Make sure your storage container is truly airtight. If the cake starts drying out, place a slice of bread in the container overnight—the moisture from the bread will transfer to the cake.
Maintaining Freshness: This cake actually tastes even better on day 2! The moisture from the frosting softens the cake layers slightly, and all the flavors meld together beautifully.
Make-Ahead & Freezer Notes
Coconut cake is excellent for making ahead, which makes party planning so much easier!
Freezing Cake Layers (Unfrosted): This is my preferred make-ahead method! Bake the cake layers, cool completely, then wrap each layer tightly in plastic wrap, then aluminum foil. Freeze for up to 3 months. When ready to use, thaw in the refrigerator overnight, then bring to room temperature before frosting. The texture is virtually identical to fresh!
Freezing Assembled Cake: You can freeze the fully assembled and frosted cake! Freeze uncovered for 1-2 hours until the frosting is firm, then wrap very carefully in plastic wrap and foil. Freeze for up to 2 months. Thaw in the refrigerator overnight (still wrapped), then unwrap and let come to room temperature before serving.
Making Components Ahead: Bake the cake layers up to 2 days ahead and keep wrapped at room temperature (or refrigerated in humid climates). Make the frosting up to 3 days ahead and refrigerate in an airtight container. When ready to assemble, bring the frosting to room temperature and beat for 1-2 minutes to restore fluffiness.
Advance Assembly Timeline: For parties, I recommend this schedule: Bake layers 1-2 days ahead (or pull from freezer 1 day ahead to thaw). Make frosting 1 day ahead. Assemble and frost the cake the morning of your event or the night before. The cake actually improves after sitting for several hours.
Frosting from Frozen: If you froze just the layers, you don’t need to thaw them completely before frosting! Frost them while still slightly frozen—it’s actually easier because frozen cakes don’t shed as many crumbs. Let the assembled cake come to room temperature before serving.
Best Thawing Method: Always thaw in the refrigerator, not at room temperature, to prevent condensation and sogginess. Keep the cake wrapped while thawing to protect it from absorbing refrigerator odors.
Serving Suggestions
This stunning coconut cake deserves to be the star of your celebration, but here are some delicious accompaniments:
Beverage Pairings:
- Freshly brewed coffee or espresso (the slight bitterness balances the sweetness perfectly)
- Hot tea—Earl Grey or chamomile pair beautifully
- Cold milk (classic and kid-friendly)
- Champagne or Prosecco for celebrations
- Dessert wine like Moscato or Riesling
- Coconut milk or piña colada for a tropical theme
Complementary Desserts:
- Fresh berries (strawberries, raspberries, or blueberries) on the side
- Vanilla bean ice cream or coconut ice cream
- Fresh whipped cream with a splash of rum
- Toasted macadamia nuts sprinkled around the serving plate
- Passion fruit coulis or mango sauce drizzled on plates
Occasion Serving Ideas:
Easter Brunch: Serve alongside ham, deviled eggs, fresh fruit salad, and hot cross buns
Birthday Party: Present on a cake stand with candles, served with ice cream
Wedding Shower: Cut into small squares and serve on individual dessert plates with fresh flowers
Mother’s Day: Pair with mimosas and fresh strawberries for a special brunch
Christmas Dinner: Serve as an elegant alternative to traditional fruit cake
Presentation Ideas:
- Place on a white pedestal cake stand for dramatic height
- Surround the base with fresh flowers or greenery
- Serve on plates with a dusting of powdered sugar
- Garnish plates with fresh mint leaves
- Add a dollop of whipped cream and fresh berry to each slice
- Drizzle plates with white chocolate or caramel sauce
FAQs Section
Q: Can I make this cake without coconut extract?
A: Yes, but the coconut flavor won’t be as pronounced. You can increase the vanilla extract to 3 teaspoons total in the cake, or try adding ½ cup of sweetened shredded coconut directly to the batter. However, coconut extract really makes a difference and is worth buying—one small bottle lasts for many recipes!
Q: Why did my cake layers sink in the middle?
A: This usually happens from opening the oven door too early (causes temperature drop), using too much leavening, or underbaking. Make sure your baking powder is fresh and measured accurately. Don’t open the oven for the first 25 minutes of baking, and bake until a toothpick comes out clean.
Q: Can I use coconut oil instead of butter?
A: You can, but it will significantly change the flavor and texture. Coconut oil creates a denser cake with strong coconut flavor. If you try it, use refined coconut oil and melt it, then let it cool to room temperature before using. The texture won’t be quite as tender as butter-based cake.
Q: My frosting is too soft/runny. How do I fix it?
A: Add more powdered sugar (¼ cup at a time) until it thickens to your desired consistency. You can also refrigerate the frosting for 15-20 minutes to firm it up. Make sure your butter and cream cheese were at the right temperature—if they’re too soft, the frosting will be runny.
Q: Can I make this as a sheet cake instead of layers?
A: Absolutely! Pour all the batter into a greased and floured 9×13-inch pan and bake for 35-40 minutes. Let cool completely, then frost the top and coat with coconut. Much easier for casual gatherings!
Q: What’s the best way to cut clean slices?
A: Use a long, sharp knife and wipe it clean between each slice. For the cleanest cuts, refrigerate the cake for 30 minutes before slicing—this firms up the frosting. You can also dip the knife in hot water, wipe dry, and then slice (repeat between cuts).
Q: Can I make this dairy-free?
A: Yes! Use coconut oil instead of butter in the cake (¾ cup melted and cooled). Use full-fat coconut milk (already in the recipe). For frosting, use dairy-free butter and dairy-free cream cheese (brands like Kite Hill or Miyoko’s work well). Use coconut cream instead of heavy cream.
Q: How do I transport this cake without ruining it?
A: Refrigerate the cake for at least 1 hour to firm up the frosting. Place it in a sturdy cake carrier with a secure lid. If transporting in a car, place the carrier on a flat surface (not a seat) and drive carefully! Alternatively, transport the layers and frosting separately and assemble at your destination.
Conclusion
There you have it—the ultimate coconut cake recipe that’s guaranteed to impress at any celebration! This beautiful three-layer creation combines tender, coconutty cake with smooth cream cheese frosting and that iconic snowy coconut coating for a dessert that’s as delicious as it is stunning.
What I love most about this coconut cake is how it brings people together. Whether you’re celebrating a birthday, marking a holiday, or simply treating your family to something special, this cake creates moments of joy and connection. The smiles when you bring it to the table, the “oohs” and “ahhs” when you cut into those perfect layers, the requests for seconds—these are the moments that make baking worthwhile.
I’d absolutely love to hear about your coconut cake success! Did you make it for a special occasion? Did your family devour it in one sitting? Did you try any of the flavor variations? Drop a comment below and share your experience—I read every single one and love hearing from you!
And please, if you loved this recipe, save it to your Pinterest boards so you can find it easily whenever a celebration calls for something spectacular. Share it with your baking friends who appreciate a good layer cake, and tag me in your photos—I adore seeing your beautiful creations!
Now go grab those ingredients and get baking—a gorgeous coconut cake is waiting to happen in your kitchen! 🥥🎂✨