Classic Pineapple Upside Down Cake – Sweet, Nostalgic, and Perfectly Moist
There’s something utterly magical about a pineapple upside down cake—the way those caramelized pineapple rings glisten on top, surrounded by jewel-like maraschino cherries, all sitting atop a tender, buttery cake that’s soaked with sweet pineapple-caramel syrup. This iconic American dessert is the definition of retro charm meets timeless deliciousness, and it never fails to bring smiles to the table.
Pineapple upside down cake is one of those showstopper desserts that looks incredibly impressive but is surprisingly easy to make. The “upside down” technique—where you arrange the fruit in the bottom of the pan with butter and sugar, pour cake batter over it, then flip it after baking—creates a stunning presentation that makes you look like a professional baker. The best part? It all happens in one pan, making cleanup a breeze!
This classic dessert is perfect for so many occasions: Sunday family dinners, potlucks, holiday gatherings, birthday celebrations, or just because you’re craving something sweet and nostalgic. It transports you straight back to grandma’s kitchen with its old-fashioned appeal, yet it’s fancy enough to serve at dinner parties. Whether you’re making it for the first time or returning to a childhood favorite, this pineapple upside down cake recipe delivers every single time with its perfect balance of caramelized fruit, buttery cake, and pure comfort food magic.
History / Background
Pineapple upside down cake has a fascinating history that perfectly captures a specific moment in American culinary culture. While upside down cakes existed in various forms long before pineapples entered the picture—European cooks made tarte Tatin and similar inverted fruit desserts for centuries—the pineapple version became an American phenomenon in the 1920s.
The timing wasn’t coincidental. In 1903, James Dole started the Hawaiian Pineapple Company (later Dole Food Company), and by the 1920s, canned pineapple had become widely available and affordable across the United States. This was revolutionary—fresh pineapples were exotic, expensive, and difficult to prepare, but canned pineapple rings were accessible to every home cook in America.
In 1925, the Hawaiian Pineapple Company sponsored a recipe contest seeking creative ways to use their canned pineapple. They received over 2,500 recipe submissions for pineapple upside down cake alone! This wasn’t a new invention—cookbooks from the early 1920s mention similar cakes—but the contest catapulted it into mainstream popularity. The recipe became a sensation practically overnight, appearing in women’s magazines, community cookbooks, and on dining tables across the country.
The cake became particularly popular during the Great Depression because it was economical, used shelf-stable ingredients, and looked elegant enough for special occasions. It represented a small luxury during difficult times—a taste of tropical paradise made from pantry staples.
Cast iron skillets were the original baking vessel for pineapple upside down cake, which contributed to its popularity since most households owned one. The heavy skillet distributed heat evenly and created that signature caramelized bottom that became the gorgeous top when flipped.
By the 1950s and 1960s, pineapple upside down cake had secured its place as an icon of American home baking. It appeared at church socials, school fundraisers, and family celebrations throughout the mid-20th century. While food trends have come and gone, this retro dessert has remained beloved, experiencing periodic revivals as new generations discover its simple charm. Today, it represents nostalgia, comfort, and the golden age of American home baking—a true classic that has stood the test of time.
Why You’ll Love This Recipe
This pineapple upside down cake recipe is everything a home baker could want—it’s visually stunning, foolproof, and tastes absolutely divine. Even if you’re a beginner baker, this recipe guides you to success with its straightforward technique and reliable results. The combination of caramelized fruit and tender cake creates a dessert that’s both elegant and comforting.
Here’s why this recipe will become a staple in your baking repertoire:
- Show-stopping presentation – The caramelized pineapple and cherry topping looks like it came from a professional bakery
- One-pan wonder – Everything bakes in a single pan for easy cleanup
- Beginner-friendly – No complicated techniques or fancy equipment required
- Reliably delicious – This tried-and-true recipe works perfectly every time
- Retro charm – Brings nostalgic, vintage appeal to modern tables
- Budget-friendly – Made with affordable pantry staples and canned fruit
- Make-ahead friendly – Can be prepared hours or even a day in advance
- Moist and tender – The pineapple juice keeps the cake incredibly moist
- Not overly sweet – Perfectly balanced flavors that aren’t cloying
- Impressive but easy – Minimal effort for maximum “wow” factor
- Family favorite – Appeals to all ages from kids to grandparents
- Versatile serving – Delicious warm, room temperature, or chilled
- Great for gatherings – Feeds a crowd and travels well to potlucks
The caramelized pineapple topping with its glossy, buttery-brown sugar coating is genuinely irresistible, while the cake underneath stays incredibly moist from absorbing all those delicious fruit juices. It’s comfort food at its finest!
Ingredient Notes
Understanding your ingredients ensures perfect results every time. Here’s what goes into this classic cake:
Unsalted Butter: Used in both the topping and the cake batter. Real butter is essential for that rich, authentic flavor—don’t substitute with margarine or oil. For the topping, melted butter combines with brown sugar to create the caramel base. In the cake, softened butter creates a tender crumb.
Light Brown Sugar: The foundation of that gorgeous caramel topping. Light brown sugar has just enough molasses to create depth without overwhelming the pineapple flavor. The sugar melts during baking and forms a glossy, caramelized coating. You can use dark brown sugar for a deeper molasses flavor, but light is traditional.
Canned Pineapple Rings: The star of the show! Use good-quality canned pineapple rings in 100% pineapple juice (not heavy syrup). You’ll need about 7 rings for a standard cake. Don’t skip draining them well—excess moisture can make the cake soggy. Save that juice for the cake batter! Fresh pineapple can be used but won’t have the same nostalgic flavor.
Maraschino Cherries: These bright red cherries are traditional and add beautiful color contrast. Drain them thoroughly and pat dry with paper towels. While they’re somewhat controversial in modern cooking, they’re authentically retro and beloved in this recipe. If you prefer, use fresh cherries or omit them entirely.
Granulated Sugar: Sweetens the cake batter and helps create structure. The amount is balanced perfectly so the cake isn’t overly sweet—the caramelized topping provides plenty of sweetness.
Eggs: Provide structure, richness, and help bind everything together. Room temperature eggs incorporate more smoothly into the batter, creating a more tender cake. Two large eggs are ideal for this recipe.
Vanilla Extract: Pure vanilla extract adds warmth and depth to the cake. It enhances the butter flavor and complements the pineapple beautifully. Don’t skip it!
All-Purpose Flour: The backbone of the cake structure. Measure carefully—too much makes the cake dense and dry, too little makes it fall apart. For best results, spoon flour into your measuring cup and level it off, or weigh it (1 cup = 120g).
Baking Powder: The leavening agent that makes the cake rise and creates that tender, fluffy texture. Make sure yours is fresh (check the expiration date)—old baking powder won’t work properly.
Salt: A small amount enhances all the flavors and balances the sweetness. Never skip the salt in baking—it’s crucial for well-rounded flavor.
Milk: Adds moisture and creates a tender crumb. Whole milk works best for richness, but 2% milk works too. The milk should be at room temperature so it doesn’t solidify the butter when mixed.
Pineapple Juice: Reserved from the canned pineapples, this adds moisture and intensifies the pineapple flavor throughout the cake. It’s the secret to keeping the cake moist for days!
Equipment Needed
This recipe requires basic baking equipment that most home kitchens already have:
- 9-inch or 10-inch cast iron skillet OR 9-inch round cake pan – Cast iron is traditional and creates the best caramelization, but a regular cake pan works perfectly too
- Medium mixing bowl – For combining dry ingredients
- Large mixing bowl or stand mixer – For creaming butter and sugar and mixing the batter
- Electric hand mixer or stand mixer – Makes creaming butter much easier (though you can do it by hand with a wooden spoon and some elbow grease!)
- Measuring cups and spoons – For accurate measurements
- Rubber spatula – For scraping bowls and spreading batter
- Can opener – For opening the pineapple can
- Paper towels – For draining pineapple rings and cherries
- Cooling rack – Essential for cooling and flipping
- Serving plate larger than your pan – For inverting the cake
- Toothpick or cake tester – For checking doneness
- Small saucepan (optional) – If melting butter on the stovetop instead of microwave
Pro tip: If using a cake pan instead of cast iron, line the bottom with parchment paper for easier release, though it’s not strictly necessary if you grease well.
PrintClassic Pineapple Upside Down Cake – Sweet, Nostalgic, and Perfectly Moist

This classic pineapple upside down cake features caramelized pineapple rings and maraschino cherries atop a tender, buttery cake. Beautifully nostalgic and surprisingly easy to make, it’s the perfect retro dessert for any occasion!
- Prep Time: 15 minutes
- Cook Time: 45 minutes
- Total Time: 1 hour
- Yield: 8-10 servings 1x
- Category: Dessert
- Method: Baking
- Cuisine: American
- Diet: Vegetarian
Ingredients
For the Topping:
- ¼ cup (½ stick) unsalted butter, melted
- ½ cup packed light brown sugar
- 7-8 canned pineapple rings (from a 20 oz can), well drained
- 7-8 maraschino cherries, drained and patted dry
- 2 tablespoons reserved pineapple juice
For the Cake:
- ½ cup (1 stick) unsalted butter, softened to room temperature
- ¾ cup granulated sugar
- 2 large eggs, at room temperature
- 1½ teaspoons pure vanilla extract
- 1½ cups all-purpose flour
- 1½ teaspoons baking powder
- ¼ teaspoon salt
- ½ cup whole milk, at room temperature
- ¼ cup reserved pineapple juice
Instructions
- Preheat and prepare: Preheat your oven to 350°F (175°C). If using a cake pan, grease it well with butter or cooking spray. If using a cast iron skillet, make sure it’s clean and dry (no need to grease cast iron).
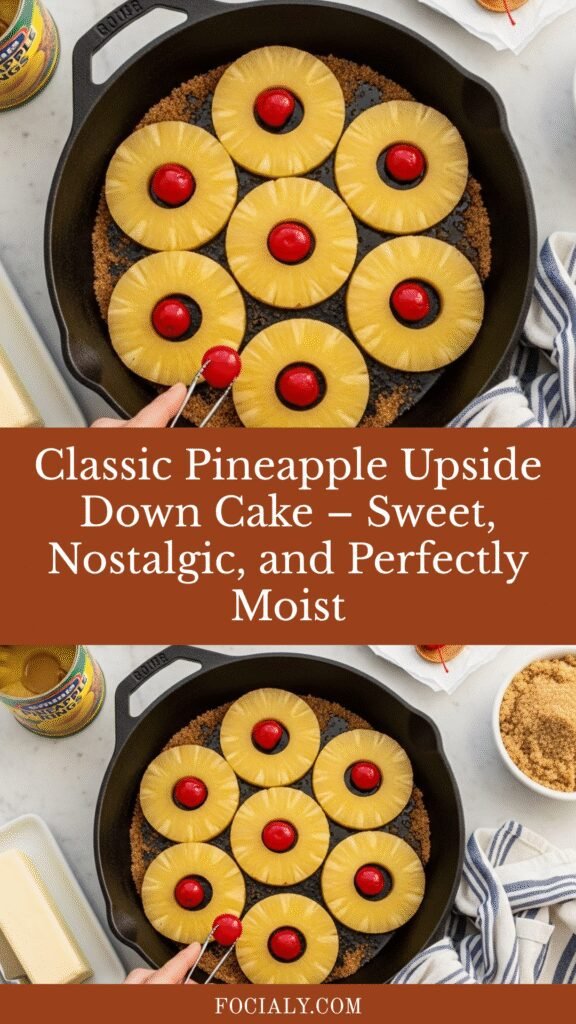
- Make the topping: Pour the ¼ cup melted butter into the bottom of your 9-inch or 10-inch pan, tilting to coat evenly. Sprinkle the brown sugar evenly over the melted butter. Drizzle 2 tablespoons of reserved pineapple juice over the brown sugar. Arrange the pineapple rings in a single layer over the brown sugar mixture—you should fit about 7 rings in a 9-inch pan, slightly overlapping if needed. Place a maraschino cherry in the center of each pineapple ring and in any gaps between rings for a beautiful presentation. Set the pan aside.
- Cream butter and sugar: In a large mixing bowl, using an electric mixer on medium-high speed, beat the softened ½ cup butter and granulated sugar together for 3-4 minutes until light, fluffy, and pale in color. This incorporates air and creates a tender cake. Scrape down the sides of the bowl as needed.
- Add eggs and vanilla: Add the eggs one at a time, beating well after each addition until fully incorporated. The mixture should look smooth and creamy. Beat in the vanilla extract.
- Combine dry ingredients: In a medium bowl, whisk together the flour, baking powder, and salt until evenly combined.
- Mix wet ingredients: In a small bowl or measuring cup, combine the ½ cup milk with ¼ cup reserved pineapple juice. Stir to mix.
- Alternate adding dry and wet: With the mixer on low speed, add the flour mixture to the butter mixture in three additions, alternating with the milk mixture in two additions. Start and end with flour. Mix each addition just until combined—don’t overmix! The batter should be smooth and slightly thick. Scrape down the sides and bottom of the bowl to ensure everything is incorporated.
- Assemble and bake: Carefully pour the cake batter over the arranged pineapple rings in the pan, spreading gently and evenly with a spatula to cover all the fruit. The batter will be thick—take your time spreading it into an even layer without disturbing the fruit arrangement too much.
- Bake: Place the pan on the center rack of your preheated oven and bake for 40-50 minutes (40 minutes for 10-inch pan, 45-50 minutes for 9-inch pan). The cake is done when the top is golden brown, springs back when lightly touched, and a toothpick inserted into the center comes out clean or with just a few moist crumbs. If you’re using a cast iron skillet, it may take a few extra minutes since the pan is heavier.
- Cool briefly: Remove from the oven and place the pan on a cooling rack. Let the cake cool in the pan for 5-10 minutes—no longer! If it cools too much, the caramelized sugar will harden and make it difficult to unmold.
- Flip and reveal: Run a knife carefully around the edges of the cake to loosen it. Place your serving plate upside down over the top of the pan. Using oven mitts or thick towels (the pan is still hot!), hold the plate and pan together firmly and quickly flip them over in one confident motion. Leave the pan in place for a minute to let the caramel drip down, then carefully lift the pan away. If any pineapple or cherries stick to the pan, simply remove them and place them back on the cake—the warm caramel will hold them in place.
- Serve: Let the cake cool for at least 15-20 minutes before slicing, or serve warm. The cake is delicious warm, at room temperature, or even chilled!
Notes
- Drain fruit thoroughly: Excess moisture from the pineapple and cherries can make the cake soggy. Pat them dry with paper towels before arranging.
- Don’t skip the flip timing: Flip the cake after 5-10 minutes of cooling. If you wait too long, the caramelized sugar hardens and makes unmolding difficult.
- Pan size matters: A 9-inch pan creates a taller cake, while a 10-inch pan makes a slightly thinner cake. Both work beautifully—adjust baking time accordingly.
- Room temperature ingredients: Make sure butter, eggs, and milk are at room temperature for the smoothest batter and best texture.
Nutrition
- Serving Size: 1 slice (⅛ of cake)
- Calories: 385
- Sugar: 38g
- Sodium: 180mg
- Fat: 16g
- Saturated Fat: 10g
- Unsaturated Fat: 5g
- Trans Fat: 0g
- Carbohydrates: 58g
- Fiber: 1g
- Protein: 4g
- Cholesterol: 75mg
Note: Nutrition information is an estimate and will vary based on specific ingredients used and portion sizes.
Tips & Variations
This classic recipe is wonderfully adaptable to suit your preferences and creativity. Here are some delicious ways to customize it:
Fruit Variations:
- Peach Upside Down Cake: Replace pineapple with canned peach halves arranged cut-side down
- Apple Upside Down Cake: Use thinly sliced apples arranged in concentric circles, add ½ teaspoon cinnamon to the batter
- Mixed Berry: Use a combination of fresh or frozen berries instead of pineapple
- Mango Upside Down Cake: Substitute with fresh mango slices for a tropical twist
- Cherry Upside Down Cake: Use only cherries, no pineapple, for a beautiful all-cherry top
Flavor Enhancements:
- Coconut Pineapple Cake: Add ½ cup shredded coconut to the batter and use coconut milk instead of regular milk
- Rum Cake: Add 2 tablespoons rum to the batter and brush the finished cake with rum syrup
- Spiced Cake: Add ½ teaspoon cinnamon and ¼ teaspoon nutmeg to the dry ingredients
- Almond Flavor: Replace vanilla with almond extract for a different flavor profile
- Citrus Twist: Add 1 tablespoon orange or lemon zest to the batter
Topping Variations:
- Use dark brown sugar instead of light for a deeper molasses flavor
- Add chopped pecans or walnuts scattered among the pineapple rings
- Drizzle with caramel sauce after flipping for extra indulgence
- Use fresh pineapple for a slightly less sweet, more natural fruit flavor
Dietary Modifications:
- Gluten-Free: Use 1:1 gluten-free flour blend (Bob’s Red Mill works well)
- Dairy-Free: Replace butter with coconut oil or vegan butter, and use almond or oat milk
- Reduced Sugar: Decrease granulated sugar in the cake to ½ cup (the topping provides plenty of sweetness)
- Egg-Free: Use flax eggs (2 tablespoons ground flaxseed + 6 tablespoons water, let sit 5 minutes)
Individual Servings: Make pineapple upside down cupcakes! Line a muffin tin with paper liners, place a pineapple chunk and cherry in each cup with brown sugar and butter, pour batter over, and bake for 18-22 minutes.
Pro Chef Tips
Elevate your pineapple upside down cake from good to absolutely spectacular with these professional techniques:
1. Use a cast iron skillet for best results: Cast iron retains and distributes heat evenly, creating superior caramelization on the fruit. The heavy bottom prevents hot spots that can burn the sugar. If you have one, use it!
2. Don’t over-drain the pineapple: While you want to drain the rings well, save that precious juice! It adds moisture and authentic pineapple flavor throughout the cake. Use it in the batter and drizzle 2 tablespoons over the brown sugar in the pan.
3. Cream butter and sugar thoroughly: Take the full 3-4 minutes to cream the butter and sugar until it’s pale and fluffy. This incorporates air, which creates a lighter, more tender cake. Don’t rush this step!
4. Room temperature is crucial: Cold eggs and milk will cause the butter to seize up and create a lumpy batter. Let everything come to room temperature (set them out 30 minutes before baking), or warm eggs in a bowl of warm water for 5 minutes.
5. Master the flip timing: This is the most critical step! Flip too soon and the cake might fall apart; flip too late and the caramelized sugar hardens, making it stick. The sweet spot is 5-10 minutes after removing from the oven. Set a timer!
6. The flip technique: Use a serving plate larger than your pan. Center it upside down over the cake pan, hold both firmly together, take a deep breath, and flip in one confident motion over the sink (just in case!). Let it sit upside down for 1 minute before lifting the pan.
7. Arrange pineapple strategically: Place rings close together to minimize gaps. Put one ring in the center, then arrange 6 around it like flower petals. Fill any gaps with cherry halves for a gorgeous presentation.
8. Test for doneness properly: The toothpick test is important, but also trust other signs: the cake should pull slightly away from the sides, spring back when touched, and smell absolutely amazing. An over-baked cake will be dry.
9. Don’t overmix the batter: Once you add the flour, mix only until you no longer see dry streaks. Overmixing develops gluten, creating a tough, dense cake instead of a tender one.
10. Embrace imperfections: If a pineapple ring or cherry sticks to the pan, no problem! Just place it back on the cake. The warm caramel acts like glue. Rustic charm is part of this cake’s appeal!
Common Mistakes to Avoid
Even though this recipe is straightforward, these common pitfalls can affect your results:
1. Not draining the fruit well enough: Excess liquid from the pineapple and cherries creates a soggy cake and prevents proper caramelization. After draining from the can, place the rings on paper towels and pat them thoroughly dry. Do the same with the cherries—those bright red syrupy ones hold a lot of moisture!
2. Waiting too long to flip: If you let the cake cool completely in the pan, the caramelized sugar hardens and becomes cement-like, making it nearly impossible to unmold cleanly. The magic window is 5-10 minutes—still warm enough for the caramel to be fluid, but cool enough that the cake won’t fall apart.
3. Using cold ingredients: Cold butter won’t cream properly, cold eggs won’t emulsify smoothly, and cold milk can cause the batter to curdle or form lumps. Always bring dairy and eggs to room temperature before starting—it makes a huge difference in texture!
4. Overmixing the batter: Once flour goes in, you’re developing gluten with every stir. Mix only until combined—some small lumps are fine! Overmixed cake turns out dense, tough, and chewy instead of light and tender.
5. Opening the oven door too early: Resist the temptation to check on your cake before the 35-minute mark. Opening the door releases heat and can cause the cake to sink in the middle or bake unevenly. Trust the process!
6. Using syrup-packed pineapple: Pineapple canned in heavy syrup is too sweet and makes the cake cloying. Always use pineapple rings in 100% pineapple juice for balanced sweetness and authentic fruit flavor.
7. Skipping the knife around the edges: Before flipping, always run a thin knife around the perimeter to loosen the cake from the sides. This ensures a clean release and prevents the edges from tearing.
Storage & Meal Prep
Pineapple upside down cake stores beautifully and often tastes even better the next day as the flavors meld together:
Room Temperature Storage: Once completely cooled, cover the cake loosely with plastic wrap or aluminum foil, or place it under a cake dome. It will keep at room temperature for 2-3 days in a cool, dry place away from direct sunlight. The caramelized topping keeps the cake moist, so it won’t dry out quickly.
Refrigerator Storage: For longer storage or in hot, humid weather, refrigerate the cake. Cover tightly with plastic wrap or place in an airtight container. It will keep fresh for 5-7 days in the refrigerator. The cake actually becomes more moist in the fridge as the pineapple juices continue to soak in. Let it sit at room temperature for 15-20 minutes before serving for best flavor and texture.
Serving Temperature: This cake is delicious at any temperature! Serve it warm from the oven for a comforting dessert, at room temperature for convenience, or chilled from the fridge for a refreshing treat. Each temperature offers a slightly different experience.
Individual Portions: If you want to prep individual servings for grab-and-go treats or lunch boxes, cut the cake into slices and wrap each slice individually in plastic wrap. They’ll stay fresh and moist, making portion control easy.
Reheating: To recapture that fresh-from-the-oven warmth:
- Microwave: 15-20 seconds per slice until just warmed through
- Oven: Wrap in foil and warm at 300°F for 10-15 minutes
- Individual slices in toaster oven: 5-7 minutes at 300°F
Keeping It Fresh: The key to keeping pineapple upside down cake moist is preventing it from drying out. Always cover it tightly, and consider placing a piece of bread in the container—it will dry out while keeping your cake moist (an old baker’s trick!).
Make-Ahead & Freezer Notes
Pineapple upside down cake is an excellent make-ahead dessert, perfect for stress-free entertaining:
Baking in Advance: You can bake this cake up to 1 day ahead. Let it cool completely, cover tightly, and store at room temperature or in the refrigerator. The flavors actually improve as they meld overnight! Bring to room temperature or warm slightly before serving.
Freezing Whole Cake: This cake freezes beautifully:
- Let the cake cool completely after baking
- Wrap tightly in two layers of plastic wrap, then in aluminum foil
- Label with the date and contents
- Freeze for up to 3 months
- Thaw overnight in the refrigerator, still wrapped
- Bring to room temperature or warm in a 300°F oven for 15 minutes before serving
Freezing Individual Slices: For ultimate convenience:
- Cut the cake into slices
- Wrap each slice individually in plastic wrap
- Place all wrapped slices in a large freezer bag or airtight container
- Freeze for up to 3 months
- Thaw individual slices at room temperature for 1-2 hours or microwave for 30-45 seconds
Does It Really Freeze Well? Yes! The moisture from the pineapple and caramelized sugar prevents the cake from becoming dry or freezer-burned. Many people actually prefer making it ahead and freezing because it’s one less thing to worry about on the day of serving.
Partial Prep: If you want to split up the work:
- Prepare and arrange the topping in the pan, cover tightly, and refrigerate for up to 24 hours
- Make the cake batter fresh when ready to bake
- This gives you the convenience of advance prep with the best cake texture
Best Thawing Method: For the best texture and moisture retention, always thaw frozen cake in the refrigerator overnight while still wrapped. This slow, gentle thawing prevents condensation from making the topping soggy.
Serving Suggestions
While pineapple upside down cake is delicious on its own, these serving ideas take it to the next level:
Classic Pairings:
- Vanilla ice cream: The traditional pairing—the cold, creamy ice cream melting into the warm, caramelized cake is perfection
- Whipped cream: Light, fluffy homemade whipped cream adds elegance and cuts the sweetness
- Crème fraîche: For a sophisticated twist, the tangy richness complements the sweet fruit beautifully
- Custard sauce: Traditional British-style pouring custard (crème anglaise) is luxurious and delicious
Gourmet Touches:
- Salted caramel sauce: Drizzle over each slice for extra decadence and a sweet-salty contrast
- Coconut whipped cream: Adds tropical flair and is dairy-free
- Toasted coconut flakes: Sprinkle over the top for texture and complementary flavor
- Fresh whipped cream with rum: Add a tablespoon of rum to your whipped cream for an adult version
- Macadamia nut crumble: Chopped toasted macadamias add tropical crunch
Beverage Pairings:
- Coffee or espresso (the bitterness balances the sweetness perfectly)
- Hot tea—especially Earl Grey or chai
- Cold milk for a simple, nostalgic pairing
- Piña colada (non-alcoholic or with rum)
- Iced coffee or cold brew
- Dessert wine like Moscato or late-harvest Riesling
- Tropical fruit smoothie for brunch
Breakfast or Brunch: Yes, cake for breakfast! This makes an excellent brunch dessert alongside:
- Fresh fruit salad
- Mimosas or fruit punch
- Coffee service
- Yogurt parfait bar
- Quiche or egg dishes
For Special Occasions:
- Birthday celebrations: Add candles for a unique birthday cake alternative
- Dinner parties: Serve warm with ice cream for an impressive yet easy dessert
- Potlucks: This cake travels beautifully and serves a crowd
- Holiday gatherings: The retro appeal makes it perfect for family celebrations
- Summer BBQs: Refreshing fruit flavor is perfect for outdoor gatherings
Creative Presentations:
- Serve in individual cast iron skillets for a rustic presentation
- Plate with a drizzle of caramel sauce and a sprig of fresh mint
- Dust with powdered sugar for an elegant finish
- Top with a scoop of macadamia nut ice cream for ultimate tropical vibes
- Serve alongside fresh pineapple slices and berries
FAQs Section
Q: Can I use fresh pineapple instead of canned?
A: Yes, you can use fresh pineapple! Cut it into ¼-inch thick rings or slices. However, canned pineapple has two advantages: it’s already perfectly sliced and softened, and the canning process concentrates the sweetness slightly. Fresh pineapple will work but may be slightly less sweet and more tart. If using fresh, you’ll need to substitute pineapple juice (store-bought or fresh-squeezed) for the reserved juice called for in the recipe.
Q: Why did my cake stick to the pan?
A: This usually happens if you waited too long before flipping (the caramel hardened) or didn’t run a knife around the edges before flipping. The key is timing—flip while the cake is still warm (5-10 minutes after baking) so the caramel is still soft and fluid. Also, make sure to loosen the edges with a knife first. If using a regular cake pan (not cast iron), you can line the bottom with parchment paper as insurance, though it’s not necessary if you flip at the right time.
Q: Can I make this cake without the cherries?
A: Absolutely! The cherries are traditional and add visual appeal, but they’re totally optional. You can omit them entirely, replace them with other fruits (try fresh raspberries or blackberries), or use dried cranberries for a different look. The cake will still be delicious and beautiful without them.
Q: How do I know when the cake is done baking?
A: Look for multiple signs: (1) the top is golden brown and springs back when lightly touched, (2) the cake has pulled slightly away from the sides of the pan, (3) a toothpick inserted in the center comes out clean or with just a few moist crumbs, and (4) the kitchen smells incredible! Baking time varies based on pan size and oven accuracy—start checking at 40 minutes.
Q: Can I make this in a different size or shape pan?
A: Yes! A 9-inch round pan is traditional, but you can use a 10-inch pan (check doneness at 40 minutes) or even an 8-inch square pan (may need a few extra minutes baking time). You can also make this in a 9×13-inch baking dish for a thinner cake that serves more people—reduce baking time to 30-35 minutes. Individual servings in muffin tins work wonderfully too (bake for 18-22 minutes).
Q: Why is my cake dense instead of fluffy?
A: Several factors could cause this: (1) overmixing the batter after adding flour develops too much gluten, (2) your baking powder might be expired and lost its leavening power, (3) you didn’t cream the butter and sugar long enough (aim for 3-4 minutes until light and fluffy), or (4) you used cold ingredients instead of room temperature ones. Make sure to follow the recipe timing and techniques for best results.
Q: Can I make this cake ahead for a party?
A: Yes! Pineapple upside down cake is an excellent make-ahead dessert. Bake it up to 1 day in advance, let it cool completely, cover tightly, and store at room temperature or refrigerate. You can even freeze it up to 3 months ahead. The flavors actually improve as they meld, making it perfect for stress-free entertaining!
Conclusion
There’s something truly special about pineapple upside down cake that transcends trends and generations. It’s a dessert that brings instant nostalgia, yet feels fresh and exciting every time you make it. The combination of buttery caramelized fruit, tender cake, and that show-stopping presentation makes it a winner for any occasion—from casual weeknight dinners to elegant celebrations.
What I love most about this recipe is how it transforms simple, affordable ingredients into something that looks and tastes like you spent hours in the kitchen, when in reality, it comes together in about an hour from start to finish. The one-pan method means easy cleanup, and the reliable technique ensures success every single time, even for beginner bakers.
Whether you’re recreating a cherished childhood memory, introducing this classic to a new generation, or simply craving something sweet and comforting, this pineapple upside down cake delivers pure joy on a plate. The caramelized pineapple, the tender crumb, the glossy brown sugar topping—every element works together in perfect harmony.
Ready to bring this retro classic into your kitchen? I promise you won’t regret it! Gather your ingredients, preheat that oven, and get ready to create something truly special. Don’t forget to share your beautiful results in the comments below—I love seeing your creations! And please save this recipe to your Pinterest boards so you can find it easily whenever the craving strikes. Trust me, once you make this cake, you’ll want to bake it again and again. Happy baking! 🍍✨