Easy Jelly Roll Recipe – Perfect Soft Sponge Cake with Delicious Filling

There’s something absolutely magical about slicing into a beautifully swirled jelly roll cake and revealing those gorgeous spiral layers. This classic dessert looks impressively fancy but is surprisingly achievable for home bakers of all skill levels. Whether you’re planning a special occasion dessert, looking for a stunning addition to your holiday table, or simply craving a nostalgic sweet treat, this jelly roll recipe delivers on taste, texture, and visual appeal every single time.
Introduction of Recipe
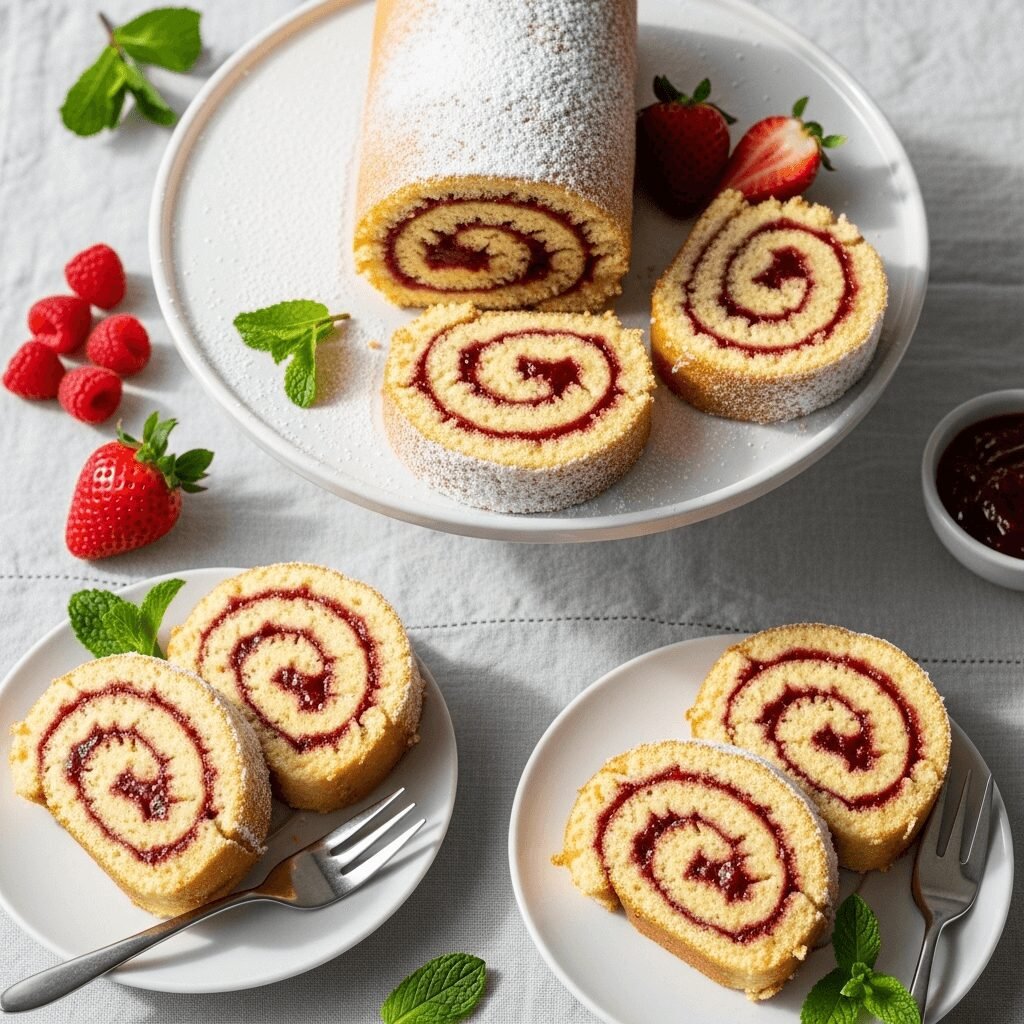
A jelly roll is a thin, airy sponge cake that’s baked in a flat pan, spread with your favorite filling (traditionally fruit jam or jelly, but the possibilities are endless!), and then carefully rolled into a beautiful spiral log. The result is a light, elegant dessert with stunning swirled layers that slice beautifully and taste absolutely divine. This recipe creates a tender, moist sponge cake that rolls without cracking, making it perfect for both beginners and experienced bakers.
Jelly rolls are incredibly versatile desserts that work wonderfully for birthday parties, holiday gatherings, afternoon tea, baby showers, or any celebration where you want to serve something special. They’re also fantastic for meal prep since they stay fresh for several days and actually taste even better the next day once the flavors have had time to meld together. You can customize them with different fillings, frostings, and flavor combinations to suit any taste preference or dietary need.
History / Background
The jelly roll has a rich culinary heritage that spans continents and centuries. This elegant rolled cake technique is believed to have originated in Central Europe during the 19th century, where it was known as a “roulade.” The concept quickly spread throughout Europe, with each country adding their own regional twist. In Austria, it became the famous Sachertorte roulade, while in Switzerland, bakers created the beloved Swiss roll.
The dessert made its way to America in the late 1800s and quickly became a staple in American home baking, particularly in the South where it was often served at church socials, potlucks, and family gatherings. The term “jelly roll” became popular in the United States, referring specifically to the traditional version filled with fruit preserves or jelly. During World War II, jelly rolls gained even more popularity because they used relatively few ingredients compared to layer cakes, making them an economical choice during rationing.
Throughout the decades, the jelly roll has remained a beloved classic because it represents the perfect combination of simplicity and elegance. Victorian-era hostesses prized jelly rolls for their impressive presentation, while Depression-era home cooks appreciated their thriftiness. Today, the jelly roll continues to be a favorite among home bakers who love that it can be dressed up or down depending on the occasion, and that it offers endless possibilities for creative flavor combinations.
Interestingly, the jelly roll also has musical significance—it became a popular term in early jazz and blues music, which shows just how deeply embedded this dessert was in American culture during the early 20th century.
Why You’ll Love This Recipe
This jelly roll recipe has been perfected over countless baking sessions to ensure you get professional-quality results in your own kitchen. The sponge cake is incredibly light and airy with just the right amount of structure to roll beautifully without cracking. The technique I’ve refined here takes the intimidation out of making rolled cakes, so even if you’ve never attempted one before, you’ll be amazed at how stunning your first jelly roll turns out.
Here’s why this recipe will become your go-to dessert:
- Surprisingly Simple – Despite looking like a bakery masterpiece, this recipe uses basic pantry ingredients and straightforward techniques that any home baker can master
- Foolproof Rolling Method – The secret technique of rolling the cake while it’s still warm prevents cracking and creates those perfect spiral layers
- Endlessly Customizable – Use any filling you love, from classic strawberry jam to chocolate ganache, lemon curd, whipped cream with fresh berries, or cream cheese frosting
- Make-Ahead Friendly – This cake actually improves after a day in the refrigerator, making it perfect for party planning and reducing day-of stress
- Crowd-Pleasing Presentation – Those beautiful swirled slices always impress guests and look absolutely gorgeous on any dessert table
- Budget-Friendly Elegance – Creates an impressive dessert using affordable ingredients that you probably already have on hand
- Perfect Portions – Slices beautifully into neat servings, making it ideal for parties where you need to serve many guests
- Lighter Than Layer Cakes – The airy sponge cake feels less heavy than traditional layer cakes, perfect for after a big meal
Ingredient Notes
Eggs – The foundation of any great jelly roll. You’ll need them separated (yolks and whites apart) because we’ll beat the whites to stiff peaks, which creates the cake’s signature airy texture. Room temperature eggs separate more easily and whip up better. This is not a recipe where you can skip the separation step—it’s absolutely essential for achieving that light, rollable sponge.
Granulated Sugar – Sweetens the cake and helps stabilize the egg whites when beaten. We’ll divide it between the yolks and whites. The sugar also helps create a tender crumb that won’t crack when rolled.
All-Purpose Flour – Provides just enough structure without making the cake dense. Cake flour can be substituted for an even more delicate texture, but all-purpose works beautifully. Make sure to sift it to remove any lumps and incorporate air.
Baking Powder – A small amount gives the cake a gentle lift without making it too puffy, which could cause cracking when rolled.
Salt – Enhances all the flavors and balances the sweetness. Don’t skip it, even though it’s a tiny amount.
Vanilla Extract – Adds warmth and depth to the cake’s flavor. Use pure vanilla extract rather than imitation for the best taste.
Powdered Sugar – Used for dusting the towel before rolling and for finishing the cake. It prevents sticking and adds a beautiful, professional appearance.
Filling of Choice – Traditional options include strawberry, raspberry, or grape jelly, but you can use jam, preserves, lemon curd, chocolate hazelnut spread, whipped cream, buttercream, or cream cheese frosting. You’ll need about 3/4 to 1 cup of filling.
Substitution Tips: For a gluten-free version, use a 1:1 gluten-free baking flour blend. For dairy-free, this recipe is naturally dairy-free unless you choose a dairy-based filling. To reduce sugar, you can decrease the sugar in the cake by up to 2 tablespoons, though this may affect the texture slightly.
Equipment Needed
- 15×10-inch jelly roll pan (also called a half-sheet pan or rimmed baking sheet)
- Parchment paper for lining the pan
- Two large mixing bowls (one for yolks, one for whites)
- Electric hand mixer or stand mixer for beating egg whites to stiff peaks
- Whisk for mixing the yolk mixture
- Fine-mesh sieve or flour sifter for sifting dry ingredients
- Rubber spatula for folding ingredients together
- Clean kitchen towel (not terry cloth—use a smooth flour sack towel)
- Offset spatula or butter knife for spreading filling
- Wire cooling rack
- Sharp serrated knife for slicing the finished roll
- Measuring cups and spoons
Jelly Roll Recipe

A light, fluffy sponge cake rolled with your favorite sweet filling to create a beautiful spiral dessert that’s perfect for any celebration. This foolproof recipe ensures a crack-free roll every time.
- Prep Time: 12 minutes
- Cook Time: 30 minutes
- Total Time: 1 hour 2 minutes
- Yield: 10 servings 1x
- Category: Dessert
- Method: Baking
- Cuisine: American
- Diet: Vegetarian
Ingredients
- 4 large eggs, separated, at room temperature
- 3/4 cup granulated sugar, divided
- 1 teaspoon vanilla extract
- 3/4 cup all-purpose flour
- 1 teaspoon baking powder
- 1/4 teaspoon salt
- 1/4 cup powdered sugar (for dusting)
- 3/4 to 1 cup filling of your choice (strawberry jam, raspberry preserves, lemon curd, chocolate spread, or whipped cream)
- Additional powdered sugar for finishing
Instructions
- Preheat and Prepare: Preheat your oven to 375°F (190°C). Line a 15×10-inch jelly roll pan with parchment paper, leaving a slight overhang on the short sides for easy removal. Lightly spray the parchment with cooking spray.
- Beat the Egg Whites: In a large, completely clean mixing bowl, beat the egg whites with an electric mixer on medium speed until soft peaks form. Gradually add 1/4 cup of the granulated sugar, one tablespoon at a time, beating on high speed until stiff, glossy peaks form. Set aside.
- Mix the Egg Yolks: In another large bowl, whisk together the egg yolks and remaining 1/2 cup granulated sugar until thick and pale yellow, about 2-3 minutes. Stir in the vanilla extract.
- Combine Dry Ingredients: In a separate bowl, sift together the flour, baking powder, and salt.
- Fold Everything Together: Gently fold the flour mixture into the egg yolk mixture until just combined. Then, carefully fold in about one-third of the beaten egg whites to lighten the batter. Finally, gently fold in the remaining egg whites until no white streaks remain. Be gentle to preserve the air bubbles—this is what makes your cake light and rollable.
- Bake: Spread the batter evenly into the prepared pan, smoothing it to the edges. Bake for 10-12 minutes, or until the cake springs back when lightly touched and is just starting to turn golden brown. Do not overbake or the cake will crack when rolled.
- Prepare for Rolling: While the cake bakes, lay a clean kitchen towel flat on your counter and dust it generously with powdered sugar.
- Roll the Cake: As soon as the cake comes out of the oven, run a knife around the edges and immediately invert it onto the prepared towel. Carefully peel off the parchment paper. Starting at one short end, roll up the cake and towel together into a log. Place seam-side down on a wire rack and let cool completely, about 30 minutes.
- Fill and Re-roll: Once completely cool, carefully unroll the cake (it’s okay if it wants to stay slightly curved). Spread your filling evenly over the cake, leaving a 1/2-inch border around the edges. Gently roll the cake back up without the towel this time, keeping it tight but not squeezing. Place seam-side down.
- Finish and Serve: Dust the top with powdered sugar just before serving. Slice with a sharp serrated knife using a gentle sawing motion. Serve immediately or refrigerate until ready to serve.
Notes
- The key to a crack-free jelly roll is rolling it while it’s still warm with the towel, then letting it cool in that shape. This “trains” the cake to roll without breaking.
- Don’t overbake the cake—it should be just set and barely golden. An overbaked cake will crack.
- Make sure your egg whites are beaten to stiff peaks but not dry—they should be glossy and hold their shape.
- Fold gently when combining ingredients to preserve the air bubbles that make the cake light.
- If small cracks do appear, don’t worry—the powdered sugar topping will hide them beautifully!
Nutrition
- Serving Size: 1 slice (1/10 of cake)
- Calories: 165
- Sugar: 24g
- Sodium: 105mg
- Fat: 2.5g
- Saturated Fat: 0.8g
- Unsaturated Fat: 1.5g
- Trans Fat: 0g
- Carbohydrates: 32g
- Fiber: 0.5g
- Protein: 4g
- Cholesterol: 74mg
Note: Nutrition information is approximate and will vary depending on the filling used. Values shown are for cake with fruit jam filling.
Tips & Variations
Flavor Variations:
- Chocolate Jelly Roll: Add 3 tablespoons cocoa powder to the dry ingredients (reduce flour by 3 tablespoons) and fill with chocolate ganache or whipped cream
- Lemon Jelly Roll: Add 1 tablespoon lemon zest to the batter and fill with lemon curd
- Pumpkin Spice: Add 1 teaspoon pumpkin pie spice to the dry ingredients and fill with cream cheese frosting
- Berry Cream: Fill with whipped cream mixed with fresh berries
- Peanut Butter Chocolate: Fill with a mixture of peanut butter and chocolate chips
Dietary Modifications:
- For a lighter version, use only 1/2 cup sugar in the cake and choose a low-sugar jam filling
- Make it gluten-free by substituting with a 1:1 gluten-free flour blend
- Create a dairy-free version by choosing a non-dairy filling like fruit preserves
Presentation Ideas:
- Drizzle with melted chocolate or fruit glaze before serving
- Top with fresh berries and whipped cream
- Dust with cocoa powder instead of powdered sugar for chocolate versions
- Add a ribbon of chocolate or caramel sauce on the serving plate
Pro Chef Tips
Temperature Matters: Room temperature eggs separate more easily and whip to greater volume. Take your eggs out of the fridge 30-60 minutes before baking, or place them (in their shells) in a bowl of warm water for 5 minutes.
The Perfect Roll: The secret to avoiding cracks is rolling the cake while it’s still hot. The steam inside makes it pliable. If you let it cool flat, it will crack when you try to roll it later.
Don’t Over-Beat the Batter: Once you add the egg whites to the yolk mixture, fold gently and stop as soon as no white streaks remain. Over-mixing deflates the air bubbles and results in a denser cake that’s more likely to crack.
Towel Choice is Critical: Use a smooth, lint-free kitchen towel, not a fluffy terry cloth towel. The terry cloth texture can imprint on your cake. Flour sack towels work perfectly.
Even Spreading for Even Rolling: Make sure your batter is spread evenly to all corners of the pan. An uneven cake will be thicker in some spots and more likely to crack or roll unevenly.
The Offset Spatula Secret: When spreading your filling, an offset spatula gives you the most control and helps you spread evenly without tearing the delicate cake.
Chill for Cleaner Slices: While you can serve the jelly roll at room temperature, chilling it for 30-60 minutes before slicing results in much cleaner, prettier slices with well-defined spirals.
Common Mistakes to Avoid
Mistake #1: Overbaking the Cake – This is the number one reason jelly rolls crack. The cake should be just set and barely golden. Check it at 10 minutes—if it springs back when touched, it’s done even if it doesn’t look very brown.
Mistake #2: Waiting Too Long to Roll – You must roll the cake immediately after removing it from the oven while it’s still hot and pliable. Waiting even 5 minutes can result in cracks.
Mistake #3: Under-Beating the Egg Whites – Your egg whites need to reach stiff peaks (when you lift the beaters, the peaks stand straight up without drooping). Soft peaks will collapse during baking, resulting in a dense cake.
Mistake #4: Overfilling the Roll – More is not better here. Too much filling will squeeze out the sides and make the cake unroll itself. Stick to 3/4 to 1 cup maximum.
Mistake #5: Using a Dirty Bowl for Egg Whites – Even a tiny bit of fat (including egg yolk) will prevent egg whites from whipping properly. Make sure your bowl and beaters are completely clean and dry.
Mistake #6: Rolling Too Tightly – When re-rolling with the filling, roll snugly but don’t squeeze. Rolling too tightly can crack the cake or squeeze out all the filling.
Storage & Meal Prep
Refrigerator Storage: Store your jelly roll covered tightly with plastic wrap or in an airtight container in the refrigerator for up to 4-5 days. The cake actually tastes better on day two after the flavors have melded together. Keep it whole and slice only as needed for the freshest results.
Room Temperature: If using a non-perishable filling like jam or jelly, you can keep the jelly roll covered at room temperature for up to 2 days. However, if your filling contains dairy (whipped cream, cream cheese frosting, pastry cream), always refrigerate.
Serving Temperature: Jelly rolls are delicious served chilled, at room temperature, or slightly warmed. If serving chilled from the fridge, let it sit at room temperature for 10-15 minutes before slicing for the best texture and flavor.
Reheating: Generally, jelly rolls are best served without reheating. However, if you prefer it slightly warm, microwave individual slices for 10-15 seconds. Don’t overheat or the filling will become runny.
Keeping It Fresh: To prevent the cake from drying out, make sure it’s wrapped tightly. You can also place a piece of wax paper directly on the cut end before wrapping to seal in moisture.
Make-Ahead & Freezer Notes
Make-Ahead Instructions: This is an excellent make-ahead dessert! You can bake the cake, roll it with the towel, and let it cool up to 1 day in advance. Store it (still rolled in the towel) wrapped in plastic wrap at room temperature. When ready to serve, unroll, fill, and finish as directed. You can also complete the entire cake up to 2 days ahead—simply store it wrapped tightly in the refrigerator.
Freezing the Unfilled Cake: For ultimate convenience, freeze the cooled, rolled cake (still in the towel) wrapped tightly in plastic wrap and then aluminum foil for up to 2 months. Thaw overnight in the refrigerator, then unroll, fill, and serve.
Freezing the Filled Cake: You can freeze the completed, filled jelly roll. Wrap it tightly in plastic wrap, then aluminum foil. Freeze for up to 1 month. Note that some fillings freeze better than others—jam, buttercream, and cream cheese frostings freeze beautifully, while fresh whipped cream doesn’t freeze as well. Thaw overnight in the refrigerator before serving.
Best Reheating Method: If frozen, always thaw in the refrigerator rather than at room temperature for food safety and best texture. For best results, bring to room temperature before serving or warm individual slices slightly as mentioned above.
Pro Freezer Tip: Slice the jelly roll before freezing, placing wax paper between slices. This allows you to grab individual portions whenever a craving strikes without thawing the entire roll.
Serving Suggestions
A jelly roll is beautiful enough to stand alone, but pairing it with complementary sides and beverages takes your dessert presentation to the next level.
Perfect Pairings:
- Fresh Berries – A mix of fresh strawberries, raspberries, and blueberries adds color, freshness, and a delightful tartness that balances the cake’s sweetness
- Whipped Cream or Vanilla Ice Cream – A dollop of freshly whipped cream or a scoop of vanilla ice cream makes each slice extra indulgent
- Hot Beverages – Serve with freshly brewed coffee, Earl Grey tea, chai latte, or hot chocolate for a cozy afternoon treat
- Fresh Mint – A small sprig of fresh mint on each plate adds a pop of color and aromatic freshness
- Fruit Coulis – Drizzle plates with a simple raspberry or strawberry coulis for an elegant presentation
- Chocolate Sauce – Especially delicious with chocolate or vanilla jelly rolls
- Lemon Curd – Serve extra lemon curd on the side for lemon jelly roll lovers
Occasion Ideas:
- Birthday Parties – Decorate the top with birthday candles for a unique alternative to traditional layer cakes
- Holiday Gatherings – Create festive versions using red and green fillings for Christmas, or pumpkin spice for Thanksgiving
- Baby Showers – Tint the filling with food coloring to match the party theme (pink or blue)
- Afternoon Tea – Slice into smaller portions and serve alongside other tea sandwiches and petit fours
- Potlucks – Easy to transport and serves a crowd beautifully
FAQs Section
Q: Why did my jelly roll crack when I rolled it?
A: The most common cause is overbaking. The cake needs to be just set but still very moist and pliable. Also, make sure you roll it immediately while still hot—waiting even a few minutes can cause cracking. Finally, roll gently without squeezing or pulling.
Q: Can I use cake flour instead of all-purpose flour?
A: Absolutely! Cake flour will make your jelly roll even more tender and delicate. Use the same amount (3/4 cup) as called for with all-purpose flour. No other adjustments are necessary.
Q: How do I know when my egg whites are beaten enough?
A: Your egg whites should form stiff, glossy peaks. When you lift your beaters straight up out of the mixture, the peaks should stand straight up without drooping or curling over. They should look smooth and shiny, not dry or grainy.
Q: Can I make this ahead for a party?
A: Yes! Jelly rolls are perfect make-ahead desserts. You can make it completely up to 2 days ahead and store it covered in the refrigerator. Many people actually think it tastes even better the next day once the flavors have had time to meld together.
Q: What’s the best filling to use?
A: Traditional jelly rolls use fruit preserves or jam (strawberry, raspberry, or apricot are classics), but you can use absolutely anything you like! Lemon curd, chocolate hazelnut spread, buttercream frosting, cream cheese frosting, whipped cream with fresh fruit, or even peanut butter all work beautifully. Use about 3/4 to 1 cup of filling.
Q: My jelly roll came out dense instead of light and fluffy. What happened?
A: This usually means the egg whites weren’t beaten enough, or the batter was over-mixed after the egg whites were folded in. Make sure your egg whites reach stiff peaks before folding them in, and fold gently just until no white streaks remain—no more than that.
Q: Can I make mini jelly rolls instead of one large one?
A: Yes! Divide the batter between two smaller pans or use a muffin top pan for individual portions. Adjust the baking time to 6-8 minutes for smaller sizes. Mini jelly rolls are adorable for parties and easier to serve.
Q: Do I really need to use the towel method?
A: Yes, the towel method is essential for training the cake to hold its rolled shape without cracking. Rolling it while hot with the towel “sets” the curve. Trying to roll a completely cooled, flat cake will almost always result in cracks.
Conclusion
There you have it—a complete guide to creating the most beautiful, delicious jelly roll that will have everyone asking for your secret! This classic dessert proves that impressive doesn’t have to mean complicated. With just a few basic ingredients, simple techniques, and the helpful tips I’ve shared, you’ll be rolling out perfect spiral cakes like a pro baker.
The beauty of this jelly roll recipe is its versatility. Once you master the basic technique, you can experiment with endless flavor combinations to suit any season, occasion, or craving. From traditional strawberry jam to decadent chocolate ganache, elegant lemon curd to festive pumpkin spice, your jelly roll possibilities are truly limitless.
I’d love to hear how your jelly roll turns out! Did you stick with a classic filling or get creative with your own combination? What occasion are you making it for? Drop a comment below sharing your experience, and don’t forget to rate the recipe. Your feedback helps other home bakers and helps me continue creating recipes you’ll love.
Ready to bake? Pin this recipe to your Pinterest dessert board so you’ll have it whenever a celebration calls for something special! Share it with your fellow baking enthusiasts who’d love to master this impressive technique. And if you make it, tag me on social media—I absolutely love seeing your beautiful jelly roll creations!
Happy baking, and here’s to creating delicious memories in your kitchen! 🎂✨