The Ultimate Chocolate Cookies Recipe – Soft, Chewy & Irresistibly Delicious!

There’s something absolutely magical about biting into a warm chocolate cookie fresh from the oven. These chocolate cookies are the ultimate treat for chocolate lovers – perfectly soft and chewy in the center with slightly crisp edges, loaded with rich chocolate flavor that melts in your mouth. Whether you’re baking for a weekend family gathering, preparing treats for a school bake sale, or simply craving something sweet on a cozy evening, these chocolate cookies deliver every single time.
What makes this recipe special is its foolproof approach. You don’t need to be an experienced baker to create bakery-quality cookies at home. With simple pantry ingredients and straightforward instructions, you’ll have a batch of gorgeous, Instagram-worthy cookies ready in under 30 minutes. They’re perfect for holidays like Christmas and Valentine’s Day, wonderful as after-school snacks, and make thoughtful homemade gifts that everyone appreciates. The deep chocolate flavor combined with the perfect texture makes these cookies absolutely addictive – you’ve been warned!
History / Background
Chocolate cookies have a fascinating history that traces back to the early 20th century when chocolate became more accessible to home bakers. While chocolate chip cookies famously emerged from Ruth Wakefield’s Toll House Inn in the 1930s, fully chocolate-based cookies developed their own devoted following shortly after.
The evolution of chocolate cookies is tied closely to the development of Dutch-process cocoa powder in the 1800s by Dutch chemist Coenraad Johannes van Houten. This innovation made cocoa powder smoother, darker, and less acidic, transforming how chocolate could be used in baking. American home bakers embraced this ingredient enthusiastically, experimenting with different ratios and techniques to create the perfect chocolate cookie.
During World War II, chocolate cookies became comfort food for soldiers and families alike. Homemade cookies were frequently sent in care packages overseas, and chocolate cookies specifically were prized for their ability to stay fresh during shipping and for providing a morale boost with their rich, indulgent flavor.
Throughout the decades, chocolate cookies have remained a staple in American baking culture. From classic recipes passed down through generations to modern variations featuring different types of chocolate, sea salt toppings, or stuffed centers, the humble chocolate cookie continues to evolve while maintaining its place as one of the most beloved homemade treats. Today, they represent comfort, celebration, and the simple joy of home baking.
Why You’ll Love This Recipe
These chocolate cookies strike the perfect balance between simple preparation and impressive results. The recipe has been tested and perfected to ensure consistent success every single time you bake them. The cookies deliver an intensely chocolatey experience without being overly sweet, making them appealing to both kids and adults.
Here’s why this recipe will become your go-to:
- Quick and easy – Ready in just 25 minutes from start to finish, perfect for last-minute cravings or unexpected guests
- Minimal ingredients – Uses common pantry staples you likely already have on hand, no specialty items required
- Foolproof technique – Clear, step-by-step instructions that guarantee success even for beginner bakers
- Perfect texture – Soft and chewy centers with slightly crisp edges create the ideal cookie experience
- Deeply chocolatey – Double chocolate flavor from both cocoa powder and chocolate chips satisfies serious chocolate lovers
- Versatile – Easily customizable with different mix-ins, toppings, or chocolate varieties
- Crowd-pleaser – Loved by everyone from picky kids to discerning adults
- Budget-friendly – Affordable ingredients make this an economical treat for families
- Great for gifting – These cookies look beautiful and stay fresh, making them perfect for gift boxes
- Freezer-friendly – Both dough and baked cookies freeze beautifully for future convenience
Ingredient Notes
Understanding your ingredients helps you achieve the best possible results and make smart substitutions when needed.
All-purpose flour – Provides structure to the cookies. Bread flour will make them chewier, while cake flour creates a more delicate, tender texture. For gluten-free cookies, use a 1:1 gluten-free baking blend.
Unsweetened cocoa powder – The star ingredient that delivers rich chocolate flavor. Dutch-process cocoa creates a darker, smoother flavor, while natural cocoa is slightly more acidic and fruity. Either works beautifully in this recipe.
Butter – Use unsalted butter so you can control the salt level. The butter should be softened to room temperature for proper creaming. Don’t substitute with margarine as it affects both texture and flavor.
Granulated sugar and brown sugar – This combination creates the ideal texture. Granulated sugar promotes spread and crispness, while brown sugar adds moisture and chewiness plus a subtle caramel note.
Eggs – Bind the ingredients together and add moisture. Room temperature eggs incorporate more smoothly into the batter. For vegan cookies, use flax eggs (1 tablespoon ground flaxseed + 3 tablespoons water per egg).
Vanilla extract – Enhances the chocolate flavor. Use pure vanilla extract rather than imitation for the best taste.
Baking soda – Creates lift and spread. Don’t substitute with baking powder as they function differently.
Salt – Balances sweetness and amplifies the chocolate flavor. Even if you use salted butter, add the salt called for in the recipe.
Chocolate chips – Semi-sweet chips are classic, but dark chocolate chips create a more sophisticated flavor, and milk chocolate makes them sweeter and creamier. You can also use chopped chocolate bars for irregular, melty pockets.
Equipment Needed
Having the right tools makes baking easier and more enjoyable. Here’s what you’ll need:
- Mixing bowls – One large bowl for wet ingredients and one medium bowl for dry ingredients
- Electric mixer – Stand mixer or hand mixer for creaming butter and sugar (you can also use a wooden spoon and some elbow grease)
- Measuring cups and spoons – For accurate ingredient measurements
- Whisk – For combining dry ingredients
- Rubber spatula – For scraping down bowl sides and folding in chocolate chips
- Baking sheets – Two or three for rotating batches
- Parchment paper or silicone baking mats – Prevents sticking and ensures even baking
- Cookie scoop or spoon – A 2-tablespoon scoop creates uniformly sized cookies
- Wire cooling rack – Allows air circulation for proper cooling
- Oven thermometer – Optional but helpful to ensure accurate oven temperature
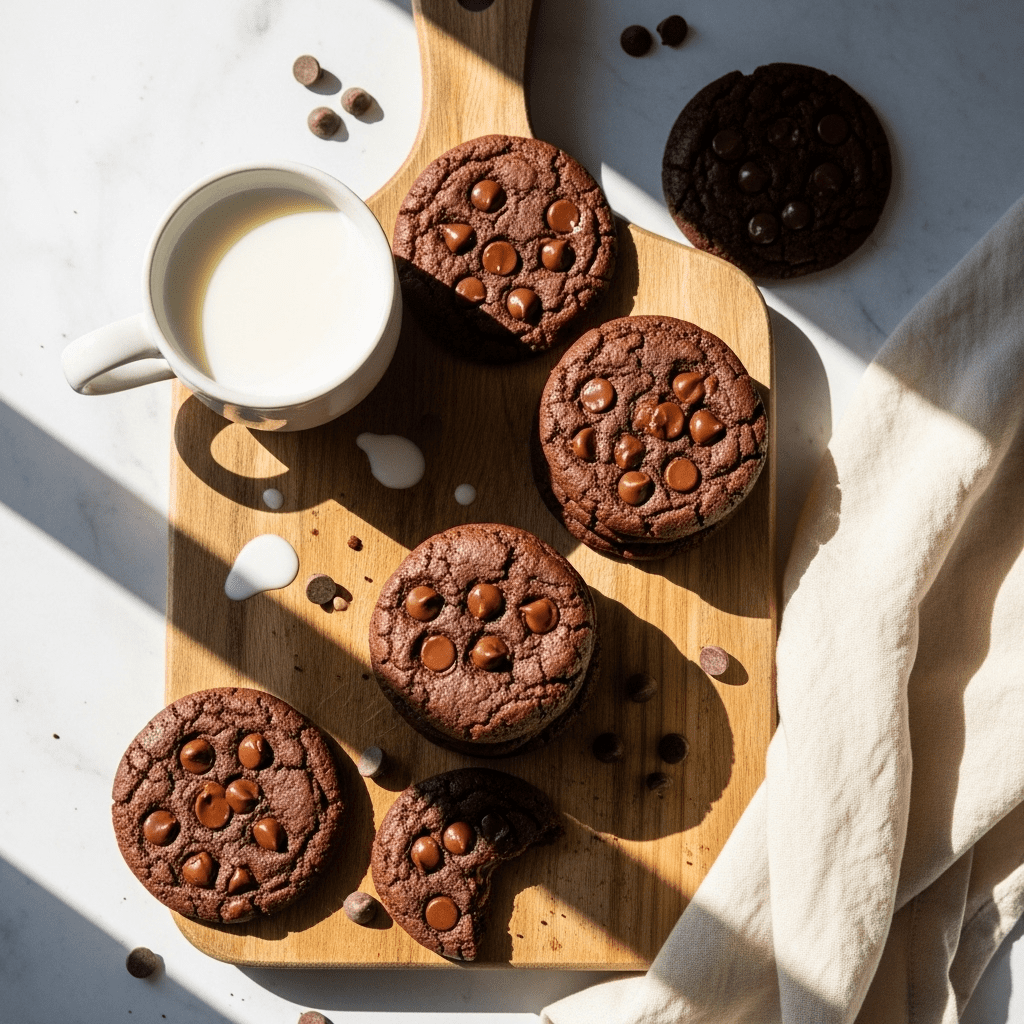
Chocolate Cookies Recipe
These soft and chewy chocolate cookies are loaded with rich chocolate flavor and studded with melty chocolate chips. Perfect for satisfying your chocolate cravings, they’re easy to make with simple ingredients and loved by everyone!
- Prep Time: 10 minutes
- Cook Time: 12 minutes
- Total Time: 22 minutes
- Yield: 24 cookies 1x
- Category: Dessert
- Method: Baking
- Cuisine: American
- Diet: Vegetarian
Ingredients
- 1¾ cups all-purpose flour
- ¾ cup unsweetened cocoa powder
- 1 teaspoon baking soda
- ½ teaspoon salt
- 1 cup unsalted butter, softened
- 1 cup granulated sugar
- ½ cup packed brown sugar
- 2 large eggs, room temperature
- 2 teaspoons vanilla extract
- 2 cups semi-sweet chocolate chips
Instructions
- Preheat your oven to 350°F (175°C). Line two baking sheets with parchment paper or silicone baking mats and set aside.
- Combine dry ingredients – In a medium bowl, whisk together the flour, cocoa powder, baking soda, and salt until well combined with no lumps. Set this aside.
- Cream butter and sugars – In a large mixing bowl, use an electric mixer to beat the softened butter, granulated sugar, and brown sugar together on medium speed for 3-4 minutes until the mixture is light, fluffy, and pale in color. This creaming process incorporates air for a better texture.
- Add eggs and vanilla – Beat in the eggs one at a time, mixing well after each addition. Add the vanilla extract and beat until fully incorporated, scraping down the sides of the bowl as needed.
- Mix in dry ingredients – Reduce mixer speed to low. Gradually add the flour mixture to the wet ingredients, mixing just until no flour streaks remain. Don’t overmix or the cookies will become tough.
- Fold in chocolate chips – Using a rubber spatula, gently fold the chocolate chips into the dough, distributing them evenly throughout.
- Scoop the dough – Using a 2-tablespoon cookie scoop or spoon, drop rounded portions of dough onto the prepared baking sheets, spacing them about 2 inches apart to allow for spreading.
- Bake – Bake for 10-12 minutes. The cookies are done when the edges look set but the centers still appear slightly underdone. They’ll look a bit puffy and soft – this is perfect!
- Cool properly – Let the cookies cool on the baking sheet for 5 minutes (this is crucial for the right texture), then transfer them to a wire rack to cool completely.
- Serve and enjoy – Serve warm for the ultimate gooey experience, or store once completely cooled.
Notes
- Don’t overbake! Cookies continue cooking on the hot pan after removal from the oven. Slightly underbaked cookies will be perfectly soft and chewy once cooled.
- Room temperature ingredients blend more smoothly and create better texture.
- For extra-thick cookies, chill the dough for 30 minutes before scooping.
- Cookies will appear soft when you remove them from the oven – they firm up as they cool.
- For uniform cookies, use a cookie scoop rather than spoons.
Nutrition
- Serving Size: 1 cookie
- Calories: 215
- Sugar: 20g
- Sodium: 125mg
- Fat: 11g
- Saturated Fat: 7g
- Unsaturated Fat: 3g
- Trans Fat: 0g
- Carbohydrates: 28g
- Fiber: 2g
- Protein: 3g
- Cholesterol: 35mg
Tips & Variations
Make them double chocolate – Add ½ cup of white chocolate chips along with the semi-sweet chips for a beautiful contrast.
Create triple chocolate cookies – Use a combination of dark, milk, and white chocolate chips for ultimate chocolate variety.
Add crunch – Fold in ½ cup of chopped walnuts, pecans, or toasted hazelnuts for added texture and flavor.
Mint chocolate version – Replace vanilla extract with peppermint extract and use dark chocolate chips. Top with crushed candy canes during the holidays.
Espresso chocolate cookies – Add 1 tablespoon of instant espresso powder to the dry ingredients. Coffee intensifies chocolate flavor beautifully.
Salted chocolate cookies – Sprinkle flaky sea salt on top of cookies immediately after removing from the oven for a sweet-salty combination.
Stuffed cookies – Press a square of your favorite chocolate bar into the center of each dough ball before baking for a gooey, melty surprise.
Make them gluten-free – Use a 1:1 gluten-free flour blend. The texture will be slightly different but still delicious.
Vegan version – Replace butter with vegan butter, eggs with flax eggs, and use dairy-free chocolate chips.
Smaller cookies – Use a 1-tablespoon scoop and reduce baking time to 8-10 minutes for bite-sized treats perfect for parties.
Pro Chef Tips
Use high-quality cocoa powder – The cocoa is the primary chocolate flavor, so investing in good cocoa (like Guittard or Valrhona) makes a noticeable difference. Dutch-process cocoa creates a smoother, more elegant flavor profile.
Don’t skip the creaming step – Properly creaming butter and sugar for a full 3-4 minutes creates air pockets that make cookies lighter and give them that signature crackly top.
Measure flour correctly – Too much flour makes dry, cakey cookies. Use the spoon-and-level method: spoon flour into the measuring cup and level off with a knife rather than scooping directly.
Rotate your baking sheets – Halfway through baking, rotate the pan 180 degrees for even browning, especially if your oven has hot spots.
Use parchment paper – It prevents sticking without adding extra fat and promotes even browning. Silicone mats work too but may result in less spreading.
Chill for thicker cookies – If you prefer thick, bakery-style cookies, refrigerate the dough for 30 minutes to 2 hours before baking. Cold dough spreads less in the oven.
The 5-minute rest is crucial – Letting cookies sit on the hot baking sheet after removing from the oven allows them to finish cooking gently and prevents breaking when transferred.
Underbake slightly – The single biggest mistake is overbaking. Remove cookies when centers still look slightly underdone – they’ll be perfectly chewy once cooled.
Common Mistakes to Avoid
Using cold butter – Butter that’s too cold won’t cream properly, resulting in dense cookies that don’t spread. Let butter sit at room temperature for 30-45 minutes until you can press a finger into it easily.
Overmixing the dough – Once you add the flour, mix just until combined. Overmixing develops gluten, making cookies tough and cakey instead of tender.
Skipping the oven preheat – Placing cookies in an oven that hasn’t fully reached temperature affects spreading and texture. Always preheat for at least 15 minutes.
Crowding the baking sheet – Cookies need space to spread. Leave at least 2 inches between dough balls, or they’ll merge into one giant cookie.
Using expired leavening agents – Baking soda loses potency over time. If yours is more than 6 months old, test it by adding a little to vinegar. It should bubble vigorously.
Not letting cookies cool on the pan – Transferring cookies immediately from the hot pan causes them to break or fall apart. That 5-minute rest time allows them to firm up properly.
Opening the oven door repeatedly – Every time you open the oven, you lose heat and extend baking time. Use your oven light to check on cookies instead.
Storage & Meal Prep
Room temperature storage – Store completely cooled cookies in an airtight container at room temperature for up to 5 days. Place parchment paper between layers to prevent sticking. A piece of bread in the container helps maintain softness.
Refrigerator storage – While not necessary, refrigerated cookies last up to 2 weeks in an airtight container. Let them come to room temperature before serving, or warm briefly in the microwave (10-15 seconds per cookie).
Reheating tips – For that fresh-baked taste, microwave individual cookies for 10-15 seconds, or warm several cookies on a baking sheet in a 300°F oven for 5 minutes. This remelts the chocolate chips and restores the soft texture.
Maintaining texture – If cookies become too soft, crisp them up by placing them in a 300°F oven for 3-5 minutes. If they become too hard, place a slice of bread in the storage container overnight.
Packaging for gifts – Arrange cookies in decorative tins or boxes with parchment paper between layers. They stay fresh for up to a week when properly packaged, making them perfect for gift-giving.
Make-Ahead & Freezer Notes
Freezing cookie dough – This is the ultimate make-ahead strategy! Scoop dough into balls, place on a baking sheet, and freeze until solid (about 2 hours). Transfer frozen dough balls to a freezer bag or container. They’ll keep for up to 3 months. Bake directly from frozen, adding 1-2 extra minutes to the baking time. No thawing needed!
Freezing baked cookies – Completely cooled cookies freeze beautifully for up to 3 months. Place them in a single layer on a baking sheet and freeze until solid, then transfer to freezer bags or containers. This prevents them from sticking together.
Thawing frozen cookies – Remove frozen cookies from the container and let them thaw at room temperature for 30-45 minutes. For faster thawing, microwave for 15-20 seconds.
Make-ahead dough (refrigerator) – Prepare the dough up to 3 days ahead and store it tightly covered in the refrigerator. In fact, many bakers prefer this method as it enhances the flavor and creates thicker cookies. Let chilled dough sit at room temperature for 10 minutes before scooping if it’s too firm.
Portioning tip – Pre-scoop all the dough balls at once, freeze them on a tray, then bag them. This way you can bake just a few fresh cookies whenever the craving hits without committing to a full batch.
Serving Suggestions
These chocolate cookies are wonderful on their own, but pairing them with complementary items creates an even more special experience.
Beverages – Cold milk is the classic pairing that never gets old. For adults, try them with hot coffee, espresso, or a creamy latte. Hot chocolate creates an ultra-chocolatey experience, while herbal tea (especially mint or chamomile) provides a nice contrast.
Ice cream sandwiches – Sandwich vanilla, chocolate, or mint chip ice cream between two cookies for a decadent frozen treat. Let the ice cream soften slightly for easier assembly.
Dessert platters – Arrange chocolate cookies alongside brownies, blondies, and other bar cookies for a beautiful dessert spread at parties or gatherings.
With fruit – Fresh strawberries, raspberries, or sliced bananas provide a refreshing contrast to the rich chocolate flavor and add a healthy component.
Cookie crumbles – Crumble cooled cookies over ice cream sundaes, yogurt parfaits, or pudding for added texture and chocolate flavor.
Dessert boards – Create a stunning dessert charcuterie board with these cookies, fresh fruit, chocolate truffles, caramel sauce, whipped cream, and nuts.
For breakfast – We won’t judge! Enjoy a cookie with your morning coffee for a special weekend treat.
Party presentation – Stack cookies on a tiered stand for birthdays, showers, or holiday gatherings. Add fresh flowers or ribbon for decoration.
FAQs Section
Can I use regular cocoa powder instead of Dutch-process?
Absolutely! Regular (natural) cocoa powder works perfectly in this recipe. Dutch-process cocoa creates a darker color and slightly smoother flavor, but natural cocoa delivers wonderful results too. The recipe works with either type without any adjustments.
Why are my cookies spreading too much?
Excessive spreading usually happens because the butter was too warm or melted, the dough wasn’t chilled, or there’s too much sugar. Make sure your butter is softened but not melted (it should hold its shape). If cookies consistently spread too much, chill the dough for 30 minutes before baking. Also, check that your baking soda is fresh and you’re measuring flour correctly using the spoon-and-level method.
How do I make cookies thicker and puffier?
For bakery-style thick cookies, chill your dough for at least 30 minutes before scooping. Use a cookie scoop to create taller dough balls rather than flattening them. You can also try increasing the flour by 2-3 tablespoons or reducing the sugar slightly. Baking at a slightly higher temperature (375°F) for a shorter time can also create puffier cookies.
Can I substitute the chocolate chips with something else?
Definitely! Try chopped chocolate bars (dark, milk, or white), peanut butter chips, butterscotch chips, or caramel bits. You can also use a combination. Dried cranberries, cherries, or chopped nuts add great texture and flavor. For a sophisticated version, use high-quality chocolate chunks or feves.
My cookies turned out cakey instead of chewy. What happened?
Cakey cookies usually result from too much flour (caused by incorrectly measuring), overmixing the dough after adding flour, or overbaking. Make sure you’re using the spoon-and-level method for measuring flour and mixing just until the flour disappears. Also, remove cookies from the oven when they still look slightly underdone in the center.
Do I need to use both granulated and brown sugar?
Using both types of sugar creates the best texture and flavor. Brown sugar contains molasses, which adds moisture, chewiness, and a subtle caramel flavor. Granulated sugar promotes spread and creates crispy edges. You could use all brown sugar for chewier cookies or all granulated sugar for crispier cookies, but the combination provides the ideal balance.
Can I make the dough ahead and bake later?
Yes! You can refrigerate the dough for up to 3 days or freeze it for up to 3 months. Refrigerated dough often produces even better cookies because the flavors have time to develop and the cold dough spreads less during baking, creating thicker cookies. Frozen dough balls can be baked directly from the freezer with just 1-2 extra minutes of baking time.
Conclusion
These chocolate cookies truly are the ultimate chocolate lover’s dream – rich, satisfying, and absolutely foolproof. Whether you’re an experienced baker or just starting your baking journey, this recipe sets you up for success with clear instructions and reliable results every single time. The combination of deep cocoa flavor, melty chocolate chips, and that perfect soft-and-chewy texture makes these cookies irresistible to everyone who tries them.
What I love most about this recipe is its versatility. You can keep it classic and simple, or get creative with different mix-ins, chocolate varieties, and toppings. They’re perfect for so many occasions – from casual weeknight treats to special celebrations, from lunchbox surprises to thoughtful homemade gifts. And with the make-ahead and freezer options, you can always have fresh-baked chocolate cookies ready whenever the craving strikes.
I hope you’ll give these chocolate cookies a try in your own kitchen! Once you experience how easy they are to make and how amazing they taste, I’m confident they’ll become a regular part of your baking rotation. Don’t forget to bookmark this recipe and save it to your Pinterest boards so you can find it whenever you need it. If you make these cookies, I’d absolutely love to hear about your experience – leave a comment below sharing how they turned out or any creative variations you tried. Happy baking, and enjoy every chocolatey bite!