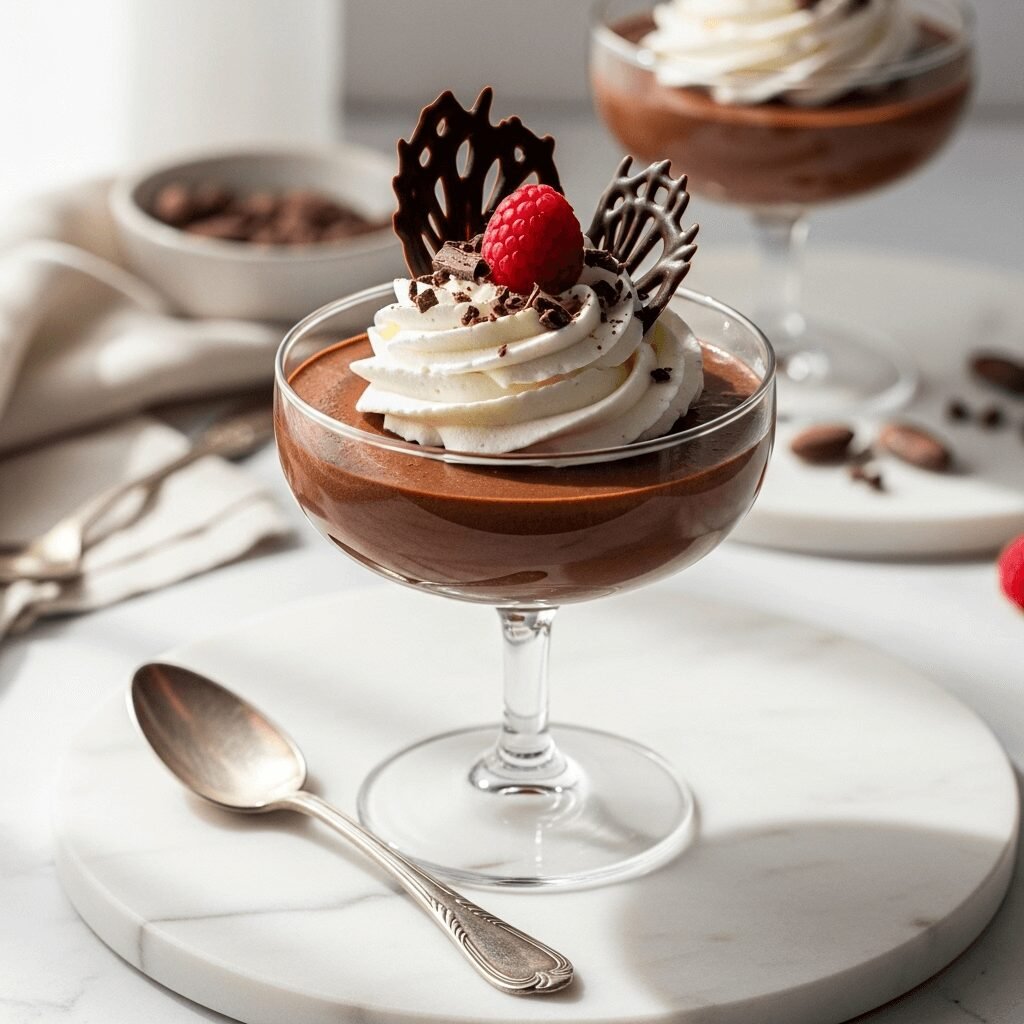
Easy French Chocolate Mousse – Rich, Creamy & Restaurant-Quality

Chocolate mousse is the epitome of elegant simplicity – a dessert so luxuriously smooth and intensely chocolatey that it feels like you’re indulging in something from a five-star Parisian bistro. This classic French chocolate mousse recipe transforms just a handful of simple ingredients into a cloud-like, velvety dessert that melts on your tongue. Despite its sophisticated reputation, chocolate mousse is surprisingly easy to make at home, requiring no baking and minimal hands-on time. It’s perfect for romantic dinners, dinner parties, holiday celebrations, or any time you want to impress your guests (or yourself!) with an irresistibly decadent treat. The best part? You can make it ahead, leaving you stress-free when it’s time to serve.
History / Background
Chocolate mousse, or “mousse au chocolat” in French, has been delighting dessert lovers since the 18th century. The word “mousse” means “foam” in French, perfectly describing this dessert’s airy, light-as-air texture achieved through the incorporation of whipped ingredients. While the exact origins are debated among culinary historians, chocolate mousse as we know it today gained prominence in France during the 1800s.
The earliest documented chocolate mousse recipes appeared in French cookbooks in the late 1700s, though these early versions were quite different from what we enjoy today. They often included ingredients like bread or eggs cooked into a custard base. The modern chocolate mousse – relying on the magic of whipped egg whites and cream for its signature texture – emerged in the mid-19th century as French chefs refined their techniques.
Chocolate mousse gained international fame in the 20th century, particularly after World War II when French cuisine experienced a renaissance and spread globally. The dessert became synonymous with romance and sophistication, appearing on the menus of fine dining establishments worldwide. French chef Auguste Escoffier included chocolate mousse recipes in his influential culinary guides, helping standardize the technique.
By the 1960s and 70s, chocolate mousse had become a staple at American dinner parties, representing culinary sophistication during the height of French cuisine’s influence on American cooking. Today, while the classic recipe remains beloved, countless variations exist – from vegan versions to those flavored with coffee, orange, or raspberry. However, the traditional French chocolate mousse remains the gold standard for rich, luxurious chocolate desserts.
Why You’ll Love This Recipe
This classic chocolate mousse recipe delivers restaurant-quality results with surprisingly little effort, making it the perfect dessert for both special occasions and when you’re simply craving something extraordinary.
- Incredibly rich and decadent – intense chocolate flavor that satisfies even the strongest chocolate cravings
- Silky-smooth texture that literally melts in your mouth
- Only 5 basic ingredients – no complicated or hard-to-find items needed
- No baking required – perfect for hot summer days or when you don’t want to heat up the kitchen
- Make-ahead friendly – actually tastes better after chilling overnight
- Impressive presentation – looks and tastes like something from a fancy French restaurant
- Customizable – easy to adapt with different flavors or toppings
- Naturally gluten-free – suitable for gluten-sensitive guests
- Portion-controlled elegance – rich flavor means small servings satisfy
- Perfect for entertaining – can be made 1-2 days ahead and simply garnished before serving
Ingredient Notes
Dark Chocolate: The star of the show! Use high-quality dark chocolate with 60-70% cacao content for the best flavor and texture. The chocolate’s quality directly impacts your mousse, so choose one you’d enjoy eating on its own. Avoid chocolate chips as they contain stabilizers that prevent smooth melting. Brands like Ghirardelli, Valrhona, Lindt, or Guittard work beautifully. For a sweeter mousse, use 50-60% cacao; for more intense chocolate flavor, go up to 70-75%.
Eggs: Fresh, high-quality eggs are essential since they’re not fully cooked in this recipe. The egg whites provide the mousse’s signature airy texture when whipped, while the yolks add richness and help emulsify the chocolate. Some cooks prefer using pasteurized eggs for food safety, which is a great option if you’re concerned. Room temperature eggs whip up better than cold ones.
Heavy Cream: Also called heavy whipping cream, this is what makes the mousse luxuriously creamy and adds stability. The high fat content (36-40%) is important – don’t substitute with half-and-half or light cream. For best results, use cream that’s been chilled in the refrigerator overnight.
Granulated Sugar: Sweetens the mousse and helps stabilize the whipped egg whites. The amount can be adjusted based on your chocolate’s sweetness level and personal preference. Superfine or caster sugar dissolves more easily if you have it.
Vanilla Extract: Enhances the chocolate flavor without being detectable as a separate flavor. Use pure vanilla extract rather than imitation for the best taste. You can substitute with other extracts like peppermint or almond, or add a tablespoon of liqueur for an adult version.
Optional Salt: Just a tiny pinch of salt enhances all the flavors and balances the sweetness, making the chocolate taste even more chocolatey.
Equipment Needed
- Double boiler or heatproof bowl over saucepan (for melting chocolate)
- Electric hand mixer or stand mixer (for whipping)
- Large mixing bowls (at least 3)
- Rubber spatula (for folding)
- Whisk
- Measuring cups and spoons
- Fine-mesh strainer (optional, for separating eggs)
- Serving glasses or ramekins (6-8, depending on size)
- Plastic wrap or covers (for chilling)
- Piping bag (optional, for elegant presentation)
Easy French Chocolate Mousse – Rich, Creamy & Restaurant-Quality

This classic French chocolate mousse is silky, rich, and incredibly decadent. Made with just five simple ingredients, it delivers restaurant-quality results that will impress any chocolate lover. The airy texture comes from properly whipped egg whites and cream, creating a dessert that’s both light and intensely satisfying.
- 8 ounces (225g) high-quality dark chocolate (60-70% cacao), finely chopped
- 4 large eggs, separated (room temperature)
- ¼ cup (50g) granulated sugar, divided
- 1 cup (240ml) heavy whipping cream, cold
- 1 teaspoon pure vanilla extract
- Pinch of salt
For Garnish (Optional):
- Whipped cream
- Chocolate shavings or curls
- Fresh berries
- Cocoa powder for dusting
- Mint leaves
- Prep Time: 20 minutes
- Cook Time: 5 minutes
- Total Time: 25 minutes (plus 4 hours chilling time)
- Yield: 6 servings 1x
- Category: Dessert
- Method: No-Bake
- Cuisine: French
- Diet: Gluten Free
Ingredients
Prepare Your Mise en Place:
- Separate the eggs carefully, making sure no yolk gets into the whites (even a tiny bit of yolk will prevent whites from whipping properly). Place whites in one large clean bowl and yolks in another. Let them sit at room temperature for 15-20 minutes. Ensure your bowl for whipping egg whites is completely clean and grease-free.
Melt the Chocolate:
- Fill a medium saucepan with about 2 inches of water and bring to a gentle simmer. Place a heatproof bowl on top (bottom shouldn’t touch the water) and add the chopped chocolate. Stir occasionally until completely melted and smooth, about 3-4 minutes. Remove from heat and let cool for 5 minutes – it should be warm but not hot. If the chocolate is too hot, it will cook the eggs when combined.
Create the Base:
- Add the egg yolks, one at a time, to the slightly cooled chocolate, whisking vigorously after each addition until smooth and glossy. The mixture will thicken slightly. Add vanilla extract and a pinch of salt, mixing until combined. Set aside to cool to room temperature while you whip the other components.
Whip the Egg Whites:
- Using an electric mixer with clean, dry beaters, beat the egg whites on medium speed until soft peaks form, about 2-3 minutes. They should look foamy and white. Gradually add half of the sugar (2 tablespoons) while continuing to beat. Increase to high speed and beat until stiff, glossy peaks form, about 2-3 more minutes. The peaks should stand straight up when you lift the beaters. Don’t overbeat or they’ll become grainy.
Whip the Cream:
- In another clean, cold bowl, beat the heavy cream with the remaining 2 tablespoons of sugar on medium-high speed until soft to medium peaks form, about 2-3 minutes. The cream should hold its shape but still look silky and smooth. Don’t overwhip or it will become grainy and butter-like.
Fold It All Together:
- This is the crucial step for maintaining that airy texture! First, gently fold about one-third of the whipped egg whites into the chocolate mixture using a rubber spatula. Use a gentle folding motion – cut down through the center, sweep across the bottom, and bring the spatula up along the side. This lightens the chocolate base and makes it easier to incorporate the remaining whites.
- Add the remaining egg whites and gently fold until just combined – you may still see a few white streaks, and that’s okay. Overmixing will deflate the mousse.
- Finally, fold in the whipped cream using the same gentle technique until the mixture is uniform in color and no white streaks remain. The mixture should be light, airy, and smooth.
Chill and Set:
- Divide the mousse among 6-8 serving glasses, ramekins, or small bowls. You can spoon it in for a rustic look or use a piping bag for an elegant presentation. Smooth the tops with a spoon or offset spatula.
- Cover each serving with plastic wrap (press it directly onto the surface to prevent a skin from forming, or tent it slightly above) and refrigerate for at least 4 hours, preferably overnight. The mousse will firm up and the flavors will develop beautifully as it chills.
Garnish and Serve:
- Just before serving, remove from the refrigerator and add your desired garnishes. A dollop of whipped cream, a sprinkle of chocolate shavings, fresh raspberries, or a light dusting of cocoa powder all work beautifully. Serve chilled.
Instructions
Prepare Your Mise en Place:
- Separate the eggs carefully, making sure no yolk gets into the whites (even a tiny bit of yolk will prevent whites from whipping properly). Place whites in one large clean bowl and yolks in another. Let them sit at room temperature for 15-20 minutes. Ensure your bowl for whipping egg whites is completely clean and grease-free.
Melt the Chocolate:
- Fill a medium saucepan with about 2 inches of water and bring to a gentle simmer. Place a heatproof bowl on top (bottom shouldn’t touch the water) and add the chopped chocolate. Stir occasionally until completely melted and smooth, about 3-4 minutes. Remove from heat and let cool for 5 minutes – it should be warm but not hot. If the chocolate is too hot, it will cook the eggs when combined.
Create the Base:
- Add the egg yolks, one at a time, to the slightly cooled chocolate, whisking vigorously after each addition until smooth and glossy. The mixture will thicken slightly. Add vanilla extract and a pinch of salt, mixing until combined. Set aside to cool to room temperature while you whip the other components.
Whip the Egg Whites:
- Using an electric mixer with clean, dry beaters, beat the egg whites on medium speed until soft peaks form, about 2-3 minutes. They should look foamy and white. Gradually add half of the sugar (2 tablespoons) while continuing to beat. Increase to high speed and beat until stiff, glossy peaks form, about 2-3 more minutes. The peaks should stand straight up when you lift the beaters. Don’t overbeat or they’ll become grainy.
Whip the Cream:
- In another clean, cold bowl, beat the heavy cream with the remaining 2 tablespoons of sugar on medium-high speed until soft to medium peaks form, about 2-3 minutes. The cream should hold its shape but still look silky and smooth. Don’t overwhip or it will become grainy and butter-like.
Fold It All Together:
- This is the crucial step for maintaining that airy texture! First, gently fold about one-third of the whipped egg whites into the chocolate mixture using a rubber spatula. Use a gentle folding motion – cut down through the center, sweep across the bottom, and bring the spatula up along the side. This lightens the chocolate base and makes it easier to incorporate the remaining whites.
- Add the remaining egg whites and gently fold until just combined – you may still see a few white streaks, and that’s okay. Overmixing will deflate the mousse.
- Finally, fold in the whipped cream using the same gentle technique until the mixture is uniform in color and no white streaks remain. The mixture should be light, airy, and smooth.
Chill and Set:
- Divide the mousse among 6-8 serving glasses, ramekins, or small bowls. You can spoon it in for a rustic look or use a piping bag for an elegant presentation. Smooth the tops with a spoon or offset spatula.
- Cover each serving with plastic wrap (press it directly onto the surface to prevent a skin from forming, or tent it slightly above) and refrigerate for at least 4 hours, preferably overnight. The mousse will firm up and the flavors will develop beautifully as it chills.
Garnish and Serve:
- Just before serving, remove from the refrigerator and add your desired garnishes. A dollop of whipped cream, a sprinkle of chocolate shavings, fresh raspberries, or a light dusting of cocoa powder all work beautifully. Serve chilled.
Notes
- Raw egg safety: This recipe contains raw eggs. Use fresh, high-quality eggs or pasteurized eggs if you’re concerned about food safety, especially for pregnant women, young children, elderly individuals, or those with compromised immune systems.
- Temperature matters: Make sure your melted chocolate has cooled to warm (not hot) before adding egg yolks, or it will scramble them.
- Folding technique is key: Gentle folding preserves the air you’ve incorporated into the egg whites and cream. Overmixing will result in a dense, heavy mousse.
- Chocolate quality: Use the best chocolate you can afford – it makes a huge difference in flavor.
- Make it ahead: Chocolate mousse actually improves after 8-24 hours in the refrigerator as the flavors meld.
Nutrition
- Serving Size: 1 portion (about ½ cup)
- Calories: 385
- Sugar: 24g
- Sodium: 65mg
- Fat: 28g
- Saturated Fat: 17g
- Unsaturated Fat: 9g
- Trans Fat: 0g
- Carbohydrates: 28g
- Fiber: 3g
- Protein: 7g
- Cholesterol: 165mg
Tips & Variations
White Chocolate Mousse: Replace the dark chocolate with high-quality white chocolate. Reduce sugar to 2-3 tablespoons total as white chocolate is sweeter. The texture will be slightly softer.
Mocha Mousse: Add 1-2 tablespoons of instant espresso powder dissolved in 1 tablespoon of hot water to the melted chocolate. Coffee enhances chocolate flavor beautifully.
Orange Chocolate Mousse: Add 1-2 teaspoons of orange zest to the melted chocolate and substitute orange liqueur (Grand Marnier or Cointreau) for the vanilla extract.
Mint Chocolate Mousse: Replace vanilla extract with ½-1 teaspoon peppermint extract. Be careful – peppermint extract is strong! Start with less and adjust to taste.
Baileys or Kahlua Mousse: Add 2-3 tablespoons of your favorite liqueur to the chocolate mixture after adding the egg yolks for an adults-only version.
Raspberry Swirl Mousse: Layer the mousse with raspberry coulis or jam in serving glasses for a beautiful striped effect and fruity contrast.
Vegan Chocolate Mousse: Use aquafaba (chickpea liquid) in place of egg whites and coconut cream in place of dairy cream. Use vegan dark chocolate.
Lighter Version: Use only 2 whole eggs plus 2 additional egg whites, and reduce the cream to ¾ cup. The texture will be slightly less rich but still delicious.
Chocolate Peanut Butter Mousse: Fold in ¼ cup smooth peanut butter with the chocolate mixture before adding the whipped ingredients.
Pro Chef Tips
Temper the chocolate mixture properly: When adding egg yolks to melted chocolate, make sure the chocolate has cooled to barely warm. If it’s too hot, you’ll scramble the yolks; if it’s too cool, it will seize into lumps. The sweet spot is around 100-110°F (38-43°C) – warm to the touch but not uncomfortable.
Use copper or glass bowls for egg whites: Copper bowls create more stable egg white foam due to a chemical reaction. Glass or stainless steel works well too. Never use plastic bowls as they can retain grease that prevents proper whipping.
Check your eggs’ freshness: Fresh eggs separate more easily, but slightly older egg whites (3-5 days old) actually whip to greater volume with more stable peaks. The proteins have loosened slightly, making them better for whipping.
The fold, don’t stir technique: When incorporating whipped ingredients, use a large rubber spatula and cut down through the center, sweep along the bottom, and lift up the side. Rotate the bowl a quarter turn and repeat. This preserves maximum air while combining ingredients. Work quickly but gently – you want to see just a few streaks of white remaining before stopping.
Chill your cream and bowl: For the fluffiest whipped cream, place your mixing bowl and beaters in the freezer for 10-15 minutes before whipping. Cold temperature helps the fat molecules in cream solidify and trap more air.
Don’t overwhip: Stop whipping egg whites when they form stiff, glossy peaks that stand straight up. Overwhipped whites look dry, grainy, and separated. Similarly, stop whipping cream when it holds soft to medium peaks – overwhipped cream becomes grainy or butter-like.
Layer flavors: A small pinch of espresso powder, even if you’re not making mocha mousse, intensifies chocolate flavor without tasting like coffee. A tiny pinch of cayenne pepper adds complexity and depth.
Serve at the right temperature: While mousse needs to be chilled to set, let it sit at room temperature for 5-10 minutes before serving. This allows the chocolate flavor to bloom and the texture to become even silkier.
Common Mistakes to Avoid
Using chocolate chips instead of bar chocolate: Chocolate chips contain stabilizers that prevent them from melting smoothly. They’ll create a grainy, separated mousse. Always use high-quality bar chocolate chopped into small, even pieces.
Getting water or grease in the chocolate: Even a tiny drop of water will cause melted chocolate to “seize” – becoming thick, grainy, and unusable. Make sure all bowls and utensils are completely dry. If chocolate does seize, you can sometimes save it by whisking in a tablespoon of warm cream or butter.
Adding hot chocolate to eggs: If your chocolate mixture is too hot when you add the egg yolks, they’ll scramble and create lumps. Let the chocolate cool for about 5 minutes after melting. It should feel warm but not hot when you test it with your finger.
Getting even a tiny bit of yolk in the egg whites: Egg yolks contain fat, which prevents egg whites from whipping properly. Even a speck of yolk will keep your whites from reaching stiff peaks. Separate eggs carefully, and if you do get yolk in the whites, use a shell piece to fish it out or start with a fresh bowl.
Overmixing when folding: Vigorous stirring or mixing too long deflates all the air you’ve worked to incorporate, resulting in a dense, heavy mousse instead of a light, airy one. Stop folding as soon as you no longer see distinct streaks – a few wisps of white are fine.
Not chilling long enough: Chocolate mousse needs at least 4 hours to properly set. Serving it too soon results in a soft, runny texture. For best results, make it the day before and let it chill overnight.
Serving too-large portions: Chocolate mousse is incredibly rich. Small servings (½ cup or less) are more appropriate and satisfying than large bowls. Use small glasses or ramekins for perfect portion control.
Storage & Meal Prep
Refrigerator Storage: Store chocolate mousse covered in the refrigerator for up to 3 days. Cover individual servings with plastic wrap pressed directly onto the surface to prevent a skin from forming, or use an airtight container. The texture may become slightly firmer over time but will still taste delicious.
Longer Storage: For best quality, consume within 2-3 days. While it’s technically safe for up to 4 days when properly refrigerated, the texture may start to change and the mousse can develop a slightly grainy texture.
Serving from Cold: Remove mousse from the refrigerator 5-10 minutes before serving to take the chill off. This allows the chocolate flavor to fully bloom and makes the texture more luxuriously creamy.
Pre-Portioning: Chocolate mousse is perfect for meal prep! Make it in individual serving glasses or jars, cover well, and you’ll have elegant desserts ready to grab all week.
Preventing Skin Formation: Always press plastic wrap directly onto the surface of the mousse if storing in a large container. Exposure to air creates a skin on top that’s unpleasant to eat. For individual servings, you can tent the wrap slightly above the mousse if you plan to pipe or decorate the top later.
Make-Ahead & Freezer Notes
Perfect Make-Ahead Dessert: Chocolate mousse is one of the best make-ahead desserts! In fact, it tastes better when made 8-24 hours in advance, as the flavors have time to develop and meld together. Make it the day before your event and simply add garnishes before serving.
Advance Preparation Timeline: You can make chocolate mousse up to 2 days before serving. Store covered in the refrigerator. Add whipped cream, chocolate shavings, or other garnishes right before serving for the freshest presentation.
Freezing Chocolate Mousse: Yes, you can freeze chocolate mousse! Spoon it into individual freezer-safe containers or use a large airtight container. Freeze for up to 1 month. The texture may be slightly denser after freezing but will still be delicious.
Thawing Instructions: Transfer frozen mousse to the refrigerator and let it thaw slowly overnight. Never thaw at room temperature or in the microwave, as this can cause texture problems. Once thawed, give it a gentle stir if needed and serve cold.
Partial Freezing for Different Texture: Some people enjoy chocolate mousse served semi-frozen, almost like a frozen chocolate treat. Try freezing for just 2-3 hours for a firmer, almost ice-cream-like consistency that’s still creamy.
Freezing Just the Base: You can also freeze just the chocolate-egg mixture before folding in the whipped cream and whites. Thaw overnight, bring to room temperature, and proceed with whipping and folding fresh cream and whites.
Serving Suggestions
Chocolate mousse is incredibly versatile and can be dressed up or kept simple depending on the occasion:
Classic Garnishes:
- Freshly whipped cream rosettes or dollops
- Dark chocolate shavings or curls
- Dusting of unsweetened cocoa powder
- Fresh berries (raspberries, strawberries, or blackberries)
- Candied orange peel
- Fresh mint leaves
Elegant Pairings:
- Crispy tuile cookies or pirouette cookies
- Delicate butter cookies or French macarons
- Fresh fruit compote or berry coulis
- Salted caramel sauce drizzled on top
- Crushed amaretti cookies
- Candied nuts (hazelnuts or pecans)
Beverage Pairings:
- Espresso or strong coffee
- Dessert wine (Port or late-harvest Riesling)
- Champagne or sparkling wine
- Baileys Irish Cream
- Hot chocolate (for serious chocolate lovers!)
- Red wine with chocolate notes (Zinfandel or Syrah)
Creative Presentations:
- Layer in parfait glasses with whipped cream and cookie crumbs
- Serve in chocolate cups or edible chocolate bowls
- Pipe into mini phyllo cups for bite-sized portions
- Create a chocolate mousse cake by using it as filling
- Serve alongside fresh fruit skewers for dipping
- Make mousse parfaits with layers of crushed Oreos or graham crackers
Complete Dessert Menu Ideas: Serve chocolate mousse as part of a dessert trio with crème brûlée and fresh fruit tart, or pair it with vanilla panna cotta for a beautiful black-and-white presentation.
FAQs Section
Q: Can I make chocolate mousse without raw eggs?
A: Yes! You can use pasteurized eggs (which are heat-treated to kill bacteria while still raw), or make a cooked version where you create a custard base first by gently heating the egg yolks with sugar until they reach 160°F. Another option is to use aquafaba (chickpea liquid) in place of egg whites for a vegan version. The texture may be slightly different but still delicious.
Q: Why did my chocolate mousse turn out grainy?
A: Graininess usually comes from one of three issues: using chocolate chips instead of bar chocolate, overheating the chocolate causing it to seize, or overwhipping the cream or egg whites until they separate. Always use chopped bar chocolate, melt it gently, and stop whipping as soon as you reach the desired consistency.
Q: Can I use milk chocolate instead of dark chocolate?
A: Yes, but reduce or omit the sugar since milk chocolate is much sweeter than dark chocolate. Milk chocolate mousse will also have a softer set because it contains more sugar and milk solids. The flavor will be milder and sweeter – delicious but less intensely chocolatey than traditional mousse.
Q: How do I know when my egg whites are properly whipped?
A: Properly whipped egg whites should be glossy and white, and form stiff peaks that stand straight up when you lift the beaters. If you turn the bowl upside down, they shouldn’t move. Underwhipped whites will be foamy but droopy; overwhipped whites look dry, grainy, and may start separating. Stop at stiff, glossy peaks.
Q: Why is my chocolate mousse too dense or heavy?
A: This usually happens from overmixing when folding the whipped ingredients into the chocolate base, which deflates the air you’ve incorporated. It can also result from chocolate that was too hot when you added the eggs, or from adding the whipped ingredients all at once. Always fold gently, work with room-temperature chocolate base, and lighten the mixture first with a portion of the whites before adding the rest.
Q: Can I make chocolate mousse dairy-free?
A: Absolutely! Use coconut cream (the thick part from a can of full-fat coconut milk that’s been refrigerated) in place of heavy cream, and use aquafaba (liquid from canned chickpeas) in place of egg whites. Make sure your chocolate is dairy-free as well. The technique remains the same, though coconut cream may need to be chilled longer before whipping.
Q: How far in advance can I make chocolate mousse?
A: You can make chocolate mousse up to 2 days ahead, and it actually improves in flavor when made 8-24 hours before serving. Store covered in the refrigerator. Just add garnishes right before serving. For longer storage, it can be frozen for up to 1 month, though the texture may be slightly denser after thawing.
Q: What’s the difference between chocolate mousse and chocolate pudding?
A: While both are chocolate desserts, they’re quite different! Chocolate pudding is a cooked custard thickened with cornstarch or flour, creating a smooth, creamy but denser texture. Chocolate mousse is lightened with whipped cream and/or egg whites, creating an airy, foam-like texture – hence the name “mousse” meaning foam in French. Mousse is typically richer and more elegant.
Conclusion
There’s something truly magical about making chocolate mousse at home – transforming simple ingredients into something so elegant and indulgent feels like pure culinary sorcery. This classic French chocolate mousse recipe proves that impressive desserts don’t have to be complicated. With just five ingredients, a little patience, and the proper technique, you can create a dessert that rivals anything you’d find in a fancy restaurant.
The beauty of chocolate mousse lies in its versatility. Serve it simply in small glasses for an elegant weeknight treat, dress it up with elaborate garnishes for a dinner party, or customize the flavors to make it uniquely yours. Either way, that first spoonful – silky, intensely chocolatey, and cloud-like in texture – never fails to delight.
Ready to make your own restaurant-quality chocolate mousse? I’d love to hear how it turns out! Did you try any of the flavor variations? What garnishes did you choose? Leave a comment below and share your experience. And if you loved this recipe, please pin it to your favorite Pinterest dessert board so you can find it again and share it with fellow chocolate lovers!
Now grab your whisk and some good chocolate – it’s time to create some magic in your kitchen! 🍫