The Ultimate Donut Holes Recipe: Fluffy, Golden Bites of Pure Joy
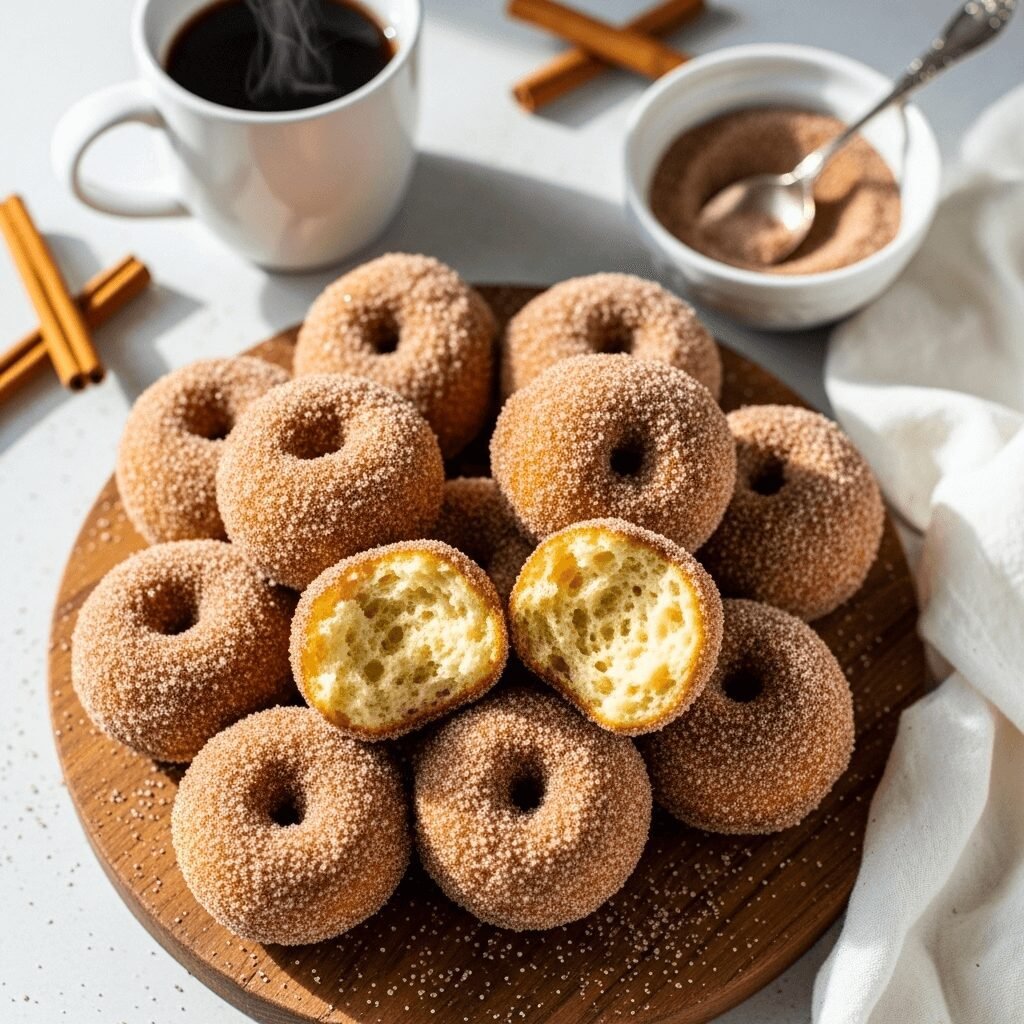
There’s something absolutely magical about biting into a warm, pillowy donut hole dusted with cinnamon sugar or glazed to perfection. These bite-sized beauties are the ultimate crowd-pleaser—perfect for breakfast spreads, afternoon snacks, holiday gatherings, or anytime you’re craving something sweet and satisfying. Unlike their full-sized counterparts, homemade donut holes are surprisingly quick to make and don’t require any fancy equipment like a donut cutter. They’re the perfect weekend baking project that’ll make your entire house smell like a professional bakery.
This donut holes recipe delivers incredibly soft, fluffy centers with a slightly crispy exterior that’s simply irresistible. Whether you’re planning a brunch party, looking for a fun baking activity with kids, or simply want to treat yourself to something special, these homemade donut holes are guaranteed to disappear within minutes. They’re endlessly customizable—coat them in cinnamon sugar, drizzle with chocolate glaze, toss in powdered sugar, or get creative with your favorite toppings. Best of all, this recipe uses simple pantry staples you probably already have on hand, making it an accessible treat for home bakers of all skill levels.
History / Background
Donut holes, affectionately known as “munchkins” by Dunkin’ Donuts fans, have an interesting origin story rooted in American culinary innovation. The modern donut as we know it—with its signature hole in the center—is credited to a New England ship captain named Hanson Gregory, who in 1847 allegedly punched a hole in the center of a fried cake to ensure even cooking and eliminate the soggy middle problem that plagued early donuts.
But what to do with those leftover dough circles? American ingenuity at its finest! Rather than waste perfectly good dough, bakers began frying those little “holes” alongside the full-sized donuts. By the mid-20th century, donut holes had become a beloved treat in their own right, particularly popular at church socials, county fairs, and bakeries across the country.
The term “donut holes” became widely popularized in the 1970s when major donut chains began marketing them as a convenient, portable snack. Today, they’re a staple at coffee shops, bakeries, and home kitchens nationwide. What started as a creative solution to food waste has evolved into one of America’s favorite sweet treats—proof that sometimes the best innovations come from simply not wanting to throw anything away. The beauty of homemade donut holes is that you’re creating these delicious bites intentionally, with complete control over size, flavor, and freshness.
Why You’ll Love This Recipe
This homemade donut holes recipe is an absolute game-changer for anyone who loves fresh, warm donuts but doesn’t want the hassle of complicated shaping or specialized equipment. These little spheres of joy come together quickly and deliver that authentic bakery taste and texture right in your own kitchen.
Here’s why this recipe will become your new favorite:
- Surprisingly Simple – No yeast rising for hours or complicated techniques required; this straightforward recipe uses basic ingredients and yields consistent, delicious results every time
- Quick Satisfaction – From mixing bowl to your mouth in under 30 minutes, making these perfect for spontaneous cravings or last-minute entertaining
- Budget-Friendly Treat – Costs a fraction of what you’d pay at a bakery, and makes enough to feed a crowd without breaking the bank
- Endlessly Customizable – The basic recipe is a blank canvas for your creativity—try different coatings, glazes, and fillings to create your signature version
- Kid-Approved Fun – Children absolutely love helping roll the dough into balls and decorating them with various toppings; it’s a wonderful family bonding activity
- Impressive Results – These look and taste so professional that nobody will believe you made them at home; they’re guaranteed to earn you compliments
- Perfect Texture – Achieves that ideal combination of a slightly crisp golden exterior with an incredibly soft, tender, and fluffy interior
- Crowd-Pleaser Guarantee – Whether you’re serving adults or children, traditional eaters or adventurous foodies, everyone loves these bite-sized treats
Ingredient Notes
Understanding your ingredients is key to donut hole success. Here’s what you’ll need and why each component matters:
All-Purpose Flour – The foundation of your donut holes, providing structure while keeping them tender. Bread flour will make them too chewy, while cake flour might make them too delicate. All-purpose strikes the perfect balance. If you need a gluten-free option, use a 1:1 gluten-free baking flour blend.
Granulated Sugar – Adds sweetness to the dough itself and helps create that beautiful golden-brown color when frying. Don’t reduce the amount, as it also affects texture and moisture retention.
Baking Powder – The leavening agent responsible for that light, fluffy texture. Make sure yours is fresh (test it by adding a spoonful to hot water—it should fizz vigorously).
Salt – Essential for balancing sweetness and enhancing all the other flavors. Never skip the salt, even in sweet recipes!
Ground Nutmeg – The secret ingredient that gives donut holes their classic, nostalgic flavor. Fresh-grated nutmeg is spectacular if you have it, but ground works perfectly. You can substitute with cinnamon if preferred, though nutmeg is traditional.
Milk – Provides moisture and richness. Whole milk yields the best flavor and texture, but 2% works fine. For dairy-free options, use unsweetened almond milk or oat milk.
Eggs – Bind everything together and add richness. They should be at room temperature for better incorporation. Each large egg can be replaced with a flax egg (1 tablespoon ground flaxseed + 3 tablespoons water, mixed and let sit for 5 minutes) for a vegan version.
Butter – Adds incredible flavor and tender crumb. Melted and cooled slightly before adding. Can substitute with coconut oil for dairy-free needs.
Vanilla Extract – Enhances all the flavors and adds aromatic depth. Pure vanilla extract is vastly superior to imitation.
Vegetable Oil for Frying – Choose a neutral oil with a high smoke point like canola, vegetable, or peanut oil. You’ll need enough to fill your pot about 2-3 inches deep for proper frying.
Cinnamon Sugar for Coating – The classic finish! Mix 1 cup granulated sugar with 2 tablespoons ground cinnamon. You can also use powdered sugar, glaze, or chocolate coating.
Equipment Needed
Having the right tools makes this recipe even easier and ensures consistent results:
- Large Mixing Bowl – For combining your dry ingredients
- Medium Mixing Bowl – For whisking together wet ingredients
- Whisk – For mixing dry ingredients and beating eggs
- Wooden Spoon or Spatula – For stirring the dough together
- Measuring Cups and Spoons – Accurate measurements are crucial in baking
- Heavy-Bottomed Pot or Dutch Oven – For frying; needs to be at least 3-4 inches deep to safely hold oil
- Candy or Deep-Fry Thermometer – Essential for maintaining proper oil temperature (350-375°F)
- Slotted Spoon or Spider Strainer – For safely removing donut holes from hot oil
- Paper Towel-Lined Plate or Cooling Rack – For draining excess oil
- Shallow Bowl – For your cinnamon sugar or coating
- Cookie Scoop (Optional) – A 1-tablespoon scoop ensures uniform size and speeds up the process
Donut Holes Recipe

These homemade donut holes are incredibly soft, fluffy, and perfectly golden with a classic cinnamon-sugar coating. Ready in just 30 minutes, they’re the ultimate sweet treat that tastes just like your favorite bakery—but better because they’re fresh and warm from your own kitchen!
- Prep Time: 15 minutes
- Cook Time: 15 minutes
- Total Time: 30 minutes
- Yield: 30-35 donut holes 1x
- Category: Dessert
- Method: Deep-Frying
- Cuisine: American
- Diet: Vegetarian
Ingredients
For the Donut Holes:
- 2 cups all-purpose flour
- ½ cup granulated sugar
- 2 teaspoons baking powder
- ½ teaspoon salt
- ½ teaspoon ground nutmeg
- ¾ cup whole milk, room temperature
- 2 large eggs, room temperature
- 2 tablespoons unsalted butter, melted and slightly cooled
- 1 teaspoon vanilla extract
- Vegetable oil for frying (about 6-8 cups, depending on pot size)
For the Cinnamon Sugar Coating:
- 1 cup granulated sugar
- 2 tablespoons ground cinnamon
Instructions
- Prepare Your Coating: In a shallow bowl, whisk together 1 cup sugar and 2 tablespoons cinnamon until well combined. Set aside near your frying station for easy coating while the donut holes are still warm.
- Mix Dry Ingredients: In a large mixing bowl, whisk together the flour, ½ cup sugar, baking powder, salt, and nutmeg until no lumps remain and everything is evenly distributed.
- Combine Wet Ingredients: In a medium bowl, whisk together the milk, eggs, melted butter, and vanilla extract until smooth and well combined. Make sure your butter isn’t too hot or it will cook the eggs.
- Create the Dough: Pour the wet ingredients into the dry ingredients. Using a wooden spoon or spatula, gently stir until just combined. The dough will be thick and slightly sticky—resist the urge to overmix, as this will make your donut holes tough. A few small lumps are perfectly fine.
- Heat the Oil: Pour oil into your heavy-bottomed pot or Dutch oven to a depth of 2-3 inches. Heat over medium-high heat until it reaches 350-375°F on a candy thermometer. This temperature is crucial—too low and your donut holes will absorb too much oil and be greasy; too high and they’ll burn on the outside while staying raw inside.
- Shape the Donut Holes: While oil is heating, lightly flour your hands or use a small cookie scoop to portion out the dough into balls about 1 tablespoon each (roughly 1 inch in diameter). Roll them gently between your palms to create smooth spheres. Place them on a lightly floured plate or baking sheet.
- Fry in Batches: Carefully drop 5-6 donut holes into the hot oil, being careful not to overcrowd the pot (this will lower the oil temperature). Fry for about 2-3 minutes total, turning them occasionally with a slotted spoon so they brown evenly on all sides. They should be deep golden brown and cooked through.
- Drain and Coat: Using your slotted spoon or spider strainer, remove the donut holes and let excess oil drip off. Place them on a paper towel-lined plate for just a few seconds, then immediately transfer to your cinnamon sugar bowl while they’re still warm. Toss gently to coat completely.
- Repeat: Continue frying the remaining donut holes in batches, always making sure the oil returns to the proper temperature between batches. Monitor your thermometer and adjust heat as needed.
- Serve Fresh: These are absolutely best enjoyed warm and fresh, though they’ll stay delicious for several hours. Serve immediately and watch them disappear!
Notes
- Temperature is Everything: Keep that oil between 350-375°F for the best results. Too cool = greasy donut holes; too hot = burnt outsides with raw centers.
- Size Matters: Keep your donut holes uniform in size (about 1 inch) so they cook evenly. Larger ones may need an extra 30-60 seconds of frying time.
- Don’t Skip the Room Temperature Ingredients: Room temperature eggs and milk incorporate much better into the batter, creating a smoother dough and better texture.
- Work Quickly with the Coating: Toss donut holes in cinnamon sugar while they’re still warm so the coating sticks properly.
- Oil Reuse: You can strain and reuse your frying oil 2-3 times if stored properly in a sealed container in a cool, dark place.
Serving Size: 1 donut hole
Calories: 78
Sugar: 8g
Sodium: 52mg
Fat: 3.2g
Saturated Fat: 0.8g
Unsaturated Fat: 2.2g
Nutrition
- Serving Size: 1 donut hole
- Calories: 78
- Sugar: 8g
- Sodium: 52mg
- Fat: 3.2g
- Saturated Fat: 0.8g
- Unsaturated Fat: 2.2g
- Trans Fat: 0g
- Carbohydrates: 11g
- Fiber: 0.3g
- Protein: 1.2g
- Cholesterol: 15mg
Note: Nutrition information is approximate and will vary based on specific ingredients used and coating choices. Values are based on donut holes coated in cinnamon sugar.
Tips & Variations
Glaze Options:
- Classic Vanilla Glaze: Mix 2 cups powdered sugar with 4-5 tablespoons milk and 1 teaspoon vanilla extract until smooth. Dip warm donut holes.
- Chocolate Glaze: Melt 1 cup chocolate chips with 2 tablespoons butter and 2 tablespoons milk. Drizzle or dip.
- Maple Glaze: Combine 2 cups powdered sugar with 3 tablespoons pure maple syrup and 2-3 tablespoons milk.
Flavor Variations:
- Apple Cider: Replace half the milk with apple cider and add 1 teaspoon apple pie spice
- Lemon Poppy Seed: Add 2 tablespoons lemon zest and 1 tablespoon poppy seeds to the dough
- Chocolate: Add ¼ cup cocoa powder to the dry ingredients and reduce flour by ¼ cup
- Pumpkin Spice: Replace ¼ cup milk with pumpkin puree and add 1 teaspoon pumpkin pie spice
Coating Ideas:
- Powdered sugar (classic and simple)
- Crushed graham crackers mixed with cinnamon
- Coconut flakes (toast them first for extra flavor)
- Crushed freeze-dried strawberries mixed with powdered sugar
- Everything bagel seasoning for a savory twist (skip the sugar in the dough)
Filled Donut Holes: Use a piping bag fitted with a small tip to inject jam, custard, or chocolate cream into the center of cooled donut holes. Make a small hole with a skewer first, then fill carefully.
Pro Chef Tips
Temperature Control is Your Best Friend: Invest in a good candy thermometer and watch it constantly. Professional bakers know that consistent oil temperature is the difference between mediocre and magnificent fried foods. If your oil gets too hot between batches, remove it from heat for a minute or two.
The Dough Knows Best: Don’t overmix your batter—this activates too much gluten and creates tough, chewy donut holes instead of tender, fluffy ones. Mix until just combined, and you’ll see lumps in the batter. That’s exactly what you want.
The Float Test: Your donut holes are ready to flip when they naturally float and start to show golden color on the bottom (visible when you gently lift one with your spoon). They’ll turn themselves if the oil is the right temperature and they’re cooking properly.
Double-Coating Method: For an extra-special treat, do a double coat. First coat in cinnamon sugar while warm, let them cool for 5 minutes, then dip the top half in glaze and immediately sprinkle with more cinnamon sugar or toppings before the glaze sets.
The Paper Bag Technique: Place warm donut holes in a paper bag with your cinnamon sugar, fold the top closed, and shake vigorously. This creates a more even, generous coating with less mess and waste.
Rest the Dough: If you have time, let your mixed dough rest in the refrigerator for 15-30 minutes before frying. This allows the flour to fully hydrate and creates an even better texture. Chilled dough is also easier to shape.
Season Your Oil: Add a small piece of fresh ginger or a cinnamon stick to your frying oil (remove before adding dough). This infuses subtle flavor into your donut holes that you can’t quite identify but elevates them from good to extraordinary.
Common Mistakes to Avoid
Overcrowding the Pot: Adding too many donut holes at once dramatically drops the oil temperature, resulting in greasy, oil-soaked treats that never get that beautiful golden crust. Fry in small batches of 5-6 pieces, being patient between batches.
Making Them Too Large: Bigger isn’t always better with donut holes. If you make them larger than 1 inch in diameter, the outsides will burn before the centers cook through. Keep them small and uniform for even cooking and the perfect texture ratio of crispy outside to fluffy inside.
Using Cold Ingredients: Cold eggs and milk don’t incorporate well into the batter, creating an uneven texture with pockets of flour and an inconsistent crumb. Always bring dairy and eggs to room temperature first—it only takes 20-30 minutes on the counter.
Not Testing Your Oil Temperature: Relying on visual cues alone is risky. Always use a thermometer to maintain that sweet spot between 350-375°F. You can test with a small piece of dough—it should sizzle immediately and take about 2-3 minutes to brown.
Coating Too Early or Too Late: If you drain donut holes for too long before coating, the sugar won’t stick properly. Conversely, if you coat them when they’re too hot and oily, the coating becomes a gummy mess. The perfect window is after draining on paper towels for just 10-15 seconds—still very warm but not dripping with oil.
Storage & Meal Prep
Room Temperature Storage: Donut holes are best enjoyed fresh and warm, but you can store leftovers in an airtight container at room temperature for up to 2 days. Place parchment paper between layers to prevent sticking. They’ll lose some of their crispness but will still taste delicious.
Refrigeration: While not ideal, you can refrigerate donut holes in an airtight container for up to 4 days. The cold temperature will firm them up and dry them out slightly. Bring to room temperature before eating, or warm them in a 300°F oven for 5-7 minutes to revive them.
Reheating for Best Results: The secret to making day-old donut holes taste fresh again is gentle reheating. Place them on a baking sheet and warm in a 300°F oven for 5-8 minutes. For an even better result, brush them lightly with melted butter first, then rewarm and toss in fresh cinnamon sugar after heating.
Microwave Method: In a pinch, you can microwave donut holes for 10-15 seconds. Place a cup of water in the microwave alongside them to add moisture and prevent them from becoming rubbery. They’ll soften considerably and are best eaten immediately after microwaving.
Preventing Sogginess: Never store donut holes in plastic bags or containers while they’re still warm—the trapped steam will make them soggy. Always let them cool completely first, and if possible, store them in containers with slight ventilation or parchment paper layers to absorb any moisture.
Make-Ahead & Freezer Notes
Freezing Uncoated Donut Holes: For the best make-ahead option, fry your donut holes completely and let them cool, but don’t coat them. Arrange on a baking sheet in a single layer and freeze until solid (about 2 hours), then transfer to a freezer-safe bag or container. They’ll keep for up to 3 months. When ready to serve, reheat straight from frozen in a 325°F oven for 10-12 minutes, then coat in warm cinnamon sugar.
Freezing Coated Donut Holes: You can freeze already-coated donut holes, though the coating may become slightly less crisp. Use the same flash-freezing method, then store in airtight containers with parchment between layers. Reheat from frozen at 300°F for 8-10 minutes.
Freezing the Raw Dough: While not as ideal as freezing cooked donut holes, you can freeze the shaped raw dough balls. Place them on a parchment-lined baking sheet, freeze until solid, then transfer to a freezer bag. Thaw in the refrigerator overnight before frying as directed, adding about 1 extra minute to the frying time since they’ll be colder.
Make-Ahead Dough Strategy: You can prepare the dough the night before, cover it tightly, and refrigerate overnight. Cold dough is actually easier to shape and handle. Let it sit at room temperature for 15-20 minutes before shaping and frying, though you can fry straight from the fridge if you add about 30 seconds to the cooking time.
Best Reheating from Frozen: The air fryer is excellent for reheating frozen donut holes. Set to 320°F and heat for 4-5 minutes, shaking the basket halfway through. They come out crispy on the outside and soft inside, almost like they were freshly made.
Serving Suggestions
Beverages: Donut holes pair perfectly with hot coffee, cold milk, hot chocolate, apple cider (especially in fall), chai lattes, or even a sweet dessert wine for adult gatherings. Create a coffee bar alongside your donut hole spread for a complete café experience at home.
Breakfast Board: Arrange donut holes on a large platter with fresh fruit (strawberries, blueberries, sliced peaches), yogurt dipping sauces, and various glazes in small bowls. Add some crispy bacon or breakfast sausages for a sweet-and-savory combination that’s perfect for brunch entertaining.
Dessert Bar: Set up a donut hole decorating station with multiple glaze options, sprinkles, mini chocolate chips, chopped nuts, shredded coconut, and crushed cookies. This is especially fun for birthday parties, showers, or family gatherings where guests can customize their own treats.
Ice Cream Topping: Serve warm donut holes as a topping for vanilla ice cream sundaes. The temperature contrast between hot and cold is absolutely incredible. Drizzle with chocolate or caramel sauce for an over-the-top dessert.
Casual Dipping: Offer various dipping sauces like chocolate ganache, caramel sauce, strawberry sauce, cream cheese frosting, or even Nutella. This interactive element makes eating donut holes even more fun, especially for kids.
Holiday Presentations: String donut holes on wooden skewers with fresh fruit for a festive presentation at parties. For Christmas, dust with powdered sugar for a “snowy” effect. For Valentine’s Day, use pink glaze and heart-shaped sprinkles.
Portable Packaging: Pack donut holes in small paper bags or boxes tied with ribbon for party favors, bake sale items, or gifts for neighbors and friends. They travel well for a few hours and make thoughtful homemade presents.
FAQs Section
Can I bake these donut holes instead of frying them?
Yes, you can bake them for a lighter version, though the texture will be more cake-like and less authentic. Preheat your oven to 375°F, place dough balls on a parchment-lined baking sheet, and bake for 10-12 minutes until golden. Brush with melted butter immediately after baking, then roll in cinnamon sugar. They won’t have that characteristic slight crispness on the outside but will still be delicious.
Why are my donut holes greasy?
The most common cause is oil that’s too cool. When oil temperature drops below 350°F, the donut holes absorb excess oil instead of forming a crispy outer seal. Always use a thermometer, don’t overcrowd your pot, and allow oil to return to temperature between batches. Also ensure you’re draining them properly on paper towels immediately after frying.
Can I use a different type of flour?
All-purpose flour is really best for this recipe. Bread flour has too much protein and will make them dense and chewy. Cake flour makes them too delicate and crumbly. If you need gluten-free donut holes, use a 1:1 gluten-free baking flour blend (like Bob’s Red Mill or King Arthur), and expect a slightly different texture—still delicious but not quite as fluffy.
My donut holes are raw in the middle. What did I do wrong?
This usually means either your oil was too hot (cooking the outside too quickly) or your donut holes were too large. Keep them at 1 inch in diameter maximum, maintain oil temperature between 350-375°F, and make sure they cook for the full 2-3 minutes, turning occasionally for even cooking. You can test one by breaking it open to check before removing the whole batch.
How do I know when they’re done frying?
Perfectly cooked donut holes are deep golden brown all over, float to the surface, and feel light when lifted with your slotted spoon. If you’re unsure, sacrifice one and break it open—the inside should be cooked through with no raw dough, fluffy and light, not doughy or dense. After your first batch, you’ll get a feel for the exact timing.
Can I make these dairy-free or vegan?
Absolutely! Use your favorite plant-based milk (unsweetened almond or oat milk work best), replace butter with melted coconut oil, and use flax eggs (1 tablespoon ground flaxseed mixed with 3 tablespoons water per egg, let sit 5 minutes). The texture will be slightly different but still delicious.
What’s the best oil for frying?
Use a neutral-flavored oil with a high smoke point like vegetable oil, canola oil, or peanut oil. Avoid olive oil (smoke point too low and flavor too strong) or coconut oil (solidifies and creates inconsistent temperatures). The oil should be fresh and never previously used for savory foods, as donut holes will absorb those flavors.
Conclusion
There’s nothing quite like the satisfaction of biting into a warm, freshly made donut hole that you created in your own kitchen. These little golden spheres of happiness are proof that some of the best things in life really are simple—just a handful of pantry ingredients, a bit of hot oil, and a generous coating of cinnamon sugar transform into something absolutely magical.
Whether you’re making these homemade donut holes for a special weekend breakfast, a holiday gathering, an afternoon treat with friends, or simply because you’re craving something sweet and comforting, this recipe delivers every single time. The best part? Once you master this basic technique, you can experiment with endless variations, flavors, and coatings to make them uniquely yours.
I hope this recipe brings as much joy to your kitchen as it has to mine. There’s something wonderful about sharing homemade treats with the people you love—watching their faces light up with that first warm, sugary bite is worth every minute of prep time. These donut holes prove that you don’t need to be a professional baker or have fancy equipment to create something truly special.
Now it’s your turn! Give this recipe a try this weekend and let me know how it goes. Did you stick with classic cinnamon sugar or get creative with glazes? Did your family devour them before they even had a chance to cool? I’d love to hear about your donut hole adventures!
Pin this recipe to your Pinterest boards so you can find it easily whenever a craving strikes! Don’t forget to leave a comment below sharing your results, any creative variations you tried, or questions you might have. Happy frying, and enjoy every delicious bite! 🍩✨