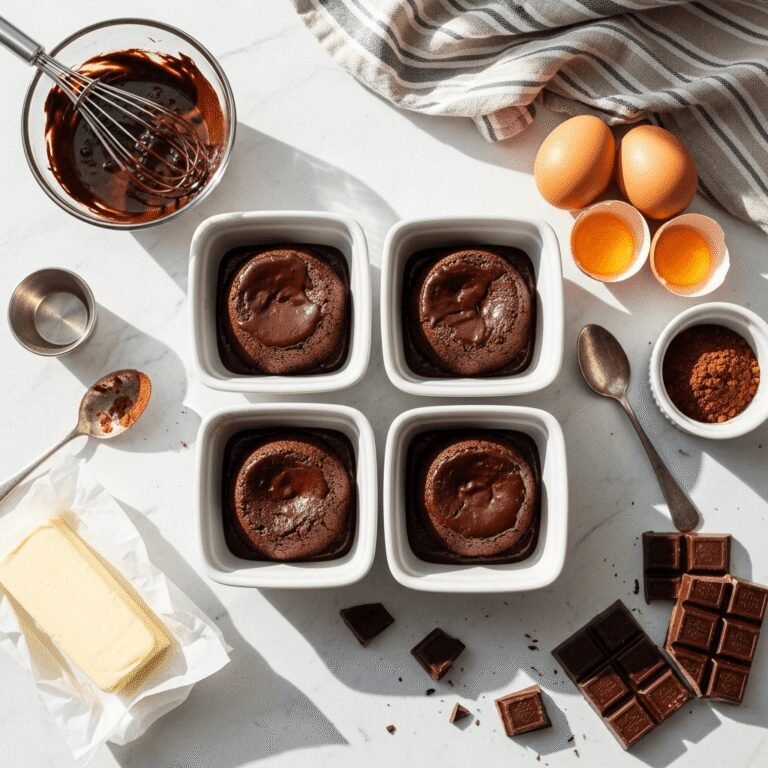
Decadent Flourless Chocolate Cake Recipe (Naturally Gluten-Free & Incredibly Rich!)
There’s something absolutely magical about a flourless chocolate cake. Rich, intensely chocolatey, and with a texture that falls somewhere between a dense brownie and a silky mousse, this gluten-free chocolate cake is pure indulgence on a plate. Whether you’re hosting a dinner party, celebrating a special occasion, or simply treating yourself to something extraordinary, this easy flourless chocolate cake delivers restaurant-quality results with minimal effort.
Unlike traditional cakes that rely on flour for structure, this flourless chocolate torte gets its incredible texture from eggs and quality chocolate alone. The result? A cake that’s naturally gluten-free, deeply satisfying, and guaranteed to impress even the most discerning chocolate lovers. With just six simple ingredients and about 45 minutes from start to finish, you’ll have a show-stopping dessert that looks like it came from a fancy bakery.
This flourless chocolate dessert is perfect for holidays, birthdays, Valentine’s Day, or any time you want to serve something truly special. It’s elegant enough for formal gatherings yet simple enough for weekend baking. Plus, since it’s naturally gluten-free, it’s an inclusive option that everyone at the table can enjoy—no one will even realize it’s missing the flour!
History / Background
The flourless chocolate cake has a fascinating culinary heritage that spans multiple continents and cultures. While its exact origin is debated among food historians, most agree that flourless chocolate cakes gained prominence in European baking, particularly in France and Austria during the 18th and 19th centuries.
The French have long been masters of chocolate desserts, and many credit French pastry chefs with perfecting the art of the flourless chocolate cake, known in France as “gâteau au chocolat.” These rich, decadent cakes were originally created in aristocratic kitchens where only the finest ingredients were used, and flour was sometimes purposely omitted to create an even more luxurious, chocolate-forward experience.
The cake also has significant ties to Jewish Passover traditions. Since leavened grains are forbidden during Passover, Jewish bakers developed flourless cakes that could be enjoyed during the holiday. These Passover chocolate cakes became beloved family recipes passed down through generations, proving that necessity truly is the mother of invention.
In the 1980s and 1990s, flourless chocolate cake experienced a renaissance in American restaurants, appearing on fine dining menus across the country. Celebrity chefs embraced this elegant dessert, and it became synonymous with upscale cuisine. Today, with the rise of gluten-free diets and gluten sensitivity awareness, flourless chocolate cake has found new relevance. It’s no longer just a special occasion dessert—it’s become a go-to recipe for home bakers who want to create something impressive that accommodates various dietary needs.
The beauty of this cake lies in its simplicity and purity of flavor. By removing flour from the equation, the chocolate becomes the undisputed star, creating a dessert that’s both sophisticated and comforting.
Why You’ll Love This Recipe
This flourless chocolate cake recipe is about to become your secret weapon for impressive entertaining. It combines simplicity with elegance in a way that few desserts can match.
Here’s why this recipe is a must-try:
- Naturally gluten-free – Perfect for guests with celiac disease or gluten sensitivity, without compromising on taste or texture
- Only 6 ingredients – No complicated ingredient list or specialty items required
- Rich and decadent – Intensely chocolatey flavor that satisfies even the most serious chocolate cravings
- Make-ahead friendly – Actually tastes better the next day, making it perfect for party planning
- Impressive presentation – Looks like a professional bakery creation with minimal decorating
- Versatile serving options – Serve it plain, dusted with powdered sugar, topped with whipped cream, or with fresh berries
- Foolproof recipe – Simple technique that even beginner bakers can master successfully
- Budget-friendly elegance – Creates a restaurant-quality dessert without breaking the bank
- Small or large gatherings – Easily serves 8-10 people, and the recipe can be doubled for larger crowds
This is the kind of recipe that makes you look like a culinary genius while requiring minimal actual effort. The dense, fudgy texture and deep chocolate flavor create a dessert experience that’s truly unforgettable.
Ingredient Notes
Understanding your ingredients is key to flourless chocolate cake success. Here’s what you’ll need and why each component matters:
High-Quality Dark Chocolate (or Semi-Sweet) – This is the star ingredient, so quality matters tremendously. Use chocolate with 60-70% cacao for the best balance of sweetness and rich chocolate flavor. Avoid chocolate chips as they contain stabilizers that prevent smooth melting. Good brands include Ghirardelli, Lindt, or Guittard. Substitution: Semi-sweet chocolate bars work beautifully if you prefer a sweeter cake.
Unsalted Butter – Provides richness, moisture, and helps create that silky texture. Unsalted butter gives you better control over the salt level in your cake. Substitution: Coconut oil can work for dairy-free versions, though it will slightly alter the flavor.
Granulated Sugar – Sweetens the cake and helps create structure when beaten with eggs. Substitution: You can use coconut sugar for a deeper, caramel-like flavor, though it will darken the cake.
Large Eggs – The eggs are crucial for structure and leavening since there’s no flour. They create the cake’s signature texture. Room temperature eggs incorporate better into the batter. Note: This recipe requires 5 large eggs—there’s no good substitution for eggs in flourless chocolate cake.
Pure Vanilla Extract – Enhances the chocolate flavor and adds depth. Always use pure vanilla, not imitation. Substitution: Vanilla bean paste or espresso powder can add complex flavor notes.
Salt – A small amount enhances all the other flavors and balances the sweetness. Note: If using salted butter, reduce added salt by half.
Equipment Needed
Having the right tools makes this recipe even easier. Here’s what you’ll need:
- 9-inch springform pan – Essential for easy removal; regular cake pans make unmolding difficult
- Parchment paper – For lining the bottom of the pan to prevent sticking
- Medium saucepan or double boiler – For gently melting chocolate and butter
- Large mixing bowl – For beating eggs and sugar
- Electric hand mixer or stand mixer – Makes beating eggs much easier (you can do it by hand, but it takes serious arm strength!)
- Rubber spatula – For folding and scraping down the bowl
- Wire cooling rack – Allows air to circulate around the cake as it cools
- Fine-mesh sieve (optional) – For dusting powdered sugar evenly over the finished cake
- Measuring cups and spoons – For accurate measurements
- Instant-read thermometer (optional) – Helps prevent overbaking
Flourless Chocolate Cake Recipe
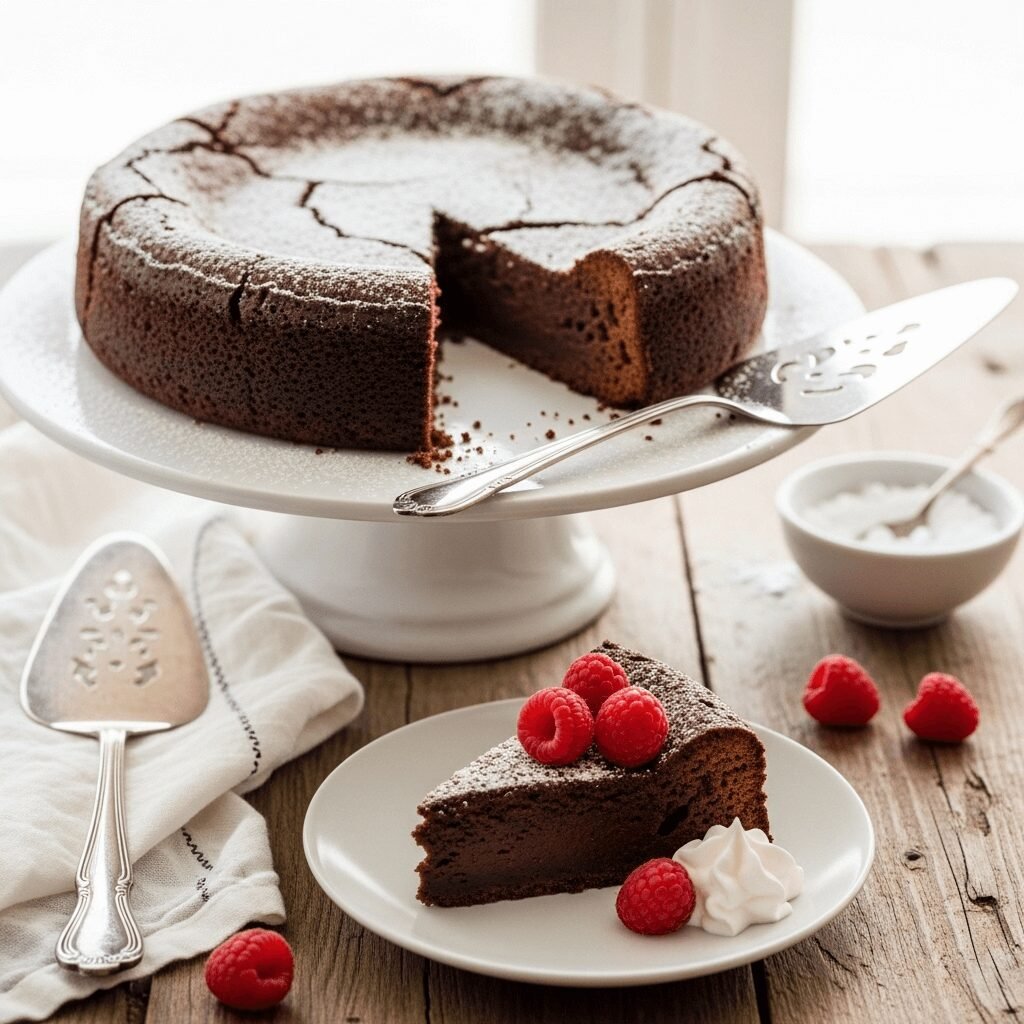
This decadent flourless chocolate cake is rich, fudgy, and naturally gluten-free. Made with just six simple ingredients, it delivers intense chocolate flavor with a silky, dense texture that melts in your mouth. Perfect for special occasions or any time you crave an elegant, impressive dessert.
- Prep Time: 15 minutes
- Cook Time: 30 minutes
- Total Time: 45 minutes
- Yield: 8-10 servings 1x
- Category: Dessert
- Method: Baking
- Cuisine: French
- Diet: Gluten Free
Ingredients
- 12 oz (340g) high-quality dark chocolate (60-70% cacao), chopped
- ¾ cup (170g) unsalted butter, cut into pieces
- 1 cup (200g) granulated sugar, divided
- 5 large eggs, room temperature, separated
- 1 teaspoon pure vanilla extract
- ¼ teaspoon salt
- Powdered sugar for dusting (optional)
- Fresh berries and whipped cream for serving (optional)
Instructions
- Preheat and prepare the pan: Preheat your oven to 350°F (175°C). Line the bottom of a 9-inch springform pan with parchment paper, then grease the sides generously with butter or cooking spray. This ensures easy release after baking.
- Melt chocolate and butter: Place chopped chocolate and butter in a medium saucepan over low heat (or use a double boiler). Stir frequently until completely melted and smooth, about 3-4 minutes. Remove from heat and let cool slightly, about 5 minutes. The mixture should be warm but not hot when you add the eggs.
- Mix egg yolks and sugar: In a large bowl, whisk together egg yolks and ½ cup of the sugar until pale and slightly thickened, about 2 minutes. Stir in vanilla extract and salt.
- Combine chocolate with yolk mixture: Slowly pour the melted chocolate mixture into the egg yolk mixture, stirring constantly until smooth and well combined. Set aside.
- Beat egg whites: In a clean, dry mixing bowl, beat egg whites with an electric mixer on medium speed until foamy, about 1 minute. Gradually add the remaining ½ cup sugar while continuing to beat. Increase speed to high and beat until stiff, glossy peaks form, about 3-4 minutes. Don’t overbeat—the whites should be stiff but not dry.
- Fold in egg whites: Gently fold about one-third of the beaten egg whites into the chocolate mixture to lighten it. Then carefully fold in the remaining egg whites in two additions, using a rubber spatula and broad, sweeping motions. Fold just until no white streaks remain—be gentle to preserve the air you’ve beaten into the whites.
- Bake the cake: Pour batter into the prepared pan and smooth the top with a spatula. Bake for 28-32 minutes, until the cake has risen slightly, the top appears set but still has a slight jiggle in the center, and a toothpick inserted 2 inches from the edge comes out with a few moist crumbs. Don’t overbake—the center should remain slightly underdone.
- Cool completely: Remove from oven and place on a wire rack. The cake will rise during baking and then fall as it cools—this is completely normal and creates the characteristic dense texture. Allow to cool completely in the pan, about 2 hours. The cake will continue to set as it cools.
- Remove from pan and serve: Once completely cool, run a thin knife around the edges of the pan, then release the springform sides. Invert the cake onto a plate, remove the pan bottom and parchment paper, then invert again onto your serving plate so the attractive top is facing up. Dust with powdered sugar just before serving. Slice with a hot, dry knife (dip in hot water and wipe clean between cuts) for the cleanest slices.
Notes
- The cake should have a slight jiggle in the center when done—it will firm up as it cools. Overbaking creates a dry, crumbly texture.
- This cake tastes even better the next day after the flavors have melded and the texture has settled.
- Store covered at room temperature for up to 2 days, or refrigerate for up to 5 days.
- For the richest flavor, use the highest quality chocolate you can afford—the chocolate is the main flavor, so quality makes a noticeable difference.
- If your egg whites won’t whip properly, make sure your bowl is completely clean and grease-free, and that no egg yolk has gotten into the whites.
Nutrition
- Serving Size: 1 slice (1/10 of cake)
- Calories: 385
- Sugar: 32g
- Sodium: 95mg
- Fat: 26g
- Saturated Fat: 15g
- Unsaturated Fat: 9g
- Trans Fat: 0g
- Carbohydrates: 36g
- Fiber: 3g
- Protein: 6g
- Cholesterol: 145mg
Tips & Variations
Make this flourless chocolate cake your own with these creative adaptations:
Chocolate Variations:
- Use Mexican chocolate with cinnamon for a spiced version
- Add 1 tablespoon espresso powder to intensify the chocolate flavor
- Swirl in ½ cup raspberry or cherry preserves before baking for a fruity twist
- Mix in 1 teaspoon orange zest for chocolate-orange flavor
Texture Modifications:
- Fold in ½ cup toasted chopped nuts (pecans, almonds, or hazelnuts) for crunch
- Add 2 tablespoons cocoa powder for an even more intense chocolate experience
- Stir in 2 tablespoons liqueur (Grand Marnier, Kahlua, or Chambord) for adult flavor
Dietary Adjustments:
- Make it dairy-free by using coconut oil instead of butter (use refined coconut oil to minimize coconut flavor)
- Reduce sugar to ¾ cup total for a less sweet, more intensely dark chocolate cake
- Use sugar alternatives like coconut sugar or monk fruit sweetener (adjust quantities according to package directions)
Presentation Ideas:
- Top with chocolate ganache for an ultra-decadent finish
- Serve with salted caramel sauce drizzled over each slice
- Add a dollop of mascarpone whipped cream and fresh raspberries
- Dust with cocoa powder instead of powdered sugar for a sophisticated look
Pro Chef Tips
Elevate your flourless chocolate cake with these professional techniques:
- Temperature matters: Always bring eggs to room temperature before starting. Cold eggs won’t incorporate as well and can cause the chocolate to seize. Place eggs in a bowl of warm (not hot) water for 10 minutes if you’re in a hurry.
- Master the chocolate melt: Never overheat chocolate or let water come in contact with it. Chocolate should be warm and fluid, not hot and grainy. If it seems too thick, stir in a tablespoon of butter to restore smoothness.
- Perfect egg white peaks: The egg whites should hold a peak that stands straight up but has a slight curl at the tip—this is the perfect stiff peak stage. Overbeaten whites become grainy and won’t fold in smoothly. If you accidentally overbeat, add one fresh egg white and beat briefly to restore texture.
- Gentle folding technique: When incorporating egg whites, use a rubber spatula and cut down through the center, sweep along the bottom, and fold up and over. Rotate the bowl a quarter turn and repeat. This preserves maximum air while ensuring even mixing.
- Don’t overbake: The single biggest mistake is overbaking flourless chocolate cake. The center should still jiggle slightly when gently shaken—it will firm up as it cools. An instant-read thermometer should read 195°F (90°C) in the center when done.
- Embrace the crack: The top of the cake will develop cracks as it cools—this is not only normal but a sign of an authentic flourless chocolate cake. The cracks add rustic charm; if you want a smooth presentation, simply dust with powdered sugar or top with ganache.
- Hot knife, clean cuts: For bakery-perfect slices, heat your knife under hot water, wipe it completely dry, then make a cut. Wipe the blade clean and reheat between each slice.
Common Mistakes to Avoid
Sidestep these pitfalls for perfect results every time:
- Using chocolate chips instead of bar chocolate: Chocolate chips contain stabilizers that prevent them from melting smoothly. Always use chopped chocolate bars for the silkiest texture.
- Skipping the parchment paper: Even in a well-greased springform pan, flourless chocolate cake can stick. Always line the bottom with parchment to guarantee easy removal.
- Adding chocolate mixture when too hot: If the melted chocolate is too hot when added to the egg yolks, it can scramble the eggs. Let it cool for 5 minutes after melting—it should feel warm to the touch, not hot.
- Deflating the egg whites: Being too aggressive when folding in egg whites destroys the air bubbles you’ve worked hard to create. Fold gently and stop as soon as the mixture is uniform—a few small streaks are better than an over-mixed, deflated batter.
- Overbaking: This is the most common error. Remember, the cake continues cooking from residual heat after you remove it from the oven. A slightly underdone center will set perfectly as it cools, while an overbaked cake will be dry and crumbly. When in doubt, underbake slightly.
Storage & Meal Prep
Keep your flourless chocolate cake fresh with proper storage:
Room Temperature Storage: Cover the cake loosely with plastic wrap or place under a cake dome and store at room temperature for up to 2 days. The cake actually tastes better at room temperature than cold, as the texture is softer and the chocolate flavor more pronounced.
Refrigerator Storage: Wrap tightly with plastic wrap or store in an airtight container in the refrigerator for up to 5 days. Bring to room temperature for 30-60 minutes before serving for the best texture and flavor. Cold cake will be firmer and denser.
Reheating Tips: While flourless chocolate cake is typically served at room temperature or chilled, you can warm individual slices in the microwave for 10-15 seconds to create a warm, molten center. Serve immediately with vanilla ice cream for a “lava cake” experience.
Extending Freshness: The high fat content from chocolate and butter means this cake stays moist for days. If it seems to be drying out slightly, brush the top lightly with simple syrup or coffee liqueur to restore moisture.
Make-Ahead & Freezer Notes
This flourless chocolate cake is an excellent make-ahead dessert for stress-free entertaining:
Make-Ahead Instructions: This cake actually improves with time! Bake the cake up to 2 days in advance, cool completely, and store covered at room temperature. The flavors deepen and meld beautifully overnight. Add powdered sugar, ganache, or other toppings just before serving to keep them fresh-looking.
Freezing the Whole Cake: Cool the cake completely, then wrap tightly in plastic wrap followed by aluminum foil, or place in a freezer-safe container. Freeze for up to 3 months. Thaw overnight in the refrigerator, still wrapped, then bring to room temperature before serving. The texture remains remarkably good after freezing.
Freezing Individual Slices: Cut the cake into slices and wrap each piece individually in plastic wrap, then place all wrapped slices in a freezer-safe container or bag. This allows you to thaw only what you need. Thaw individual slices at room temperature for 2-3 hours or in the refrigerator overnight.
Best Reheating Method: For frozen cake, always thaw in the refrigerator first (never at room temperature, which can create condensation and make the cake soggy). Once thawed, bring to room temperature for the best texture. If serving warm, reheat individual slices in the microwave for 15-20 seconds, or in a 300°F oven for 5-7 minutes.
Serving Suggestions
Transform your flourless chocolate cake into a complete dessert experience:
Classic Accompaniments:
- Lightly sweetened whipped cream or crème fraîche to balance the richness
- Fresh berries (raspberries, strawberries, or blackberries) for tartness and color
- Vanilla bean ice cream for a temperature and texture contrast
- Raspberry or cherry coulis for a bright, fruity element
Beverage Pairings:
- Hot espresso or strong coffee to complement the chocolate
- Port wine or dessert wine for an elegant dinner party
- Cold milk for a comforting, nostalgic combination
- Chambord or Frangelico liqueur drizzled over each slice
Upscale Presentations:
- Drizzle with salted caramel sauce and sprinkle with flaky sea salt
- Top with chocolate ganache and gold leaf for special occasions
- Serve with mint crème anglaise pooled on the plate
- Accompany with candied orange peel for sophisticated flavor
Casual Serving Ideas:
- Dust with powdered sugar and serve with afternoon tea
- Top with peanut butter whipped cream for a chocolate-peanut butter combo
- Serve with hot fudge sauce and vanilla ice cream for a brownie sundae vibe
- Add a dollop of Nutella and toasted hazelnuts for extra indulgence
FAQs Section
Q: Why did my flourless chocolate cake sink in the middle?
A: This is completely normal and expected! Flourless chocolate cakes always sink as they cool because they rise from beaten egg whites rather than chemical leaveners or flour structure. The center typically sinks the most, creating a slightly concave surface. This is a characteristic feature, not a flaw. Simply dust with powdered sugar or top with ganache to create a beautiful presentation.
Q: Can I use milk chocolate instead of dark chocolate?
A: While you can use milk chocolate, it will result in a much sweeter cake with less intense chocolate flavor. Milk chocolate contains more sugar and less cocoa, so the cake won’t have that deep, sophisticated chocolate taste. If you prefer a sweeter dessert, try semi-sweet chocolate (around 55-60% cacao) as a compromise between dark and milk chocolate.
Q: My cake seems too dense and fudgy—did I do something wrong?
A: Actually, that’s exactly what flourless chocolate cake should be! It’s supposed to have a dense, fudgy, brownie-like texture. If it seems too dense even for your taste, it may have been slightly overbaked (which makes it drier and denser), or the egg whites weren’t beaten to proper stiff peaks before folding. Make sure to beat whites until they hold firm peaks and fold gently to preserve air.
Q: Can I make this recipe in a regular cake pan instead of a springform?
A: It’s not recommended. Flourless chocolate cake is very delicate and can break when trying to flip it out of a regular pan. Springform pans allow you to simply release the sides and easily transfer the cake. If you absolutely must use a regular pan, line the bottom and sides with parchment paper with overhanging edges that you can use as handles to lift the cake out.
Q: Is this cake suitable for people with celiac disease?
A: Yes! This flourless chocolate cake is naturally gluten-free since it contains no flour or gluten-containing ingredients. However, if serving to someone with celiac disease, make absolutely sure your chocolate doesn’t contain any gluten-containing additives (check the label for “may contain wheat” warnings) and that you haven’t cross-contaminated with flour from other baking projects.
Q: Why do I need to separate the eggs and beat the whites separately?
A: Beating egg whites to stiff peaks incorporates air that helps the cake rise and creates a lighter (though still dense) texture. If you simply mixed whole eggs into the batter, you’d get a much heavier, more fudge-like result. The whipped whites are what give flourless chocolate cake its characteristic texture that’s denser than regular cake but lighter than solid fudge.
Q: How do I know when the cake is done baking?
A: The top should look set and slightly cracked, with just a slight jiggle in the very center when you gently shake the pan. A toothpick inserted 2 inches from the edge should come out with moist crumbs (not wet batter, but not completely clean either). The internal temperature should reach about 195°F (90°C). Remember, the cake continues to cook and set as it cools, so slight underdone is better than overbaked.
Conclusion
There you have it—everything you need to create a show-stopping flourless chocolate cake that will have everyone asking for seconds (and the recipe!). This decadent, gluten-free dessert proves that sometimes the simplest ingredients create the most extraordinary results. The pure, intense chocolate flavor combined with that perfect fudgy-yet-light texture makes this cake an unforgettable experience.
Whether you’re baking for a special celebration, need a gluten-free option for guests, or simply want to treat yourself to something truly indulgent, this flourless chocolate cake delivers every single time. The best part? It actually gets better with time, making it the perfect make-ahead dessert for stress-free entertaining.
Don’t be intimidated by the egg white folding or the inevitable sinking in the middle—these are all part of what makes this cake so special. Embrace the cracks, dust it with powdered sugar, and serve it with pride. Your guests will think you spent hours on this elegant dessert, and you can smile knowing it took you less than an hour of active work.
Ready to make this incredible flourless chocolate cake? Save this recipe to your Pinterest boards so you’ll have it whenever a chocolate craving strikes! And after you bake it (and fall in love with it), come back and leave a comment telling me how it turned out. Did you add any creative toppings? Serve it with something special? I’d love to hear about your flourless chocolate cake adventures!
Happy baking, chocolate lovers!