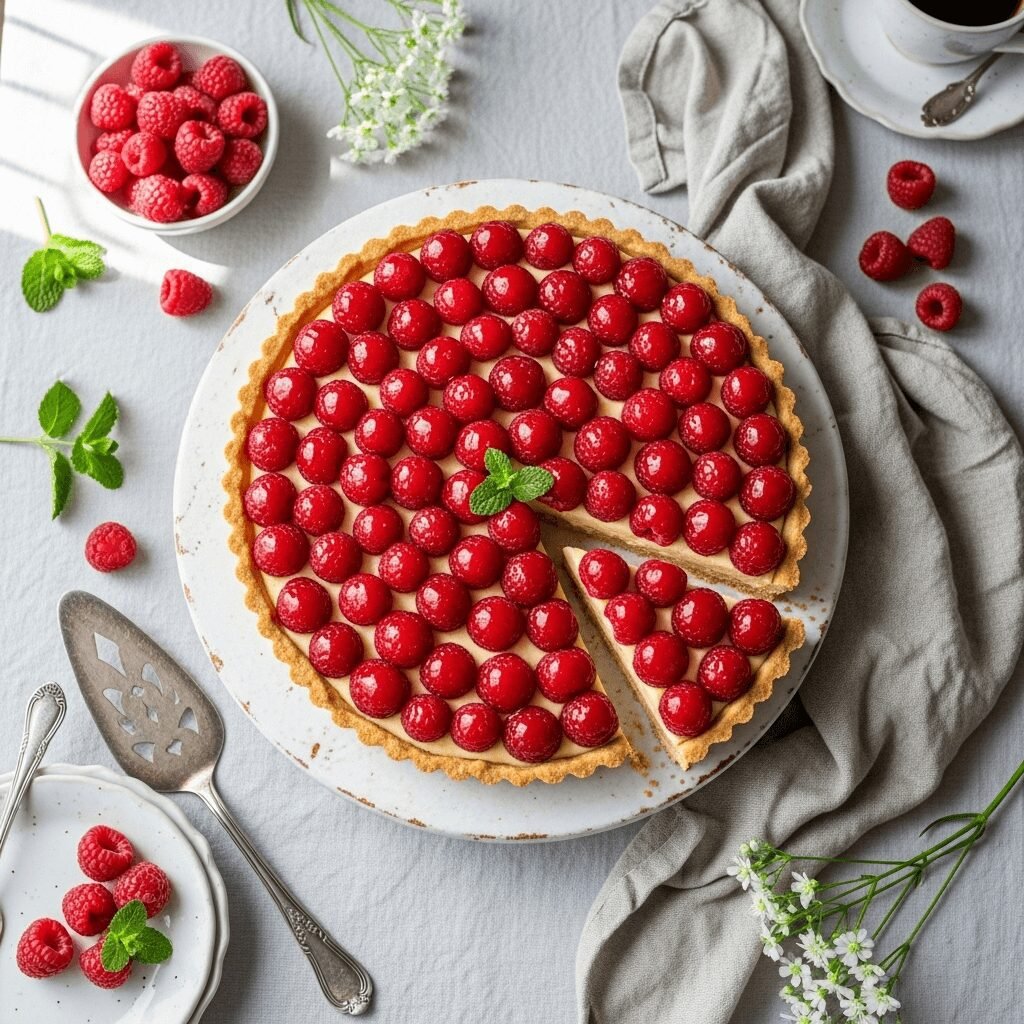
The Ultimate Fresh Raspberry Tart Recipe – Elegant, Easy & Absolutely Delicious!

There’s something utterly magical about a fresh raspberry tart – those jewel-toned berries nestled in silky pastry cream, all cradled in a buttery, crisp tart shell. This stunning dessert looks like it came straight from a Parisian patisserie window, but I promise you, it’s completely achievable in your own kitchen, even if you’ve never made a tart before.
This raspberry tart is the perfect showstopper for special occasions – think Mother’s Day brunch, summer garden parties, birthday celebrations, or even just a weekend treat when you want to feel fancy. The combination of the sweet-tart raspberries, velvety vanilla pastry cream, and that gorgeous golden crust creates a symphony of flavors and textures that’ll have everyone asking for seconds (and the recipe!).
What I love most about this dessert is that while it looks incredibly impressive, it’s actually quite forgiving to make. You can prepare components ahead of time, assemble it just before serving, and watch your guests’ faces light up when you bring this beauty to the table. Whether you’re hosting a bridal shower, celebrating a graduation, or simply want to elevate your Sunday dinner, this raspberry tart delivers elegance without the stress.
History / Background
The raspberry tart has its roots deeply planted in French pastry tradition, where fruit tarts have been a cornerstone of pâtisserie for centuries. In France, these tarts – known as “tartes aux framboises” – grace the windows of bakeries throughout the country, especially during late spring and summer when raspberries are at their peak.
The classic French fruit tart evolved from medieval Europe, where wealthy households would showcase their access to fresh fruits and expensive sugar by creating elaborate pastries. By the 17th and 18th centuries, French pastry chefs had refined the art of tart-making, developing the techniques for pâte sucrée (sweet pastry dough) and crème pâtissière (pastry cream) that we still use today.
Raspberries themselves have been cultivated in Europe since the Middle Ages, with wild varieties growing throughout the temperate regions. The connection between raspberries and fine pastry became particularly strong in the Loire Valley and Burgundy regions of France, where both the fruit and the culinary traditions flourished.
When French culinary techniques spread internationally, the raspberry tart became a symbol of refined dessert-making across Europe and eventually in America. Today, it represents the perfect marriage of rustic fruit and sophisticated pastry technique – a dessert that honors tradition while remaining accessible to home bakers everywhere.
Why You’ll Love This Recipe
This raspberry tart recipe strikes the perfect balance between elegance and approachability. I’ve tested and refined this recipe countless times to ensure it works beautifully for home bakers of all skill levels, and the results are consistently stunning.
Here’s why this recipe will become your go-to fancy dessert:
- Impressive presentation – This tart looks like a million bucks and will have everyone thinking you’re a professional pastry chef
- Make-ahead friendly – You can prepare the crust and pastry cream up to 2 days in advance, then assemble just before serving
- Perfect texture combination – Crispy, buttery crust + silky smooth pastry cream + fresh, juicy berries = dessert perfection
- Not overly sweet – The tartness of fresh raspberries balances beautifully with the sweet pastry cream
- Customizable – Use this as a base recipe and swap in your favorite berries or create mixed berry versions
- Surprisingly simple – Despite looking fancy, this uses straightforward techniques that build your confidence
- Budget-friendly elegance – Much more affordable than ordering from a bakery, and tastes even better
- Crowd-pleaser – I’ve never served this to someone who didn’t ask for the recipe
- Perfect portions – Slice into neat wedges that look beautiful on the plate
Ingredient Notes
Let me walk you through each component of this raspberry tart so you understand exactly what you’re working with and why each ingredient matters.
For the Tart Crust (Pâte Sucrée):
- All-purpose flour – Provides structure for the crust. You can substitute with a gluten-free 1:1 baking blend if needed
- Unsalted butter – Must be cold and cubed. This creates the flaky, tender texture. Always use unsalted so you can control the salt level
- Powdered sugar – Dissolves more easily than granulated sugar and creates a more tender, cookie-like crust
- Egg yolk – Acts as a binder and adds richness. The fat in the yolk makes the crust tender
- Vanilla extract – Adds aromatic sweetness. Always use pure vanilla, not imitation
- Salt – Enhances all the flavors and balances the sweetness
For the Pastry Cream:
- Whole milk – The base of the cream. Don’t use low-fat milk; you need the fat content for richness
- Granulated sugar – Sweetens the cream and helps thicken it
- Egg yolks – The primary thickening agent. They create that luxurious, silky texture
- Cornstarch – Works with the egg yolks to thicken the cream and prevent it from curdling
- Vanilla bean paste or extract – This is where you want to splurge on quality. Vanilla bean paste adds beautiful specks
- Butter – Stirred in at the end for extra richness and silky texture. Use unsalted, European-style butter if possible
- Heavy cream – Lightens the pastry cream and adds a mousse-like quality
For the Topping:
- Fresh raspberries – The star of the show! Look for firm, bright red berries without any mold or mushiness. You’ll need about 3 cups
- Apricot jam – Used for the glaze. This adds shine and a subtle sweetness. Strain it to remove any fruit chunks
- Lemon juice – Just a touch to thin the jam and add brightness
Equipment Needed
Having the right tools makes this recipe so much easier. Here’s what you’ll need:
- 9 or 9.5-inch tart pan with removable bottom – This is essential for that professional look and easy removal
- Food processor – Makes the dough come together in seconds (or use a pastry cutter and bowl)
- Rolling pin – For rolling out your tart dough evenly
- Parchment paper – For blind baking the crust
- Pie weights or dried beans – Prevents the crust from puffing up during blind baking
- Medium saucepan – For making the pastry cream
- Whisk – Essential for smooth pastry cream without lumps
- Fine-mesh strainer – Ensures your pastry cream is silky smooth
- Mixing bowls – Various sizes for different components
- Plastic wrap – For covering the pastry cream while it chills
- Offset spatula – Makes spreading the pastry cream smooth and even
- Pastry brush – For applying the apricot glaze
- Measuring cups and spoons – Baking is science, so accurate measurements matter
Raspberry Tart Recipe

This stunning fresh raspberry tart features a buttery, crisp sweet pastry crust filled with luxurious vanilla pastry cream and topped with fresh, juicy raspberries. It’s an elegant French-inspired dessert that looks impressive but is surprisingly simple to make at home.
- Prep Time: 30 minutes (plus 1 hour chilling time)
- Cook Time: 25 minutes
- Total Time: 1 hour 55 minutes
- Yield: 8-10 servings 1x
- Category: Dessert
- Method: Baking
- Cuisine: French
- Diet: Vegetarian
Ingredients
For the Sweet Tart Crust:
- 1 ½ cups (190g) all-purpose flour
- ½ cup (60g) powdered sugar
- ¼ teaspoon salt
- ½ cup (113g) cold unsalted butter, cut into small cubes
- 1 large egg yolk
- 1 teaspoon vanilla extract
- 1-2 tablespoons ice water (if needed)
For the Vanilla Pastry Cream:
- 2 cups (480ml) whole milk
- ½ cup (100g) granulated sugar, divided
- 4 large egg yolks
- 3 tablespoons cornstarch
- 2 teaspoons vanilla bean paste (or pure vanilla extract)
- 2 tablespoons unsalted butter
- ½ cup (120ml) heavy cream, cold
For the Topping:
- 3 cups (about 12 ounces) fresh raspberries
- 3 tablespoons apricot jam
- 1 teaspoon fresh lemon juice
- 1 tablespoon water
Instructions
Make the Tart Crust:
- Prepare the dough: In a food processor, pulse together flour, powdered sugar, and salt until combined. Add the cold butter cubes and pulse 10-12 times until the mixture resembles coarse crumbs with some pea-sized butter pieces remaining. Add the egg yolk and vanilla, then pulse until the dough just begins to come together. If the dough seems too dry, add ice water, 1 teaspoon at a time, pulsing between additions.
- Chill the dough: Turn the dough out onto a clean surface and gently knead it 2-3 times until it comes together into a cohesive ball. Flatten into a disc, wrap tightly in plastic wrap, and refrigerate for at least 1 hour (or up to 2 days).
- Roll out the dough: On a lightly floured surface, roll the chilled dough into an 11-12 inch circle, about ⅛-inch thick. Carefully transfer it to your tart pan by rolling it around the rolling pin, then unrolling it over the pan.
- Form the tart shell: Gently press the dough into the bottom and up the sides of the pan. Trim excess dough by rolling your rolling pin across the top of the pan. Prick the bottom all over with a fork. Freeze for 15 minutes.
- Blind bake: Preheat oven to 375°F (190°C). Line the frozen tart shell with parchment paper and fill with pie weights or dried beans. Bake for 15 minutes, then carefully remove the parchment and weights. Bake for another 10-12 minutes until the crust is golden brown. Cool completely on a wire rack.
Make the Pastry Cream:
- Heat the milk: In a medium saucepan, heat the milk and ¼ cup of the sugar over medium heat until it just begins to steam and small bubbles form around the edges. Do not let it boil.
- Prepare the egg mixture: While the milk heats, whisk together the egg yolks, remaining ¼ cup sugar, and cornstarch in a medium bowl until smooth and pale yellow.
- Temper the eggs: Slowly pour about ½ cup of the hot milk into the egg mixture while whisking constantly. This tempers the eggs so they don’t scramble. Pour this mixture back into the saucepan with the remaining milk, whisking constantly.
- Cook the cream: Cook over medium heat, whisking constantly, until the mixture thickens and comes to a boil. Let it boil for 1 minute while whisking (this cooks out the cornstarch taste). Remove from heat.
- Finish the cream: Whisk in the vanilla bean paste and butter until smooth. Strain the pastry cream through a fine-mesh strainer into a clean bowl to remove any lumps. Press plastic wrap directly onto the surface of the cream to prevent a skin from forming. Refrigerate until completely cold, at least 2 hours or overnight.
- Lighten the cream: When ready to assemble, whip the cold heavy cream to stiff peaks. Whisk the chilled pastry cream until smooth, then fold in the whipped cream until fully combined. This creates a lighter, mousse-like filling.
Assemble the Tart:
- Fill the tart: Spread the lightened pastry cream evenly into the cooled tart shell using an offset spatula. Smooth the top.
- Arrange the berries: Starting from the outer edge, arrange raspberries in concentric circles over the pastry cream, placing them close together. You can stand them on their flat ends or lay them on their sides for different looks.
- Make the glaze: In a small saucepan or microwave-safe bowl, heat the apricot jam, lemon juice, and water until melted and smooth. Strain through a fine-mesh strainer to remove any fruit chunks.
- Glaze the tart: Using a pastry brush, gently brush the warm apricot glaze over the raspberries. This adds shine and helps preserve the berries.
- Serve: Refrigerate the tart for at least 30 minutes before serving to let everything set. Remove the outer ring of the tart pan just before slicing. Serve chilled.
Notes
- The tart crust can be baked up to 2 days in advance and stored at room temperature in an airtight container.
- Pastry cream can be made up to 3 days ahead and refrigerated. Whip the cream and fold it in just before assembling.
- For the best texture and appearance, assemble the tart no more than 4-6 hours before serving.
- If raspberries aren’t available, substitute with strawberries, blackberries, blueberries, or a mixed berry combination.
- The apricot glaze is optional but highly recommended for a professional finish and added moisture.
- Always let the tart chill for at least 30 minutes after assembly so the pastry cream firms up for clean slicing.
Nutrition
- Serving Size: 1 slice (based on 10 servings)
- Calories: 385
- Sugar: 24g
- Sodium: 95mg
- Fat: 22g
- Saturated Fat: 13g
- Unsaturated Fat: 7g
- Trans Fat: 0g
- Carbohydrates: 42g
- Fiber: 3g
- Protein: 6g
- Cholesterol: 165mg
Tips & Variations
Flavor Variations:
- Lemon Raspberry Tart: Add 2 tablespoons of lemon zest to the pastry cream and use lemon curd as a base layer before adding the pastry cream
- Chocolate Raspberry Tart: Brush the baked crust with melted dark chocolate before adding the pastry cream
- Almond Cream Base: Spread a thin layer of frangipane (almond cream) in the crust before adding pastry cream for a French-style tart
- Mixed Berry: Combine raspberries with blueberries, blackberries, and sliced strawberries for a colorful presentation
- White Chocolate: Fold 3 ounces of melted and cooled white chocolate into the finished pastry cream
Dietary Modifications:
- Gluten-Free: Use a 1:1 gluten-free flour blend for the crust (may be slightly more crumbly)
- Dairy-Free: Use coconut cream for the pastry cream and vegan butter for the crust (texture will differ slightly)
- Lower Sugar: Reduce the sugar in the pastry cream to ⅓ cup; the berries provide natural sweetness
Presentation Ideas:
- Dust with powdered sugar just before serving
- Add fresh mint leaves between berry clusters
- Drizzle with white chocolate before adding berries
- Garnish with edible flowers like violas or pansies
- Create a geometric pattern with the berries instead of concentric circles
Pro Chef Tips
- Cold butter is crucial: For the flakiest crust, make sure your butter is very cold. I even freeze my cubed butter for 10 minutes before using it. Cold butter creates steam pockets during baking, resulting in that perfect tender, flaky texture.
- Don’t overwork the dough: Once the dough comes together, stop mixing. Overworking develops gluten, which makes the crust tough instead of tender. You want to see some small butter pieces – they’re your friends!
- Blind baking is non-negotiable: Always blind bake tart crusts with weights. This prevents puffing and creates a crisp bottom that won’t get soggy from the filling. The extra step is absolutely worth it.
- Temper those eggs properly: When making pastry cream, slowly add the hot milk to the eggs while whisking constantly. If you add it too quickly, you’ll get scrambled eggs instead of smooth cream. Take your time with this step.
- Strain for perfection: Always strain your pastry cream through a fine-mesh strainer. This removes any cooked egg bits or lumps and gives you that silky, luxurious texture you’re aiming for.
- Direct contact prevents skin: Press plastic wrap directly onto the surface of the pastry cream while it cools. This prevents that thick skin from forming on top, which can create lumps when you try to smooth it later.
- Assemble close to serving time: While components can be made ahead, assemble the tart no more than 6 hours before serving. The moisture from the cream can eventually soften the crust, and fresh berries release juice over time.
- Choose berries wisely: Select the freshest, firmest raspberries you can find. Avoid any containers with mold or crushed berries. Pat them dry gently if they’re wet before arranging on the tart.
Common Mistakes to Avoid
Mistake #1: Skipping the chilling time for the dough
If you skip chilling the dough, it will shrink dramatically during baking and may not hold its shape. The chilling time allows the gluten to relax and the butter to firm up. Be patient – it’s worth the wait!
Mistake #2: Boiling the pastry cream too vigorously
While you do need to bring the pastry cream to a boil, don’t let it bubble violently. Gentle boiling while whisking constantly is key. Too much heat can cause the eggs to curdle or the mixture to develop lumps.
Mistake #3: Using warm pastry cream to assemble
Never fill your tart with warm or room-temperature pastry cream. It needs to be completely chilled and thickened, or it will run out when you slice the tart. Patience here ensures clean, beautiful slices.
Mistake #4: Overhandling the berries
Raspberries are delicate! Handle them gently and minimally. Don’t wash them unless absolutely necessary (it makes them mushy). If you must rinse them, do so very gently and pat them completely dry.
Mistake #5: Forgetting to remove the tart pan sides before slicing
Always remove the outer ring of the tart pan before you start slicing. If you try to slice with the ring still on, you’ll have a mess. Gently push up from the bottom while supporting the tart, and the ring will release cleanly.
Storage & Meal Prep
Storing Assembled Tart:
Once assembled, this raspberry tart should be refrigerated and consumed within 24 hours for the best texture and flavor. Cover it loosely with plastic wrap, being careful not to touch the berries. The crust will gradually soften as it sits, and the berries will release juice, so it’s truly best eaten the same day.
Storing Components Separately:
This is where the magic of make-ahead baking happens! Store the baked and cooled tart shell at room temperature in an airtight container for up to 2 days. Store the pastry cream (before folding in whipped cream) in the refrigerator with plastic wrap pressed directly on the surface for up to 3 days. The raspberries should be stored unwashed in the refrigerator in their original container.
Room Temperature:
The assembled tart can sit at room temperature for up to 2 hours if you’re serving it at a party or dinner. After that, it should return to the refrigerator to prevent the dairy-based pastry cream from spoiling.
Reheating:
This tart is served cold, so no reheating is necessary. In fact, never heat this tart – it would melt the pastry cream and make the berries mushy. Always serve it chilled for the best experience.
Make-Ahead & Freezer Notes
Make-Ahead Timeline:
This is an excellent make-ahead dessert when you break it into components:
- 2-3 days before: Make and bake the tart crust, cool completely, and store at room temperature
- 2-3 days before: Make the pastry cream (without folding in the whipped cream), refrigerate
- Morning of serving: Whip the cream, fold into pastry cream, and assemble the tart
- 2-6 hours before serving: Add the raspberries and glaze
Freezing the Tart Shell:
The unbaked tart dough can be frozen for up to 3 months. Wrap the disc tightly in plastic wrap, then aluminum foil, and freeze. Thaw overnight in the refrigerator before rolling out. You can also freeze the baked tart shell (without filling) for up to 1 month. Wrap it carefully to prevent breakage. Thaw at room temperature for 1 hour before filling.
Freezing Pastry Cream:
While technically possible, I don’t recommend freezing pastry cream. The texture changes significantly upon thawing, often becoming grainy or separated. If you must freeze it, freeze it without the whipped cream folded in, and expect to whisk it vigorously after thawing to restore smoothness.
Freezing Assembled Tart:
Unfortunately, this assembled tart doesn’t freeze well. The fresh berries become mushy and watery when thawed, and the pastry cream can separate. If you need a frozen dessert, consider making the components, freezing them separately, and assembling fresh when needed.
Best Reheating Method:
As mentioned, this tart is never reheated – it’s always served chilled. Remove it from the refrigerator about 10-15 minutes before serving if you prefer it slightly less cold, but never let it sit at room temperature for more than 2 hours.
Serving Suggestions
This elegant raspberry tart is versatile enough to shine in many different settings. Here are my favorite ways to serve it:
Perfect Pairings:
- Hot beverages: Serve alongside espresso, cappuccino, French press coffee, or Earl Grey tea for a classic French café experience
- Dessert wines: Pair with a sweet Moscato d’Asti, late-harvest Riesling, or Champagne for a sophisticated finish to dinner
- Whipped cream: A dollop of lightly sweetened whipped cream on the side never hurts
- Vanilla ice cream: A scoop of premium vanilla bean ice cream creates a beautiful contrast of temperatures
- Fresh berries: Serve extra fresh berries on the side for those who can’t get enough
Occasion Ideas:
- Brunch: This tart is stunning on a brunch table alongside quiche, fresh fruit, and mimosas
- Afternoon tea: Slice into smaller wedges for an elegant tea party dessert
- Dinner parties: End a sophisticated dinner with individual slices plated with a mint sprig
- Bridal or baby showers: The beautiful presentation makes it perfect for celebrations
- Holiday dessert table: Add this to your Thanksgiving, Christmas, or Easter dessert spread
Plating Suggestions:
For restaurant-style presentation, place a slice on a white plate, add a small quenelle of whipped cream, dust with powdered sugar, and garnish with a fresh mint leaf and a few extra raspberries. A drizzle of raspberry coulis on the plate adds extra flair.
FAQs Section
Q: Can I use frozen raspberries instead of fresh?
A: I don’t recommend using frozen raspberries for the topping because they release too much liquid when thawed, making the tart soggy and the presentation messy. However, you can fold frozen (thawed and well-drained) raspberries into the pastry cream for a raspberry-flavored cream filling, then top with fresh berries.
Q: Why did my tart crust shrink during baking?
A: Crust shrinkage happens when the dough wasn’t chilled long enough, was overworked (developing too much gluten), or was stretched when placed in the pan rather than gently pressed. Always chill the dough for at least an hour, handle it minimally, and drape it gently into the pan without stretching. Freezing the shaped crust for 15 minutes before blind baking also helps prevent shrinking.
Q: My pastry cream has lumps – can I fix it?
A: Yes! Immediately strain the lumpy pastry cream through a fine-mesh strainer while it’s still warm, pressing it through with a spatula or the back of a spoon. This will remove any cooked egg bits or cornstarch lumps. If the cream has already cooled, try blending it in a regular blender or with an immersion blender until smooth, then strain.
Q: How far in advance can I assemble this tart?
A: For the best texture and appearance, assemble the tart no more than 4-6 hours before serving. The crust and pastry cream can be made 2-3 days ahead and stored separately. Assemble it the morning of your event if serving that evening, or assemble it 2-4 hours before an afternoon event.
Q: Can I make mini tarts instead of one large tart?
A: Absolutely! This recipe works beautifully in 4-inch tartlet pans. You’ll get about 6-8 mini tarts depending on the size. Reduce the blind-baking time to about 12-15 minutes total. Mini tarts are perfect for individual servings at parties and make portion control easier.
Q: What can I substitute for the apricot jam in the glaze?
A: You can use seedless raspberry jam, strawberry jam, or even apple jelly for the glaze. The key is to strain it so it’s smooth and glossy. Red currant jelly is traditional in French baking and works beautifully. In a pinch, you can skip the glaze entirely, though it does add a lovely shine and helps preserve the berries.
Q: My pastry cream is too thick/too thin – what went wrong?
A: If it’s too thick, you may have overcooked it or used too much cornstarch. Whisk in a little cold milk or cream to loosen it. If it’s too thin, you likely didn’t cook it long enough. Return it to the heat and cook, whisking constantly, until it thickens and bubbles. The cream should coat the back of a spoon and hold its shape when cool.
Conclusion
There you have it – your complete guide to creating a stunning, bakery-worthy raspberry tart right in your own kitchen! I know it might seem like a lot of steps, but I promise that once you make this tart, you’ll realize how manageable it truly is. The key is breaking it down into components and tackling them one at a time.
This raspberry tart has become one of my absolute favorite desserts to make for special occasions because it never fails to impress. The look on people’s faces when you present this gorgeous tart is priceless – they think you’ve been slaving in the kitchen for hours, but you know the secret: it’s just smart prep work and simple techniques.
I’d love to hear how your raspberry tart turns out! Did you make any fun variations? Are you serving it for a special occasion? Drop a comment below with your experience, and don’t forget to rate this recipe if you try it. Your feedback helps other home bakers feel confident trying new recipes.
And here’s the most important part: Pin this recipe to your Pinterest boards! Save it to your “Desserts to Try,” “French Pastries,” “Special Occasion Recipes,” or “Elegant Entertaining” boards so you can find it easily when you’re ready to impress your guests. Trust me, you’ll want to have this recipe bookmarked for every celebration that comes your way.
Happy baking, friends! Here’s to creating beautiful, delicious moments in your kitchen. 🥧💕