The Ultimate Tiramisu Cake Recipe – A Dreamy Italian-Inspired Dessert
If you’ve ever dreamed of transforming the beloved Italian classic tiramisu into a show-stopping layer cake, this Tiramisu Cake recipe is about to become your new obsession. This dessert combines everything we love about traditional tiramisu—rich mascarpone cream, coffee-soaked layers, and a dusting of cocoa—but reimagines it as an elegant, sliceable cake that’s perfect for celebrations, dinner parties, or those moments when you want to treat yourself to something truly special.
Unlike the traditional tiramisu served in a dish, this cake version features tender vanilla sponge layers brushed with espresso syrup and filled with luscious mascarpone frosting. It’s sophisticated enough for a wedding reception yet approachable enough for a Sunday family dinner. Whether you’re celebrating a birthday, hosting a holiday gathering, or simply want to impress your coffee-loving friends, this tiramisu cake delivers on flavor, texture, and visual appeal. The best part? While it looks like it came from an upscale Italian bakery, you can absolutely make it at home with ingredients you can find at your local grocery store.
History / Background
Tiramisu, which translates to “pick me up” or “lift me up” in Italian, has a fascinating history that’s almost as rich as the dessert itself. While the exact origins are debated among food historians, most agree that tiramisu was created in the Veneto region of Italy, specifically in the city of Treviso, sometime in the 1960s or 1970s. The most popular story credits Roberto Linguanotto, a pastry chef at the restaurant Le Beccherie, with inventing this now-iconic dessert.
The original tiramisu was a simple but ingenious combination: ladyfinger cookies (savoiardi) soaked in strong espresso and layered with a mixture of mascarpone cheese, eggs, and sugar, then dusted with cocoa powder. It was designed to be a pick-me-up dessert—the caffeine from the coffee and the sugar providing an energy boost, hence the name. The dessert quickly gained popularity throughout Italy and eventually spread worldwide, becoming one of the most recognizable Italian desserts globally.
The evolution from traditional tiramisu to tiramisu cake happened as creative bakers around the world began experimenting with the flavors and format. American and European pastry chefs started replacing the ladyfingers with sponge cake layers, making the dessert more suitable for celebrations and easier to slice and serve at gatherings. This cake adaptation maintains all the essential flavors—coffee, mascarpone, cocoa—while adding structure and visual drama that makes it perfect for special occasions.
Today, tiramisu cake has become a staple in bakeries and home kitchens alike, bridging the gap between rustic Italian tradition and modern celebration cakes. It honors the original while offering a new way to experience those beloved flavors in a format that’s easier to serve to a crowd.
Why You’ll Love This Recipe
This tiramisu cake recipe strikes the perfect balance between impressive presentation and manageable home baking. While it might look like something you’d order at a fancy restaurant, the techniques are straightforward and the results are consistently stunning.
Here’s why this recipe will become your go-to celebration cake:
- Authentic Italian flavors – Real espresso, genuine mascarpone cheese, and quality cocoa create the classic tiramisu taste everyone loves
- Make-ahead friendly – Actually tastes better when made a day in advance, making party prep stress-free
- Crowd-pleasing appeal – Coffee lovers and dessert enthusiasts alike will ask for seconds
- Impressive but doable – Looks professionally made but uses straightforward baking techniques
- Perfectly balanced sweetness – Not overly sweet like many American cakes; the coffee and cocoa balance the richness
- Customizable intensity – Adjust the espresso strength to suit your taste preferences
- No raw eggs – Unlike traditional tiramisu, this recipe uses a cooked custard base for safety
- Stable frosting – The mascarpone cream holds up beautifully even at room temperature for several hours
This cake is special enough for milestone birthdays, elegant enough for bridal showers, yet comforting enough for a simple weekend celebration. It’s the kind of dessert that makes people lean back in their chairs, close their eyes, and say “wow” after the first bite.
Ingredient Notes
Understanding your ingredients makes all the difference in achieving that authentic tiramisu flavor and perfect texture. Here’s what you need to know:
Mascarpone Cheese – This is the star of the show and non-negotiable for authentic flavor. Mascarpone is an Italian cream cheese that’s smoother, sweeter, and less tangy than American cream cheese. It creates that signature silky, rich filling. You’ll find it in the specialty cheese section of most grocery stores. Don’t substitute regular cream cheese as it will be too tangy and the texture won’t be right. If you absolutely must substitute, use full-fat cream cheese beaten with heavy cream, but know the flavor will differ.
Espresso or Strong Coffee – This provides the essential coffee flavor that defines tiramisu. Use freshly brewed espresso if possible, or very strong coffee. Instant espresso powder dissolved in hot water works perfectly too. The coffee should be strong enough that you can taste it prominently—this isn’t the time for weak breakfast coffee. You’ll need it cooled to room temperature before using.
Heavy Whipping Cream – This gets whipped and folded into the mascarpone mixture, creating that light, mousse-like texture. Must be cold and full-fat for proper whipping. Don’t use half-and-half or light cream.
All-Purpose Flour – Standard all-purpose flour works perfectly for the cake layers. If using cake flour, your layers will be even more tender, but all-purpose is completely fine.
Eggs – You’ll need eggs for both the cake and the custard-based frosting. Use large eggs at room temperature for the cake batter (they incorporate more easily). For the custard, cold eggs are fine since you’ll be heating them anyway.
Granulated Sugar – Used in both the cake and the frosting. Regular white sugar is what you want here—don’t substitute with coconut sugar or brown sugar as they’ll alter the flavor.
Cocoa Powder – Use unsweetened Dutch-process cocoa for dusting. It has a smoother, less acidic flavor than natural cocoa and that classic dark color you see on traditional tiramisu.
Coffee Liqueur (Optional) – Kahlúa or Marsala wine adds depth and authenticity. If you prefer non-alcoholic, skip it or use coffee extract for more coffee flavor. The alcohol does cook off somewhat when brushed on the warm cake layers.
Vanilla Extract – Pure vanilla extract enhances all the other flavors. Don’t skip it even though tiramisu is primarily about coffee—vanilla rounds everything out.
Salt – A small amount in both the cake and frosting balances the sweetness and enhances flavors.
Butter – Unsalted butter for the cake layers, at room temperature for easy creaming.
Equipment Needed
Having the right tools makes this recipe significantly easier. Here’s what you’ll need:
- Three 8-inch or 9-inch round cake pans – For even, professional-looking layers
- Electric mixer (stand or hand) – Essential for whipping cream and making frosting
- Mixing bowls (multiple sizes) – For separating your wet and dry ingredients
- Rubber spatula – For folding and spreading
- Wire cooling racks – For cooling cake layers evenly
- Offset spatula – Makes frosting and smoothing the cake much easier
- Pastry brush – For brushing the espresso syrup onto cake layers
- Medium saucepan – For making the custard base
- Whisk – For the custard and mixing dry ingredients
- Measuring cups and spoons – For accurate measurements
- Parchment paper – Line your cake pans for easy release
- Fine-mesh sieve – For dusting cocoa powder evenly
- Cake turntable (optional but helpful) – Makes frosting so much easier
- Serrated knife – For leveling cake layers if needed
Tiramisu Cake Recipe

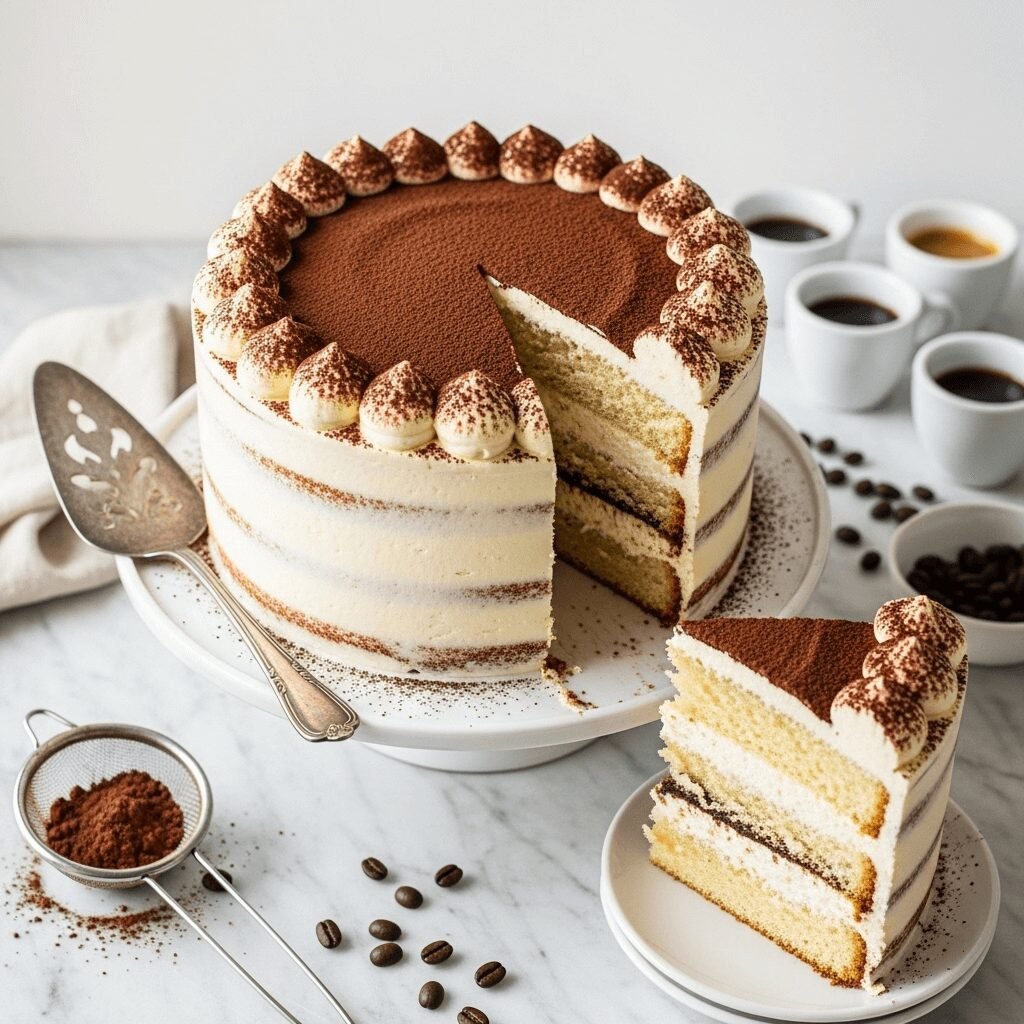
This stunning Tiramisu Cake features light vanilla sponge layers soaked in espresso syrup and filled with dreamy mascarpone frosting. It’s the perfect showstopper dessert that combines the beloved flavors of traditional Italian tiramisu in an elegant layer cake format. Make it ahead for stress-free entertaining!
- Prep Time: 45 minutes
- Cook Time: 25 minutes
- Total Time: 4 hours 10 minutes
- Yield: 12-14 servings 1x
- Category: Dessert
- Method: Baking
- Cuisine: American
- Diet: Vegetarian
Ingredients
For the Cake Layers:
- 2¾ cups all-purpose flour
- 2½ teaspoons baking powder
- ½ teaspoon salt
- 1 cup unsalted butter, room temperature
- 2 cups granulated sugar
- 4 large eggs, room temperature
- 1 tablespoon pure vanilla extract
- 1 cup whole milk, room temperature
For the Espresso Soak:
- 1½ cups strong brewed espresso or coffee, cooled
- ¼ cup granulated sugar
- ¼ cup coffee liqueur (Kahlúa) or 2 tablespoons coffee extract (optional)
For the Mascarpone Frosting:
- 6 large egg yolks
- ¾ cup granulated sugar
- ⅓ cup whole milk
- 16 ounces mascarpone cheese, room temperature
- 2 cups cold heavy whipping cream
- 2 teaspoons vanilla extract
- Pinch of salt
For Assembly:
- ¼ cup unsweetened cocoa powder (for dusting)
- Dark chocolate shavings (optional, for garnish)
Instructions
Make the Cake Layers:
- Prep your pans: Preheat oven to 350°F (175°C). Grease three 8-inch or 9-inch round cake pans with butter or cooking spray, line bottoms with parchment paper circles, then grease the parchment. Lightly dust with flour, tapping out excess.
- Mix dry ingredients: In a medium bowl, whisk together flour, baking powder, and salt. Set aside.
- Cream butter and sugar: In a large bowl using an electric mixer on medium-high speed, beat butter and sugar together for 4-5 minutes until light, fluffy, and pale in color. This step is crucial for a tender cake—don’t rush it!
- Add eggs: Add eggs one at a time, beating well after each addition. Mix in vanilla extract.
- Alternate wet and dry: With mixer on low speed, add flour mixture in three additions, alternating with milk in two additions, beginning and ending with flour. Mix each addition just until combined. Don’t overmix or your cake will be tough.
- Bake: Divide batter evenly among prepared pans (use a kitchen scale for precision if you have one). Smooth tops with a spatula. Bake for 23-27 minutes, until a toothpick inserted in the center comes out clean and cake springs back when gently pressed. The tops should be lightly golden.
- Cool: Let cakes cool in pans for 10 minutes, then turn out onto wire racks. Remove parchment and let cool completely before assembling (about 1 hour).
Make the Espresso Soak:
- Combine ingredients: While cakes cool, stir together cooled espresso, sugar, and coffee liqueur (if using) until sugar dissolves. Set aside.
Make the Mascarpone Frosting:
- Cook the custard base: In a medium saucepan, whisk together egg yolks, sugar, and milk. Cook over medium-low heat, stirring constantly with a whisk or wooden spoon, for 8-10 minutes until mixture thickens enough to coat the back of a spoon (should reach about 160°F on a thermometer). Don’t let it boil or the eggs will scramble.
- Cool the custard: Remove from heat and let cool to room temperature, stirring occasionally. You can speed this up by placing the pan in a bowl of ice water. Once cooled, transfer to a bowl, cover with plastic wrap pressed directly on the surface, and refrigerate until completely chilled (at least 1 hour).
- Beat the mascarpone: In a large bowl, beat mascarpone cheese with an electric mixer on medium speed for 1-2 minutes until smooth and creamy. Add the chilled custard mixture and beat until combined and smooth.
- Whip the cream: In a separate large, cold bowl, beat heavy cream, vanilla, and salt on medium-high speed until stiff peaks form. Be careful not to overbeat.
- Fold together: Gently fold the whipped cream into the mascarpone mixture in three additions, using a rubber spatula and a folding motion. Fold just until no white streaks remain—don’t overmix or you’ll deflate the frosting.
Assemble the Cake:
- Prep for assembly: Place your first cake layer on a serving plate or cake stand. If domed on top, use a serrated knife to level it.
- First layer: Brush the top generously with espresso soak (about ⅓ of the mixture). Let it soak in for a minute. Spread about 1 cup of mascarpone frosting evenly over the soaked layer, leaving a small border at the edges.
- Second layer: Place second cake layer on top, brush with another ⅓ of espresso soak, then spread with another cup of frosting.
- Third layer: Top with final cake layer (place it bottom-side up for a flat top surface). Brush with remaining espresso soak.
- Crumb coat: Spread a very thin layer of frosting over the entire cake (top and sides) to seal in crumbs. This is your crumb coat. Refrigerate for 30 minutes to set.
- Final frosting: Remove from fridge and spread remaining frosting over top and sides of cake, smoothing with an offset spatula. You can make it perfectly smooth or create rustic swirls—both look beautiful.
- Finish: Just before serving, dust the top generously with cocoa powder using a fine-mesh sieve. Add chocolate shavings if desired.
- Chill and serve: Refrigerate cake for at least 2 hours before serving, or ideally overnight. The flavors meld and improve with time. Let sit at room temperature for 15-20 minutes before slicing for the best texture.
Notes
- Make-ahead essential: This cake actually tastes better when made a day ahead! The espresso soaks into the layers and the flavors meld beautifully. Just wait to dust with cocoa until right before serving.
- Espresso strength: Don’t be shy with the coffee—it should be strong and pronounced. Weak coffee will result in a bland cake.
- Room temperature ingredients: This matters! Room temp butter, eggs, and milk create a smoother batter and better texture.
- Mascarpone quality: Invest in good-quality mascarpone. The cheap stuff can be grainy and won’t whip as nicely.
- Frosting consistency: If your mascarpone frosting seems too soft, refrigerate for 15-20 minutes before frosting the cake. If too stiff, let it sit at room temperature briefly.
- Alcohol-free option: Skip the coffee liqueur or replace with 2 tablespoons coffee extract in the espresso soak.
- Storage: Keep refrigerated, covered, for up to 4 days. The cake holds up beautifully and actually improves over the first 24-48 hours.
Nutrition
- Serving Size: 1 slice (⅛ of cake)
- Calories: 620
- Sugar: 45g
- Sodium: 180mg
- Fat: 38g
- Saturated Fat: 23g
- Unsaturated Fat: 13g
- Trans Fat: 0g
- Carbohydrates: 58g
- Fiber: 1g
- Protein: 9g
- Cholesterol: 245mg
Nutrition information is approximate and based on 12 servings. Values will vary based on specific ingredients used.
Tips & Variations
Flavor Variations:
- Chocolate Tiramisu Cake: Replace ½ cup of flour with Dutch-process cocoa powder for chocolate cake layers
- Amaretto Tiramisu: Use amaretto liqueur instead of coffee liqueur for an almond twist
- Mocha Tiramisu: Add 2 tablespoons cocoa powder to the espresso soak for extra chocolate flavor
- Hazelnut Tiramisu: Fold ½ cup ground toasted hazelnuts into the frosting and garnish with whole toasted hazelnuts
Texture Adjustments:
- Extra-moist layers: Increase the espresso soak by half and really saturate those layers
- Lighter frosting: Use 3 cups whipped cream instead of 2 for an even fluffier filling
- Denser cake: Use cake flour instead of all-purpose for an extra-tender crumb
Dietary Modifications:
- Reduced sugar: Cut the sugar in the cake by ¼ cup and the frosting by 2 tablespoons (though it will be noticeably less sweet)
- Alcohol-free: Simply omit the coffee liqueur or substitute with more espresso and a teaspoon of coffee extract
Presentation Ideas:
- Individual portions: Make in ramekins or small jars for single-serve tiramisu cakes
- Naked cake style: Skip the outside frosting and leave the layers exposed for a rustic look
- Chocolate drip: Add a dark chocolate ganache drip around the edges before dusting with cocoa
- Coffee bean garnish: Top with chocolate-covered espresso beans for extra flair
Pro Chef Tips
Temperature control is everything: The biggest mistake home bakers make is not paying attention to ingredient temperatures. Room temperature butter creams better, room temperature eggs incorporate without curdling, and room temperature mascarpone whips smoothly. Plan ahead and set everything out 1-2 hours before baking.
Don’t over-soak, but don’t under-soak either: Your cake layers should be moist but not soggy. Brush the espresso mixture on in stages—add some, let it soak in for 30 seconds, then add more. The cake should feel springy but decidedly damp to the touch. If you can squeeze liquid out, you’ve gone too far.
The custard step is non-negotiable: Yes, you could skip the cooked custard base and just beat mascarpone with cream, but the custard adds stability, richness, and helps the frosting hold up at room temperature. It’s also safer than using raw eggs like traditional tiramisu. The extra 10 minutes of cooking is absolutely worth it.
Fold, don’t stir: When combining the whipped cream with the mascarpone mixture, use a folding motion—cutting down through the center, then sweeping along the bottom and up the sides. Stirring will deflate all those beautiful air bubbles you worked hard to create, resulting in a dense frosting.
Chill between steps: If your kitchen is warm, pop that frosting in the fridge for 15 minutes partway through assembly. This prevents it from getting too soft and sliding off the cake. You want it to be spreadable but hold its shape.
Use a turntable: This simple tool makes frosting a layer cake SO much easier. You can improvise with a lazy Susan or upside-down bowl, but the ability to spin the cake while keeping your spatula still creates a much smoother finish.
The overnight rest makes magic happen: I cannot stress this enough—tiramisu cake tastes exponentially better after 24 hours in the fridge. The flavors meld, the espresso penetrates the layers more deeply, and the whole thing comes together in a way that just doesn’t happen fresh. If you’re short on time, at least give it 4-6 hours, but overnight is ideal.
Common Mistakes to Avoid
Using American cream cheese instead of mascarpone: This is the number one mistake people make. Regular cream cheese is tangier, denser, and has a different fat content. Your frosting will taste more like cream cheese frosting than authentic tiramisu. Mascarpone might cost a few dollars more, but it’s essential for the right flavor and texture. No substitutions here!
Overbeating the frosting: Once you fold the whipped cream into the mascarpone, be gentle. Overmixing deflates the air bubbles and turns your light, fluffy frosting into a dense, buttery mess. Stop as soon as no white streaks remain. It’s better to undermix slightly than overmix.
Weak coffee: Your espresso soak should taste strong—like espresso, not like your morning cup of coffee with cream and sugar. If you taste it and think “this is too strong,” it’s probably just right. Weak coffee results in a cake that’s vaguely coffee-flavored instead of boldly coffee-forward like tiramisu should be.
Not leveling your cake layers: If your layers domed while baking (which is normal), take 30 seconds to level them with a serrated knife before assembly. Domed layers create unstable cakes that lean, tip, or have frosting sliding off. A flat surface gives you clean lines and professional results.
Dusting with cocoa too early: Cocoa powder absorbs moisture from the frosting and can look splotchy or dark if added too far in advance. Dust with cocoa just before serving—literally right before you bring it to the table or take photos. This keeps it looking fresh and beautiful.
Skipping the crumb coat: That first thin layer of frosting might seem like extra work, but it seals in all those crumbs so your final frosting layer is pristine and smooth. Skip this step and you’ll have a cake with visible crumbs in the frosting—still delicious, but not as pretty.
Serving too cold: Cake straight from the fridge is firm and the flavors are muted. Let your tiramisu cake sit at room temperature for 15-20 minutes before serving. This softens the frosting slightly, makes slicing easier, and allows all those beautiful flavors to come forward.
Storage & Meal Prep
Short-term storage: This cake must be stored in the refrigerator due to the mascarpone and whipped cream in the frosting. Cover it loosely with plastic wrap or place in a cake carrier. It will stay fresh for 4-5 days, though the texture is best within the first three days.
The cocoa powder caveat: If you’ve already dusted the top with cocoa, it will darken and look less appetizing after a day or two in the fridge. Store the cake without the cocoa dusting and add it fresh right before serving each time.
Leftover slices: Wrap individual slices in plastic wrap and store in an airtight container in the fridge. This is actually great because tiramisu cake makes an excellent breakfast treat (don’t judge—there’s coffee in it!). Slices keep for 4-5 days.
Room temperature serving: As mentioned, let the cake (or your slice) sit out for 15-20 minutes before eating. The frosting softens, the flavors bloom, and the texture is just better. Straight from the fridge, it’s too firm and cold.
Transporting: If you need to bring this to a party, transport it in a rigid cake carrier and keep it cool. It’s fairly stable at room temperature for 2-3 hours if your party isn’t in a hot environment, but don’t leave it out longer than that. The mascarpone and whipped cream can soften too much and lose their structure.
Make-Ahead & Freezer Notes
The perfect make-ahead dessert: This is one of those magical recipes that actually improves when made in advance. Bake the cake layers, make the frosting, and assemble the whole thing 1-2 days before you need it. Just wait to dust with cocoa until serving time. The espresso really penetrates the layers during that time, and the flavors develop beautifully.
Component make-ahead: You can also break this into stages:
- Cake layers: Bake up to 2 days ahead, wrap tightly in plastic wrap, and store at room temperature
- Frosting: Make up to 1 day ahead and refrigerate in an airtight container; let come to room temperature and re-whip briefly before using
- Espresso soak: Make up to 3 days ahead and refrigerate; bring to room temperature before using
Freezing the assembled cake: I don’t recommend freezing the fully assembled cake. The whipped cream frosting doesn’t freeze and thaw well—it can become watery or separated. However, if you must freeze it, do so without the cocoa dusting, freeze solid unwrapped first, then wrap very tightly in plastic wrap and aluminum foil. Thaw overnight in the refrigerator. The texture won’t be quite as good as fresh.
Freezing components: The unfrosted cake layers freeze beautifully! Wrap each cooled layer tightly in plastic wrap, then aluminum foil, and freeze for up to 3 months. Thaw wrapped at room temperature for 2-3 hours before assembling. This is perfect if you want to break up the work or if you find mascarpone on sale and want to stock up on cake layers.
Freezing the frosting: While you technically can freeze the mascarpone frosting, I don’t recommend it. The texture changes and can become grainy when thawed. If you do freeze it, thaw overnight in the fridge, let come to room temperature, then re-whip on medium speed for 1-2 minutes to restore some of the texture.
Best reheating method: This is a cold dessert, so there’s no reheating! In fact, never warm tiramisu cake—it would melt the frosting and turn it into a soupy mess. Serve cold or at cool room temperature only.
Serving Suggestions
Tiramisu cake is a rich, satisfying dessert, so you’ll want to pair it thoughtfully with complementary foods and beverages.
Coffee and drinks:
- Fresh espresso or cappuccino (naturally—double down on the coffee!)
- Sweet dessert wine like Vin Santo or Moscato d’Asti
- Port or sherry for an elegant evening dessert
- Irish coffee for an adults-only gathering
- Iced coffee for warm weather celebrations
Fresh fruit pairings:
- Fresh berries (strawberries, raspberries, or blueberries) alongside each slice
- Sliced oranges or blood oranges for a citrus contrast
- Macerated strawberries (berries tossed with sugar and a splash of balsamic)
- Grilled peaches in summer
Complementary desserts for a dessert table:
- Biscotti for dipping in coffee
- Pizzelle or other thin, crispy Italian cookies
- Chocolate truffles
- Lemon sorbet as a palate cleanser
After-dinner setting:
- Serve after a light Italian meal—this is a rich dessert, so keep the main course lighter
- Perfect after pasta with marinara or primavera
- Beautiful end to a grilled chicken or fish dinner
- Ideal for holiday meals when you want something special but not traditional (looking at you, Thanksgiving and Christmas!)
Occasion ideas:
- Birthday celebrations (add candles on top!)
- Bridal or baby showers
- Mother’s Day or Father’s Day
- Italian-themed dinner parties
- Coffee lovers’ gatherings
- Engagement parties
- Anniversary dinners
Plating suggestions: Slice with a sharp knife wiped clean between cuts for neat edges. Place each slice on a white plate, dust with a tiny bit of extra cocoa, add a few fresh berries on the side, and perhaps a small mint leaf for color. If you’re feeling fancy, add a small quenelle of sweetened whipped cream on the side.
FAQs Section
Can I make this tiramisu cake without alcohol?
Absolutely! The coffee liqueur adds depth but isn’t essential. Simply omit it from the espresso soak, or replace it with an extra ¼ cup of espresso plus 1-2 teaspoons of coffee extract for more pronounced coffee flavor. The cake will be just as delicious—many people actually prefer it without alcohol, especially when serving to a mixed crowd or at family gatherings.
Why is my mascarpone frosting too runny?
This usually happens for one of three reasons: (1) Your whipped cream wasn’t beaten to stiff peaks—it should hold its shape firmly when you lift the beaters; (2) Your custard base wasn’t completely cooled before adding to the mascarpone—warm custard will melt everything; or (3) You overmixed when folding everything together, deflating the air. The fix: refrigerate the frosting for 20-30 minutes to firm it up before frosting your cake. If it’s truly soupy, you may need to whip more cream separately and fold it in.
Can I use regular cream cheese instead of mascarpone?
While I really don’t recommend this (mascarpone has a sweeter, milder, more luxurious flavor), if you absolutely cannot find mascarpone, beat 16 oz of full-fat cream cheese with ¼ cup of heavy cream until very smooth. Be aware that your frosting will be tangier and slightly different in texture—more like American cheesecake than Italian tiramisu. It’ll still be delicious, just not authentically tiramisu.
How far in advance can I make this cake?
This is the best part—you can and should make it 1-2 days in advance! The cake actually improves as the espresso soaks into the layers and the flavors meld. Make it, assemble it completely (except for the cocoa dusting), cover, and refrigerate. Dust with cocoa just before serving. Don’t make it more than 2 days ahead, as the cake layers can start to get too soggy and the frosting can weep.
My cake layers came out dry. What did I do wrong?
Dry cake usually results from (1) Overbaking—check a few minutes early and remove when a toothpick has just a few moist crumbs, not completely clean; (2) Too much flour—measure carefully by spooning flour into measuring cups and leveling off; or (3) Overmixing the batter, which develops gluten and creates a tough texture. The good news? The espresso soak helps compensate for slightly dry layers, so be generous when brushing it on.
Can I make this as a smaller or larger cake?
Yes! For a smaller cake, make two 8-inch layers instead of three (you’ll have extra batter—make cupcakes!). For a larger cake, use three 9-inch pans or make four layers with 6-inch pans for a dramatic tall cake. Just adjust your frosting and espresso soak quantities proportionally. A 9-inch three-layer cake serves 14-16 people instead of 12.
Do I have to make the custard base for the frosting?
The custard base serves two purposes: it stabilizes the frosting so it holds up better at room temperature, and it’s the safer alternative to the raw eggs used in traditional tiramisu. You could skip it and just beat mascarpone with powdered sugar then fold in whipped cream, but your frosting will be softer and less stable. The custard only takes 10 extra minutes and makes a significant difference in both safety and quality.
How do I get clean slices without the frosting smooshing everywhere?
Use a long, sharp knife and wipe it clean with a hot, damp towel between each cut. Dip the knife in hot water, wipe it dry, then slice straight down in one motion—don’t saw back and forth. Also make sure the cake is properly chilled (at least 2 hours in the fridge) before slicing. If you let it sit at room temperature for 20 minutes before serving, it’ll be easier to cut but not so warm that the frosting slides.
Conclusion
There’s something magical about transforming a beloved Italian classic into celebration-worthy cake form. This tiramisu cake captures everything we love about the traditional dessert—that intoxicating coffee aroma, the creamy mascarpone richness, the delicate cocoa dusting—while making it perfect for birthdays, holidays, and special gatherings where you want to serve something that makes people’s eyes light up.
Yes, this recipe has several components and takes a bit of time, but I promise each step is straightforward and absolutely worth it. The beauty is that you can spread the work over two days, and the cake actually gets better as it sits in the fridge, making it the ultimate make-ahead showstopper for stress-free entertaining.
Whether you’re a tiramisu devotee or simply a coffee and dessert lover, this cake delivers on every level—impressive presentation, authentic flavor, and that perfect balance of coffee, cream, and sweetness that makes it irresistible. Your friends and family will think you ordered it from an Italian bakery, and you’ll know you created this masterpiece right in your own kitchen.
Ready to make your own stunning tiramisu cake? Save this recipe to your Pinterest boards, gather your ingredients, and get ready to impress everyone at your next celebration! I’d love to see your beautiful creations—tag me in your photos and let me know how it turned out. Happy baking!