The Best White Chocolate Brownies You’ll Ever Make

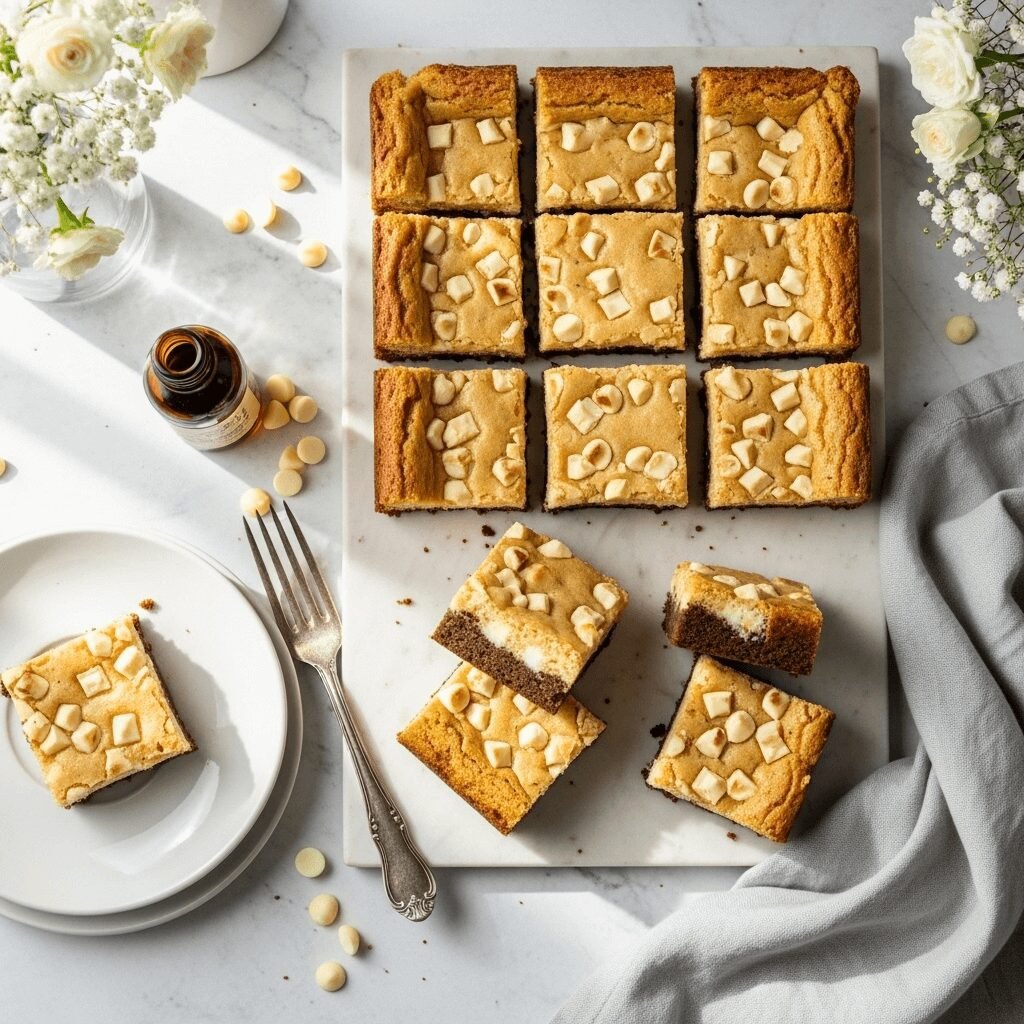
White chocolate brownies are the sophisticated cousin of traditional chocolate brownies—rich, buttery, and impossibly fudgy with that distinctive sweet, creamy flavor of white chocolate. Unlike their darker counterparts, these blonde beauties offer a more delicate, vanilla-forward taste that melts in your mouth with every bite. They’re perfect for baby showers, bridal parties, holiday cookie exchanges, or any time you want to serve something a little different from the usual chocolate dessert. These brownies strike the perfect balance between cake-like texture and dense, chewy centers, studded with extra white chocolate chunks that create pockets of melted sweetness throughout.
What makes white chocolate brownies truly special is their versatility. They’re a blank canvas for add-ins like macadamia nuts, dried cranberries, or raspberry swirls, and they look absolutely stunning on a dessert table. The golden-brown edges and pale interior create a beautiful contrast that photographs wonderfully—making them a Pinterest favorite. Whether you’re an experienced baker or just starting out, this recipe delivers consistent, bakery-quality results every single time.
History / Background
While traditional chocolate brownies have been around since the late 1800s, white chocolate brownies are a more modern innovation that emerged in the late 20th century. The story of white chocolate itself begins in Switzerland in the 1930s when Nestlé developed the first white chocolate bar. However, it wasn’t until the 1980s and 1990s—during the gourmet dessert boom in America—that creative bakers began experimenting with white chocolate as the star ingredient in brownies.
The term “blondies” had existed for decades, referring to brownies made without cocoa powder, but white chocolate brownies took this concept to a new level. They became particularly popular in upscale bakeries and coffee shops along the West Coast, where pastry chefs were reimagining classic American desserts with premium ingredients. The addition of actual white chocolate—rather than just leaving out the cocoa—created a richer, more luxurious treat that quickly gained a devoted following.
Today, white chocolate brownies have earned their place in the American dessert canon. They’re especially beloved at celebrations where a lighter-colored dessert is preferred, and they’ve become a staple in wedding dessert bars and elegant tea parties. The recipe has evolved to include countless variations, but the classic version remains a testament to the magic that happens when quality white chocolate meets buttery brownie batter.
Why You’ll Love This Recipe
These white chocolate brownies are about to become your new go-to dessert recipe, and here’s why: they deliver that perfect fudgy texture everyone craves without being overly sweet or one-dimensional. The white chocolate provides a sophisticated flavor profile that appeals to both kids and adults, making them ideal for any gathering.
Here’s what makes this recipe absolutely irresistible:
- Simple ingredients you probably already have in your pantry—no exotic or hard-to-find items required
- Quick preparation that takes just 15 minutes of active time before the oven does all the work
- Foolproof results even if you’re new to baking—the recipe is incredibly forgiving
- Budget-friendly compared to buying bakery brownies, and feeds a crowd
- Make-ahead friendly so you can prep for parties without last-minute stress
- Customizable with endless add-in possibilities to suit your taste preferences
- Photo-worthy presentation that looks as good as it tastes, perfect for sharing on social media
- Crowd-pleaser status guaranteed—I’ve never met anyone who could resist these
- Better than box mix but nearly as easy, giving you homemade quality without complications
The texture is what really sets these apart. You get crispy, slightly caramelized edges that give way to a dense, creamy center that’s loaded with melted white chocolate. Each bite offers that satisfying contrast between the firm exterior and soft interior that makes brownies so addictive.
Ingredient Notes
Understanding your ingredients helps you bake better brownies every time. Here’s what you need to know:
White Chocolate: Use high-quality white chocolate bars or chips (look for cocoa butter as the first ingredient). Avoid “white baking chips” or “vanilla chips” as they contain vegetable oils instead of cocoa butter and won’t deliver the same rich flavor. Ghirardelli, Lindt, or Baker’s Premium white chocolate work beautifully. You’ll need some melted into the batter and some chopped for mix-ins.
Butter: Unsalted butter is essential so you can control the salt level. It adds moisture, richness, and helps create that fudgy texture. Make sure it’s at room temperature for easy mixing. European-style butter with higher fat content will make even more decadent brownies.
Granulated Sugar: Provides sweetness and helps create the characteristic crackly top. Don’t reduce the sugar significantly or you’ll lose texture and structure.
Brown Sugar: Adds moisture and a subtle caramel note that complements the white chocolate. Light brown sugar works perfectly, but dark brown sugar will give you deeper flavor.
Eggs: Room temperature eggs incorporate more easily and create better structure. They bind everything together and contribute to that fudgy texture.
Vanilla Extract: Pure vanilla extract is worth the investment here—it enhances the white chocolate flavor beautifully. Imitation vanilla can taste artificial in such a simple recipe.
All-Purpose Flour: Regular all-purpose flour is perfect. Don’t substitute cake flour (too delicate) or bread flour (too tough).
Salt: Just a pinch to balance the sweetness and enhance all the other flavors.
Substitutions: You can swap in equal amounts of light brown sugar if you’re out of granulated. For a gluten-free version, use a 1-to-1 gluten-free baking flour blend. To make them dairy-free, use vegan butter and dairy-free white chocolate chips, though the texture will be slightly different.
Equipment Needed
Having the right tools makes baking these brownies effortless:
- 9×13-inch baking pan (metal works best for even browning; glass will work but may require slightly longer baking)
- Parchment paper or aluminum foil for easy removal and cleanup
- Large mixing bowl for combining wet ingredients
- Medium saucepan or microwave-safe bowl for melting chocolate and butter
- Whisk for beating eggs and incorporating ingredients
- Rubber spatula for folding and spreading batter
- Measuring cups and spoons (proper measurements are crucial for brownies)
- Sharp knife for chopping white chocolate chunks
- Wire cooling rack to prevent soggy bottoms
- Toothpick or cake tester for checking doneness
White Chocolate Brownies Recipe
These ultra-fudgy white chocolate brownies feature a buttery, dense texture loaded with premium white chocolate. With their golden edges and creamy center, they’re the perfect elegant dessert for any occasion.
- Prep Time: 15 minutes
- Cook Time: 30 minutes
- Total Time: 45 minutes (plus cooling time)
- Yield: 16 large brownies or 24 small squares 1x
- Category: Dessert
- Method: Baking
- Cuisine: American
- Diet: Vegetarian
Ingredients
- 1 cup (2 sticks) unsalted butter, melted
- 12 oz high-quality white chocolate, divided (8 oz melted, 4 oz chopped into chunks)
- 1 cup granulated sugar
- ½ cup light brown sugar, packed
- 4 large eggs, room temperature
- 1 tablespoon pure vanilla extract
- 2 cups all-purpose flour
- 1 teaspoon salt
Instructions
- Prepare your pan: Preheat your oven to 350°F (175°C). Line a 9×13-inch baking pan with parchment paper, leaving overhang on the sides for easy removal. Lightly grease the parchment with butter or cooking spray.
- Melt chocolate and butter: In a medium saucepan over low heat, combine the melted butter and 8 oz of chopped white chocolate. Stir constantly until the chocolate is completely melted and smooth. Remove from heat and let cool for 5 minutes. (Alternatively, melt in the microwave in 30-second intervals, stirring between each.)
- Mix wet ingredients: Pour the melted white chocolate mixture into a large mixing bowl. Add both sugars and whisk vigorously for about 2 minutes until well combined and slightly glossy. The mixture should be smooth and the sugar beginning to dissolve.
- Add eggs and vanilla: Add eggs one at a time, whisking well after each addition. The batter will become lighter and fluffier. Stir in the vanilla extract until fully incorporated.
- Incorporate dry ingredients: Sift the flour and salt together, then gently fold into the wet ingredients using a rubber spatula. Mix just until no flour streaks remain—overmixing will make tough brownies. The batter should be thick and glossy.
- Add chocolate chunks: Fold in the remaining 4 oz of chopped white chocolate, reserving a small handful to press into the top before baking.
- Bake: Pour the batter into your prepared pan and spread evenly with a spatula. Press the reserved white chocolate chunks on top. Bake for 28-32 minutes, until the edges are golden brown and set, but the center still has a slight jiggle. A toothpick inserted 2 inches from the edge should come out with a few moist crumbs (not wet batter).
- Cool completely: Remove from the oven and let cool in the pan on a wire rack for at least 1 hour. For the best fudgy texture, refrigerate for 2 hours before cutting. Use the parchment overhang to lift the brownies out, then cut into squares with a sharp knife wiped clean between cuts.
Notes
- Don’t overbake! These brownies will firm up as they cool. The center should look slightly underdone when you remove them from the oven.
- For cleaner cuts, refrigerate the brownies before slicing and use a hot knife (run it under hot water and dry between cuts).
- Room temperature eggs mix more easily and create better texture.
- If your batter seems too thick, that’s normal—white chocolate brownies have a denser batter than regular brownies.Serving Size: 1 brownie (1/16 of recipe)
Calories: 385
Sugar: 32g
Sodium: 180mg
Fat: 20g
Saturated Fat: 12g
Unsaturated Fat: 6g
Nutrition
- Serving Size: 1 brownie (1/16 of recipe)
- Calories: 385
- Sugar: 32g
- Sodium: 180mg
- Fat: 20g
- Saturated Fat: 12g
- Unsaturated Fat: 6g
- Trans Fat: 0g
- Carbohydrates: 46g
- Fiber: 0.5g
- Protein: 5g
- Cholesterol: 85mg
Tips & Variations
Transform these brownies into your own signature dessert with these creative twists:
Raspberry White Chocolate Brownies: Swirl ⅓ cup raspberry jam into the batter before baking and add freeze-dried raspberry pieces on top for a fruity contrast.
Macadamia Nut Version: Fold in 1 cup chopped toasted macadamia nuts for that classic white chocolate-macadamia combination that tastes like vacation.
Lemon White Chocolate: Add 2 tablespoons fresh lemon zest and 1 tablespoon lemon juice to brighten the flavors and cut through the sweetness.
Salted Caramel Drizzle: After baking and cooling, drizzle with salted caramel sauce and sprinkle with flaky sea salt for an upscale finish.
Cookies and Cream: Crush 10 Oreo cookies and fold them into the batter for a fun cookies-and-cream variation kids will devour.
Espresso Enhancement: Add 1 tablespoon instant espresso powder to intensify the flavor and add subtle complexity.
Coconut Paradise: Mix in ½ cup shredded sweetened coconut and top with toasted coconut flakes before baking.
Healthier Option: Substitute half the butter with unsweetened applesauce and use coconut sugar instead of white sugar for a slightly lighter version (texture will be more cake-like).
Pro Chef Tips
These insider secrets will take your brownies from good to extraordinary:
Temperature matters more than you think: Bring all your ingredients to room temperature before mixing. Cold eggs and butter don’t emulsify properly, resulting in dense, heavy brownies instead of that perfect fudgy texture.
The quality of white chocolate is everything: Since white chocolate is the star ingredient, don’t skimp here. Look for brands that list cocoa butter as the first or second ingredient. Cheap white chocolate can taste waxy and artificial, ruining an otherwise perfect batch.
Master the underbake: The single biggest secret to fudgy brownies is pulling them from the oven when they still look slightly underdone. The residual heat continues cooking them as they cool. If they look fully cooked in the oven, they’ll be dry and cakey once cooled.
Create a water bath for ultra-fudgy texture: Place your brownie pan inside a larger pan filled with about an inch of hot water (bain-marie). This gentle, even heat creates incredibly moist brownies, though it adds about 5 minutes to baking time.
Brown your butter first: For next-level flavor, brown the butter before melting the white chocolate in it. The nutty, caramelized notes add incredible depth. Just be careful not to burn it—remove from heat when it’s golden brown and smells like toasted nuts.
Room temperature everything: I can’t stress this enough. Room temperature ingredients create an emulsion that gives you that shiny, crackly top and smooth texture throughout.
The toothpick test location matters: Always test doneness 2 inches from the edge, never in the center. The center should still jiggle slightly when you gently shake the pan.
Common Mistakes to Avoid
Don’t let these common pitfalls ruin your perfect batch:
Overbaking is the number one problem. White chocolate brownies continue cooking as they cool, so they should look slightly underdone when you pull them out. Set a timer for the minimum baking time and check every 2 minutes after that. Remember, you can always bake them longer, but you can’t undo dry brownies.
Using white baking chips instead of real white chocolate will give you disappointing results. Those chips contain vegetable oils and stabilizers that prevent melting smoothly. They lack the rich, creamy flavor of real white chocolate made with cocoa butter. Check the ingredient label—cocoa butter should be prominent.
Overmixing the batter after adding flour develops too much gluten, making your brownies tough and chewy instead of tender and fudgy. Mix just until the flour disappears—some small lumps are fine and will dissolve during baking.
Cutting brownies while they’re still warm creates a crumbly mess. I know it’s hard to wait, but patience pays off. Let them cool completely, or even better, refrigerate them for clean, professional-looking cuts with a sharp knife.
Not preparing the pan properly leads to stuck brownies and frustration. Always line with parchment paper, leaving overhang on the sides. This creates handles for lifting the whole batch out easily, and you’ll get perfect edges every time.
Storage & Meal Prep
Keep your brownies fresh and delicious with proper storage:
Room Temperature: Store in an airtight container at room temperature for up to 4 days. Layer parchment paper between stacked brownies to prevent sticking. They’ll actually get more fudgy on day two as the flavors meld.
Refrigeration: For longer storage, refrigerate in an airtight container for up to 1 week. The cold firms up the texture, making them extra fudgy. Let them sit at room temperature for 15-20 minutes before serving for the best flavor and texture.
Freezing Individual Portions: Wrap individual brownies tightly in plastic wrap, then place them in a freezer-safe bag or container. Freeze for up to 3 months. This is perfect for portion control or grabbing a single brownie for lunch boxes.
Reheating: For that fresh-baked experience, microwave individual brownies for 10-15 seconds. They’ll become warm and gooey with slightly melted white chocolate. You can also warm them in a 300°F oven for 5-7 minutes.
Preventing Dryness: Always store with a piece of bread in the container. The brownies will absorb moisture from the bread, staying soft and fudgy while the bread gets stale instead. Replace the bread slice every 2 days.
Make-Ahead & Freezer Notes
These brownies are ideal for advance preparation, making party planning stress-free:
Make-Ahead Batter: You can prepare the batter up to 24 hours in advance and store it covered in the refrigerator. Let it sit at room temperature for 30 minutes before baking, and add 3-5 minutes to the baking time since the batter will be cold.
Bake and Freeze: Bake the brownies completely, let them cool, then cut into squares. Freeze individual brownies or the whole batch. This is my favorite method because you can pull out exactly what you need without defrosting everything.
Freezing Unbaked Batter: Pour the batter into your prepared pan, cover tightly with plastic wrap and aluminum foil, and freeze for up to 2 months. Bake directly from frozen, adding 10-15 minutes to the baking time and covering with foil for the first 20 minutes.
Best Thawing Method: For frozen baked brownies, let them thaw at room temperature for 1-2 hours. For a quicker option, microwave individual brownies from frozen for 20-30 seconds. They’ll taste freshly baked!
Party Planning Timeline: Bake these 2-3 days before your event and store in the refrigerator. The flavors improve as they sit, and the texture becomes perfectly fudgy. Cut them the day of serving for the cleanest edges.
Serving Suggestions
Elevate your white chocolate brownies with these perfect pairings:
Classic Companions: Serve warm brownies with a scoop of vanilla bean ice cream and hot fudge sauce for an indulgent sundae. The temperature contrast is absolutely divine.
Coffee Bar Addition: These brownies pair beautifully with espresso, cappuccino, or a rich hot chocolate. Set up a dessert coffee bar at your next gathering with brownies as the star.
Fresh Fruit Balance: Cut the richness with fresh berries—strawberries, raspberries, or blackberries add a tart contrast that complements the sweet white chocolate perfectly.
Whipped Cream Topping: A dollop of fresh whipped cream with a hint of vanilla makes these feel extra special without overwhelming the delicate white chocolate flavor.
Wine Pairing: Serve alongside dessert wines like Moscato d’Asti, late-harvest Riesling, or even a cream sherry for an elegant dinner party finale.
Tea Time: These brownies are sophisticated enough for afternoon tea. Serve with Earl Grey, chamomile, or vanilla chai for a relaxing treat.
Breakfast Treat: Yes, really! Cut a small square and enjoy with your morning coffee. The white chocolate gives you a gentle energy boost without being too heavy.
Party Presentation: Create a brownie dessert board with different toppings on the side—caramel sauce, chocolate chips, chopped nuts, whipped cream, and fresh berries. Let guests customize their own brownies.
FAQs Section
Can I use white chocolate chips instead of bars? Yes, but choose high-quality chips that contain cocoa butter, not just vegetable oils. Premium brands like Ghirardelli or Guittard work well. You’ll need about 2 cups of chips to equal 12 oz by weight. The texture might be slightly less smooth when melted compared to chopped bars.
Why are my brownies cakey instead of fudgy? This usually happens from overbaking or overmixing the batter. Make sure to remove brownies when the center still has a slight jiggle, and fold the flour in gently just until combined. Too much flour can also cause this, so measure carefully using the spoon-and-level method.
Can I make these in a different pan size? Absolutely! For an 8×8-inch pan, halve the recipe and bake for 25-28 minutes. For thicker brownies, use a 9×9-inch pan with the full recipe and increase baking time to 35-40 minutes. For thinner, crispier brownies, use a half-sheet pan and reduce time to 18-22 minutes.
My white chocolate seized and became grainy. What happened? White chocolate is sensitive to heat and moisture. It likely got too hot or came into contact with water. Always melt on low heat or in short microwave bursts, stirring frequently. Make sure your bowl and utensils are completely dry. If it seizes, try whisking in a teaspoon of vegetable oil to smooth it out.
How do I know when the brownies are done? The edges should be golden brown and pulling away slightly from the pan, while the center still looks slightly underdone and jiggles a bit when gently shaken. A toothpick inserted 2 inches from the edge should come out with a few moist crumbs. Remember, they’ll firm up considerably as they cool.
Can I add other mix-ins to this recipe? Definitely! This recipe is very versatile. Try adding ½-1 cup of chopped nuts (macadamias, pecans, walnuts), dried fruit (cranberries, cherries), or even crushed cookies. Just fold them in with the white chocolate chunks. Don’t exceed 1½ cups total add-ins or the brownies won’t hold together properly.
Why do my brownies stick to the pan? Always line your pan with parchment paper with overhang on the sides, even if it’s nonstick. Grease the parchment lightly for extra insurance. Let the brownies cool completely before trying to remove them—warm brownies are fragile and will fall apart. Refrigerating for an hour makes removal even easier.
Conclusion
There’s something truly magical about pulling a pan of golden-topped white chocolate brownies from the oven and watching that perfectly fudgy center come together as they cool. These brownies prove that you don’t need complicated techniques or exotic ingredients to create a dessert that wows every single time. Whether you’re baking for a special celebration, a casual weekend treat, or just because you’re craving something sweet and satisfying, this recipe delivers consistently delicious results.
The beauty of these white chocolate brownies lies in their simplicity and versatility. They’re fancy enough for bridal showers and baby celebrations, yet comforting enough for everyday enjoyment with your afternoon coffee. They make thoughtful homemade gifts, impressive potluck contributions, and unforgettable additions to any dessert table.
I’d love to hear how your brownies turn out! Drop a comment below with your results, any creative variations you tried, or questions you might have. And please, don’t forget to snap a photo and pin this recipe to your favorite dessert board on Pinterest—your fellow bakers will thank you for sharing this gem. Happy baking, and may your brownies always be perfectly fudgy!