Homemade Moon Pie Recipe – The Ultimate Southern Treat You Can Make at Home!

There’s something magical about biting into a Moon Pie – that perfect combination of soft, pillowy marshmallow sandwiched between two tender graham cookies, all enveloped in a smooth chocolate coating. While these iconic treats have been a Southern staple for over a century, making them from scratch at home takes this nostalgic snack to an entirely new level of deliciousness.
This homemade Moon Pie recipe delivers everything you love about the classic version, but with fresher ingredients, richer flavors, and that satisfying feeling of creating something special with your own hands. Whether you’re planning a retro-themed party, looking for a fun weekend baking project with the kids, or simply craving that distinctive Moon Pie experience with a homemade twist, this recipe will become your new favorite dessert adventure.
These delightful treats are perfect for lunchboxes, afternoon snacks, potluck desserts, birthday parties, or anytime you want to surprise someone with a thoughtful homemade gift. They’re also wonderful for holidays, picnics, and family gatherings where you want to serve something both familiar and impressively homemade.
History / Background
The Moon Pie has a fascinating history that’s deeply woven into American culture, particularly in the South. This beloved confection was created in 1917 by the Chattanooga Bakery in Tennessee, and the origin story is as charming as the treat itself. According to company legend, a traveling salesman asked coal miners in Kentucky what kind of snack they’d like, and one miner famously gestured toward the moon and said he wanted something “that big” and round. Thus, the Moon Pie was born.
Originally sold for just a nickel, Moon Pies quickly became a lunchbox staple for working-class Americans throughout the South. The combination of affordable ingredients, substantial size, and satisfying sweetness made them the perfect energy boost for miners, factory workers, and schoolchildren alike. By the 1950s and 60s, Moon Pies had achieved iconic status, particularly when paired with an RC Cola – a combination so popular in the South that “RC Cola and a Moon Pie” became a cultural catchphrase representing simple pleasures and Southern heritage.
The treats gained even more fame through their association with Mardi Gras celebrations, particularly in Mobile, Alabama, where they’ve been thrown from parade floats since the 1950s. Today, Moon Pies are produced in millions each year and have expanded to include various flavors including vanilla, banana, and strawberry. However, the original chocolate variety remains the most beloved.
Making Moon Pies from scratch honors this rich tradition while allowing modern home bakers to experience the joy of creating these nostalgic treats with quality ingredients and personal touches that simply can’t be replicated in a factory setting.
Why You’ll Love This Recipe
This homemade Moon Pie recipe transforms a beloved commercial snack into an artisanal treat that tastes exponentially better than anything you can buy at the store. When you make these from scratch, you control the quality of every ingredient, resulting in cookies that are more flavorful, marshmallow that’s impossibly fluffy, and chocolate coating that’s genuinely luxurious.
Here’s why this recipe will become a family favorite:
- Nostalgic yet elevated – All the charm of the classic treat with significantly better flavor and texture
- Surprisingly achievable – While they look impressive, the steps are straightforward and beginner-friendly
- Customizable – Easily adapt the recipe with different chocolate coatings, marshmallow flavors, or cookie variations
- Perfect make-ahead treat – These actually improve after a day, making them ideal for party planning
- Budget-friendly – Makes a generous batch using pantry staples that cost far less than buying premium packaged versions
- Kid-approved project – Children love helping with the assembly and coating process
- Gift-worthy – Wrap these beauties up for the most impressive homemade gift that shows real thoughtfulness
- Freezer-friendly – Make a double batch and freeze some for future cravings
- No special equipment required – Everything you need is probably already in your kitchen
Ingredient Notes
Graham Cookies:
- All-purpose flour and graham flour – The combination creates that distinctive graham cracker flavor with perfect tenderness. If you can’t find graham flour, substitute with whole wheat flour plus an extra tablespoon of honey.
- Brown sugar – Adds moisture and that subtle molasses flavor that makes graham crackers special.
- Butter – Use unsalted butter at room temperature for the best texture and flavor control.
- Honey – Essential for authentic graham flavor; don’t substitute with more sugar.
- Baking soda and salt – Provide lift and balance the sweetness.
Marshmallow Filling:
- Gelatin – Creates that signature bouncy, stable marshmallow texture. Use unflavored gelatin powder.
- Granulated sugar and corn syrup – Work together to create the proper marshmallow structure and sweetness.
- Vanilla extract – Pure vanilla is worth it here for the best flavor.
- Egg whites – Provide stability and that classic marshmallow fluffiness. They’re safe in this recipe because the hot sugar syrup cooks them.
Chocolate Coating:
- Chocolate melting wafers or chocolate chips – Melting wafers give the smoothest coating, but quality chocolate chips work beautifully too.
- Coconut oil or shortening – Just a tablespoon helps thin the chocolate for easier coating and a prettier finish.
Equipment Needed
- Stand mixer or hand mixer with whisk attachment
- Two mixing bowls (one large, one medium)
- Small saucepan
- Candy thermometer (highly recommended for marshmallow)
- Rolling pin
- 3-inch round cookie cutter or drinking glass
- Parchment paper
- Two baking sheets
- Piping bag or large zip-top bag
- Wire cooling rack
- Offset spatula or butter knife
- Measuring cups and spoons
- Rubber spatula
Moon Pie Recipe

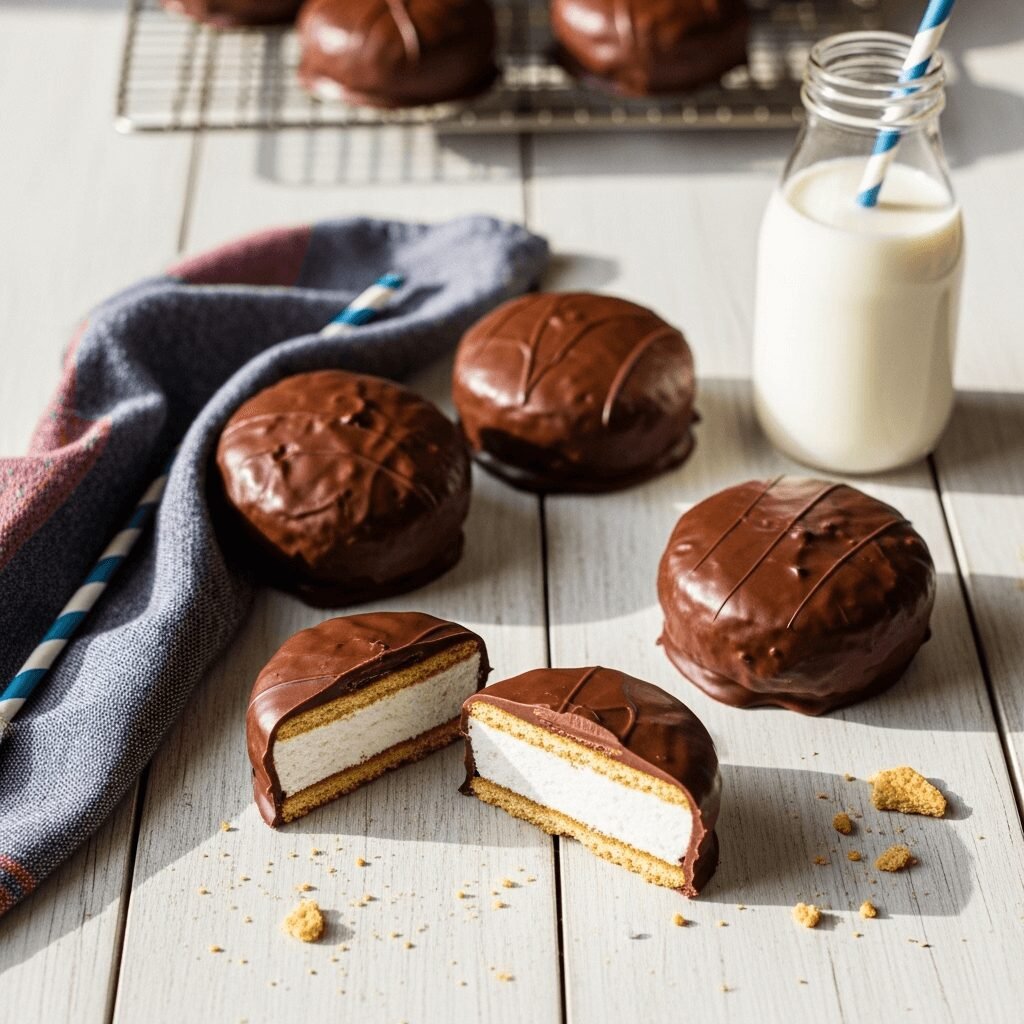
Homemade Moon Pies feature tender graham cookies sandwiched with fluffy marshmallow filling and coated in rich chocolate. This classic Southern treat is made from scratch with simple ingredients for a nostalgic dessert that tastes infinitely better than store-bought versions.
- Prep Time: 45 minutes
- Chill Time: 2 hours
- Cook Time: 12 minutes (cookies only)
- Total Time: 3 hours
- Yield: 12 Moon Pies 1x
- Category: Dessert
- Method: Baking
- Cuisine: American (Southern)
- Diet: Vegetarian
Ingredients
For the Graham Cookies:
- 1½ cups all-purpose flour
- 1 cup graham flour (or whole wheat flour)
- ½ cup packed light brown sugar
- 1 teaspoon baking soda
- ½ teaspoon salt
- ½ cup (1 stick) unsalted butter, softened
- ⅓ cup honey
- 2 tablespoons whole milk
- 1 teaspoon vanilla extract
For the Marshmallow Filling:
- 3 tablespoons unflavored gelatin powder
- ½ cup cold water, divided
- 1½ cups granulated sugar
- ¾ cup light corn syrup
- ¼ teaspoon salt
- 2 large egg whites
- 2 teaspoons vanilla extract
For the Chocolate Coating:
- 20 ounces chocolate melting wafers or semisweet chocolate chips
- 1 tablespoon coconut oil or vegetable shortening
Instructions
Make the Graham Cookies:
- Prepare the dough: In a large bowl, whisk together the all-purpose flour, graham flour, brown sugar, baking soda, and salt until well combined. Add the softened butter, honey, milk, and vanilla extract. Using a hand mixer or stand mixer, beat on medium speed until the dough comes together into a cohesive ball, about 2-3 minutes. The dough should be soft but not sticky.
- Chill the dough: Shape the dough into a flat disk, wrap tightly in plastic wrap, and refrigerate for at least 30 minutes. This makes the dough much easier to roll out and prevents the cookies from spreading too much during baking.
- Roll and cut: Preheat your oven to 350°F (175°C) and line two baking sheets with parchment paper. On a lightly floured surface, roll the chilled dough to about ⅛-inch thickness. Using a 3-inch round cookie cutter, cut out circles and place them on the prepared baking sheets, spacing them about 1 inch apart. Gather scraps, re-roll, and continue cutting until all dough is used. You should get about 24 cookies.
- Bake: Bake for 10-12 minutes, until the edges are just starting to turn golden brown. The centers may look slightly soft, but they’ll firm up as they cool. Let cookies cool on the baking sheet for 5 minutes, then transfer to a wire rack to cool completely.
Make the Marshmallow Filling:
- Bloom the gelatin: Pour ¼ cup of cold water into the bowl of your stand mixer and sprinkle the gelatin evenly over the surface. Let it sit for 5 minutes to bloom (it will absorb the water and become thick).
- Cook the sugar syrup: In a small saucepan, combine the remaining ¼ cup water, sugar, corn syrup, and salt. Place over medium-high heat and stir until the sugar dissolves. Attach a candy thermometer to the pan and cook without stirring until the mixture reaches 240°F (soft-ball stage), about 7-10 minutes. Watch carefully as it approaches temperature.
- Whip the egg whites: While the syrup cooks, add the egg whites to the gelatin mixture in your stand mixer bowl. Using the whisk attachment, beat on medium-high speed until soft peaks form, about 2-3 minutes.
- Combine and whip: With the mixer running on low speed, very carefully pour the hot sugar syrup in a slow, steady stream down the side of the bowl (avoid pouring directly onto the whisk, which can splatter). Once all the syrup is added, increase speed to high and whip for 7-10 minutes, until the mixture is very thick, glossy, and tripled in volume. The bowl should feel barely warm to the touch. Beat in the vanilla extract during the last minute.
- Pipe the filling: Transfer the marshmallow to a large piping bag or zip-top bag with the corner snipped off. Working quickly before the marshmallow sets, pipe a generous mound of marshmallow onto the flat side of 12 cookies, leaving about ¼ inch border around the edges. Gently press the remaining 12 cookies on top, flat side down, creating sandwiches. Let the assembled Moon Pies sit at room temperature for at least 30 minutes to allow the marshmallow to set.
Coat with Chocolate:
- Melt the chocolate: Combine the chocolate wafers (or chips) and coconut oil in a microwave-safe bowl. Microwave in 30-second intervals, stirring between each, until completely smooth and melted. Alternatively, melt using a double boiler on the stovetop.
- Coat the Moon Pies: Place a wire rack over a parchment-lined baking sheet (to catch drips). Using a fork or dipping tool, carefully lower one Moon Pie at a time into the melted chocolate, turning to coat completely. Lift it out, letting excess chocolate drip off, then place it on the wire rack. Repeat with all Moon Pies.
- Set the chocolate: Let the chocolate coating set at room temperature for about 1 hour, or refrigerate for 20-30 minutes to speed up the process. The chocolate should be completely firm and no longer tacky to the touch.
- Serve and enjoy: Once the chocolate is fully set, your homemade Moon Pies are ready to enjoy! For the best texture and flavor, let them sit at room temperature for 24 hours before serving – this allows the cookies to soften slightly and all the flavors to meld together beautifully.
Notes
- Candy thermometer: While you can make marshmallow without one, a thermometer ensures perfect results every time. The mixture must reach 240°F for proper setting.
- Gelatin: Don’t substitute with agar-agar, as it creates a different texture that won’t work for this recipe.
- Cookie thickness: Keep cookies uniform in thickness (about ⅛ inch) so they bake evenly and create perfectly sized Moon Pies.
- Work quickly: Marshmallow begins setting within 15-20 minutes, so have your cookies ready and pipe all the filling before it becomes too stiff.
- Chocolate coating: If your chocolate becomes too thick while dipping, microwave it for 10-15 seconds to thin it back out.
- Best texture: Moon Pies actually taste better on day two! The cookies absorb a bit of moisture from the marshmallow, creating that signature soft texture.
Nutrition
- Serving Size: 1 Moon Pie
- Calories: 385
- Sugar: 42g
- Sodium: 185mg
- Fat: 14g
- Saturated Fat: 8g
- Unsaturated Fat: 5g
- Trans Fat: 0g
- Carbohydrates: 63g
- Fiber: 2g
- Protein: 4g
- Cholesterol: 15mg
Tips & Variations
Flavor Variations:
- Vanilla Moon Pies: Use white chocolate or vanilla melting wafers for the coating instead of chocolate.
- Peanut Butter Twist: Add 2 tablespoons of peanut butter powder to the marshmallow mixture for a nutty flavor.
- Mint Chocolate: Add ½ teaspoon peppermint extract to the chocolate coating for refreshing mint Moon Pies.
- Banana Flavor: Replace the vanilla extract in the marshmallow with banana extract for a banana Moon Pie version.
- Double Chocolate: Add 2 tablespoons of cocoa powder to the cookie dough for chocolate graham cookies.
Dietary Modifications:
- Gluten-Free: Use a 1:1 gluten-free flour blend in place of both flours, and ensure your graham flour substitute is certified gluten-free.
- Vegan Version: This recipe is challenging to make vegan due to the egg whites and gelatin, but you can try using aquafaba (chickpea liquid) whipped with agar powder, though texture will differ.
Customization Ideas:
- Salted Caramel: Drizzle finished Moon Pies with salted caramel sauce before the chocolate sets completely.
- Sprinkles: Add colorful sprinkles or crushed graham crackers on top of the wet chocolate coating for visual appeal.
- Smaller Sizes: Use a 2-inch cutter to make mini Moon Pies – perfect for parties or portion control.
- Different Cookies: Try using chocolate chip cookies or snickerdoodles instead of graham cookies for a completely different treat.
Pro Chef Tips
Temperature Control is Key: When making marshmallow, precise temperature matters enormously. Invest in a good candy thermometer and make sure it doesn’t touch the bottom of the pan (which can give false readings). The sugar syrup must reach exactly 240°F – too low and your marshmallow won’t set properly; too high and it becomes too stiff to work with.
Master the Chocolate Coating: Professional chocolatiers know that the secret to a smooth, glossy coating is proper chocolate temperature. Your melted chocolate should be warm but not hot (around 90-95°F is ideal). If it’s too hot, it will be too thin and won’t coat properly. If it’s too cool, it will be thick and create a lumpy coating. Keep it in this sweet spot by occasionally reheating for just 10-15 seconds at a time.
Cookie Consistency Matters: For the most professional-looking Moon Pies, ensure all your cookies are exactly the same size and thickness. Use a ruler when rolling the dough to ⅛-inch thickness, and press the cookie cutter straight down without twisting (which can create uneven edges that prevent good sealing).
The 24-Hour Rule: While it’s tempting to dig in immediately, professional bakers know that Moon Pies reach their peak texture after sitting for 24 hours. During this time, moisture from the marshmallow softens the cookies to that perfect tender texture, and the flavors meld together beautifully. Your patience will be rewarded!
Assembly Line Method: Work like a professional pastry chef by setting up an efficient assembly line. Have all cookies laid out, marshmallow ready in your piping bag, and chocolate melted before you start assembling. This ensures you work quickly while the marshmallow is still pipeable and maintains consistent quality across all your Moon Pies.
Common Mistakes to Avoid
1. Over-baking the cookies: Graham cookies should be just barely golden at the edges and appear slightly soft in the center when you remove them from the oven. Over-baked cookies will be too crispy and won’t achieve that tender Moon Pie texture. Remember, they continue baking on the hot pan even after leaving the oven.
2. Not blooming gelatin properly: Gelatin must sit in cold water for at least 5 minutes to bloom correctly. Skipping this step or not giving it enough time results in marshmallow that won’t set properly or has a gritty texture. The gelatin should look swollen and spongy before you add the hot syrup.
3. Rushing the marshmallow: If your marshmallow isn’t whipped long enough (7-10 minutes on high speed), it won’t reach the proper volume and stability. It should be very thick, glossy, and hold stiff peaks. If it’s too runny, it will ooze out from between the cookies and won’t provide proper structure.
4. Chocolate too thick or too thin: Adding too much coconut oil makes the chocolate coating too thin and it won’t set properly (it may remain sticky). Using chocolate that’s too thick makes coating difficult and creates a heavy, unappetizing layer. Start with just 1 tablespoon of oil per 20 ounces of chocolate and add more only if absolutely needed.
5. Storing too soon: Don’t stack or wrap Moon Pies until the chocolate coating is completely set and hard. If you stack them while the chocolate is still tacky, they’ll stick together and ruin that beautiful coating you worked so hard to achieve. Give them at least an hour at room temperature or 30 minutes in the refrigerator.
Storage & Meal Prep
Room Temperature Storage: Store your homemade Moon Pies in an airtight container at room temperature for up to 5 days. Layer them between sheets of parchment paper to prevent sticking. They actually improve in texture over the first 24-48 hours as the cookies soften slightly from the marshmallow’s moisture.
Refrigerator Storage: While not necessary, you can refrigerate Moon Pies for up to 2 weeks in an airtight container. The chocolate coating will become very firm, and the cookies will be a bit firmer as well. Let them sit at room temperature for 15-20 minutes before eating for the best texture and flavor.
Preventing Staleness: The biggest enemy of homemade Moon Pies is air exposure, which can make the cookies stale and the chocolate bloom (develop white streaks). Always store in airtight containers with as little empty space as possible. If your container is too large, fill empty space with crumpled parchment paper to reduce air circulation.
Reheating Tips: Moon Pies are best enjoyed at room temperature, but if you want to experience them slightly warm (which is absolutely delicious), microwave individual Moon Pies for just 8-10 seconds. The marshmallow becomes incredibly soft and fluffy, and the chocolate coating gets just barely melty. Don’t overdo it, or the marshmallow will liquefy!
Make-Ahead & Freezer Notes
Component Preparation: These Moon Pies are excellent for make-ahead preparation. You can bake the graham cookies up to 3 days in advance and store them in an airtight container at room temperature. The marshmallow must be made and assembled the same day, as it sets quickly and can’t be re-whipped once it firms up.
Freezing Assembled Moon Pies: Great news – Moon Pies freeze beautifully! Once the chocolate coating is completely set (give them at least 2 hours), wrap each Moon Pie individually in plastic wrap, then place them all in a freezer-safe zip-top bag or airtight container. They’ll keep for up to 3 months in the freezer.
Thawing Instructions: Remove Moon Pies from the freezer and let them thaw at room temperature for about 2-3 hours, still in their wrapping. This prevents condensation from forming on the chocolate coating, which can cause white spots or a dull appearance. Once thawed, they taste just as fresh as the day you made them.
Freezing Before Chocolate Coating: If you want to save time later, you can freeze the cookie-marshmallow sandwiches before coating them in chocolate. Freeze them on a parchment-lined baking sheet until solid (about 1 hour), then transfer to a freezer bag. When ready to finish, let them thaw completely before dipping in melted chocolate. This actually makes the coating process easier because the marshmallow is firmer.
Best Practices: For entertaining, make your Moon Pies 2-3 days before your event. They’ll have achieved perfect texture, and you can focus on other preparations. If making further ahead, freeze them and thaw 24 hours before serving.
Serving Suggestions
Classic Pairings: Honor Southern tradition by serving your homemade Moon Pies with an ice-cold RC Cola or root beer. The combination of sweet, chocolatey treat with fizzy cola is nostalgic perfection. For a non-caffeinated option, serve with cold whole milk, which balances the sweetness beautifully.
Dessert Platter Ideas: Create a stunning retro dessert spread by serving Moon Pies alongside other vintage American treats like homemade Twinkies, Oatmeal Creme Pies, or Hostess Cupcakes. Add some fresh strawberries and whipped cream to lighten the presentation and provide a refreshing contrast.
Coffee and Tea Service: Moon Pies are wonderful with afternoon coffee or tea. The sweetness pairs especially well with strong black coffee, espresso, or robust breakfast tea. For a sophisticated twist, serve them with chai lattes or Mexican hot chocolate.
Ice Cream Sundae Topper: Chop a Moon Pie into chunks and use it as a decadent topping for vanilla or coffee ice cream. Add some hot fudge sauce and whipped cream for an over-the-top dessert that’s pure indulgence.
Party Presentation: For birthday parties or gatherings, arrange Moon Pies on a tiered cake stand decorated with ribbon and fresh flowers. Create a “Moon Pie Bar” where guests can choose from different varieties (if you’ve made multiple flavors) and pair them with various beverages.
S’mores Alternative: Use homemade Moon Pies as an elevated alternative to traditional s’mores. Warm them slightly near a campfire (or in the microwave for 10 seconds) so the marshmallow gets extra gooey and the chocolate becomes melty. It’s all the fun of s’mores without the mess!
Lunchbox Treat: Pack these in lunchboxes as a special homemade treat that’s so much better than store-bought snacks. Wrap individually in plastic wrap or parchment paper tied with baker’s twine for an adorable presentation kids will love.
FAQs Section
Can I make Moon Pies without a candy thermometer? While it’s possible, a candy thermometer is highly recommended for marshmallow success. If you don’t have one, you can use the cold-water test: drop a small amount of the sugar syrup into a bowl of very cold water. It should form a soft, pliable ball that flattens when removed from the water. This indicates it’s reached soft-ball stage (240°F). However, this method requires practice and isn’t as reliable as using a thermometer.
Why is my marshmallow too runny or not setting? This usually means the sugar syrup didn’t reach the proper temperature (240°F). If it’s undercooked, the marshmallow won’t have enough structure to set. Another possibility is that the gelatin wasn’t bloomed properly or the marshmallow wasn’t whipped long enough. Make sure you beat it for a full 7-10 minutes until it’s very thick and holds stiff peaks.
Can I use store-bought marshmallow fluff instead of making homemade marshmallow? Yes! For a shortcut version, you can absolutely use store-bought marshmallow fluff or creme. Simply spread a generous layer on one cookie and top with another. The texture will be different from the homemade version (slightly denser and stickier), but it’s still delicious and much easier. This is a great option when making Moon Pies with kids.
How do I prevent the chocolate coating from cracking? Chocolate cracks when it’s too thick or when there’s a temperature shock. Make sure you’re adding enough coconut oil to thin the chocolate slightly (but not too much). Also, avoid refrigerating the Moon Pies immediately after coating – let them set at room temperature instead. If you must refrigerate, let the chocolate coating set at room temperature first for at least 30 minutes.
My cookies spread too much during baking. What went wrong? Cookie spreading is usually caused by dough that wasn’t chilled long enough or butter that was too soft. Make sure you refrigerate the dough for at least 30 minutes before rolling, and ensure your butter is softened but not melted when making the dough. Also, make sure your oven temperature is accurate – an oven that’s too cool can cause excessive spreading.
Can I make these with different types of chocolate? Absolutely! While milk chocolate or semisweet chocolate is traditional, you can use dark chocolate (60-70% cacao) for a more sophisticated, less sweet version. White chocolate also works wonderfully for “vanilla” Moon Pies. You can even mix different chocolates or add flavorings like peppermint or espresso powder to the melted chocolate.
Why do my Moon Pies look dull instead of shiny? A dull chocolate coating is usually caused by chocolate bloom, which happens when moisture comes in contact with the chocolate or when the chocolate gets too warm and then cools. Make sure your marshmallow-filled cookies are completely dry before dipping. Store finished Moon Pies in a cool, dry place, and avoid temperature fluctuations. Using chocolate melting wafers instead of regular chocolate chips also helps ensure a shinier finish.
Conclusion
Making homemade Moon Pies is more than just recreating a beloved snack – it’s about bringing a piece of Southern tradition into your kitchen and creating something truly special with your own hands. These tender graham cookies embracing fluffy marshmallow, all wrapped in chocolate perfection, represent comfort, nostalgia, and the simple joy of homemade treats.
While they require a bit more effort than opening a package from the store, the difference in taste and quality is absolutely remarkable. Your family and friends will be amazed when you tell them you made these iconic treats from scratch, and you’ll love the control you have over ingredients and flavors. Plus, there’s something incredibly satisfying about mastering a recipe that seems intimidating at first but turns out to be totally achievable.
Whether you’re making these for a special occasion, as thoughtful homemade gifts, or simply because you’re craving that distinctive Moon Pie experience, this recipe delivers every time. The cookies are perfectly tender, the marshmallow is impossibly fluffy, and that chocolate coating brings everything together in chocolatey harmony.
I’d love to hear about your Moon Pie adventures! Did you try any flavor variations? What did your family think? Drop a comment below and share your experience. And if you loved this recipe, please save it to your Pinterest boards so you can find it easily next time that Moon Pie craving hits. Don’t forget to share it with your friends who love retro treats and Southern classics – they’ll thank you for introducing them to homemade Moon Pie magic!
Happy baking, and enjoy every bite of these nostalgic, homemade beauties! 🌙🥧