Ultimate Oreo Cheesecake Recipe – Rich, Creamy & Irresistibly Delicious!
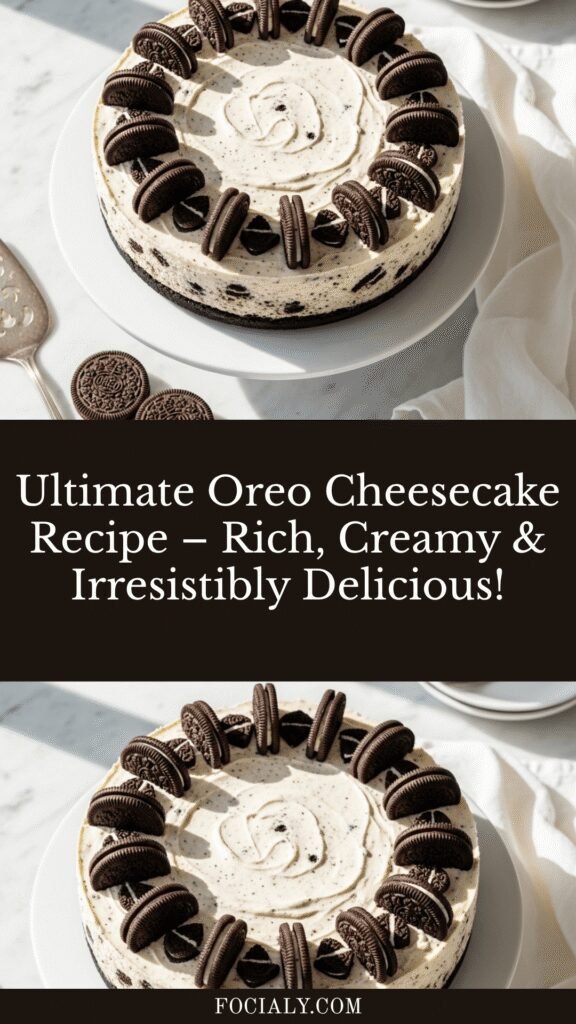
If you’re looking for a show-stopping dessert that combines the beloved flavor of Oreo cookies with the luxurious creaminess of New York-style cheesecake, you’ve found your new favorite recipe! This Oreo cheesecake is the perfect marriage of crunchy chocolate cookie crust, silky smooth cream cheese filling loaded with Oreo pieces, and a beautiful Oreo cookie topping that makes every slice Instagram-worthy.
This decadent dessert has become an absolute sensation at potlucks, holiday gatherings, birthday celebrations, and family dinners across America. The combination of cookies and cream flavor profile appeals to both kids and adults alike, making it one of the most requested desserts for special occasions. Whether you’re celebrating a birthday, hosting Thanksgiving dinner, bringing dessert to a summer BBQ, or simply treating yourself to something special on a weekend, this Oreo cheesecake never fails to impress.
What makes this recipe truly special is how it transforms simple, accessible ingredients into an elegant, bakery-quality dessert. The Oreo crust provides the perfect chocolate foundation, while chunks of Oreos throughout the filling create delightful surprises in every bite. The cheesecake bakes to creamy perfection with a water bath method that ensures a crack-free surface, and after proper chilling, it slices beautifully with clean, professional-looking edges. Best of all, while it looks incredibly fancy and tastes like it came from an upscale restaurant, it’s surprisingly straightforward to make at home, even if you’re not an experienced baker.
History / Background
Cheesecake itself has ancient origins dating back to ancient Greece, where it was served to athletes during the first Olympic games in 776 BC. The Greeks believed cheesecake provided a good source of energy, and there are records of cheesecake being served at Greek weddings. When the Romans conquered Greece, they modified the recipe and spread it throughout Europe. Each culture that embraced cheesecake added its own twist, from the Italian ricotta-based versions to the German quark cheesecakes.
However, the cheesecake we know and love today—the rich, dense, cream cheese-based version—is distinctly American. The modern cheesecake was born in New York in the early 1900s, shortly after cream cheese was invented in 1872 by William Lawrence in Chester, New York. He was actually trying to recreate French Neufchâtel cheese but accidentally created something entirely new and even better. This new cream cheese became the foundation for what we now call New York-style cheesecake, characterized by its dense, smooth, and ultra-creamy texture.
The iconic New York cheesecake became famous at delicatessens and restaurants throughout the city, with establishments like Junior’s Cheesecake (founded in 1950 in Brooklyn) and Lindy’s (which opened in 1921) claiming to have perfected the recipe. These establishments helped solidify cheesecake as one of New York’s most beloved desserts.
The Oreo cookie itself was created in 1912 by the National Biscuit Company (Nabisco) in New York City, making it over 110 years old! The distinctive chocolate wafer and cream filling sandwich cookie was originally called the “Oreo Biscuit,” and while the origin of the name remains a mystery, the cookie quickly became America’s favorite cookie. With over 500 billion Oreos sold since their creation, they’ve become a cultural icon.
The genius combination of Oreo cookies and cheesecake likely emerged in the 1980s and 1990s when home bakers and restaurants began experimenting with adding America’s favorite cookie to America’s favorite cake. The cookies and cream flavor explosion was already popular in ice cream, so incorporating Oreos into cheesecake was a natural evolution. Today, Oreo cheesecake represents the ultimate American comfort dessert—combining two iconic treats into one unforgettable experience. It’s become so popular that major chain restaurants like The Cheesecake Factory have featured their own versions, and home bakers have made it one of the most searched and pinned dessert recipes on the internet.
Why You’ll Love This Recipe
This Oreo cheesecake recipe is destined to become your go-to showstopper dessert, and once you taste it, you’ll understand why it’s such a crowd favorite. The combination of textures—from the crunchy Oreo crust to the creamy, velvety filling studded with cookie pieces—creates a dessert experience that’s truly unforgettable.
Here’s why this Oreo cheesecake recipe will become your new favorite:
- Crowd-pleasing flavor – Everyone loves Oreos, and everyone loves cheesecake, so combining them creates an instant hit with all ages
- Easier than you think – While it looks impressive and professional, the recipe is straightforward with clear instructions that even beginner bakers can follow
- No special skills required – You don’t need to be a pastry chef; if you can use a mixer and follow directions, you can make this cheesecake
- Make-ahead friendly – This cheesecake actually needs to chill overnight, making it perfect for stress-free entertaining since all the work is done in advance
- Feeds a crowd – One 9-inch cheesecake serves 12-16 people, making it economical for parties and gatherings
- Visually stunning – The black-and-white color scheme with Oreo pieces on top creates a gorgeous presentation that photographs beautifully for social media
- Versatile for occasions – Perfect for birthdays, holidays, potlucks, baby showers, or just because you deserve something special
- Stable and sliceable – Unlike some temperamental desserts, this cheesecake slices cleanly and holds its shape beautifully on the plate
- Can be customized – Once you master the base recipe, you can experiment with different Oreo flavors or add-ins
- Better than store-bought – Homemade cheesecake tastes infinitely better than anything from the frozen dessert aisle, and costs less too
- Impressive yet approachable – Your guests will think you spent hours on this elaborate dessert when it’s actually quite simple
Ingredient Notes
The magic of this Oreo cheesecake lies in using quality ingredients in the right proportions. Let’s break down what you’ll need and why each component matters:
Oreo Cookies – You’ll need about 24-30 Oreo cookies total: some for the crust, some for mixing into the filling, and some for decorating the top. Use regular Oreos, not Double Stuf (the extra filling makes the crust too soft and greasy). Don’t bother removing the cream filling from the cookies—it all gets processed together for the crust. Store-brand chocolate sandwich cookies can work in a pinch, but genuine Oreos provide the authentic flavor everyone loves.
Cream Cheese – This is the foundation of your cheesecake, so don’t skimp here. Use full-fat brick-style cream cheese (not spreadable, not whipped, not light). You’ll need three 8-ounce packages for a standard 9-inch cheesecake. The cream cheese must be at room temperature—this is crucial! Cold cream cheese creates lumps that won’t fully blend, resulting in a grainy texture. Set your cream cheese out 2-3 hours before baking, or soften it carefully in 10-second microwave bursts.
Granulated Sugar – Sweetens the cheesecake filling and helps create that smooth, creamy texture. Regular white sugar works perfectly; no need for superfine or anything fancy.
Sour Cream – Adds tanginess that balances the sweetness and contributes to that classic New York cheesecake flavor. Full-fat sour cream is essential—low-fat versions can make your cheesecake runny. If you can’t find sour cream, full-fat Greek yogurt works as a substitute, though it will be slightly less tangy.
Eggs – These bind the filling together and help it set properly. You’ll need 3-4 large eggs at room temperature. Cold eggs can cause the batter to curdle or create lumps. Let them sit in warm water for 10 minutes if you forgot to take them out ahead of time.
Vanilla Extract – Pure vanilla extract enhances all the flavors. Don’t use imitation vanilla if you can avoid it—the real stuff makes a noticeable difference in the final flavor.
Heavy Cream or Whole Milk – A small amount adds extra richness and helps create that silky-smooth texture. Heavy cream is preferred for the richest result.
Butter – Unsalted butter binds the Oreo crumbs together to form the crust. Make sure it’s melted and slightly cooled before mixing with the cookie crumbs. Salted butter can work, but unsalted gives you better control over the flavor.
Salt – Just a pinch enhances all the other flavors and balances the sweetness. Even though Oreos contain salt, a tiny bit more in the filling makes everything taste better.
Equipment Needed
Having the right tools makes cheesecake-making much easier and ensures better results:
- 9-inch Springform Pan – This is essential! The removable sides allow you to release the cheesecake without damaging it. Make sure yours doesn’t leak by wrapping the outside with aluminum foil (this is crucial for the water bath method)
- Food Processor or Blender – For crushing Oreos into fine crumbs for the crust; you can also use a rolling pin and zip-top bag if needed
- Stand Mixer or Hand Mixer – A stand mixer with a paddle attachment makes the process easiest, but a hand mixer works fine too
- Large Mixing Bowls – At least one large bowl for mixing the filling
- Rubber Spatula – For scraping down the sides of the bowl and ensuring everything is well mixed
- Measuring Cups and Spoons – For accurate measurements
- Roasting Pan or Large Baking Dish – Needs to be large enough to hold your springform pan for the water bath
- Aluminum Foil – Heavy-duty foil to wrap around the springform pan to prevent water from seeping in
- Kettle or Large Pot – For boiling water for the water bath
- Cooling Rack – For cooling the cheesecake after baking
- Sharp Knife – For slicing; clean and wipe between each cut for neat slices
- Offset Spatula (optional) – Helps remove slices from the pan cleanly
Ultimate Oreo Cheesecake Recipe – Rich, Creamy & Irresistibly Delicious!
The ultimate Oreo cheesecake with a crunchy chocolate cookie crust, rich and creamy filling loaded with Oreo pieces, and beautiful Oreo cookie topping. This restaurant-quality dessert is surprisingly easy to make at home!
- Prep Time: 30 minutes
- Cook Time: 1 hour 10 minutes
- Total Time: 8 hours (overnight)
- Yield: 12-16 slices 1x
- Category: Dessert
- Method: Baking
- Cuisine: American
- Diet: Vegetarian
Ingredients
For the Oreo Crust:
- 24 Oreo cookies (about 2½ cups crushed)
- 5 tablespoons unsalted butter, melted
For the Cheesecake Filling:
- 24 ounces (3 packages) cream cheese, softened to room temperature
- 1 cup granulated sugar
- 1 cup sour cream, room temperature
- 1 teaspoon vanilla extract
- ¼ teaspoon salt
- 3 large eggs, room temperature
- ½ cup heavy cream
- 15 Oreo cookies, roughly chopped
For Topping:
- 8-10 Oreo cookies, halved or quartered
- Optional: whipped cream for serving
Instructions
Step 1: Prepare Your Pan and Oven
Preheat your oven to 325°F (163°C). Wrap the outside of a 9-inch springform pan with 2-3 layers of heavy-duty aluminum foil, ensuring it goes up the sides to prevent water from seeping in during the water bath. Spray the inside of the pan with non-stick spray or brush with butter.
Step 2: Make the Oreo Crust
Place 24 Oreo cookies (including the cream filling) in a food processor and pulse until you have fine, uniform crumbs. You should have about 2½ cups of crumbs. Transfer to a bowl and stir in the melted butter until the mixture resembles wet sand. Press this mixture firmly and evenly into the bottom of your prepared springform pan, using the bottom of a measuring cup to pack it down. Extend the crust about ½ inch up the sides. Place in the refrigerator while you prepare the filling.
Step 3: Prepare the Cheesecake Filling
In a large bowl or stand mixer, beat the softened cream cheese on medium speed for 2-3 minutes until smooth and completely lump-free. Scrape down the sides of the bowl. Add the sugar and beat for another 2 minutes until light and fluffy. Add the sour cream, vanilla extract, and salt, beating until just combined.
Step 4: Add Eggs and Cream
Add the eggs one at a time, beating on low speed after each addition just until incorporated. Don’t overmix once the eggs are added—this can incorporate too much air and cause cracks. Pour in the heavy cream and mix gently until smooth. Use a rubber spatula to scrape the bottom and sides to ensure everything is incorporated.
Step 5: Fold in Oreos
Roughly chop 15 Oreo cookies into quarters or smaller pieces. Gently fold these into the cheesecake batter using a spatula. Reserve some cookie pieces to sprinkle on top if desired.
Step 6: Pour and Prep for Water Bath
Pour the cheesecake filling over the prepared crust, spreading it evenly and smoothing the top with a spatula. Tap the pan gently on the counter a few times to release air bubbles. Place the wrapped springform pan in a large roasting pan. Arrange Oreo halves or quarters on top of the cheesecake in a decorative pattern.
Step 7: Create Water Bath and Bake
Carefully pour hot water into the roasting pan (not into the cheesecake!) until it reaches about halfway up the sides of the springform pan. This water bath ensures even, gentle cooking that prevents cracks. Carefully transfer to the oven and bake for 65-75 minutes. The cheesecake is done when the edges are set but the center still jiggles slightly when you gently shake the pan (about a 2-inch circle in the center should wobble).
Step 8: Cool Gradually
Turn off the oven and crack the oven door open about 4 inches. Let the cheesecake cool in the oven for 1 hour—this gradual temperature change prevents cracking. Remove from the oven and water bath, remove the foil, and let cool completely on a wire rack (about 2 hours at room temperature).
Step 9: Chill Overnight
Once cooled to room temperature, cover the cheesecake with plastic wrap or aluminum foil and refrigerate for at least 8 hours or overnight. This chilling time is essential for the cheesecake to set properly and develop its full flavor and texture.
Step 10: Serve
When ready to serve, run a thin knife around the edge of the pan, then release and remove the springform ring. Use a sharp knife to cut slices, wiping the blade clean between each cut for neat slices. Serve with whipped cream if desired.
Notes
- Room temperature ingredients are crucial for a smooth, lump-free filling.
- Don’t skip the water bath—it’s what creates that creamy texture and prevents cracks.
- The cheesecake continues to set as it chills, so don’t worry if the center seems slightly soft when you remove it from the oven.
- For easiest slicing, use a sharp knife dipped in hot water and wiped clean between each cut.
- Cheesecake tastes best when served slightly chilled, not cold from the refrigerator. Let it sit out 15-20 minutes before serving.
Nutrition
- Serving Size: 1 slice (1/12 of cheesecake)
- Calories: 445
- Sugar: 32g
- Sodium: 315mg
- Fat: 28g
- Saturated Fat: 16g
- Unsaturated Fat: 10g
- Trans Fat: 0.5g
- Carbohydrates: 42g
- Fiber: 1g
- Protein: 7g
- Cholesterol: 115mg
Tips & Variations
Flavor Variations:
- Mint Oreo Cheesecake – Use Mint Oreos throughout for a refreshing mint chocolate flavor
- Peanut Butter Oreo Cheesecake – Use Peanut Butter Oreos and swirl in peanut butter before baking
- Birthday Cake Oreo Cheesecake – Use Birthday Cake Oreos and add colorful sprinkles to the filling
- Chocolate Drizzle – Drizzle melted chocolate or ganache over the top before serving
- Cookies and Cream Overload – Double the Oreos in the filling for extra cookie chunks
- Salted Caramel – Drizzle with salted caramel sauce before serving
- Red Velvet Oreo – Use Red Velvet Oreos for a festive twist
- White Chocolate – Fold in white chocolate chips with the Oreos
Texture Adjustments:
- For extra dense cheesecake, use all cream cheese and omit the sour cream
- For lighter, fluffier texture, add an extra ¼ cup sour cream
- For richer flavor, replace heavy cream with an additional ¼ cup sour cream
Dietary Modifications:
- Make it gluten-free by using certified gluten-free chocolate sandwich cookies
- For smaller portions, bake in a muffin tin as individual mini cheesecakes (adjust baking time to 20-25 minutes)
Pro Chef Tips
Tip #1: Room Temperature is Non-Negotiable
This is the single most important factor in achieving a smooth, creamy cheesecake without lumps. Cold cream cheese will never fully blend, no matter how long you mix. Set all dairy ingredients (cream cheese, sour cream, eggs) on the counter 2-3 hours before you start baking. If you’re in a rush, place cream cheese in a zip-top bag and submerge in warm (not hot) water for 15 minutes.
Tip #2: Don’t Overmix After Adding Eggs
Once you add the eggs to your cheesecake batter, mix only until just incorporated. Overmixing at this stage incorporates too much air, which expands during baking and creates cracks as it cools. Use low speed and stop as soon as you don’t see streaks of egg.
Tip #3: The Water Bath is Your Secret Weapon
The water bath (bain-marie) might seem like extra work, but it’s absolutely worth it. The humid environment and gentle, even heat prevent the top from drying out and cracking. Make sure your foil wrapping is secure—even a small leak can create a soggy crust. Some bakers place the springform pan in a slightly larger cake pan before wrapping for extra protection.
Tip #4: Accept the Jiggle
New cheesecake bakers often overbake because they’re waiting for the center to look “set.” A properly baked cheesecake should have a 2-3 inch circle in the center that jiggles like Jell-O when you gently shake the pan. It will firm up completely during the chilling process. An overbaked cheesecake will be dry and more prone to cracking.
Tip #5: Patience with Cooling
Rapid temperature changes are the enemy of crack-free cheesecakes. The gradual cooling process—first in the turned-off oven with the door cracked, then at room temperature, then in the refrigerator—allows the cheesecake to relax slowly without stress cracks forming. Never rush this process by putting a hot cheesecake directly in the fridge.
Tip #6: The Knife Trick for Perfect Slices
For bakery-perfect slices, use a long, thin knife dipped in hot water, then dried with a towel. Make one cut, wipe the knife completely clean, dip in hot water again, dry, and make the next cut. This removes any cheesecake residue and Oreo pieces that would drag and create messy slices.
Common Mistakes to Avoid
Mistake #1: Using Cold Ingredients
This is the number one reason for lumpy cheesecake batter. Cold cream cheese will not blend smoothly no matter how long you beat it, resulting in a grainy texture with small lumps throughout your finished cheesecake. Always bring cream cheese, sour cream, and eggs to room temperature before starting. This takes 2-3 hours on the counter, so plan ahead.
Mistake #2: Overmixing the Batter
While you want to thoroughly mix the cream cheese and sugar, overmixing after adding eggs incorporates too much air. This creates air bubbles that expand during baking and can cause cracks or an uneven texture. Once eggs are added, mix on low speed just until combined, and use a spatula to fold in the final ingredients gently.
Mistake #3: Skipping the Water Bath
I know it seems like extra work, but the water bath is crucial for creating that perfectly creamy texture and preventing cracks. The steam keeps the cheesecake surface from drying out, and the gentle, even heat prevents the edges from overcooking while the center sets. Don’t skip this step! Just make sure your foil wrapping is watertight.
Mistake #4: Overbaking
Many first-time cheesecake bakers don’t trust the jiggle and end up overbaking, which results in a dry, cracked cheesecake. Remember that cheesecake continues to cook and set as it cools. When the edges are set but the center (about 2-3 inches) still wobbles like Jell-O when you gently shake the pan, it’s done. Trust the process!
Mistake #5: Rushing the Chilling Process
Cheesecake needs adequate time to chill and set properly—at least 8 hours, but preferably overnight. Trying to cut into a warm or insufficiently chilled cheesecake will result in a mess. The long chill time also allows the flavors to develop and meld together, making the cheesecake taste even better the next day. Be patient!
Storage & Meal Prep
Refrigerator Storage:
Store leftover Oreo cheesecake covered in the refrigerator for up to 5-7 days. You can leave it in the springform pan with the ring reattached, cover the top with plastic wrap or aluminum foil, or transfer slices to an airtight container. The cheesecake actually tastes better after 24-48 hours as the flavors continue to develop and meld together.
Freezer Storage:
Oreo cheesecake freezes exceptionally well for up to 2-3 months! For best results, freeze the whole cheesecake or individual slices. To freeze the whole cheesecake: chill it completely, then freeze uncovered for 2-3 hours until firm. Wrap tightly in plastic wrap, then aluminum foil, and place in a freezer-safe container or bag. To freeze individual slices: place slices on a parchment-lined baking sheet, freeze until solid, then wrap each slice individually in plastic wrap and store in a freezer bag.
Thawing Instructions:
For best texture, thaw cheesecake slowly in the refrigerator. Transfer the wrapped cheesecake from freezer to fridge 6-8 hours before serving (or overnight). Never thaw at room temperature, as this can create condensation and make the cheesecake soggy. Individual slices can be thawed in the refrigerator in 2-4 hours.
Serving Temperature:
While cheesecake should be stored cold, it tastes best when served slightly chilled, not ice-cold. Remove from the refrigerator 15-30 minutes before serving to allow it to come closer to room temperature. This brings out the full flavor and creates a creamier texture.
Make-Ahead & Freezer Notes
Oreo cheesecake is actually one of the best make-ahead desserts, making it perfect for stress-free entertaining:
Make-Ahead Timeline:
- 3 months ahead: Make and freeze the entire cheesecake (or just the crust)
- 3 days ahead: Make the complete cheesecake and store in the refrigerator
- 2 days ahead: Ideal timing—the cheesecake has fully matured in flavor
- 1 day ahead: Still perfect—the overnight chill is the minimum recommended time
Freezing the Crust Only:
If you want to get a head start, make the Oreo crust up to 3 months in advance. Press it into the springform pan, cover tightly with plastic wrap and aluminum foil, and freeze. When ready to bake, prepare the filling and pour it directly over the frozen crust—no need to thaw.
Freezing the Complete Cheesecake:
After the cheesecake has fully chilled and set (after that overnight rest), you can freeze it whole. Remove it from the springform pan, place it on a cardboard cake round or sturdy plate, and freeze uncovered for 2-3 hours until firm. Then wrap tightly in several layers of plastic wrap followed by aluminum foil. This prevents freezer burn and keeps the cheesecake fresh for up to 3 months.
Thawing Frozen Cheesecake:
The key to maintaining that creamy texture is slow, gentle thawing. Transfer the wrapped cheesecake from freezer to refrigerator the night before you plan to serve it (6-8 hours minimum). Remove wrapping once it’s mostly thawed to prevent condensation from collecting on the surface. Let it come closer to room temperature for 20-30 minutes before slicing and serving for best flavor.
Pro Tip for Parties:
If you’re serving a crowd, consider making two cheesecakes: one to serve fresh and one to keep in the freezer as backup. This way, you’re never caught without enough dessert, and you’ll have emergency dessert ready for unexpected guests or celebrations!
Serving Suggestions
Oreo cheesecake is delicious on its own, but here are some ideas to make it even more special:
Classic Accompaniments:
- Fresh whipped cream (homemade is best—just heavy cream, powdered sugar, and vanilla)
- Fresh berries (strawberries, raspberries, or blueberries add beautiful color contrast)
- Hot fudge or chocolate sauce drizzled over each slice
- Caramel sauce for a sweet and salty combination
- Coffee or espresso (the bitterness balances the sweetness perfectly)
Beverage Pairings:
- Hot coffee or cappuccino
- Cold milk (especially for kids!)
- Hot chocolate or mocha
- Dessert wine like Port or late-harvest Riesling
- Irish coffee for adult gatherings
- Iced coffee or cold brew
Special Occasion Presentations:
- Dust the top with cocoa powder through a stencil for a decorative pattern
- Garnish each slice with a fresh strawberry and mint leaf
- Add a dollop of whipped cream and an Oreo cookie on top of each slice
- Drizzle with chocolate ganache in a decorative pattern
- Serve with a scoop of vanilla or cookies and cream ice cream
Party Serving Ideas:
- Cut into smaller, bite-sized squares for a dessert buffet
- Serve on vintage dessert plates with silver forks for an elegant presentation
- Create a dessert bar with various toppings so guests can customize their slices
- Pair with coffee and tea service for an afternoon tea party
- Serve alongside other chocolate desserts for a “chocolate lover’s” dessert table
FAQs Section
Q: Why did my cheesecake crack on top?
A: Cracks typically occur due to one of several reasons: baking at too high a temperature, overbaking, overmixing air into the batter, or cooling too quickly. The water bath method helps prevent cracks by providing gentle, even heat. If your cheesecake does crack, don’t worry! You can cover it with whipped cream, ganache, or extra Oreo cookies, and it will still taste absolutely delicious.
Q: Can I make this without a water bath?
A: While the water bath produces the best texture and helps prevent cracks, you can make cheesecake without one. Reduce the oven temperature to 300°F, place a pan of hot water on the rack below your cheesecake, and watch carefully to avoid overbaking. The texture may be slightly less creamy, and cracks are more likely, but it will still taste great.
Q: How do I know when my cheesecake is done?
A: The edges should be set and slightly puffed, while the center (about 2-3 inches in diameter) should still jiggle like Jell-O when you gently shake the pan. An instant-read thermometer inserted in the center should read 150-155°F. Don’t wait for the entire cheesecake to look firm—it continues to set as it cools. Overbaking creates a dry, cracked cheesecake.
Q: Can I use reduced-fat or low-fat ingredients?
A: I strongly recommend against it. Reduced-fat cream cheese and sour cream have different water content and consistency, which can make your cheesecake runny, grainy, or unable to set properly. For the best texture and flavor, stick with full-fat dairy products. If you’re concerned about calories, simply enjoy a smaller slice of the good stuff!
Q: Why is my Oreo crust soggy?
A: This usually happens if water leaked into your springform pan during the water bath. Make sure to wrap your pan with 2-3 layers of heavy-duty aluminum foil, covering the bottom and extending well up the sides. Some bakers place the wrapped springform pan inside a slightly larger cake pan for double protection. If you consistently have issues, consider baking the crust for 8-10 minutes at 325°F before adding the filling to help it set and become more waterproof.
Q: Can I make mini Oreo cheesecakes instead of one large one?
A: Absolutely! Line a muffin tin with cupcake liners, press about 1 tablespoon of Oreo crust into each cup, and divide the filling among them. Bake at 325°F for 18-22 minutes until the centers are slightly jiggly. You won’t need a water bath for mini cheesecakes. They’re perfect for parties and portion control!
Q: How long can I keep cheesecake at room temperature?
A: Cheesecake should not sit at room temperature for more than 2 hours due to food safety concerns (it contains eggs and dairy). At parties, consider keeping the cheesecake in the refrigerator and bringing out slices as needed, or serving it toward the end of the event. In cooler weather (below 70°F), it can stay out slightly longer, but refrigerate any leftovers promptly.
Q: Can I use a regular cake pan instead of a springform pan?
A: While a springform pan makes removing the cheesecake much easier, you can use a regular 9-inch cake pan lined with parchment paper with overhang on the sides (to create handles for lifting). However, serving will be trickier—you’ll need to cut and serve directly from the pan, or carefully lift the entire cheesecake out using the parchment handles once fully chilled and very firm.
Conclusion
Congratulations! You now have everything you need to create a stunning, bakery-quality Oreo cheesecake that will have everyone asking for your recipe. While this dessert looks incredibly impressive and tastes like it came from a fancy restaurant, you’ve discovered that it’s actually achievable for home bakers of any skill level. The combination of that crunchy Oreo crust, silky cream cheese filling loaded with cookie chunks, and beautiful Oreo topping creates a dessert experience that’s truly unforgettable.
Remember, the keys to cheesecake success are patience and following a few crucial steps: room temperature ingredients, proper mixing technique, the water bath method, and adequate chilling time. Once you’ve mastered this base recipe, you can experiment with different Oreo flavors, add-ins, and toppings to create your own signature versions. Every time you serve this Oreo cheesecake, you’ll receive rave reviews and requests to make it again!
Whether you’re celebrating a birthday, hosting a holiday dinner, bringing dessert to a potluck, or simply treating yourself and your loved ones to something special, this Oreo cheesecake is guaranteed to be a showstopper. The best part? You can make it days ahead and have one less thing to worry about when entertaining.
Now it’s your turn to get in the kitchen and create some dessert magic! I’d absolutely love to hear about your Oreo cheesecake adventures, see photos of your beautiful creations, and answer any questions you might have. Drop a comment below sharing how it turned out, and don’t forget to save this recipe to your Pinterest boards so you can find it whenever a special occasion calls for an extraordinary dessert. Your friends and family are going to be so impressed!
Happy baking, and enjoy every creamy, cookie-filled bite! 🍰